User Manual (ENGLISH)
Page 4
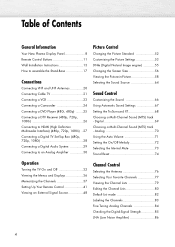
... Sound (MTS) track - Table of Contents General Information Your New Plasma Display Panel 8 Remote Control Buttons 11 Wall Installation Instructions 13 How to assemble the Stand-Base 17 Connections Connecting VHF and UHF Antennas 20 Connecting Cable TV 21 Connecting a VCR 23 Connecting a Camcorder 24 Connecting a DVD ... Analog 70 Using the Auto Volume 71 Setting the On/Off Melody 72 Selecting the Internal Mute 73 Sound Reset 74 Operation Turning the TV On and Off 32 Viewing the Menus and Displays 36 Memorizing the Channels 37 Setting Up Your Remote Control 41 Viewing an ...
... Sound (MTS) track - Table of Contents General Information Your New Plasma Display Panel 8 Remote Control Buttons 11 Wall Installation Instructions 13 How to assemble the Stand-Base 17 Connections Connecting VHF and UHF Antennas 20 Connecting Cable TV 21 Connecting a VCR 23 Connecting a Camcorder 24 Connecting a DVD ... Analog 70 Using the Auto Volume 71 Setting the On/Off Melody 72 Selecting the Internal Mute 73 Sound Reset 74 Operation Turning the TV On and Off 32 Viewing the Menus and Displays 36 Memorizing the Channels 37 Setting Up Your Remote Control 41 Viewing an ...
User Manual (ENGLISH)
Page 8
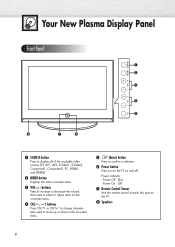
Your New Plasma Display Panel Front Panel Œ ´ ˇ ¨ ˆ " ∏ Ø Œ SOURCE button Press to display all of the available video sources (TV, AV1, AV2, S-Video1, S-Video2, Component1, Component2, PC, HDMI1, and HDMI2). ´ MENU button Displays the main on -screen menu. ¨ ...move up or down in the on-screen menu. ˆ (Enter) button Press to confirm a selection. Ø Power button Press to turn the TV on the TV. " Speakers 8 Power indicator - Also used to increase or decrease the volume. Power On : Off ∏ Remote Control Sensor Aim the...
Your New Plasma Display Panel Front Panel Œ ´ ˇ ¨ ˆ " ∏ Ø Œ SOURCE button Press to display all of the available video sources (TV, AV1, AV2, S-Video1, S-Video2, Component1, Component2, PC, HDMI1, and HDMI2). ´ MENU button Displays the main on -screen menu. ¨ ...move up or down in the on-screen menu. ˆ (Enter) button Press to confirm a selection. Ø Power button Press to turn the TV on the TV. " Speakers 8 Power indicator - Also used to increase or decrease the volume. Power On : Off ∏ Remote Control Sensor Aim the...
User Manual (ENGLISH)
Page 11
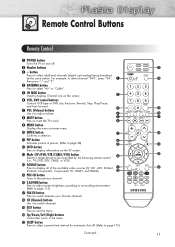
...Press to select a preset time interval for automatic shut off . ´ Number buttons ˇ - Remote Control Buttons Remote Control Œ POWER button Turns the TV on and off . (Refer to adjust volume. For example, to select channel "54-3", press "54", then press "-" and "3". ¨ ANTENNA.... button Press to select additional channels (digital and analog) being broadcast by the Samsung remote control (i.e., TV, DVD, STB, CABLE, or VCR). Ú SOURCE button Press to display all of the available video sources (TV, AV1, AV2, S-Video1, S-Video2, Component1, Component2, PC, HDMI1, and HDMI2...
...Press to select a preset time interval for automatic shut off . ´ Number buttons ˇ - Remote Control Buttons Remote Control Œ POWER button Turns the TV on and off . (Refer to adjust volume. For example, to select channel "54-3", press "54", then press "-" and "3". ¨ ANTENNA.... button Press to select additional channels (digital and analog) being broadcast by the Samsung remote control (i.e., TV, DVD, STB, CABLE, or VCR). Ú SOURCE button Press to display all of the available video sources (TV, AV1, AV2, S-Video1, S-Video2, Component1, Component2, PC, HDMI1, and HDMI2...
User Manual (ENGLISH)
Page 23
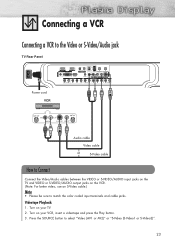
Turn on your TV. 2. Turn on your VCR, insert a videotape and press the Play button. 3. Press the SOURCE button to match the color coded input terminals and cable jacks. Videotape Playback: 1. Connecting a VCR Connecting a VCR to the Video or S-Video/Audio jack TV Rear Panel Power cord VCR Audio cable Video cable S-...Video cable How to Connect Connect the Video/Audio cables between the VIDEO or S-VIDEO/AUDIO input jacks on the TV and VIDEO or S-VIDEO/AUDIO output jacks on the VCR. (Note: For better video, use an S-Video cable.) Note • Please be ...
Turn on your TV. 2. Turn on your VCR, insert a videotape and press the Play button. 3. Press the SOURCE button to match the color coded input terminals and cable jacks. Videotape Playback: 1. Connecting a VCR Connecting a VCR to the Video or S-Video/Audio jack TV Rear Panel Power cord VCR Audio cable Video cable S-...Video cable How to Connect Connect the Video/Audio cables between the VIDEO or S-VIDEO/AUDIO input jacks on the TV and VIDEO or S-VIDEO/AUDIO output jacks on the VCR. (Note: For better video, use an S-Video cable.) Note • Please be ...
User Manual (ENGLISH)
Page 24
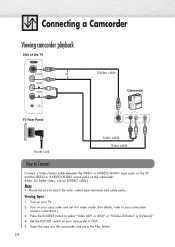
Turn on your camcorder to your camcorder owner's instructions.) 3. Insert the tape into the camcorder and press the Play button. 24 Set the IN/OUT switch on your TV. 2. Viewing Tapes 1. Press the SOURCE button to match the color coded input terminals and cable jacks. Connecting a Camcorder... Viewing camcorder playback Side of the TV S-Video cable Camcorder TV Rear Panel Power cord Audio cable Video cable How to Connect Connect a Video/Audio cable between the VIDEO or S-VIDEO/AUDIO...
Turn on your camcorder to your camcorder owner's instructions.) 3. Insert the tape into the camcorder and press the Play button. 24 Set the IN/OUT switch on your TV. 2. Viewing Tapes 1. Press the SOURCE button to match the color coded input terminals and cable jacks. Connecting a Camcorder... Viewing camcorder playback Side of the TV S-Video cable Camcorder TV Rear Panel Power cord Audio cable Video cable How to Connect Connect a Video/Audio cable between the VIDEO or S-VIDEO/AUDIO...
User Manual (ENGLISH)
Page 25
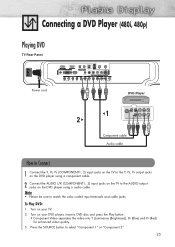
Turn on your TV. 2. Turn on the DVD player using a audio cable. Note • Please be sure to select "Component 1" or "Component 2". 25 Connecting a DVD Player (480i, 480p) Playing DVD TV Rear Panel Power cord DVD Player 1 2 Component cable Audio cable How to Connect 1 Connect the Y, PB, PR (COMPONENT1, 2) input jacks on the TV... PB, PR output jacks on the DVD player using a component cable. 2 Connect the AUDIO L/R (COMPONENT1, 2) input jacks on the TV to the AUDIO output jacks on your DVD player, insert a DVD disc and press the Play button. • Component Video separates the ...
Turn on your TV. 2. Turn on the DVD player using a audio cable. Note • Please be sure to select "Component 1" or "Component 2". 25 Connecting a DVD Player (480i, 480p) Playing DVD TV Rear Panel Power cord DVD Player 1 2 Component cable Audio cable How to Connect 1 Connect the Y, PB, PR (COMPONENT1, 2) input jacks on the TV... PB, PR output jacks on the DVD player using a component cable. 2 Connect the AUDIO L/R (COMPONENT1, 2) input jacks on the TV to the AUDIO output jacks on your DVD player, insert a DVD disc and press the Play button. • Component Video separates the ...
User Manual (ENGLISH)
Page 26
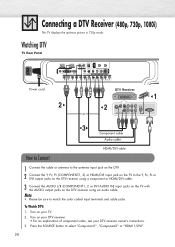
To Watch DTV: 1. Connecting a DTV Receiver (480p, 720p, 1080i) This TV displays the optimum picture in 720p mode. Turn on your DTV receiver owner's instructions. 3. Turn on your DTV receiver. • For an explanation of component video, see your TV. 2. Note • Please be sure to the Y, PB, PR or DVI output jacks on the...
To Watch DTV: 1. Connecting a DTV Receiver (480p, 720p, 1080i) This TV displays the optimum picture in 720p mode. Turn on your DTV receiver owner's instructions. 3. Turn on your DTV receiver. • For an explanation of component video, see your TV. 2. Note • Please be sure to the Y, PB, PR or DVI output jacks on the...
User Manual (ENGLISH)
Page 27
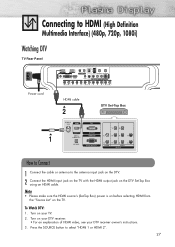
... to the antenna input jack on the DTV. 2 Connect the HDMI input jack on the TV with the HDMI output jack on the TV. Turn on your DTV receiver. • For an explanation of HDMI video, see your TV. 2. Connecting to HDMI (High Definition Multimedia Interface) (480p, 720p, 1080i) Watching DTV... TV Rear Panel Power cord HDMI cable 2 DTV Set-Top Box 1 How to Connect 1 Connect the ...
... to the antenna input jack on the DTV. 2 Connect the HDMI input jack on the TV with the HDMI output jack on the TV. Turn on your DTV receiver. • For an explanation of HDMI video, see your TV. 2. Connecting to HDMI (High Definition Multimedia Interface) (480p, 720p, 1080i) Watching DTV... TV Rear Panel Power cord HDMI cable 2 DTV Set-Top Box 1 How to Connect 1 Connect the ...
User Manual (ENGLISH)
Page 31
PLASMA DISPLAY PANEL Operation Turning the TV On and Off 32 Viewing the Menus and Displays 36 Memorizing the Channels 37 Setting Up Your Remote Control 41 Viewing an External Signal Source 48
PLASMA DISPLAY PANEL Operation Turning the TV On and Off 32 Viewing the Menus and Displays 36 Memorizing the Channels 37 Setting Up Your Remote Control 41 Viewing an External Signal Source 48
User Manual (ENGLISH)
Page 32
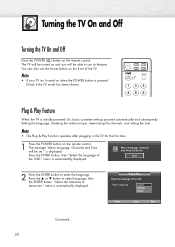
... basic customer settings proceed automatically and subsequently: Setting the language, checking the antenna input, memorizing the channels, and setting the time. The TV will be turned on and you will be able to memorize." Start 2 Press the ENTER button to select language, then the ENTER button. is automatically... use the Power button on when the POWER button is pressed: Check if the TV mode has been chosen. The message "Menu language, Channels and Time will be set . Turning the TV On and Off Turning the TV On and Off Press the POWER ( ) button on the remote control. Note ...
... basic customer settings proceed automatically and subsequently: Setting the language, checking the antenna input, memorizing the channels, and setting the time. The TV will be turned on and you will be able to memorize." Start 2 Press the ENTER button to select language, then the ENTER button. is automatically... use the Power button on when the POWER button is pressed: Check if the TV mode has been chosen. The message "Menu language, Channels and Time will be set . Turning the TV On and Off Turning the TV On and Off Press the POWER ( ) button on the remote control. Note ...
User Manual (ENGLISH)
Page 39
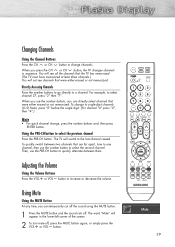
... either erased or not memorized. When you use the number buttons, you press the CH or CH button, the TV changes channels in the lower-left corner of the screen. 2 To turn mute off . For example, to quickly alternate between two channels that are far apart, tune to one channel,... press the VOL or VOL button. Using the PRE-CH button to increase or decrease the volume. To quickly switch between them. Mute 39 The TV will appear in sequence. Directly Accessing Channels Press the number buttons to go directly to a channel. To change to single-digit channels (0~9) faster, ...
... either erased or not memorized. When you use the number buttons, you press the CH or CH button, the TV changes channels in the lower-left corner of the screen. 2 To turn mute off . For example, to quickly alternate between two channels that are far apart, tune to one channel,... press the VOL or VOL button. Using the PRE-CH button to increase or decrease the volume. To quickly switch between them. Mute 39 The TV will appear in sequence. Directly Accessing Channels Press the number buttons to go directly to a channel. To change to single-digit channels (0~9) faster, ...
User Manual (ENGLISH)
Page 41
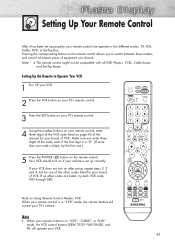
... 000 through 080. Pressing the corresponding button on the remote control allows you to Operate Your VCR 1 Turn off your VCR. 2 Press the VCR button on your TV's remote control. 3 Press the SET button on your TV's remote control. 4 Using the number buttons on your remote control, enter three digits of the VCR... listed on after set-up properly, your brand of equipment you enter three digits of VCR. If your VCR does not turn on if your remote is in five different modes: TV, VCR, Cable, DVD, or Set-Top Box. Setting Up the Remote to switch between these modes, and control whichever ...
... 000 through 080. Pressing the corresponding button on the remote control allows you to Operate Your VCR 1 Turn off your VCR. 2 Press the VCR button on your TV's remote control. 3 Press the SET button on your TV's remote control. 4 Using the number buttons on your remote control, enter three digits of the VCR... listed on after set-up properly, your brand of equipment you enter three digits of VCR. If your VCR does not turn on if your remote is in five different modes: TV, VCR, Cable, DVD, or Set-Top Box. Setting Up the Remote to switch between these modes, and control whichever ...
User Manual (ENGLISH)
Page 42
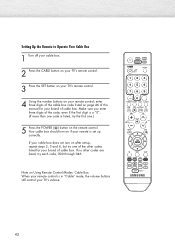
... the code, even if the first digit is a "0". (If more than one code is listed, try each code, 000 through 046. Your cable box should turn on after set up , repeat steps 2, 3 and 4, but try one .) 5 Press the POWER ( ) button on if your remote is in "Cable" mode, the volume buttons... the remote control. Setting Up the Remote to Operate Your Cable Box 1 Turn off your cable box. 2 Press the CABLE button on your TV's remote control. 3 Press the SET button on your TV's remote control. 4 Using the number buttons on your remote control, enter three digits of the cable box code listed on...
... the code, even if the first digit is a "0". (If more than one code is listed, try each code, 000 through 046. Your cable box should turn on after set up , repeat steps 2, 3 and 4, but try one .) 5 Press the POWER ( ) button on if your remote is in "Cable" mode, the volume buttons... the remote control. Setting Up the Remote to Operate Your Cable Box 1 Turn off your cable box. 2 Press the CABLE button on your TV's remote control. 3 Press the SET button on your TV's remote control. 4 Using the number buttons on your remote control, enter three digits of the cable box code listed on...

User Manual (ENGLISH)
Page 43
... no other codes listed for your brand of DVD. Setting Up the Remote to Operate Your DVD 1 Turn off your DVD. 2 Press the DVD button on your TV's remote control. 3 Press the SET button on your TV's remote control. 4 Using the number buttons on your remote control, enter three digits of the DVD... code listed on the remote control. Your DVD should turn on if your remote is in "DVD" mode, the volume buttons still control your TV's volume. 43 Make sure you enter three digits of the code, even if the first digit is a "0". (If...
... no other codes listed for your brand of DVD. Setting Up the Remote to Operate Your DVD 1 Turn off your DVD. 2 Press the DVD button on your TV's remote control. 3 Press the SET button on your TV's remote control. 4 Using the number buttons on your remote control, enter three digits of the DVD... code listed on the remote control. Your DVD should turn on if your remote is in "DVD" mode, the volume buttons still control your TV's volume. 43 Make sure you enter three digits of the code, even if the first digit is a "0". (If...
User Manual (ENGLISH)
Page 44
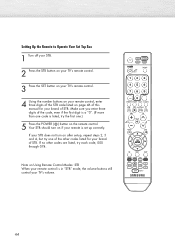
... if your remote is set -up correctly. Your STB should turn on after set up , repeat steps 2, 3 and 4, but try one of the other codes are listed, try the first one code is in "STB" mode, the volume buttons still control your TV's volume. 44 Note on Using Remote Control Modes: STB... POWER ( ) button on the remote control. Setting Up the Remote to Operate Your Set Top Box 1 Turn off your STB. 2 Press the STB button on your TV's remote control. 3 Press the SET button on your TV's remote control. 4 Using the number buttons on your remote control, enter three digits of the STB code...
... if your remote is set -up correctly. Your STB should turn on after set up , repeat steps 2, 3 and 4, but try one of the other codes are listed, try the first one code is in "STB" mode, the volume buttons still control your TV's volume. 44 Note on Using Remote Control Modes: STB... POWER ( ) button on the remote control. Setting Up the Remote to Operate Your Set Top Box 1 Turn off your STB. 2 Press the STB button on your TV's remote control. 3 Press the SET button on your TV's remote control. 4 Using the number buttons on your remote control, enter three digits of the STB code...
User Manual (ENGLISH)
Page 48
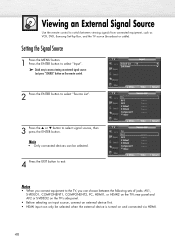
...TV, you can choose between viewing signals from connected equipment, such as VCR, DVD, Samsung Set-Top Box, and the TV... source (broadcast or cable). Note • Only connected devices can only be selected. 4 Press the EXIT button to exit. Press the ENTER button to select "Input". ➤ Quick way to access viewing an external signal source : Just press "SOURCE" button on and connected via HDMI. 48 TV... Input Source List : TV √ Edit Name √ 2 Press ...or HDMI2 on the TV's rear panel and AV2 or S-VIDEO2 on the TV's side panel. &#...
...TV, you can choose between viewing signals from connected equipment, such as VCR, DVD, Samsung Set-Top Box, and the TV... source (broadcast or cable). Note • Only connected devices can only be selected. 4 Press the EXIT button to exit. Press the ENTER button to select "Input". ➤ Quick way to access viewing an external signal source : Just press "SOURCE" button on and connected via HDMI. 48 TV... Input Source List : TV √ Edit Name √ 2 Press ...or HDMI2 on the TV's rear panel and AV2 or S-VIDEO2 on the TV's side panel. &#...
User Manual (ENGLISH)
Page 88
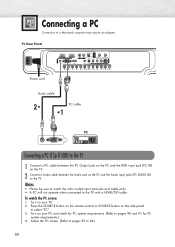
...input jacks (PC AUDIO IN) on the side panel to select "PC". 3. Press the SOURCE button on the remote control or SOURCE button on the TV. Turn on your PC and check for PC system requirements. (Refer to a Macintosh computer may require an adapter. Adjust the PC screen. (Refer to pages... 92 to the TV with a HDMI/DVI cable. Turn on your TV. 2. Notes • Please be sure to match the color coded input terminals and cable jacks. • A PC will not operate when...
...input jacks (PC AUDIO IN) on the side panel to select "PC". 3. Press the SOURCE button on the remote control or SOURCE button on the TV. Turn on your PC and check for PC system requirements. (Refer to a Macintosh computer may require an adapter. Adjust the PC screen. (Refer to pages... 92 to the TV with a HDMI/DVI cable. Turn on your TV. 2. Notes • Please be sure to match the color coded input terminals and cable jacks. • A PC will not operate when...
User Manual (ENGLISH)
Page 91
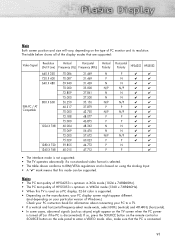
...; Depending on the manufacturer, your PC display screen might appear on the TV screen when the PC power is turned off (or if the PC is disconnected). Note Both screen position and size will vary, depending on the type of HP-S5053 is optimum in XGA mode (1024 x 768@60Hz). • The PC text...
...; Depending on the manufacturer, your PC display screen might appear on the TV screen when the PC power is turned off (or if the PC is disconnected). Note Both screen position and size will vary, depending on the type of HP-S5053 is optimum in XGA mode (1024 x 768@60Hz). • The PC text...

User Manual (ENGLISH)
Page 100
... for too long (when you set Activation to exit. To activate "On Timer" with the setting entered, set the timer "On", the television will eventually turn the TV On or Off. 1 Press the MENU button. When finished, press the ENTER button. • You can set Activation to "Yes" by pressing the number... items using the same method as above . This function is only available in timer "On" mode and prevents overheating or leakage, which may occur if a TV is on for 3 hours after the TV was turned on by pressing the number buttons on timer.
... for too long (when you set Activation to exit. To activate "On Timer" with the setting entered, set the timer "On", the television will eventually turn the TV On or Off. 1 Press the MENU button. When finished, press the ENTER button. • You can set Activation to "Yes" by pressing the number... items using the same method as above . This function is only available in timer "On" mode and prevents overheating or leakage, which may occur if a TV is on for 3 hours after the TV was turned on by pressing the number buttons on timer.

User Manual (ENGLISH)
Page 117
...turn the TV on and off. • On : LED(Blue) will save power and reduce eye fatigue. 1 Press the MENU button. More Menu Transparency Energy Saving Screen Burn Protection PC Function Help Blue Eye : Medium : Standard : OOfff : OOffn Move Enter Return TV... † More Setup √ : English √ √ : Off √ √ √ Move Enter Return TV Setup ... More Menu Transparency Energy Saving Screen Burn Protection PC Function Help Blue Eye : Medium : Standard : OOfff : OOffn ... ENTER button. • Off : LED(Blue) will not come on when you turn the TV on .
...turn the TV on and off. • On : LED(Blue) will save power and reduce eye fatigue. 1 Press the MENU button. More Menu Transparency Energy Saving Screen Burn Protection PC Function Help Blue Eye : Medium : Standard : OOfff : OOffn Move Enter Return TV... † More Setup √ : English √ √ : Off √ √ √ Move Enter Return TV Setup ... More Menu Transparency Energy Saving Screen Burn Protection PC Function Help Blue Eye : Medium : Standard : OOfff : OOffn ... ENTER button. • Off : LED(Blue) will not come on when you turn the TV on .


