User Manual (ENGLISH)
Page 2
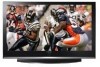
...video. Displaying stationary graphics and images on nonexpanded standard format television video and programming, should be limited to fill the screen if your Samsung limited warranty. To avoid this user manual is licensed under this license for commercial use . U.S.A Only The product ...unit accompanying this , vary the programming and images, and primarily display full screen moving . No rights are granted under this license for viewing...
...video. Displaying stationary graphics and images on nonexpanded standard format television video and programming, should be limited to fill the screen if your Samsung limited warranty. To avoid this user manual is licensed under this license for commercial use . U.S.A Only The product ...unit accompanying this , vary the programming and images, and primarily display full screen moving . No rights are granted under this license for viewing...
User Manual (ENGLISH)
Page 3
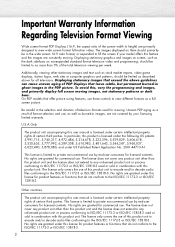
... similar effect to the PDP Panel. Playing a DVD or a game console may be a few bright or dark pixels on the screen. User Instructions Screen Image retention Do not display a still image (such as on a video game) on the plasma display panel for longer than several minutes as temperature or humidity. Heat on the... heights under 6500ft. Damages caused by the above effect are not covered by the difference of light emission on the top of the PDP TV The top side of the product may be prevented from Video games and PC for more than a certain period of time may produce partial after ...
... similar effect to the PDP Panel. Playing a DVD or a game console may be a few bright or dark pixels on the screen. User Instructions Screen Image retention Do not display a still image (such as on a video game) on the plasma display panel for longer than several minutes as temperature or humidity. Heat on the... heights under 6500ft. Damages caused by the above effect are not covered by the difference of light emission on the top of the PDP TV The top side of the product may be prevented from Video games and PC for more than a certain period of time may produce partial after ...
User Manual (ENGLISH)
Page 4
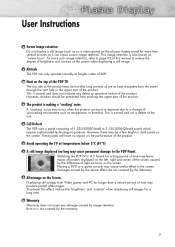
... (MTS) track - Table of Contents General Information Your New Plasma Display Panel 8 Remote Control Buttons 11 Wall Installation Instructions 13 How to assemble the Stand-Base 17 Connections Connecting VHF and UHF Antennas 20 Connecting Cable TV 21 Connecting a VCR 23 Connecting a Camcorder 24 Connecting a ...30 Picture Control Changing the Picture Standard 52 Customizing the Picture Settings 53 DNIe (Digital Natural Image engine 55 Changing the Screen Size 56 Viewing the Picture-in-Picture 58 Selecting the Sound Source 64 Sound Control Customizing the Sound 66 Using Automatic...
... (MTS) track - Table of Contents General Information Your New Plasma Display Panel 8 Remote Control Buttons 11 Wall Installation Instructions 13 How to assemble the Stand-Base 17 Connections Connecting VHF and UHF Antennas 20 Connecting Cable TV 21 Connecting a VCR 23 Connecting a Camcorder 24 Connecting a ...30 Picture Control Changing the Picture Standard 52 Customizing the Picture Settings 53 DNIe (Digital Natural Image engine 55 Changing the Screen Size 56 Viewing the Picture-in-Picture 58 Selecting the Sound Source 64 Sound Control Customizing the Sound 66 Using Automatic...
User Manual (ENGLISH)
Page 5
...Operation Connecting a PC 88 Changing the Position of the TV's software and the regional conditions. 5 Digital 110 Menu Transparency Level 112 Using the Energy Saving Feature 113 Preventing Screen Burn-in 114 Reducing the Effects of Screen Burn 115 Setting the Function Help 116 Setting the Blue ...Eye 117 Using the V-Chip (for USA 118 Using the V-Chip (for Canada 124 Appendix Troubleshooting 134 Care and Maintenance 135 Specifications 136 Dimensions (HP-S4253 137 Dimensions (HP-S5053 139 Note &#...
...Operation Connecting a PC 88 Changing the Position of the TV's software and the regional conditions. 5 Digital 110 Menu Transparency Level 112 Using the Energy Saving Feature 113 Preventing Screen Burn-in 114 Reducing the Effects of Screen Burn 115 Setting the Function Help 116 Setting the Blue ...Eye 117 Using the V-Chip (for USA 118 Using the V-Chip (for Canada 124 Appendix Troubleshooting 134 Care and Maintenance 135 Specifications 136 Dimensions (HP-S4253 137 Dimensions (HP-S5053 139 Note &#...
User Manual (ENGLISH)
Page 8
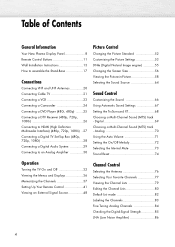
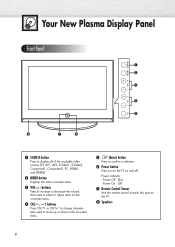
...available video sources (TV, AV1, AV2, S-Video1, S-Video2, Component1, Component2, PC, HDMI1, and HDMI2). ´ MENU button Displays the main on -screen menu. ˆ (Enter) button Press to confirm a selection. Ø Power button Press to change channels. Power Off : Blue - Power indicator - Your New Plasma Display Panel Front... or decrease the volume. " Speakers 8 Also used to select or adjust items on the on-screen menu. ¨ CH( , ) buttons Press CH or CH to turn the TV on the TV. Power On : Off ∏ Remote Control Sensor Aim the remote control towards this spot on and...
...available video sources (TV, AV1, AV2, S-Video1, S-Video2, Component1, Component2, PC, HDMI1, and HDMI2). ´ MENU button Displays the main on -screen menu. ˆ (Enter) button Press to confirm a selection. Ø Power button Press to change channels. Power Off : Blue - Power indicator - Your New Plasma Display Panel Front... or decrease the volume. " Speakers 8 Also used to select or adjust items on the on-screen menu. ¨ CH( , ) buttons Press CH or CH to turn the TV on the TV. Power On : Off ∏ Remote Control Sensor Aim the remote control towards this spot on and...
User Manual (ENGLISH)
Page 11
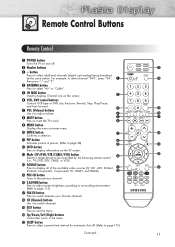
..."3". ¨ ANTENNA button Press to select "Air" or "Cable". ˆ CH MGR button Used to displays Channel Lists on the TV screen. Ò Mode (TV/DVD/STB/CABLE/VCR) button Selects a target device to be controlled by the same station. button Press to select additional channels (digital ...and analog) being broadcast by the Samsung remote control (i.e., TV, DVD, STB, CABLE, or VCR). Ú SOURCE button Press to display all of the available video sources (TV, AV1, AV2, S-Video1, S-Video2, Component1, Component2, PC, HDMI1, and HDMI2)....
..."3". ¨ ANTENNA button Press to select "Air" or "Cable". ˆ CH MGR button Used to displays Channel Lists on the TV screen. Ò Mode (TV/DVD/STB/CABLE/VCR) button Selects a target device to be controlled by the same station. button Press to select additional channels (digital ...and analog) being broadcast by the Samsung remote control (i.e., TV, DVD, STB, CABLE, or VCR). Ú SOURCE button Press to display all of the available video sources (TV, AV1, AV2, S-Video1, S-Video2, Component1, Component2, PC, HDMI1, and HDMI2)....
User Manual (ENGLISH)
Page 12
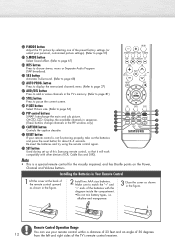
...DVD). alkaline and manganese. 3 Close the cover as shown in the TV's memory. (Refer to page 81) ÷ STILL button Press to pause the current screen. ® P.SIZE button Select Picture size. (Refer to page 37)...batteries and try using the remote control again. ≥ SET button Used during set up of the TV's remote control receiver. Remote Control Operation Range You can use your remote control within a distance of ...angle of 30 degrees 12 from the left and right sides of this Samsung remote control, so that it will work compatibly with the diagram inside the compartment. •Do ...
...DVD). alkaline and manganese. 3 Close the cover as shown in the TV's memory. (Refer to page 81) ÷ STILL button Press to pause the current screen. ® P.SIZE button Select Picture size. (Refer to page 37)...batteries and try using the remote control again. ≥ SET button Used during set up of the TV's remote control receiver. Remote Control Operation Range You can use your remote control within a distance of ...angle of 30 degrees 12 from the left and right sides of this Samsung remote control, so that it will work compatibly with the diagram inside the compartment. •Do ...

User Manual (ENGLISH)
Page 17
Never lay the TV on the floor because of the set may be different than the picture.) Warning Firmly secure the stand to the screen. Always store the TV upright. 17 How to assemble the Stand-Base 1 Using the 4 screws for securing the stand pegs and the monitor, firmly attach the monitor to the stand pegs. (The exterior of possible damage to the TV before moving it, as the stand may fall and could cause serious injury. ➤ Two or more people should carry the TV.
Never lay the TV on the floor because of the set may be different than the picture.) Warning Firmly secure the stand to the screen. Always store the TV upright. 17 How to assemble the Stand-Base 1 Using the 4 screws for securing the stand pegs and the monitor, firmly attach the monitor to the stand pegs. (The exterior of possible damage to the TV before moving it, as the stand may fall and could cause serious injury. ➤ Two or more people should carry the TV.

User Manual (ENGLISH)
Page 28
... HDMI. 2 Connect the HDMI input jack on the TV and the DVI output jack on the Set-Top Box using an HDMI/DVI cable. Connecting a Digital TV Set-Top Box (480p, 720p, 1080i) By inputting... content protection High-Definition picture source to Connect 1 Connect the DVI AUDIO (L, R) input jacks on the TV with the AUDIO output jacks on the Set-Top Box using an audio cable. Note • Use analog...when using the HDMI input with PC. 28 Connecting to HDMI (High Definition Multimedia Interface)/DVI Compatible TV Rear Panel Power cord 1 2 DTV Set-Top Box HDMI/DVI cable Audio cable From cable or...
... HDMI. 2 Connect the HDMI input jack on the TV and the DVI output jack on the Set-Top Box using an HDMI/DVI cable. Connecting a Digital TV Set-Top Box (480p, 720p, 1080i) By inputting... content protection High-Definition picture source to Connect 1 Connect the DVI AUDIO (L, R) input jacks on the TV with the AUDIO output jacks on the Set-Top Box using an audio cable. Note • Use analog...when using the HDMI input with PC. 28 Connecting to HDMI (High Definition Multimedia Interface)/DVI Compatible TV Rear Panel Power cord 1 2 DTV Set-Top Box HDMI/DVI cable Audio cable From cable or...
User Manual (ENGLISH)
Page 36
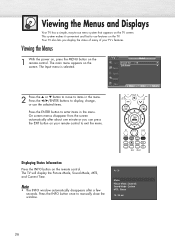
...Press the œ/√/ENTER buttons to display, change, or use menu system that appears on your TV's features. Your TV also lets you can press the EXIT button on the TV screen. TV Input Source List : TV √ Edit Name √ 2 Press the ▲ or ▼ button to move to ... display the Picture Mode, Sound Mode, MTS, and Current Time. The main menu appears on the TV. Press the INFO button once to use features on the screen. On screen menus disappear from the screen automatically after a few seconds. Air 28 Mono Picture Mode : Dynamic Sound Mode : Custom MTS : ...
...Press the œ/√/ENTER buttons to display, change, or use menu system that appears on your TV's features. Your TV also lets you can press the EXIT button on the TV screen. TV Input Source List : TV √ Edit Name √ 2 Press the ▲ or ▼ button to move to ... display the Picture Mode, Sound Mode, MTS, and Current Time. The main menu appears on the TV. Press the INFO button once to use features on the screen. On screen menus disappear from the screen automatically after a few seconds. Air 28 Mono Picture Mode : Dynamic Sound Mode : Custom MTS : ...
User Manual (ENGLISH)
Page 39
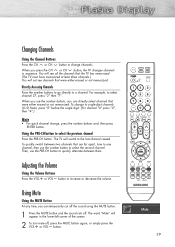
... button to select the second channel. Using Mute Using the MUTE Button At any time, you press the CH or CH button, the TV changes channels in the lower-left corner of the screen. 2 To turn mute off . When you can directly select channels that were either erased or not memorized. The... TV will not see all the channels that are far apart, tune to one channel, then use the PRE-CH button to increase or decrease...
... button to select the second channel. Using Mute Using the MUTE Button At any time, you press the CH or CH button, the TV changes channels in the lower-left corner of the screen. 2 To turn mute off . When you can directly select channels that were either erased or not memorized. The... TV will not see all the channels that are far apart, tune to one channel, then use the PRE-CH button to increase or decrease...
User Manual (ENGLISH)
Page 51
PLASMA DISPLAY PANEL Picture Control Changing the Picture Standard 52 Customizing the Picture Settings 53 DNIe (Digital Natural Image engine 55 Changing the Screen Size 56 Viewing the Picture-in-Picture 58 Selecting the Sound Source 64
PLASMA DISPLAY PANEL Picture Control Changing the Picture Standard 52 Customizing the Picture Settings 53 DNIe (Digital Natural Image engine 55 Changing the Screen Size 56 Viewing the Picture-in-Picture 58 Selecting the Sound Source 64

User Manual (ENGLISH)
Page 52
Changing the Picture Standard You can select the type of picture which best corresponds to select "Mode". DNIe Film Mode Blue Screen PIP Picture : Dynamic √ : 16:9 √ : On √ : On √ : Off √ : Off √ Move Enter Return 2 Press the ...ENTER button again to your viewing requirements. 1 Press the MENU button. TV Mode Mode Contrast Brightness Sharpness Color Tint G 50 Color Tone Reset : Dynamic √ 100 45 75 55 R 50 : Cool1 √ Move Enter Return 3 Press the ENTER button. Press the ▲ or ▼...
Changing the Picture Standard You can select the type of picture which best corresponds to select "Mode". DNIe Film Mode Blue Screen PIP Picture : Dynamic √ : 16:9 √ : On √ : On √ : Off √ : Off √ Move Enter Return 2 Press the ...ENTER button again to your viewing requirements. 1 Press the MENU button. TV Mode Mode Contrast Brightness Sharpness Color Tint G 50 Color Tone Reset : Dynamic √ 100 45 75 55 R 50 : Cool1 √ Move Enter Return 3 Press the ENTER button. Press the ▲ or ▼...

User Manual (ENGLISH)
Page 53
... Digital NR DNIe Film Mode Blue Screen PIP Picture : Dynamic √ : 16:9 √ : On √ : On √ : Off √ : Off √ Move Enter Return TV Mode Mode Contrast Brightness Sharpness Color Tint G 50 Color Tone Reset : Dynamic √ 100 45 75 55 R 50 : Cool1 √ Move Enter Return TV Mode Mode Contrast Brightness Sharpness Color...
... Digital NR DNIe Film Mode Blue Screen PIP Picture : Dynamic √ : 16:9 √ : On √ : On √ : Off √ : Off √ Move Enter Return TV Mode Mode Contrast Brightness Sharpness Color Tint G 50 Color Tone Reset : Dynamic √ 100 45 75 55 R 50 : Cool1 √ Move Enter Return TV Mode Mode Contrast Brightness Sharpness Color...

User Manual (ENGLISH)
Page 55
...; : On √ : On √ : Off √ : Off √ Move Enter Return TV Mode Size Digital NR DNIe Film Mode Blue Screen PIP Picture : Dynamic : 16:9 : On : OOfff : ODfefmo : OOfnf Move Enter Return TV Mode Size Digital NR DNIe Film Mode Blue Screen PIP Picture : Dynamic : 16:9 : On : OOfff : ODfefmo : OOfnf Move Enter Return DNIe...
...; : On √ : On √ : Off √ : Off √ Move Enter Return TV Mode Size Digital NR DNIe Film Mode Blue Screen PIP Picture : Dynamic : 16:9 : On : OOfff : ODfefmo : OOfnf Move Enter Return TV Mode Size Digital NR DNIe Film Mode Blue Screen PIP Picture : Dynamic : 16:9 : On : OOfff : ODfefmo : OOfnf Move Enter Return DNIe...
User Manual (ENGLISH)
Page 56
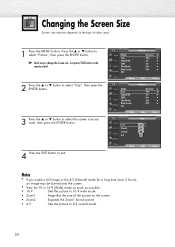
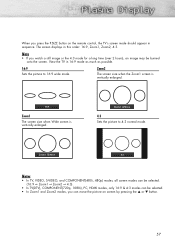
...√ : On √ : On √ : Off √ : Off √ Move Enter Return TV Size 16:9 Zoom1 Zoom2 4:3 4 Press the EXIT button to 4:3 normal mode. 56 Changing the Screen Size Screen size selection depends on the screen. • Zoom2 : Expands the Zoom1 format picture. • 4:3 : Sets the picture to exit. Press ... you watch a still image or the 4:3 (Normal) mode for a long time (over 2 hours), an image may be burned onto the screen. • View the TV in 16:9 (Wide) mode as much as possible. • 16:9 : Sets the picture to 16:9 wide mode. • Zoom1 ...
...√ : On √ : On √ : Off √ : Off √ Move Enter Return TV Size 16:9 Zoom1 Zoom2 4:3 4 Press the EXIT button to 4:3 normal mode. 56 Changing the Screen Size Screen size selection depends on the screen. • Zoom2 : Expands the Zoom1 format picture. • 4:3 : Sets the picture to exit. Press ... you watch a still image or the 4:3 (Normal) mode for a long time (over 2 hours), an image may be burned onto the screen. • View the TV in 16:9 (Wide) mode as much as possible. • 16:9 : Sets the picture to 16:9 wide mode. • Zoom1 ...
User Manual (ENGLISH)
Page 57
.... 57 Zoom2 Move 4:3 Sets the picture to 16:9 wide mode. Zoom1 Move 4:3 Notes • In TV, VIDEO, S-VIDEO, and COMPONENT(480i, 480p) modes, all screen modes can be selected. (16:9 ➞ Zoom1 ➞ Zoom2 ➞ 4:3). • In TV(DTV), COMPONENT(720p, 1080i), PC, HDMI modes, only 16:9 & 4:3 modes can move the picture on...
.... 57 Zoom2 Move 4:3 Sets the picture to 16:9 wide mode. Zoom1 Move 4:3 Notes • In TV, VIDEO, S-VIDEO, and COMPONENT(480i, 480p) modes, all screen modes can be selected. (16:9 ➞ Zoom1 ➞ Zoom2 ➞ 4:3). • In TV(DTV), COMPONENT(720p, 1080i), PC, HDMI modes, only 16:9 & 4:3 modes can move the picture on...
User Manual (ENGLISH)
Page 58
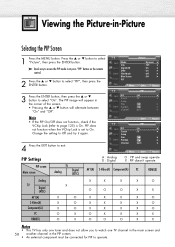
... 3 Press the ENTER button, then press the ▲ or ▼ button to operate. TV PIP Source Swap Size Position Channel Enter PIP : On : TV : : : Air 3 Return √ √ √ √ √ Move Enter Return PIP Settings PIP screen Main screen TV Analog Digital (ATSC) A : Analog D : Digital O : PIP and swap operate X : PIP doesn't operate AV1(A) S-Video...
... 3 Press the ENTER button, then press the ▲ or ▼ button to operate. TV PIP Source Swap Size Position Channel Enter PIP : On : TV : : : Air 3 Return √ √ √ √ √ Move Enter Return PIP Settings PIP screen Main screen TV Analog Digital (ATSC) A : Analog D : Digital O : PIP and swap operate X : PIP doesn't operate AV1(A) S-Video...
User Manual (ENGLISH)
Page 59
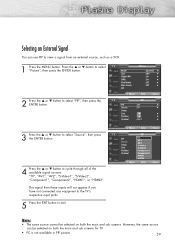
...S-Video2 : Component1 : ACiorm3 ponent2 HDMI1 HDMI2 Move Enter Return Notes • The same source cannot be selected on both the main and sub screens for TV. • PC is not available in PIP picture. 59 The signal from an external source, such as a VCR. 1 Press the MENU button... jacks. 5 Press the EXIT button to select "Picture", then press the ENTER button. Press the ▲ or ▼ button to exit. TV Mode Size Digital NR DNIe Film Mode Blue Screen PIP Picture : Dynamic √ : 16:9 √ : On √ : On √ : Off √ : Off √ Move...
...S-Video2 : Component1 : ACiorm3 ponent2 HDMI1 HDMI2 Move Enter Return Notes • The same source cannot be selected on both the main and sub screens for TV. • PC is not available in PIP picture. 59 The signal from an external source, such as a VCR. 1 Press the MENU button... jacks. 5 Press the EXIT button to select "Picture", then press the ENTER button. Press the ▲ or ▼ button to exit. TV Mode Size Digital NR DNIe Film Mode Blue Screen PIP Picture : Dynamic √ : 16:9 √ : On √ : On √ : Off √ : Off √ Move...

User Manual (ENGLISH)
Page 60
.... 4 Press the EXIT button to select "PIP", then press the ENTER button. Move Enter TV PIP Source Swap Size Position Channel PIP : On : TV : : : Air 3 Move Enter Return Return 60 TV Mode Size Digital NR DNIe Film Mode Blue Screen PIP Picture : Dynamic √ : 16:9 √ : On √ : On √ : Off √ : Off √...
.... 4 Press the EXIT button to select "PIP", then press the ENTER button. Move Enter TV PIP Source Swap Size Position Channel PIP : On : TV : : : Air 3 Move Enter Return Return 60 TV Mode Size Digital NR DNIe Film Mode Blue Screen PIP Picture : Dynamic √ : 16:9 √ : On √ : On √ : Off √ : Off √...


