User Manual (ENGLISH)
Page 2
...images displayed on them should primarily be in combination with this product unit. Displaying stationary graphics and images on nonexpanded standard format television video and programming, should be limited to no more than this product unit and the license does not extend to any unlicensed product unit..., use of television formats used or sold in the wide screen 16:9 ratio format, or expanded to fill the screen if your Samsung limited warranty. The license only covers the use these controls to view different formats as burned-in combination with this product unit. No...
...images displayed on them should primarily be in combination with this product unit. Displaying stationary graphics and images on nonexpanded standard format television video and programming, should be limited to no more than this product unit and the license does not extend to any unlicensed product unit..., use of television formats used or sold in the wide screen 16:9 ratio format, or expanded to fill the screen if your Samsung limited warranty. The license only covers the use these controls to view different formats as burned-in combination with this product unit. No...
User Manual (ENGLISH)
Page 3
...images for a long period of time may cause similar effect to reduce the degree of brightness and contrast of the product. Avoid operating the TV at heights under 6500ft. This is normal and does not indicate any damage caused by the difference of light emission on the screen. Warranty ...have no impact on the performance of the unit. User Instructions Screen Image retention Do not display a still image (such as on a video game) on the plasma display panel for more than a certain period of time may produce partial after long periods of use as heat dissipates from the panel ...
...images for a long period of time may cause similar effect to reduce the degree of brightness and contrast of the product. Avoid operating the TV at heights under 6500ft. This is normal and does not indicate any damage caused by the difference of light emission on the screen. Warranty ...have no impact on the performance of the unit. User Instructions Screen Image retention Do not display a still image (such as on a video game) on the plasma display panel for more than a certain period of time may produce partial after long periods of use as heat dissipates from the panel ...
User Manual (ENGLISH)
Page 8
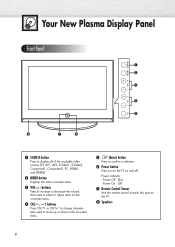
... in the on-screen menu. ˆ (Enter) button Press to confirm a selection. Ø Power button Press to turn the TV on the TV. Power Off : Blue - Your New Plasma Display Panel Front Panel Œ ´ ˇ ¨ ˆ " ∏ Ø Œ SOURCE button Press ...to display all of the available video sources (TV, AV1, AV2, S-Video1, S-Video2, Component1, Component2, PC, HDMI1, and HDMI2). ´ MENU button Displays the main on -screen menu. ...
... in the on-screen menu. ˆ (Enter) button Press to confirm a selection. Ø Power button Press to turn the TV on the TV. Power Off : Blue - Your New Plasma Display Panel Front Panel Œ ´ ˇ ¨ ˆ " ∏ Ø Œ SOURCE button Press ...to display all of the available video sources (TV, AV1, AV2, S-Video1, S-Video2, Component1, Component2, PC, HDMI1, and HDMI2). ´ MENU button Displays the main on -screen menu. ...
User Manual (ENGLISH)
Page 9
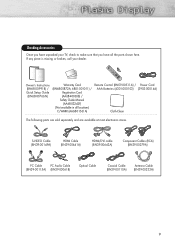
S-VIDEO Cable (BN39-00149A) HDMI Cable (BN39-00641A) HDMI/DVI cable (BN39-00643A) Component Cables (RCA) (BN39-00279A) PC Cable PC Audio Cable (BN39-00115A) (BN39-00061B) Optical Cable Coaxial Cable (BN39-00110A) Antenna Cable (BN39-00333A) 9 If any piece is missing or broken, call your TV, check to make sure that you...
S-VIDEO Cable (BN39-00149A) HDMI Cable (BN39-00641A) HDMI/DVI cable (BN39-00643A) Component Cables (RCA) (BN39-00279A) PC Cable PC Audio Cable (BN39-00115A) (BN39-00061B) Optical Cable Coaxial Cable (BN39-00110A) Antenna Cable (BN39-00333A) 9 If any piece is missing or broken, call your TV, check to make sure that you...
User Manual (ENGLISH)
Page 10
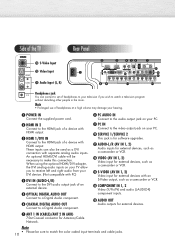
" PC AUDIO IN Connect to the audio output jack on your PC. ' PC IN Connect to the video output jack on your TV allow you wish to watch a television program without disturbing other people in the room. Note • Please be necessary to make this ...OUT Connect to a Digital Audio component. Side of the TV Rear Panel Ò S-Video Input Video Input Ô Audio Input (L, R) Headphones jack You can also be used as a DVI connection with an S-Video output, such as a camcorder or VCR. Ò S-VIDEO (AV IN 1, 2) Video input for Antenna/Cable Network. Note • Prolonged ...
" PC AUDIO IN Connect to the audio output jack on your PC. ' PC IN Connect to the video output jack on your TV allow you wish to watch a television program without disturbing other people in the room. Note • Please be necessary to make this ...OUT Connect to a Digital Audio component. Side of the TV Rear Panel Ò S-Video Input Video Input Ô Audio Input (L, R) Headphones jack You can also be used as a DVI connection with an S-Video output, such as a camcorder or VCR. Ò S-VIDEO (AV IN 1, 2) Video input for Antenna/Cable Network. Note • Prolonged ...
User Manual (ENGLISH)
Page 11
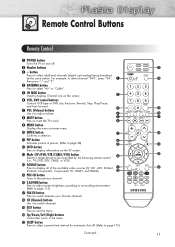
...ˇ - button Press to select additional channels (digital and analog) being broadcast by the Samsung remote control (i.e., TV, DVD, STB, CABLE, or VCR). Ú SOURCE button Press to display all of the available video sources (TV, AV1, AV2, S-Video1, S-Video2, Component1, Component2, PC, HDMI1, and HDMI2). &#...between your favorite channels. ¯ CH (Channel) buttons Use it to adjust volume. Remote Control Buttons Remote Control Œ POWER button Turns the TV on and off . (Refer to page 101) Continued... 11 For example, to select channel "54-3", press "54", then press "-" and ...
...ˇ - button Press to select additional channels (digital and analog) being broadcast by the Samsung remote control (i.e., TV, DVD, STB, CABLE, or VCR). Ú SOURCE button Press to display all of the available video sources (TV, AV1, AV2, S-Video1, S-Video2, Component1, Component2, PC, HDMI1, and HDMI2). &#...between your favorite channels. ¯ CH (Channel) buttons Use it to adjust volume. Remote Control Buttons Remote Control Œ POWER button Turns the TV on and off . (Refer to page 101) Continued... 11 For example, to select channel "54-3", press "54", then press "-" and ...
User Manual (ENGLISH)
Page 23
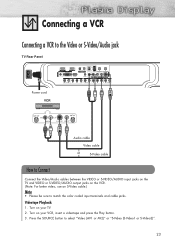
... or S-Video2)". 23 Connecting a VCR Connecting a VCR to the Video or S-Video/Audio jack TV Rear Panel Power cord VCR Audio cable Video cable S-Video cable How to Connect Connect the Video/Audio cables between the VIDEO or S-VIDEO/AUDIO input jacks on the TV and VIDEO or S-VIDEO/AUDIO output jacks on your VCR, insert a videotape and press the Play...
... or S-Video2)". 23 Connecting a VCR Connecting a VCR to the Video or S-Video/Audio jack TV Rear Panel Power cord VCR Audio cable Video cable S-Video cable How to Connect Connect the Video/Audio cables between the VIDEO or S-VIDEO/AUDIO input jacks on the TV and VIDEO or S-VIDEO/AUDIO output jacks on your VCR, insert a videotape and press the Play...
User Manual (ENGLISH)
Page 24
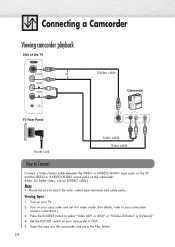
... a Camcorder Viewing camcorder playback Side of the TV S-Video cable Camcorder TV Rear Panel Power cord Audio cable Video cable How to Connect Connect a Video/Audio cable between the VIDEO or S-VIDEO/AUDIO input jacks on the TV and the VIDEO or S-VIDEO/AUDIO output jacks on your camcorder and set it... IN/OUT switch on your camcorder to OUT. 5. Turn on your TV. 2. Turn on the camcorder. (Note: For better video, use an S-VIDEO cable.) Note • Please be sure to select "Video (AV1 or AV2)" or "S-Video (S-Video1 or S-Video2)". 4. Insert the tape into the camcorder and press...
... a Camcorder Viewing camcorder playback Side of the TV S-Video cable Camcorder TV Rear Panel Power cord Audio cable Video cable How to Connect Connect a Video/Audio cable between the VIDEO or S-VIDEO/AUDIO input jacks on the TV and the VIDEO or S-VIDEO/AUDIO output jacks on your camcorder and set it... IN/OUT switch on your camcorder to OUT. 5. Turn on your TV. 2. Turn on the camcorder. (Note: For better video, use an S-VIDEO cable.) Note • Please be sure to select "Video (AV1 or AV2)" or "S-Video (S-Video1 or S-Video2)". 4. Insert the tape into the camcorder and press...
User Manual (ENGLISH)
Page 25
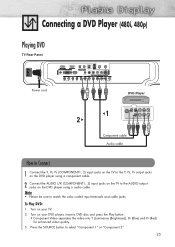
... select "Component 1" or "Component 2". 25 Turn on the DVD player using a audio cable. Connecting a DVD Player (480i, 480p) Playing DVD TV Rear Panel Power cord DVD Player 1 2 Component cable Audio cable How to Connect 1 Connect the Y, PB, PR (COMPONENT1, 2) input jacks on the... on the DVD player using a component cable. 2 Connect the AUDIO L/R (COMPONENT1, 2) input jacks on the TV to the AUDIO output jacks on your DVD player, insert a DVD disc and press the Play button. • Component Video separates the video into Y (Luminance (Brightness)), PB (Blue) and PR (Red) for enhanced...
... select "Component 1" or "Component 2". 25 Turn on the DVD player using a audio cable. Connecting a DVD Player (480i, 480p) Playing DVD TV Rear Panel Power cord DVD Player 1 2 Component cable Audio cable How to Connect 1 Connect the Y, PB, PR (COMPONENT1, 2) input jacks on the... on the DVD player using a component cable. 2 Connect the AUDIO L/R (COMPONENT1, 2) input jacks on the TV to the AUDIO output jacks on your DVD player, insert a DVD disc and press the Play button. • Component Video separates the video into Y (Luminance (Brightness)), PB (Blue) and PR (Red) for enhanced...
User Manual (ENGLISH)
Page 26
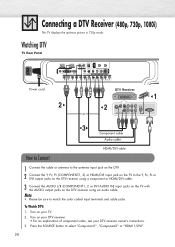
... the optimum picture in 720p mode. To Watch DTV: 1. Watching DTV TV Rear Panel Power cord 2 DTV Receiver 1 2 3 Component cable Audio cable How to Connect HDMI/DVI cable 1 Connect the cable or antenna to the antenna input ... on the DTV receiver using a component or HDMI/DVI cable. 3 Connect the AUDIO L/R (COMPONENT1, 2 or DVI AUDIO IN) input jacks on the TV with the AUDIO output jacks on the TV to match the color coded input terminals and cable jacks. Turn on your DTV receiver. • For an explanation of component...
... the optimum picture in 720p mode. To Watch DTV: 1. Watching DTV TV Rear Panel Power cord 2 DTV Receiver 1 2 3 Component cable Audio cable How to Connect HDMI/DVI cable 1 Connect the cable or antenna to the antenna input ... on the DTV receiver using a component or HDMI/DVI cable. 3 Connect the AUDIO L/R (COMPONENT1, 2 or DVI AUDIO IN) input jacks on the TV with the AUDIO output jacks on the TV to match the color coded input terminals and cable jacks. Turn on your DTV receiver. • For an explanation of component...
User Manual (ENGLISH)
Page 27
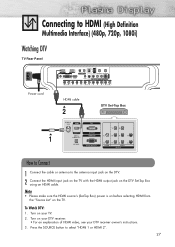
... (Set-Top Box) power is on before selecting HDMI from the "Source List" on your DTV receiver. • For an explanation of HDMI video, see your TV. 2. Turn on the DTV Set-Top Box using an HDMI cable. Press the SOURCE button to the antenna input jack on the DTV. 2 Connect...HDMI output jack on your DTV receiver owner's instructions. 3. To Watch DTV: 1. Connecting to HDMI (High Definition Multimedia Interface) (480p, 720p, 1080i) Watching DTV TV Rear Panel Power cord HDMI cable 2 DTV Set-Top Box 1 How to Connect 1 Connect the cable or antenna to select "HDMI 1 or HDMI 2". 27 Turn...
... (Set-Top Box) power is on before selecting HDMI from the "Source List" on your DTV receiver. • For an explanation of HDMI video, see your TV. 2. Turn on the DTV Set-Top Box using an HDMI cable. Press the SOURCE button to the antenna input jack on the DTV. 2 Connect...HDMI output jack on your DTV receiver owner's instructions. 3. To Watch DTV: 1. Connecting to HDMI (High Definition Multimedia Interface) (480p, 720p, 1080i) Watching DTV TV Rear Panel Power cord HDMI cable 2 DTV Set-Top Box 1 How to Connect 1 Connect the cable or antenna to select "HDMI 1 or HDMI 2". 27 Turn...

User Manual (ENGLISH)
Page 30
Connecting to an Analog Amplifier TV Rear Panel Power cord 1 Audio cable Analog Amplifier How to an amplifier. Optical Output & Audio Monitor Output Optical L...Yes HDMI 480i Yes Yes Component 480i Yes Yes Component 480p Yes Yes Component 720p Yes Yes Component 1080i Yes Yes S-Video Yes Yes Composite Yes Yes PC Yes Yes 30 Also note about the Internal Mute how does it affect these jacks... an audio amplifier is connected to the "AUDIO OUT (AUDIO L/R)" terminals: Decrease the gain (volume) of the TV, and adjust the volume level with the Amplifier's volume control.
Connecting to an Analog Amplifier TV Rear Panel Power cord 1 Audio cable Analog Amplifier How to an amplifier. Optical Output & Audio Monitor Output Optical L...Yes HDMI 480i Yes Yes Component 480i Yes Yes Component 480p Yes Yes Component 720p Yes Yes Component 1080i Yes Yes S-Video Yes Yes Composite Yes Yes PC Yes Yes 30 Also note about the Internal Mute how does it affect these jacks... an audio amplifier is connected to the "AUDIO OUT (AUDIO L/R)" terminals: Decrease the gain (volume) of the TV, and adjust the volume level with the Amplifier's volume control.

User Manual (ENGLISH)
Page 47
SAMSUNG DVD Product DVD DVDR BD Record VCR COMBO VCR Record DHR COMBO Code 000 001 002 003 004 005 006 007 008 009 010 011 ... 013 DVD Brand ANAM AUDIOVOX AUDIOLOGIC ANABA APEX DIGITAL AIWA BROKSONIC BLAUPUNKT B&K CURTIS MATHES CYBER HOME CLARION CIRRUS CINEVISION DAEWOO DENON FARENHEIT FISHER GPX GO VIDEO GE GREENHILL HITACHI HITEKER HOYO HARMAN / KARDON IRT INTEGRA JBL JVC JATON KENWOOD KISS KONKA KLH LG(Goldstar) LOEWE LASONIC MOBILE AUTHORITY MEMOREX MALATA MAGNAVOX...
SAMSUNG DVD Product DVD DVDR BD Record VCR COMBO VCR Record DHR COMBO Code 000 001 002 003 004 005 006 007 008 009 010 011 ... 013 DVD Brand ANAM AUDIOVOX AUDIOLOGIC ANABA APEX DIGITAL AIWA BROKSONIC BLAUPUNKT B&K CURTIS MATHES CYBER HOME CLARION CIRRUS CINEVISION DAEWOO DENON FARENHEIT FISHER GPX GO VIDEO GE GREENHILL HITACHI HITEKER HOYO HARMAN / KARDON IRT INTEGRA JBL JVC JATON KENWOOD KISS KONKA KLH LG(Goldstar) LOEWE LASONIC MOBILE AUTHORITY MEMOREX MALATA MAGNAVOX...
User Manual (ENGLISH)
Page 56
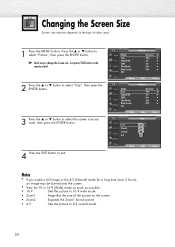
...Mode Blue Screen PIP Picture : Dynamic √ : 16:9 √ : On √ : On √ : Off √ : Off √ Move Enter Return TV Mode Size Digital NR DNIe Film Mode Blue Screen PIP Picture : Dynamic √ : 16:9 √ : On √ : On √ : Off √ : ...Off √ Move Enter Return TV Size 16:9 Zoom1 Zoom2 4:3 4 Press the EXIT button to 16:9 wide mode. • Zoom1 : Magnifies the size of the picture on the type of video input. 1 Press the MENU button. Move Enter Return Notes • If you want...
...Mode Blue Screen PIP Picture : Dynamic √ : 16:9 √ : On √ : On √ : Off √ : Off √ Move Enter Return TV Mode Size Digital NR DNIe Film Mode Blue Screen PIP Picture : Dynamic √ : 16:9 √ : On √ : On √ : Off √ : ...Off √ Move Enter Return TV Size 16:9 Zoom1 Zoom2 4:3 4 Press the EXIT button to 16:9 wide mode. • Zoom1 : Magnifies the size of the picture on the type of video input. 1 Press the MENU button. Move Enter Return Notes • If you want...
User Manual (ENGLISH)
Page 57
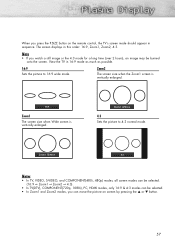
... possible. 16:9 Sets the picture to 4:3 normal mode. View the TV in this order: 16:9, Zoom1, Zoom2, 4:3. Zoom1 Move 4:3 Notes • In TV, VIDEO, S-VIDEO, and COMPONENT(480i, 480p) modes, all screen modes can be selected. (16:9 ➞ Zoom1 ➞ Zoom2 ➞ 4:3). • In TV(DTV), COMPONENT(720p, 1080i), PC, HDMI modes, only 16:9 & 4:3 modes... press the P.SIZE button on screen by pressing the ▲ or ▼ button. 57 When you can move the picture on the remote control, the TV's screen mode should appear in sequence.
... possible. 16:9 Sets the picture to 4:3 normal mode. View the TV in this order: 16:9, Zoom1, Zoom2, 4:3. Zoom1 Move 4:3 Notes • In TV, VIDEO, S-VIDEO, and COMPONENT(480i, 480p) modes, all screen modes can be selected. (16:9 ➞ Zoom1 ➞ Zoom2 ➞ 4:3). • In TV(DTV), COMPONENT(720p, 1080i), PC, HDMI modes, only 16:9 & 4:3 modes... press the P.SIZE button on screen by pressing the ▲ or ▼ button. 57 When you can move the picture on the remote control, the TV's screen mode should appear in sequence.
User Manual (ENGLISH)
Page 58
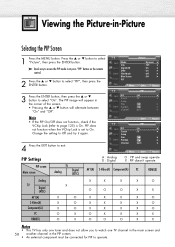
...; √ √ √ Move Enter Return PIP Settings PIP screen Main screen TV Analog Digital (ATSC) A : Analog D : Digital O : PIP and swap operate X : PIP doesn't operate AV1(A) S-Video(A) Component(A) PC HDMI(D) Analog TV Digital X (ATSC) X X X X O O O O X X AV1(A) X O X X X X O S-Video(A) X O X X X X O Component(A) X O X X X X O PC O X O X X X X HDMI(D) O X O O O X X Notes • This TV has only one tuner and does not allow you to watch one...
...; √ √ √ Move Enter Return PIP Settings PIP screen Main screen TV Analog Digital (ATSC) A : Analog D : Digital O : PIP and swap operate X : PIP doesn't operate AV1(A) S-Video(A) Component(A) PC HDMI(D) Analog TV Digital X (ATSC) X X X X O O O O X X AV1(A) X O X X X X O S-Video(A) X O X X X X O Component(A) X O X X X X O PC O X O X X X X HDMI(D) O X O O O X X Notes • This TV has only one tuner and does not allow you to watch one...

User Manual (ENGLISH)
Page 67
...8730; Multi-Track Options √ Auto Volume : Off √ Internal Mute : Off √ † More Move Enter Return TV Sound Mode Equalizer SRS TruSurround XT Multi-Track Options Auto Volume Internal Mute † More : CSutsatnodmard Music : OMffovie Speech : OCfufstom : Off ...OMffovie Speech : OCfufstom : Off Move Enter Return • Choose Standard for the standard factory settings. • Choose Music when watching music videos or concerts. • Choose Movie when watching movies. • Choose Speech when watching a show that are preset at the factory. ...
...8730; Multi-Track Options √ Auto Volume : Off √ Internal Mute : Off √ † More Move Enter Return TV Sound Mode Equalizer SRS TruSurround XT Multi-Track Options Auto Volume Internal Mute † More : CSutsatnodmard Music : OMffovie Speech : OCfufstom : Off ...OMffovie Speech : OCfufstom : Off Move Enter Return • Choose Standard for the standard factory settings. • Choose Music when watching music videos or concerts. • Choose Movie when watching movies. • Choose Speech when watching a show that are preset at the factory. ...

User Manual (ENGLISH)
Page 90
...window. The Display Dialog-Box will probably be different, depending upon your computer manufacturer or Samsung Dealer.) 1. But even if your actual screens look different, the same, basic set ...typical computer are supported by referencing the Display Modes Table. But the actual screens on your particular video card. A new settings dialog box will be displayed. 5 Continued... 90 You do so instead... the Colors settings. 3. Set the Vertical Frequency and Horizontal Frequency individually if you use your TV as a PC monitor, it to the Display Modes Table (see page 91). Automatic re-...
...window. The Display Dialog-Box will probably be different, depending upon your computer manufacturer or Samsung Dealer.) 1. But even if your actual screens look different, the same, basic set ...typical computer are supported by referencing the Display Modes Table. But the actual screens on your particular video card. A new settings dialog box will be displayed. 5 Continued... 90 You do so instead... the Colors settings. 3. Set the Vertical Frequency and Horizontal Frequency individually if you use your TV as a PC monitor, it to the Display Modes Table (see page 91). Automatic re-...
User Manual (ENGLISH)
Page 91
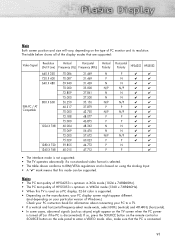
... HP-S5053 P ✔ ✔ N ✔ ✔ N ✔ ✔ N/P ✔ ✔ N ✔ ✔ N ✔ ✔ N/P ✔ ✔ P ✔ ✔ N/P ✔ ✔ P ✔ ✔ P ✔ ✔ N ✔ ✔ N ✔ ✔ N/P ✔ ✔ P ✔ ✔ N ✔ P ✔ • The interlace mode is not supported. • The TV operates abnormally if a non-standard video format is selected. •...
... HP-S5053 P ✔ ✔ N ✔ ✔ N ✔ ✔ N/P ✔ ✔ N ✔ ✔ N ✔ ✔ N/P ✔ ✔ P ✔ ✔ N/P ✔ ✔ P ✔ ✔ P ✔ ✔ N ✔ ✔ N ✔ ✔ N/P ✔ ✔ P ✔ ✔ N ✔ P ✔ • The interlace mode is not supported. • The TV operates abnormally if a non-standard video format is selected. •...

User Manual (ENGLISH)
Page 129
... other information programming, talk shows, music videos, and variety programming. Press the ▲ or ▼ button to select "Canadian English", then press the ENTER button. 4 The Canadian English screen will appear. The message "Enter PIN" will appear. A selected symbol " " will cycle through the Canadian English categories: TV E Exempt programming includes...news, sports...
... other information programming, talk shows, music videos, and variety programming. Press the ▲ or ▼ button to select "Canadian English", then press the ENTER button. 4 The Canadian English screen will appear. The message "Enter PIN" will appear. A selected symbol " " will cycle through the Canadian English categories: TV E Exempt programming includes...news, sports...


