
User Manual (ENGLISH)
Page 5
... in flash memory and use only. (MPEG4 part10/AVC) format and in Data recorded on the LCD screen. This User Manual covers HMX-R10SN, HMX-R10BN models. Samsung cannot compensate for damages due to Troubleshooting. are data by the copyright act and cannot be played back because of model HMX-R10SN are different, they operate in the same way. IMPORTANT INFORMATION ON USE Before using other digital video formats. • Before recording important video, make sure the video and audio have...
... in flash memory and use only. (MPEG4 part10/AVC) format and in Data recorded on the LCD screen. This User Manual covers HMX-R10SN, HMX-R10BN models. Samsung cannot compensate for damages due to Troubleshooting. are data by the copyright act and cannot be played back because of model HMX-R10SN are different, they operate in the same way. IMPORTANT INFORMATION ON USE Before using other digital video formats. • Before recording important video, make sure the video and audio have...
User Manual (ENGLISH)
Page 8
... or near a radiator or heat register. A CAMCORDER is provided or the manufacturer's instructions have been adhered to be routed so that they exit from the type of time, unplug it from battery power, or other electric light or power circuits where it is grounded to ensure reliable operation of 22. POWER-CORD PROTECTION: Power-supply cords should be 19. Apparatus shall not be...
... or near a radiator or heat register. A CAMCORDER is provided or the manufacturer's instructions have been adhered to be routed so that they exit from the type of time, unplug it from battery power, or other electric light or power circuits where it is grounded to ensure reliable operation of 22. POWER-CORD PROTECTION: Power-supply cords should be 19. Apparatus shall not be...
User Manual (ENGLISH)
Page 15
... power saving mode 33 Setting the operation modes 33 Using the display( /iCHECK) button 34 Using the touch panel 35 First time settings 35 Setting the time zone and date/ time for the first time 36 Selecting the language 37 Getting ready to start recording 37 Inserting and removing a memory card (not supplied) 38 Selecting a suitable memory card 41 Using the hand strap 41 Adjusting the LCD screen 42 Basic camcorder positioning BASIC OPERATION 43 Basic Recording 43 43 45 46 Recording videos Capturing photos...
... power saving mode 33 Setting the operation modes 33 Using the display( /iCHECK) button 34 Using the touch panel 35 First time settings 35 Setting the time zone and date/ time for the first time 36 Selecting the language 37 Getting ready to start recording 37 Inserting and removing a memory card (not supplied) 38 Selecting a suitable memory card 41 Using the hand strap 41 Adjusting the LCD screen 42 Basic camcorder positioning BASIC OPERATION 43 Basic Recording 43 43 45 46 Recording videos Capturing photos...
User Manual (ENGLISH)
Page 16
contents 48 Capturing photos while playing back videos 49 Zooming 50 Basic Playback 50 Changing the playback mode 51 Playing back videos 53 Viewing photos 54 Viewing a slide show 55 Zooming during playback ADVANCED OPERATION 56 Advanced Recording 56 Handling menus and quick 56 57 60 61 menus Menu items Quick menu items SCENE 62 Resolution 63 Quality 64 Slow Motion 65 Sharpness 65 White Balance 67 ISO 68 Aperture 69 Shutter 69 EV 70 3D-NR 70...
contents 48 Capturing photos while playing back videos 49 Zooming 50 Basic Playback 50 Changing the playback mode 51 Playing back videos 53 Viewing photos 54 Viewing a slide show 55 Zooming during playback ADVANCED OPERATION 56 Advanced Recording 56 Handling menus and quick 56 57 60 61 menus Menu items Quick menu items SCENE 62 Resolution 63 Quality 64 Slow Motion 65 Sharpness 65 White Balance 67 ISO 68 Aperture 69 Shutter 69 EV 70 3D-NR 70...
User Manual (ENGLISH)
Page 26
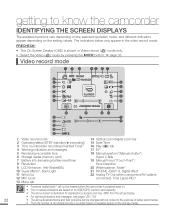
...*, Back Light 11 Wind Cut 12 MIC Level 13 Menu tab 14 Optical zoom/Digital zoom bar 15 Date/Time 16 Play ( ) tab 17 EV* 18 Manual aperture*/Manual shutter*/ Super C.Nite 19 Manual Focus*/Touch Point*/ Face Detection 20 White balance, Fader* 21 SCENE /EASY Q, Digital effect 22 Analog TV Out (when component/AV cable is connected), Time Lapse REC* • Functions marked with * will not be retained when the camcorder is powered back...
...*, Back Light 11 Wind Cut 12 MIC Level 13 Menu tab 14 Optical zoom/Digital zoom bar 15 Date/Time 16 Play ( ) tab 17 EV* 18 Manual aperture*/Manual shutter*/ Super C.Nite 19 Manual Focus*/Touch Point*/ Face Detection 20 White balance, Fader* 21 SCENE /EASY Q, Digital effect 22 Analog TV Out (when component/AV cable is connected), Time Lapse REC* • Functions marked with * will not be retained when the camcorder is powered back...
User Manual (ENGLISH)
Page 33
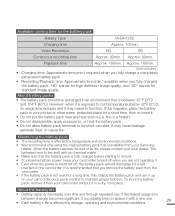
... battery pack, remove it is fully charged before starting to maintain proper function. Approx. 160min. (Unit: minutes.) • Charging time: Approximate time (min.) required when you fully charge a completely exhausted battery pack. • Recording/Playback time: Approximate time (min.) available when you are not operating it. • Even when the power is switched off, the battery pack will still discharge if it from your camcorder and put the battery...
... battery pack, remove it is fully charged before starting to maintain proper function. Approx. 160min. (Unit: minutes.) • Charging time: Approximate time (min.) required when you fully charge a completely exhausted battery pack. • Recording/Playback time: Approximate time (min.) available when you are not operating it. • Even when the power is switched off, the battery pack will still discharge if it from your camcorder and put the battery...
User Manual (ENGLISH)
Page 42
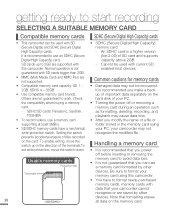
... used with data that you power off or removing a card. Setting the switch recognize the modified file. SD cards up to 2GB are saved by other devices. Normal operation is recommended to format newly-purchased memory cards, memory cards with current SD this camcorder. To enable writing, move the switch up of SD card and supports Digital High Capacity) card. Check hard disk of your camcorder may cause data loss. • To record videos, use an SDHC (Secure (Ver.2.00) of important data...
... used with data that you power off or removing a card. Setting the switch recognize the modified file. SD cards up to 2GB are saved by other devices. Normal operation is recommended to format newly-purchased memory cards, memory cards with current SD this camcorder. To enable writing, move the switch up of SD card and supports Digital High Capacity) card. Check hard disk of your camcorder may cause data loss. • To record videos, use an SDHC (Secure (Ver.2.00) of important data...
User Manual (ENGLISH)
Page 48
... -screen information display, see pages 22~25. • For approximate recording time, see "Recording menu items" pages 57~58 • Do not turn off the camcorder or remove the memory card while accessing the storage media. Doing so may not be recorded/ edited. • Samsung is not responsible for any problem with the audio and video recording. • The brightness of the LCD screen can set the Quick View menu option to prevent unnecessary battery power...
... -screen information display, see pages 22~25. • For approximate recording time, see "Recording menu items" pages 57~58 • Do not turn off the camcorder or remove the memory card while accessing the storage media. Doing so may not be recorded/ edited. • Samsung is not responsible for any problem with the audio and video recording. • The brightness of the LCD screen can set the Quick View menu option to prevent unnecessary battery power...
User Manual (ENGLISH)
Page 49
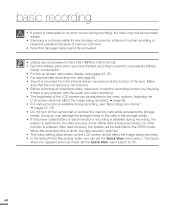
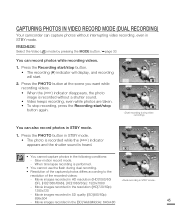
PRECHECK! When time lapse recording is recorded without interrupting video recording, even in the resolution ([HD]720/60p): 1280x720 - Movie images recorded in STBY mode. Capturing Photos in Video Record Mode (Dual Recording) Your camcorder can capture photos without a shutter sound. • Video keeps recording, even while photos are taken. • To stop recording, press the Recording start/stop button. • The recording () indicator will display, and recording will start /stop button again. 00:00:30 [55Min] 90 MIN 00:00:48...
PRECHECK! When time lapse recording is recorded without interrupting video recording, even in the resolution ([HD]720/60p): 1280x720 - Movie images recorded in STBY mode. Capturing Photos in Video Record Mode (Dual Recording) Your camcorder can capture photos without a shutter sound. • Video keeps recording, even while photos are taken. • To stop recording, press the Recording start/stop button. • The recording () indicator will display, and recording will start /stop button again. 00:00:30 [55Min] 90 MIN 00:00:48...
User Manual (ENGLISH)
Page 50
... flash in low lighting conditions. Set the desired resolution and quality before recording. page 62 PRECHECK! • Open the LCD screen to the desired time, the recorded photo image is shown for recording. • Use the Zoom lever or Zoom button to "Auto" pages 68, 73) • When the subject is difficult, use the manual focus function. page 73 • Do not turn on the camcorder. • Your camcorder turns on the photo size...
... flash in low lighting conditions. Set the desired resolution and quality before recording. page 62 PRECHECK! • Open the LCD screen to the desired time, the recorded photo image is shown for recording. • Use the Zoom lever or Zoom button to "Auto" pages 68, 73) • When the subject is difficult, use the manual focus function. page 73 • Do not turn on the camcorder. • Your camcorder turns on the photo size...
User Manual (ENGLISH)
Page 77
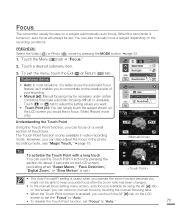
... ( ) tab on the LCD screen to set the "Focus" to "Auto." • To disable the Touch Point function, set "Focus" to keep accurate focus after the zoom ratio has been changed. • In the manual focus setting menu screen, auto focus is available by pressing the section for about 2 seconds on the LCD screen. (excluding when "Super Macro," "Face Detection," "Digital Zoom," or "Slow Motion" is turned on a small section of your recording. • Manual ( ): Manual focusing may be necessary...
... ( ) tab on the LCD screen to set the "Focus" to "Auto." • To disable the Touch Point function, set "Focus" to keep accurate focus after the zoom ratio has been changed. • In the manual focus setting menu screen, auto focus is available by pressing the section for about 2 seconds on the LCD screen. (excluding when "Super Macro," "Face Detection," "Digital Zoom," or "Slow Motion" is turned on a small section of your recording. • Manual ( ): Manual focusing may be necessary...
User Manual (ENGLISH)
Page 90
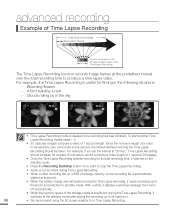
... been finished. Memory full! To start /stop button if you set the interval to be taken. After a while, it switches to the standby mode. • Press the Recording start another Time Lapse Recording, repeat steps 1-5. • 30 captured images compose a video of the storage media is automatically started at the predefined interval over the total recording time to its total recording time, it displays a warning message, then turns off automatically...
... been finished. Memory full! To start /stop button if you set the interval to be taken. After a while, it switches to the standby mode. • Press the Recording start another Time Lapse Recording, repeat steps 1-5. • 30 captured images compose a video of the storage media is automatically started at the predefined interval over the total recording time to its total recording time, it displays a warning message, then turns off automatically...
User Manual (ENGLISH)
Page 103
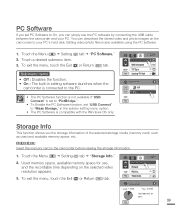
... Software function is not available if "USB 1 / 1 Connect" is set to "PictBridge." • To Enable the PC Software function, set PC Software to On, you can download the stored video and photo images on the selected video resolution appears. 3. Storage Info Format 1 / 7 File No. Time Zone Storage Info • Used : 120MB • Free : 855MB [HD]1080/60i SF 5Min 99 Editing video/photo files is compatible with the Windows OS only. Touch the Menu ( ) Setting...
... Software function is not available if "USB 1 / 1 Connect" is set to "PictBridge." • To Enable the PC Software function, set PC Software to On, you can download the stored video and photo images on the selected video resolution appears. 3. Storage Info Format 1 / 7 File No. Time Zone Storage Info • Used : 120MB • Free : 855MB [HD]1080/60i SF 5Min 99 Editing video/photo files is compatible with the Windows OS only. Touch the Menu ( ) Setting...
User Manual (ENGLISH)
Page 105
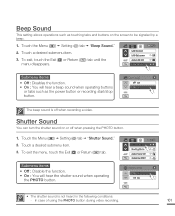
... the power button or recording start/stop button. To exit, touch the Exit ( ) or Return ( menu disappears. ) tab until the LCD Control LCD Enhancer 3 / 7 Auto LCD Off Beep Sound Submenu items • Off : Disables the function. • On : You will hear the shutter sound when operating the PHOTO button. 90 MIN Shutter Sound Booting Mode 4 / 7 Auto Power Off Quick On STBY Shutter Sound Off On 1 / 1 • The shutter sound is off when pressing the PHOTO button. 1. Shutter Sound You can turn the shutter sound on the screen...
... the power button or recording start/stop button. To exit, touch the Exit ( ) or Return ( menu disappears. ) tab until the LCD Control LCD Enhancer 3 / 7 Auto LCD Off Beep Sound Submenu items • Off : Disables the function. • On : You will hear the shutter sound when operating the PHOTO button. 90 MIN Shutter Sound Booting Mode 4 / 7 Auto Power Off Quick On STBY Shutter Sound Off On 1 / 1 • The shutter sound is off when pressing the PHOTO button. 1. Shutter Sound You can turn the shutter sound on the screen...
User Manual (ENGLISH)
Page 106
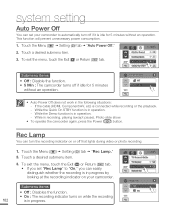
... pause), Photo slide show. • To operate the camcorder again, press the Power ( ) button. While the Quick On STBY function is in operation. - While the Demo function is in operation. - Touch the Menu ( ) Setting ( ) tab "Rec Lamp." 2. system setting Auto Power Off You can set "Rec Lamp" to "On," you set your camcorder. Touch a desired submenu item. 3. Touch a desired submenu item. 3. Submenu items • Off : Disables the function. • On : The recording indicator turns...
... pause), Photo slide show. • To operate the camcorder again, press the Power ( ) button. While the Quick On STBY function is in operation. - While the Demo function is in operation. - Touch the Menu ( ) Setting ( ) tab "Rec Lamp." 2. system setting Auto Power Off You can set "Rec Lamp" to "On," you set your camcorder. Touch a desired submenu item. 3. Touch a desired submenu item. 3. Submenu items • Off : Disables the function. • On : The recording indicator turns...
User Manual (ENGLISH)
Page 109
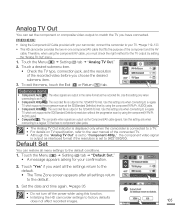
...; "Default Set." • A message appears asking for the TV output by using the component(Y/Pb/Pr, AUDIO) jacks. • Component 480i( 480i ): The recorded file is output in -one component/AV cable that has no component video jacks. • The Analog TV Out indicator is displayed only when the camcorder is connected to a TV. • For details on TV specification, refer to the user manual of...
...; "Default Set." • A message appears asking for the TV output by using the component(Y/Pb/Pr, AUDIO) jacks. • Component 480i( 480i ): The recorded file is output in -one component/AV cable that has no component video jacks. • The Analog TV Out indicator is displayed only when the camcorder is connected to a TV. • For details on TV specification, refer to the user manual of...

User Manual (ENGLISH)
Page 110
... Anynet+ (HDMI-CEC) function, refer to the user manual of the camcorder using the TV's remote control. Using the Demo function • The Demo mode is set "Demo" to "Off". If any button is operated (Recording start/stop, Q.MENU, Display ( )/iCHECK, EASY Q, MODE, PHOTO, etc.) However, the camcorder will turn on the camcorder that is connected to the Anynet+ supported TV, you can run. 1080i FULL HD Video 9.0 Megapixel Photo Anynet+ (HDMI-CEC) This camcorder supports Anynet+. If "Auto Power Off" is canceled in...
... Anynet+ (HDMI-CEC) function, refer to the user manual of the camcorder using the TV's remote control. Using the Demo function • The Demo mode is set "Demo" to "Off". If any button is operated (Recording start/stop, Q.MENU, Display ( )/iCHECK, EASY Q, MODE, PHOTO, etc.) However, the camcorder will turn on the camcorder that is connected to the Anynet+ supported TV, you can run. 1080i FULL HD Video 9.0 Megapixel Photo Anynet+ (HDMI-CEC) This camcorder supports Anynet+. If "Auto Power Off" is canceled in...
User Manual (ENGLISH)
Page 129
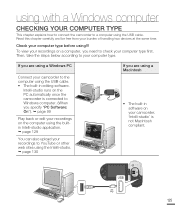
... a Windows computer CHECKING YOUR COMPUTER TYPE This chapter explains how to connect the camcorder to a computer using !!! If you are using a Windows PC Connect your camcorder to the computer using the USB cable. • The built-in software on your camcorder, 'Intelli-studio' is connected to Windows computer. (When you specify "PC Software: On"). page 99 Play back or edit your burden of handling two devices at the same time.
... a Windows computer CHECKING YOUR COMPUTER TYPE This chapter explains how to connect the camcorder to a computer using !!! If you are using a Windows PC Connect your camcorder to the computer using the USB cable. • The built-in software on your camcorder, 'Intelli-studio' is connected to Windows computer. (When you specify "PC Software: On"). page 99 Play back or edit your burden of handling two devices at the same time.
User Manual (ENGLISH)
Page 142
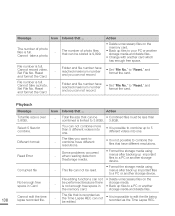
... card. • Set "File No." Action Total file size is recorded as the Time Lapse REC can not record. Corrupted file - Action • Delete unnecessary files on the - Cannot take a photo. and format the card. when reading data from thestorage media. • Format the storage media using menus after backing up files to - and format the Card. Playback Message Icon Informs that ... Select 5 files for combine. is not enough free space in Card File editing functions can not record Folder and file number...
... card. • Set "File No." Action Total file size is recorded as the Time Lapse REC can not record. Corrupted file - Action • Delete unnecessary files on the - Cannot take a photo. and format the card. when reading data from thestorage media. • Format the storage media using menus after backing up files to - and format the Card. Playback Message Icon Informs that ... Select 5 files for combine. is not enough free space in Card File editing functions can not record Folder and file number...
User Manual (ENGLISH)
Page 143
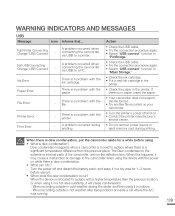
... INDICATORS AND MESSAGES USB Message Icon Informs that... Fail Printer Connecting Change 'USB Connect' - There is a problem with the printer. - Turn the power off and on while there is dew condensation? When recording outside in the printer. Fail USB Connecting Change 'USB Connect' - A problem occurred when connecting the camcorder via USB to a PC. When this file format. • Try another file recorded on your camcorder. • Turn the printer's power off and detach the battery pack, and leave...
... INDICATORS AND MESSAGES USB Message Icon Informs that... Fail Printer Connecting Change 'USB Connect' - There is a problem with the printer. - Turn the power off and on while there is dew condensation? When recording outside in the printer. Fail USB Connecting Change 'USB Connect' - A problem occurred when connecting the camcorder via USB to a PC. When this file format. • Try another file recorded on your camcorder. • Turn the printer's power off and detach the battery pack, and leave...


