
Owner Instructions
Page 2
... one program on the same TV channel) and datacasting. Digital television (DTV) is Digital Television? Many HDTV programs are comparable to progressive-scan DVD movies in two different formats. A Guide to Digital TV ● What is a new way of transmitting high quality video and audio to your home audio system. Digital Television Services ● Digital Picture Quality DTV programs are transmitted in image quality. ● HDTV program formats include 1080-line interlaced (1080i) and 720-line progressive (720p). Using DTV...
... one program on the same TV channel) and datacasting. Digital television (DTV) is Digital Television? Many HDTV programs are comparable to progressive-scan DVD movies in two different formats. A Guide to Digital TV ● What is a new way of transmitting high quality video and audio to your home audio system. Digital Television Services ● Digital Picture Quality DTV programs are transmitted in image quality. ● HDTV program formats include 1080-line interlaced (1080i) and 720-line progressive (720p). Using DTV...
Owner Instructions
Page 3
... put up outside antennas for your local DTV broadcasts are no noise, ghosting, static, or scratchy audio. 3. Can I connect my DTV set -top receiver to receive DTV signals indoors? So you need to use for existing TV reception good enough for transmitting digital TV programs that in some markets, both VHF and UHF channels are different than 12' in my townhouse, co-operative apartment, condominium, or...
... put up outside antennas for your local DTV broadcasts are no noise, ghosting, static, or scratchy audio. 3. Can I connect my DTV set -top receiver to receive DTV signals indoors? So you need to use for existing TV reception good enough for transmitting digital TV programs that in some markets, both VHF and UHF channels are different than 12' in my townhouse, co-operative apartment, condominium, or...
Owner Instructions
Page 4
...; Connecting a DVD Player/Set-Top Box via DVI ..... 15 ■ Connecting a Digital Audio System 16 ■ Connecting an Amplifier/ DVD Home Theater - Digital 53 ■ Viewing Closed Captions (On-Screen Text Messages) - Digital 39 ■ Adding and Erasing Channels 39 ■ Setting Your Favorite Channels 40 ■ Viewing the Channel Lists 41 ■ Labeling Channels - Analog 42 ■ Checking the Digital-Signal Strength - Analog 54 ■ Menu Transparency Level 55 ■ Setting the Blue Screen Mode 55 ■ Adjusting the Melody Sound...
...; Connecting a DVD Player/Set-Top Box via DVI ..... 15 ■ Connecting a Digital Audio System 16 ■ Connecting an Amplifier/ DVD Home Theater - Digital 53 ■ Viewing Closed Captions (On-Screen Text Messages) - Digital 39 ■ Adding and Erasing Channels 39 ■ Setting Your Favorite Channels 40 ■ Viewing the Channel Lists 41 ■ Labeling Channels - Analog 42 ■ Checking the Digital-Signal Strength - Analog 54 ■ Menu Transparency Level 55 ■ Setting the Blue Screen Mode 55 ■ Adjusting the Melody Sound...
Owner Instructions
Page 6
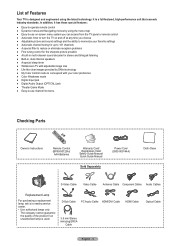
...center. • Use authorized lamps only. List of the product if an unauthorized lamp is a full-featured, high-performance unit that exceeds industry standards. Checking Parts Owner's Instructions Remote Control (BP59-00123A)/ AAA Batteries Warranty Card/ Registration Card/ Safety Guide Manual/ Quick Guide Manual Sold Separately Power Cord (3903-000144A) Cloth-Clean S-Video Cable Video Cable Antenna Cable Component Cables Audio Cables Replacement Lamp For purchasing a replacement lamp, ask at any time you choose ● Adjustable picture and sound settings and the ability...
...center. • Use authorized lamps only. List of the product if an unauthorized lamp is a full-featured, high-performance unit that exceeds industry standards. Checking Parts Owner's Instructions Remote Control (BP59-00123A)/ AAA Batteries Warranty Card/ Registration Card/ Safety Guide Manual/ Quick Guide Manual Sold Separately Power Cord (3903-000144A) Cloth-Clean S-Video Cable Video Cable Antenna Cable Component Cables Audio Cables Replacement Lamp For purchasing a replacement lamp, ask at any time you choose ● Adjustable picture and sound settings and the ability...
Owner Instructions
Page 8
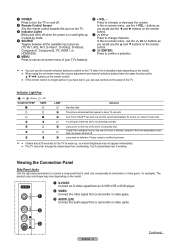
... in standby mode depending on the model. ● When using the on-screen menu the volume adjustment and channel selection buttons have lost it working. The product color and shape may not appear immediately. ● The TV has a fan to keep the inside the set is not properly shut. In the on the rear of the set will automatically appear in about 15 seconds. Indicator Light Key ( : On, : Blinking, : Off) STAND BY/TEMP TIMER LAMP Standby state...
... in standby mode depending on the model. ● When using the on-screen menu the volume adjustment and channel selection buttons have lost it working. The product color and shape may not appear immediately. ● The TV has a fan to keep the inside the set is not properly shut. In the on the rear of the set will automatically appear in about 15 seconds. Indicator Light Key ( : On, : Blinking, : Off) STAND BY/TEMP TIMER LAMP Standby state...
Owner Instructions
Page 10
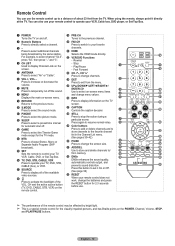
... Theater Game mode except for automatic shut off the sound. 8 MENU Displays the main on-screen menu. 9 RETURN Returns to the previous menu. 0 S.MODE Press to select the sound mode. ! b VCR/DVD Functions - Fast Forward c CH , CH Press to change the screen size. Remote Control You can also use your remote control to operate your VCR, Cable box, DVD player, or Set-Top Box. 1 POWER Turns the TV on and off. 2 Numeric Buttons Press to directly select a channel. 3 - When using the remote, always point...
... Theater Game mode except for automatic shut off the sound. 8 MENU Displays the main on-screen menu. 9 RETURN Returns to the previous menu. 0 S.MODE Press to select the sound mode. ! b VCR/DVD Functions - Fast Forward c CH , CH Press to change the screen size. Remote Control You can also use your remote control to operate your VCR, Cable box, DVD player, or Set-Top Box. 1 POWER Turns the TV on and off. 2 Numeric Buttons Press to directly select a channel. 3 - When using the remote, always point...
Owner Instructions
Page 15
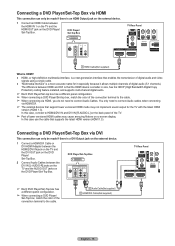
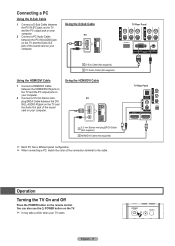
DVD Player/ Set-Top Box TV Rear Panel 1 HDMI Cable(Not supplied) What is HDMI? ● HDMI, or high-definition multimedia interface, is a next-generation interface that support lower versioned HDMI mode may cause annoying flickers or no screen display. In this case, connect to connect Audio cables when connecting via HDMI/DVI. ➢ The external devices that enables the transmission of digital audio and video signals using a single cable. ● "Multimedia interface" is a DVI Output jack on the external device. 1 Connect a HDMI/DVI Cable or DVI-HDMI Adapter between the ...
DVD Player/ Set-Top Box TV Rear Panel 1 HDMI Cable(Not supplied) What is HDMI? ● HDMI, or high-definition multimedia interface, is a next-generation interface that support lower versioned HDMI mode may cause annoying flickers or no screen display. In this case, connect to connect Audio cables when connecting via HDMI/DVI. ➢ The external devices that enables the transmission of digital audio and video signals using a single cable. ● "Multimedia interface" is a DVI Output jack on the external device. 1 Connect a HDMI/DVI Cable or DVI-HDMI Adapter between the ...
Owner Instructions
Page 16
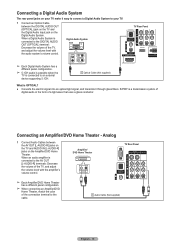
... a Digital Audio System is connected to the DIGITAL AUDIO OUT (OPTICAL) terminal: Decrease the volume of the TV, and adjust the volume level with the amplifier's volume control. When an audio amplifier is OPTICAL? ● Converts the electric signal into an optical light signal, and transmits it easy to connect a Digital Audio System to your TV. 1 Connect an Optical Cable between the AV OUT [L-AUDIO-R] jacks on the TV and AUDIO IN [L-AUDIO-R] jacks on the Digital Audio System. Amplifier/ DVD Home Theater TV Rear Panel...
... a Digital Audio System is connected to the DIGITAL AUDIO OUT (OPTICAL) terminal: Decrease the volume of the TV, and adjust the volume level with the amplifier's volume control. When an audio amplifier is OPTICAL? ● Converts the electric signal into an optical light signal, and transmits it easy to connect a Digital Audio System to your TV. 1 Connect an Optical Cable between the AV OUT [L-AUDIO-R] jacks on the TV and AUDIO IN [L-AUDIO-R] jacks on the Digital Audio System. Amplifier/ DVD Home Theater TV Rear Panel...
Owner Instructions
Page 17
... also use the POWER button on the remote control. Operation Turning the TV On and Off Press the POWER button on the TV. ➢ It may take a while when your TV starts. English - 17 Using the D-Sub Cable PC 1 D-Sub Cable (Not supplied) 2 PC Audio Cable (Not supplied) Using the HDMI/DVI Cable 1 Connect a HDMI/DVI Cable between the HDMI2/DVI IN jack on the TV and the PC output jack on your computer. 2 Connect a 3.5 mm Stereo miniplug/2RCA Cable between the...
... also use the POWER button on the remote control. Operation Turning the TV On and Off Press the POWER button on the TV. ➢ It may take a while when your TV starts. English - 17 Using the D-Sub Cable PC 1 D-Sub Cable (Not supplied) 2 PC Audio Cable (Not supplied) Using the HDMI/DVI Cable 1 Connect a HDMI/DVI Cable between the HDMI2/DVI IN jack on the TV and the PC output jack on your computer. 2 Connect a 3.5 mm Stereo miniplug/2RCA Cable between the...
Owner Instructions
Page 18
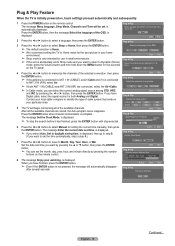
... the TV is initially powered on, basic settings proceed automatically and subsequently: 1 Press the POWER button on the TV panel. is automatically displayed. Select the language of the available channels. The message Set the Clock Mode. Set the date and time you want to return to Shop mode and you have Digital cable, select the signal source for five seconds Plug & Play Select Home Mode when installing this TV at...
... the TV is initially powered on, basic settings proceed automatically and subsequently: 1 Press the POWER button on the TV panel. is automatically displayed. Select the language of the available channels. The message Set the Clock Mode. Set the date and time you want to return to Shop mode and you have Digital cable, select the signal source for five seconds Plug & Play Select Home Mode when installing this TV at...
Owner Instructions
Page 21
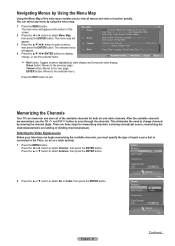
... or a cable system). 1 Press the MENU button. Yellow button: Moves to scan through the channels. There are memorized, use the selected items. Menu Map Picture Sound Channel Setup 1/2 Mode І Contrast І Brightness І Shapness І Color І Tint Color Tone І Detailed Settings І Size І Digital NR І DNIe Active Color І Color Gamut І Position І Reset Mode І DNSe І Preferred Language І Multi-Track Sound Auto Volume І Internal Mute Antenna І Auto Program І...
... or a cable system). 1 Press the MENU button. Yellow button: Moves to scan through the channels. There are memorized, use the selected items. Menu Map Picture Sound Channel Setup 1/2 Mode І Contrast І Brightness І Shapness І Color І Tint Color Tone І Detailed Settings І Size І Digital NR І DNIe Active Color І Color Gamut І Position І Reset Mode І DNSe І Preferred Language І Multi-Track Sound Auto Volume І Internal Mute Antenna І Auto Program І...
Owner Instructions
Page 22
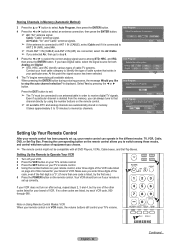
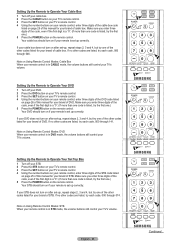
... remote control. ➢ All available DTV and analog channels are automatically stored in memory. Storing Channels in Memory (Automatic Method) 3 Press the ▲ or ▼ button to Operate Your VCR 1 Turn off your VCR. 2 Press the VCR button on your TV's remote control. 3 Press the SET button on your TV's remote control. 4 Using the number buttons on your remote control, enter three digits of the VCR code listed on if your remote is set up correctly. Cable: "Cable" antenna signal. Auto Program...
... remote control. ➢ All available DTV and analog channels are automatically stored in memory. Storing Channels in Memory (Automatic Method) 3 Press the ▲ or ▼ button to Operate Your VCR 1 Turn off your VCR. 2 Press the VCR button on your TV's remote control. 3 Press the SET button on your TV's remote control. 4 Using the number buttons on your remote control, enter three digits of the VCR code listed on if your remote is set up correctly. Cable: "Cable" antenna signal. Auto Program...
Owner Instructions
Page 23
... Operate Your Cable Box 1 Turn off your cable box. 2 Press the CABLE button on your TV's remote control. 3 Press the SET button on your TV's remote control. 4 Using the number buttons on your remote control, enter three digits of the cable box code listed on page 25 of this manual for your brand of cable box. If your remote is set -up correctly. Note on Using Remote Control Modes: Cable Box When your remote control is listed, try the first one.) 5 Press the POWER button on if your cable box does not turn on the remote control...
... Operate Your Cable Box 1 Turn off your cable box. 2 Press the CABLE button on your TV's remote control. 3 Press the SET button on your TV's remote control. 4 Using the number buttons on your remote control, enter three digits of the cable box code listed on page 25 of this manual for your brand of cable box. If your remote is set -up correctly. Note on Using Remote Control Modes: Cable Box When your remote control is listed, try the first one.) 5 Press the POWER button on if your cable box does not turn on the remote control...
Owner Instructions
Page 31
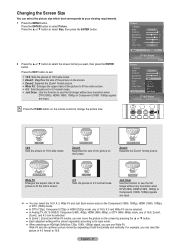
... the remote control to change the picture size. For example, you want, then press the ENTER button. English - 31 Press the P.SIZE button on the screen. Just Scan Use the function to see the full image without any truncation when DTV(1080i), HDMI (1080i, 1080p) or Component (1080i, 1080p) signals are input. Wide Fit sets the optimum picture format by pressing the ▲ or ▼ button. ● Each adjusted setting...
... the remote control to change the picture size. For example, you want, then press the ENTER button. English - 31 Press the P.SIZE button on the screen. Just Scan Use the function to see the full image without any truncation when DTV(1080i), HDMI (1080i, 1080p) or Component (1080i, 1080p) signals are input. Wide Fit sets the optimum picture format by pressing the ▲ or ▼ button. ● Each adjusted setting...
Owner Instructions
Page 45
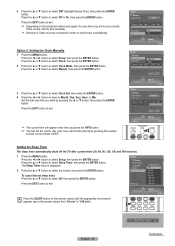
... occurs, set the time manually. ➢ Antenna or Cable must be set the month, day, year, hour, and minute directly by pressing the ▲ or ▼ button, then press the ENTER button. Time Zone DST Off Setup Enter Clock Return Clock Mode Clock Set Month / Day / Year Time Zone DST Manual Hour / Min -- : -- -- Off Adjust Setup Enter Setting the Sleep Timer The sleep timer automatically shuts off the TV after a preset time (30, 60...
... occurs, set the time manually. ➢ Antenna or Cable must be set the month, day, year, hour, and minute directly by pressing the ▲ or ▼ button, then press the ENTER button. Time Zone DST Off Setup Enter Clock Return Clock Mode Clock Set Month / Day / Year Time Zone DST Manual Hour / Min -- : -- -- Off Adjust Setup Enter Setting the Sleep Timer The sleep timer automatically shuts off the TV after a preset time (30, 60...
Owner Instructions
Page 46
... Television will eventually turn on or off if no controls are operated for 3 hours after the TV was turned on by selecting game menu. 1 Press the MENU button. Return Plug & Play Language Clock Sleep Timer Timer 1 Timer 2 Timer 3 Game Mode V-Chip English Off Off AdvenOtufrfe SportsOff StandaOrfdf ● Sound Mode in the Sound menu is active, you set the TV to turn off at a desired time. 1 Press the MENU button. Adjust the sound using the equalizer. ● The Reset in...
... Television will eventually turn on or off if no controls are operated for 3 hours after the TV was turned on by selecting game menu. 1 Press the MENU button. Return Plug & Play Language Clock Sleep Timer Timer 1 Timer 2 Timer 3 Game Mode V-Chip English Off Off AdvenOtufrfe SportsOff StandaOrfdf ● Sound Mode in the Sound menu is active, you set the TV to turn off at a desired time. 1 Press the MENU button. Adjust the sound using the equalizer. ● The Reset in...
Owner Instructions
Page 55
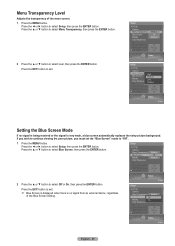
... button. 2 Press the ▲ or ▼ button to "Off". 1 Press the MENU button. If you wish to continue viewing the poor picture, you must set the "Blue Screen" mode to select level, then press the ENTER button. Menu Transparency Level Adjusts the transparency of the Blue Screen Setting. Setup Enter Setup V-Chip Caption Menu Transparency Medium Blue Screen Off Off Melody On Medium Color Weakness PC Home Theater PC Off HDMI Black Level Normal Film Mode Off Setup...
... button. 2 Press the ▲ or ▼ button to "Off". 1 Press the MENU button. If you wish to continue viewing the poor picture, you must set the "Blue Screen" mode to select level, then press the ENTER button. Menu Transparency Level Adjusts the transparency of the Blue Screen Setting. Setup Enter Setup V-Chip Caption Menu Transparency Medium Blue Screen Off Off Melody On Medium Color Weakness PC Home Theater PC Off HDMI Black Level Normal Film Mode Off Setup...
Owner Instructions
Page 62
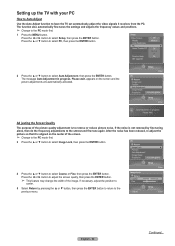
... screen quality, then press the ENTER button. ➢ This feature may change the width of the image. Image Lock Return Coarse Fine Adjust 50 31 Setup Enter English - 62 Continued... Please wait. Setup Enter PC Return Image Lock Position Auto Adjustment Image Reset Resolution 1152x864 @60Hz Setup Enter Auto Adjustment in progress. The message Auto Adjustment in progress. If the noise is to remove or reduce picture noise. Setting up the TV with your PC How to Auto Adjust Use...
... screen quality, then press the ENTER button. ➢ This feature may change the width of the image. Image Lock Return Coarse Fine Adjust 50 31 Setup Enter English - 62 Continued... Please wait. Setup Enter PC Return Image Lock Position Auto Adjustment Image Reset Resolution 1152x864 @60Hz Setup Enter Auto Adjustment in progress. The message Auto Adjustment in progress. If the noise is to remove or reduce picture noise. Setting up the TV with your PC How to Auto Adjust Use...
Owner Instructions
Page 64
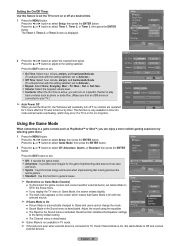
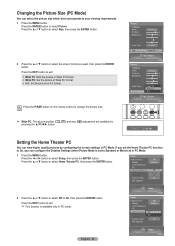
...; 4:3 : Set the picture in 4:3 format Press the P.SIZE button on the remote control to select Picture. Press the EXIT button to exit. ➢ This function is set the Home Theater PC function to your viewing requirements. 1 Press the MENU button. Press the ENTER button to change the picture size. If you set to select Setup, then press the ENTER button. Setup Blue Screen Melody Color Weakness PC Home Theater PC HDMI Black Level Film Mode Function...
...; 4:3 : Set the picture in 4:3 format Press the P.SIZE button on the remote control to select Picture. Press the EXIT button to exit. ➢ This function is set the Home Theater PC function to your viewing requirements. 1 Press the MENU button. Press the ENTER button to change the picture size. If you set to select Setup, then press the ENTER button. Setup Blue Screen Melody Color Weakness PC Home Theater PC HDMI Black Level Film Mode Function...
Owner Instructions
Page 65
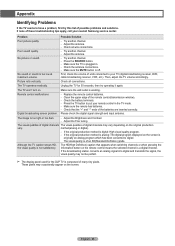
... Problems If the TV seems to have a problem, first try operating it again. No sound or sound is digital: High visual quality program. - Adjust the antenna. - Unplug the TV for the DLP TV is originally an analog program which has been converted to your remote control in . - If the original production method is analog: The digital program displayed on the screen. Adjust the antenna. - Try another channel. - Make sure the TV is too light or too dark. - The TV...
... Problems If the TV seems to have a problem, first try operating it again. No sound or sound is digital: High visual quality program. - Adjust the antenna. - Unplug the TV for the DLP TV is originally an analog program which has been converted to your remote control in . - If the original production method is analog: The digital program displayed on the screen. Adjust the antenna. - Try another channel. - Make sure the TV is too light or too dark. - The TV...


