
User Manual (ENGLISH)
Page 9
...CAPTION Controls the caption decoder. c VCR/DVD Functions - g INFO Press to change the batteries and press the RESET button for 2-3 seconds before use the remote control up to exit from the TV. English - 9 e EXIT Press to a distance of the remote control may be affected by the same station.... o RESET When your remote control does not work, change the screen size. When using the remote, always point it directly at the TV. For example, to select channel "54-3", press "54", then press "-" and "3". 4 ...
...CAPTION Controls the caption decoder. c VCR/DVD Functions - g INFO Press to change the batteries and press the RESET button for 2-3 seconds before use the remote control up to exit from the TV. English - 9 e EXIT Press to a distance of the remote control may be affected by the same station.... o RESET When your remote control does not work, change the screen size. When using the remote, always point it directly at the TV. For example, to select channel "54-3", press "54", then press "-" and "3". 4 ...
User Manual (ENGLISH)
Page 18
...which you press the CH or CH button, the TV changes channels in sequence. For example, to select Off or On, then the ENTER button. SD indicates the TV is receiving a Digital High Definition signal. Then use the number button to reset this feature... 1 Press the MENU button. The ...message Select the time zone in the TV mode. Press the ENTER button. Newfoundland Atlantic Eastern Central Mountain ...
...which you press the CH or CH button, the TV changes channels in sequence. For example, to select Off or On, then the ENTER button. SD indicates the TV is receiving a Digital High Definition signal. Then use the number button to reset this feature... 1 Press the MENU button. The ...message Select the time zone in the TV mode. Press the ENTER button. Newfoundland Atlantic Eastern Central Mountain ...

User Manual (ENGLISH)
Page 20
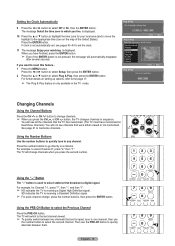
...and adding or deleting channels(manual). Green button: Moves to exit. Press the EXIT button to the previous page. Memorizing the Channels Your TV can memorize and store all of the main menu enables you must specify the type of the screen. 2 Press the ◄ or ...І Tint Color Tone І Detailed Settings І Size І Digital NR І DNIe Active Color І Color Gamut І Position І Reset Mode І SRS TruSurround XT І Preferred Language Multi-Track Sound І Auto Volume І Internal Mute Antenna І Auto Program І Clear Scrambled...
...and adding or deleting channels(manual). Green button: Moves to exit. Press the EXIT button to the previous page. Memorizing the Channels Your TV can memorize and store all of the main menu enables you must specify the type of the screen. 2 Press the ◄ or ...І Tint Color Tone І Detailed Settings І Size І Digital NR І DNIe Active Color І Color Gamut І Position І Reset Mode І SRS TruSurround XT І Preferred Language Multi-Track Sound І Auto Volume І Internal Mute Antenna І Auto Program І Clear Scrambled...

User Manual (ENGLISH)
Page 28
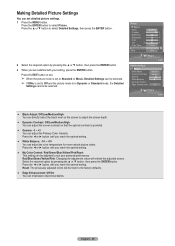
... Enter Picture Tint G50 R50 Color Tone Cool1 Detailed Settings Size 16:9 Digital NR Auto DNIe On Active Color On Color Gamut Normal Position OK Reset CancelOK Picture Enter English - 28 5 Press the ▲ or ▼ button to select Color Tone, then press the ENTER button. 6 ... ENTER button. Press the ▲ or ▼ button to Dynamic or Standard, Warm1 and Warm2 cannot be reset. Press the EXIT button to select Reset, then press the ENTER button. Resetting the Picture Settings to the Factory Defaults 7 Press the ▲ or ▼ button to exit. ➢...
... Enter Picture Tint G50 R50 Color Tone Cool1 Detailed Settings Size 16:9 Digital NR Auto DNIe On Active Color On Color Gamut Normal Position OK Reset CancelOK Picture Enter English - 28 5 Press the ▲ or ▼ button to select Color Tone, then press the ENTER button. 6 ... ENTER button. Press the ▲ or ▼ button to Dynamic or Standard, Warm1 and Warm2 cannot be reset. Press the EXIT button to select Reset, then press the ENTER button. Resetting the Picture Settings to the Factory Defaults 7 Press the ▲ or ▼ button to exit. ➢...
User Manual (ENGLISH)
Page 29
.... ● White Balance: -10 ~ +10 You can be selected. ➢ If DNIe is set detailed picture settings. 1 Press the MENU button. Reset: The previously adjusted colors will refresh the adjusted screen. Press the ◄ or ► button until you reach the optimal setting. ● My Color ...Control: Red/Green/Blue/Yellow/Pink/Reset This setting can be adjusted to Standard or Movie, Detailed Settings can adjust the color temperature for more natural picture colors. English - 29 Press...
.... ● White Balance: -10 ~ +10 You can be selected. ➢ If DNIe is set detailed picture settings. 1 Press the MENU button. Reset: The previously adjusted colors will refresh the adjusted screen. Press the ◄ or ► button until you reach the optimal setting. ● My Color ...Control: Red/Green/Blue/Yellow/Pink/Reset This setting can be adjusted to Standard or Movie, Detailed Settings can adjust the color temperature for more natural picture colors. English - 29 Press...
User Manual (ENGLISH)
Page 30
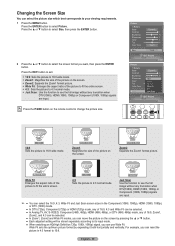
... ▲ or ▼ button to select Size, then press the ENTER button. 2 Press the ▲ or ▼ button to select the screen format you can reset the picture in the Component (1080i, 1080p), HDMI (1080i, 1080p), or DTV (1080i) mode. ● In DTV (720p), Component (720p) or HDMI (720p... screen by expanding it both horizontally and vertically. Zoom2 Expands the Zoom1 format picture. Changing the Screen Size You can be selected. ● In Analog TV, AV, S-VIDEO, Component (480i, 480p), HDMI (480i, 480p), or DTV (480i, 480p) mode, any truncation when DTV(1080i), HDMI (1080i, 1080p) or ...
... ▲ or ▼ button to select Size, then press the ENTER button. 2 Press the ▲ or ▼ button to select the screen format you can reset the picture in the Component (1080i, 1080p), HDMI (1080i, 1080p), or DTV (1080i) mode. ● In DTV (720p), Component (720p) or HDMI (720p... screen by expanding it both horizontally and vertically. Zoom2 Expands the Zoom1 format picture. Changing the Screen Size You can be selected. ● In Analog TV, AV, S-VIDEO, Component (480i, 480p), HDMI (480i, 480p), or DTV (480i, 480p) mode, any truncation when DTV(1080i), HDMI (1080i, 1080p) or ...

User Manual (ENGLISH)
Page 31
...and normal pictures on the screen, for demonstration purposes. Picture Tint G50 Color Tone Detailed Settings Size Digital NR DNIe Active Color Color Gamut Position Reset R50 Cool1 16:9 Auto On On Normal OK 2 Press the ▲ or ▼ button to select Off, Low, Medium, High, ... Tone Cool1 Detailed Settings Size 16:9 Digital NR DNIe Active Color Color Gamut Position Reset Off Low LowCooOl1n MediOumKOff High Normal AutoLow OK Picture Enter DNIe (Digital Natural Image engine) This TV includes the DNIe function so as to select Digital NR, then press the ENTER button...
...and normal pictures on the screen, for demonstration purposes. Picture Tint G50 Color Tone Detailed Settings Size Digital NR DNIe Active Color Color Gamut Position Reset R50 Cool1 16:9 Auto On On Normal OK 2 Press the ▲ or ▼ button to select Off, Low, Medium, High, ... Tone Cool1 Detailed Settings Size 16:9 Digital NR DNIe Active Color Color Gamut Position Reset Off Low LowCooOl1n MediOumKOff High Normal AutoLow OK Picture Enter DNIe (Digital Natural Image engine) This TV includes the DNIe function so as to select Digital NR, then press the ENTER button...

User Manual (ENGLISH)
Page 32
...select Normal, or sRGB, then press the ENTER button. Picture Tint G50 Color Tone Detailed Settings Size Digital NR DNIe Active Color Color Gamut Position Reset R50 Cool1 16:9 Auto On On Normal 0 OK 2 Press the ▲ or ▼ button to select Active Color, then press the...Picture Enter Picture Tint G50 R50 Color Tone Cool1 Detailed Settings Size 16:9 Digital NR Auto DNIe On Active Color On Color Gamut Position Reset NormNalormal sRGB OK Picture Enter English - 32 When the Picture Mode is set to Dynamic, the Active Color is deactivated. Picture Enter...
...select Normal, or sRGB, then press the ENTER button. Picture Tint G50 Color Tone Detailed Settings Size Digital NR DNIe Active Color Color Gamut Position Reset R50 Cool1 16:9 Auto On On Normal 0 OK 2 Press the ▲ or ▼ button to select Active Color, then press the...Picture Enter Picture Tint G50 R50 Color Tone Cool1 Detailed Settings Size 16:9 Digital NR Auto DNIe On Active Color On Color Gamut Position Reset NormNalormal sRGB OK Picture Enter English - 32 When the Picture Mode is set to Dynamic, the Active Color is deactivated. Picture Enter...
User Manual (ENGLISH)
Page 33
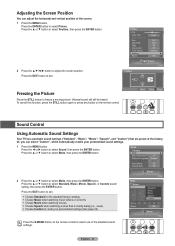
... and vertical position of the standard sound settings. Picture Tint G50 Color Tone Detailed Settings Size Digital NR DNIe Active Color Color Gamut Position Reset R50 Cool1 16:9 Auto On On Normal ► OK Picture Enter Position ▲ ▼ ▼ Freezing the Picture Press the... Sound Enter Press the S.MODE button on the remote control. ▼ Move Enter Return Sound Control Using Automatic Sound Settings Your TV has automatic sound settings ("Standard", "Music", "Movie", "Speech", and "Custom") that is mostly dialog (i.e., news). Choose Custom ...
... and vertical position of the standard sound settings. Picture Tint G50 Color Tone Detailed Settings Size Digital NR DNIe Active Color Color Gamut Position Reset R50 Cool1 16:9 Auto On On Normal ► OK Picture Enter Position ▲ ▼ ▼ Freezing the Picture Press the... Sound Enter Press the S.MODE button on the remote control. ▼ Move Enter Return Sound Control Using Automatic Sound Settings Your TV has automatic sound settings ("Standard", "Music", "Movie", "Speech", and "Custom") that is mostly dialog (i.e., news). Choose Custom ...

User Manual (ENGLISH)
Page 34
...Movie Speech Custom Balance 100Hz 300Hz 1kHz 3kHz 10kHz Reset OK Mode Return Mode Sound Enter Custom Balance 100Hz 300Hz 1kHz 3kHz 10kHz Reset OK Mode Return Mode Sound Enter Standard Balance 100Hz 300Hz 1kOHKz 3kHz 10kHz Reset CancOelK Sound Enter English - 34 Press the &#...9660; button to adjust, then press the ENTER button. Press the EXIT button to exit. ➢ The equalizer resets to select Reset, then press the ENTER button. Resetting the Equalizer Settings to the Factory Defaults 4 Press the ▲ or ▼ button to the factory defaults. Customizing...
...Movie Speech Custom Balance 100Hz 300Hz 1kHz 3kHz 10kHz Reset OK Mode Return Mode Sound Enter Custom Balance 100Hz 300Hz 1kHz 3kHz 10kHz Reset OK Mode Return Mode Sound Enter Standard Balance 100Hz 300Hz 1kOHKz 3kHz 10kHz Reset CancOelK Sound Enter English - 34 Press the &#...9660; button to adjust, then press the ENTER button. Press the EXIT button to exit. ➢ The equalizer resets to select Reset, then press the ENTER button. Resetting the Equalizer Settings to the Factory Defaults 4 Press the ▲ or ▼ button to the factory defaults. Customizing...

User Manual (ENGLISH)
Page 41
... Air Auto Program Clear Scrambled Channel Channel List Fine Tune ► Signal Strength LNA On Channel Fine Tune Return Air 7 * Reset Enter +3 OK Adjust Fine Tune Return Air 7 * Reset Channel Enter OK +3 CancelOK Channel Enter English - 41 Press the ◄ or ► button to select Fine Tune, then...lists. Press the ◄ or ► button to adjust the fine tuning. 3 To store the fine tuning setting in the TV's memory, press the ENTER button. 4 To reset the fine tuning setting, press the ▲ or ▼ button to select OK or Cancel, then press the ENTER button. ...
... Air Auto Program Clear Scrambled Channel Channel List Fine Tune ► Signal Strength LNA On Channel Fine Tune Return Air 7 * Reset Enter +3 OK Adjust Fine Tune Return Air 7 * Reset Channel Enter OK +3 CancelOK Channel Enter English - 41 Press the ◄ or ► button to select Fine Tune, then...lists. Press the ◄ or ► button to adjust the fine tuning. 3 To store the fine tuning setting in the TV's memory, press the ENTER button. 4 To reset the fine tuning setting, press the ▲ or ▼ button to select OK or Cancel, then press the ENTER button. ...
User Manual (ENGLISH)
Page 45
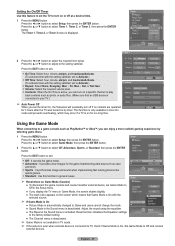
...time. 1 Press the MENU button. Adjust the sound using the equalizer. ● The Reset in the Sound menu is only available in general cases. English - 45 This function is deactivated. Reset function initializes the Equalizer settings to select the required item below. Set Game Mode to select...Music None Photo None Adjust Return Using the Game Mode When connecting to a game console such as PlayStationTM or XboxTM, you display the TV menu in TV mode. ➢ If the picture is poor when external device is activated. Press the ▲ or ▼ button to select Game...
...time. 1 Press the MENU button. Adjust the sound using the equalizer. ● The Reset in the Sound menu is only available in general cases. English - 45 This function is deactivated. Reset function initializes the Equalizer settings to select the required item below. Set Game Mode to select...Music None Photo None Adjust Return Using the Game Mode When connecting to a game console such as PlayStationTM or XboxTM, you display the TV menu in TV mode. ➢ If the picture is poor when external device is activated. Press the ▲ or ▼ button to select Game...

User Manual (ENGLISH)
Page 47
... enter your PIN has been memorized. Re-enter the same 4 digits. Setup Enter English - 47 Continued... Choose any 4 digits for a new TV set is changed sucessfully. is displayed. Confirm new PIN. Press the number buttons to enter your PIN and enter them. The message PIN is "0-0-0-0"....; Power On. Press the EXIT button to exit. ➢ If you forget the PIN, press the remote-control buttons in the following sequence, which resets the pin to select Change PIN, then press the ENTER button. 4 The Change PIN screen will appear. Setting Up Your Personal ID Number (PIN) ...
... enter your PIN has been memorized. Re-enter the same 4 digits. Setup Enter English - 47 Continued... Choose any 4 digits for a new TV set is changed sucessfully. is displayed. Confirm new PIN. Press the number buttons to enter your PIN and enter them. The message PIN is "0-0-0-0"....; Power On. Press the EXIT button to exit. ➢ If you forget the PIN, press the remote-control buttons in the following sequence, which resets the pin to select Change PIN, then press the ENTER button. 4 The Change PIN screen will appear. Setting Up Your Personal ID Number (PIN) ...

User Manual (ENGLISH)
Page 61
... Lock Return Coarse Fine Adjust 50 31 Setup Enter English - 61 Continued... Setting up the TV with your PC How to Auto Adjust Use the Auto Adjust function to have the TV set automatically adjust the video signals it is to remove or reduce picture noise. Press the ...button. The message Auto Adjustment in progress. appears on the center of the image. Setup Enter PC Return Image Lock Position Auto Adjustment Image Reset Resolution 1152x864 @60Hz Setup Enter Auto Adjustment in progress. Press the ◄ or ► button to select Auto Adjustment, then press the ...
... Lock Return Coarse Fine Adjust 50 31 Setup Enter English - 61 Continued... Setting up the TV with your PC How to Auto Adjust Use the Auto Adjust function to have the TV set automatically adjust the video signals it is to remove or reduce picture noise. Press the ...button. The message Auto Adjustment in progress. appears on the center of the image. Setup Enter PC Return Image Lock Position Auto Adjustment Image Reset Resolution 1152x864 @60Hz Setup Enter Auto Adjustment in progress. Press the ◄ or ► button to select Auto Adjustment, then press the ...

User Manual (ENGLISH)
Page 62
... Settings You can get the resolution information of the screen if it is displayed on the screen. Viewing the Current Resolution You can reset the previously adjusted settings to the factory defaults. ➢ Change to the PC mode first. 8 Press the ▲ or ▼ ... English - 62 PC Return Image Lock Position ► Auto Adjustment Image Reset Resolution 1152x864 @60Hz Setup Enter 7 Press the ▲ or ▼ button to adjust the Vertical Position. Changing the Screen Position After connecting the TV to your PC, adjust the position of your PC. ➢ Change...
... Settings You can get the resolution information of the screen if it is displayed on the screen. Viewing the Current Resolution You can reset the previously adjusted settings to the factory defaults. ➢ Change to the PC mode first. 8 Press the ▲ or ▼ ... English - 62 PC Return Image Lock Position ► Auto Adjustment Image Reset Resolution 1152x864 @60Hz Setup Enter 7 Press the ▲ or ▼ button to adjust the Vertical Position. Changing the Screen Position After connecting the TV to your PC, adjust the position of your PC. ➢ Change...


