
Owner Instructions
Page 2
... Television Services • Digital Picture Quality DTV programs are comparable to Dolby Digital 5.1 surround, using your TV set. Some 480p programs are broadcast in widescreen and are transmitted in two different formats. Using DTV, broadcasters can transmit high definition TV (HDTV) images, Dolby digital...digital audio formats from Dolby Surround 2.0 to progressive-scan DVD movies in widescreen, and offer much higher picture quality than one program on the same TV channel) and datacasting. Both HDTV formats are always broadcast in image quality. • HDTV program formats ...
... Television Services • Digital Picture Quality DTV programs are comparable to Dolby Digital 5.1 surround, using your TV set. Some 480p programs are broadcast in widescreen and are transmitted in two different formats. Using DTV, broadcasters can transmit high definition TV (HDTV) images, Dolby digital...digital audio formats from Dolby Surround 2.0 to progressive-scan DVD movies in widescreen, and offer much higher picture quality than one program on the same TV channel) and datacasting. Both HDTV formats are always broadcast in image quality. • HDTV program formats ...

Owner Instructions
Page 5
... a Computer (PC) Display (How to Connect Your PC to the TV) .........104 Adjusting the Picture Quality 107 Changing the Picture Position 108 Adjusting the Picture Quality and Position Automatically 109 Changing the Picture Size (PC Mode 110 Viewing the Current Resolution 111 Initializing the Picture Settings 112 WISELINK 114 Using the WISELINK Function 114 Using the WISELINK...
... a Computer (PC) Display (How to Connect Your PC to the TV) .........104 Adjusting the Picture Quality 107 Changing the Picture Position 108 Adjusting the Picture Quality and Position Automatically 109 Changing the Picture Size (PC Mode 110 Viewing the Current Resolution 111 Initializing the Picture Settings 112 WISELINK 114 Using the WISELINK Function 114 Using the WISELINK...

Owner Instructions
Page 9
If any time you choose • Adjustable picture and sound settings and the ability to memorize your favorite settings • Automatic channel tuning for up to 181 channels • A special filter to view and play photo (JPEG) and audio files (MP3) through the TV's WISELINK jack. S-VIDEO Cable HDMI Cable HDMI/DVI cable Component Cables...
If any time you choose • Adjustable picture and sound settings and the ability to memorize your favorite settings • Automatic channel tuning for up to 181 channels • A special filter to view and play photo (JPEG) and audio files (MP3) through the TV's WISELINK jack. S-VIDEO Cable HDMI Cable HDMI/DVI cable Component Cables...

Owner Instructions
Page 11
...TIMER LAMP Indication Standby state. Lamp may not appear immediately. • The TV has a fan to keep the inside the set is not operating normally. Lamp cover on the rear of the set is not properly shut. You'll occasionally hear it working. Indicator Light ...set will automatically be defective. Indicator Lights POWER Press to warm up, so normal brightness may be turned on in about 15 seconds. Remote Control Sensor Aim the remote control towards this spot on and off . The picture will automatically appear in about 30 seconds for the TV to turn the TV on the TV...
...TIMER LAMP Indication Standby state. Lamp may not appear immediately. • The TV has a fan to keep the inside the set is not operating normally. Lamp cover on the rear of the set is not properly shut. You'll occasionally hear it working. Indicator Light ...set will automatically be defective. Indicator Lights POWER Press to warm up, so normal brightness may be turned on in about 15 seconds. Remote Control Sensor Aim the remote control towards this spot on and off . The picture will automatically appear in about 30 seconds for the TV to turn the TV on the TV...

Owner Instructions
Page 13
... and HDMI2). 19. SOURCE Press to choose Stereo, Mono or SAP (Secondary Audio Program). 17. P.MODE Adjust the TV picture by the Samsung remote control (i.e., TV, DVD, STB, CABLE, or VCR). 18. Mode (TV/DVD/STB/CABLE/VCR) Selects a target device to the previous channel. 20. PRE-CH Tunes to be controlled by ...remote control again. 28. CH / Press to select highlight up of this remote control, so that it will work compatibly with other devices (Set-top box, VCR, Cable box, DVD, etc.) 16. SRS Activates TruSurround. (Refer to page 81) NOTES • The Color buttons are used during...
... and HDMI2). 19. SOURCE Press to choose Stereo, Mono or SAP (Secondary Audio Program). 17. P.MODE Adjust the TV picture by the Samsung remote control (i.e., TV, DVD, STB, CABLE, or VCR). 18. Mode (TV/DVD/STB/CABLE/VCR) Selects a target device to the previous channel. 20. PRE-CH Tunes to be controlled by ...remote control again. 28. CH / Press to select highlight up of this remote control, so that it will work compatibly with other devices (Set-top box, VCR, Cable box, DVD, etc.) 16. SRS Activates TruSurround. (Refer to page 81) NOTES • The Color buttons are used during...

Owner Instructions
Page 29
...; Film Mode : Off √ Move Enter Return 3 Press the EXIT button to the selected source. The TV displays the current channel, the status of your remote control to control the settings of certain picture and sound settings and the current time. Press the œ, √ or ENTER button to enter items in the menu...
...; Film Mode : Off √ Move Enter Return 3 Press the EXIT button to the selected source. The TV displays the current channel, the status of your remote control to control the settings of certain picture and sound settings and the current time. Press the œ, √ or ENTER button to enter items in the menu...

Owner Instructions
Page 57
...8224; button to select "Channel", then press the ENTER button. 2 Press the ... The settings will be set individually for each channel. • If the picture is set to On, select Off. • The LNA setting needs to be stored separately in a weak-signal area, sometimes the LNA function can improve the... Manager Name Fine Tune Signal Strength LNA : OOfnf On Move Enter Return NOTES • LNA functions only when antenna is noisy with the LNA set to exit. English - 57 or † button to select "LNA", then press the ENTER button. 3 Press the ... or † button...
...8224; button to select "Channel", then press the ENTER button. 2 Press the ... The settings will be set individually for each channel. • If the picture is set to On, select Off. • The LNA setting needs to be stored separately in a weak-signal area, sometimes the LNA function can improve the... Manager Name Fine Tune Signal Strength LNA : OOfnf On Move Enter Return NOTES • LNA functions only when antenna is noisy with the LNA set to exit. English - 57 or † button to select "LNA", then press the ENTER button. 3 Press the ... or † button...

Owner Instructions
Page 60
... TV during the day or when there is a bright light in the room. • Choose Standard for the standard factory settings. • Choose Movie when viewing a movie. • Choose Custom if you want to adjust the settings according to exit. Press the EXIT button to personal preference (see "Customizing the Picture Settings", page 61). Picture Control Picture...
... TV during the day or when there is a bright light in the room. • Choose Standard for the standard factory settings. • Choose Movie when viewing a movie. • Choose Custom if you want to adjust the settings according to exit. Press the EXIT button to personal preference (see "Customizing the Picture Settings", page 61). Picture Control Picture...

Owner Instructions
Page 61
... HDMI, PC or any Component mode. • The Tint cannot be adjusted while watching Digital TV. Customizing the Picture Settings You can select "Standard" which automatically recalls your personalized picture settings. 1 Press the MENU button. or † button. English - 61 Picture Mode : Standard √ Size : 16:9 √ Digital NR : On √ DNIe : On √ My Color...
... HDMI, PC or any Component mode. • The Tint cannot be adjusted while watching Digital TV. Customizing the Picture Settings You can select "Standard" which automatically recalls your personalized picture settings. 1 Press the MENU button. or † button. English - 61 Picture Mode : Standard √ Size : 16:9 √ Digital NR : On √ DNIe : On √ My Color...
Owner Instructions
Page 62
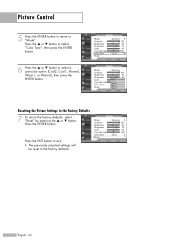
... Color Tint (G/R) G50 Color Tone Reset Move : Dynamic 100 45 75 Cool2 55 Cool1 Normal R50 :WWaarmrm1 1 Warm2 Enter Return Resetting the Picture Settings to "Mode". Mode Mode Contrast Brightness Sharpness Color Tint (G/R) G50 Color Tone Reset : Dynamic √ 100 45 75 55 R50 : Cool1... √ Move Enter Return English - 62 Picture Control 5 Press the ENTER button to return to the Factory Defaults 7 To return the factory defaults, select "Reset" by pressing the ... Press...
... Color Tint (G/R) G50 Color Tone Reset Move : Dynamic 100 45 75 Cool2 55 Cool1 Normal R50 :WWaarmrm1 1 Warm2 Enter Return Resetting the Picture Settings to "Mode". Mode Mode Contrast Brightness Sharpness Color Tint (G/R) G50 Color Tone Reset : Dynamic √ 100 45 75 55 R50 : Cool1... √ Move Enter Return English - 62 Picture Control 5 Press the ENTER button to return to the Factory Defaults 7 To return the factory defaults, select "Reset" by pressing the ... Press...

Owner Instructions
Page 63
... Alternate method Press the P.SIZE button on the remote control repeatedly to select one of the picture size settings. • "16:9": Sets the picture to 16:9 wide mode. • "Zoom1": Magnifies the size of the picture on the remote control. • When watching a DTV signal (only 720p, 1080i), you... the P.SIZE button on screen. • "Zoom2": Magnifies the size of the picture more than "Zoom1". • "Wide Fit": Enlarges the aspect ratio of the picture to fit the entire screen. • "4:3": Sets the picture to exit. or † button to select the screen format you can use Wide...
... Alternate method Press the P.SIZE button on the remote control repeatedly to select one of the picture size settings. • "16:9": Sets the picture to 16:9 wide mode. • "Zoom1": Magnifies the size of the picture on the remote control. • When watching a DTV signal (only 720p, 1080i), you... the P.SIZE button on screen. • "Zoom2": Magnifies the size of the picture more than "Zoom1". • "Wide Fit": Enlarges the aspect ratio of the picture to fit the entire screen. • "4:3": Sets the picture to exit. or † button to select the screen format you can use Wide...

Owner Instructions
Page 65
... Press the ... or † button to provide a high visual quality. English - 65 Using this function, you set DNIe Demo to select "Off", "Demo", or "On", then press the ENTER button. Press the ... Picture Mode : Standard √ Size : 16:9 √ Digital NR : On √ DNIe : On √ ... Natural Image engine) This feature brings you can view the difference in visual quality. 1 Press the MENU button. Viewing the DNIe Demonstration This TV includes the DNIe function so as to select "DNIe", then press the ENTER button. 3 Press the ... or † button to On,...
... Press the ... or † button to provide a high visual quality. English - 65 Using this function, you set DNIe Demo to select "Off", "Demo", or "On", then press the ENTER button. Press the ... Picture Mode : Standard √ Size : 16:9 √ Digital NR : On √ DNIe : On √ ... Natural Image engine) This feature brings you can view the difference in visual quality. 1 Press the MENU button. Viewing the DNIe Demonstration This TV includes the DNIe function so as to select "DNIe", then press the ENTER button. 3 Press the ... or † button to On,...

Owner Instructions
Page 66
... adjustment is shown on the right side, and an adjustment bar is no OSD on the bottom of the picture settings you to adjust colors according to accept the selected mode. Move Enter Return My Color Control Easy Control : Custom √ Detail ... - 66 • "Blue": Emphasizes Clear Blues. • "Green": Emphasizes Mild Greens. • "Pink": Emphasizes Warm Skin Colors. • "Standard": Standard Picture. Picture Control Setting the My Color Control Mode My Color Control allows you want. Press the EXIT button to "Custom". • Pressing the ENTER button on the remote...
... adjustment is shown on the right side, and an adjustment bar is no OSD on the bottom of the picture settings you to adjust colors according to accept the selected mode. Move Enter Return My Color Control Easy Control : Custom √ Detail ... - 66 • "Blue": Emphasizes Clear Blues. • "Green": Emphasizes Mild Greens. • "Pink": Emphasizes Warm Skin Colors. • "Standard": Standard Picture. Picture Control Setting the My Color Control Mode My Color Control allows you want. Press the EXIT button to "Custom". • Pressing the ENTER button on the remote...

Owner Instructions
Page 67
Press the œ or √ button to select "Detail Control", then press the ENTER button. English - 67 Press the ... Press the ... Picture Mode : Standard √ Size : 16:9 √ Digital NR : On √ DNIe : On √ My Color Control √ Film Mode : ...Custom √ Detail Control √ Move Enter Return 3 Press the ... Changing the adjustment value will be reset to the factory defaults. Custom Settings 1 Press the MENU button. or † button to adjust the value of the color selected. Detail Control Pink 50 Green 50 Blue 50...
Press the œ or √ button to select "Detail Control", then press the ENTER button. English - 67 Press the ... Press the ... Picture Mode : Standard √ Size : 16:9 √ Digital NR : On √ DNIe : On √ My Color Control √ Film Mode : ...Custom √ Detail Control √ Move Enter Return 3 Press the ... Changing the adjustment value will be reset to the factory defaults. Custom Settings 1 Press the MENU button. or † button to adjust the value of the color selected. Detail Control Pink 50 Green 50 Blue 50...

Owner Instructions
Page 69
...† button to select "Off" or "On", then press the ENTER button. English - 69 Setting the Film Mode You can automatically sense and process film signals from all sources and adjust the picture for optimum quality. 1 Press the MENU button. or † button to select "Film Mode", ...Size : 16:9 √ Digital NR : On √ DNIe : On √ My Color Control √ Film Mode : Off √ Move Enter Return Picture Mode : Standard Size : 16:9 Digital NR : On DNIe : On My Color Control Film Mode : OOfff On Move Enter Return NOTE • Film mode is...
...† button to select "Off" or "On", then press the ENTER button. English - 69 Setting the Film Mode You can automatically sense and process film signals from all sources and adjust the picture for optimum quality. 1 Press the MENU button. or † button to select "Film Mode", ...Size : 16:9 √ Digital NR : On √ DNIe : On √ My Color Control √ Film Mode : Off √ Move Enter Return Picture Mode : Standard Size : 16:9 Digital NR : On DNIe : On My Color Control Film Mode : OOfff On Move Enter Return NOTE • Film mode is...

Owner Instructions
Page 71
Setting the Blue Screen Mode If no signal is being received or the signal is very weak, a blue screen automatically replaces the noisy picture background. or † button to select "Blue Screen", then press the ENTER button. 3 Press the ... or † button to select "Setup", then press the ENTER ... Caption Menu Transparency : Medium Blue Screen : OOfff † More On Move Enter Return English - 71 Press the ... If you wish to continue viewing the poor picture, you must set the "Blue Screen" mode to "Off". 1 Press the MENU button.
Setting the Blue Screen Mode If no signal is being received or the signal is very weak, a blue screen automatically replaces the noisy picture background. or † button to select "Blue Screen", then press the ENTER button. 3 Press the ... or † button to select "Setup", then press the ENTER ... Caption Menu Transparency : Medium Blue Screen : OOfff † More On Move Enter Return English - 71 Press the ... If you wish to continue viewing the poor picture, you must set the "Blue Screen" mode to "Off". 1 Press the MENU button.

Owner Instructions
Page 86
...or † button to exit. or † button to select "Setup", then press the ENTER button. 2 Press the ... If Game Mode is On • Picture Mode is automatically changed to Custom and users cannot change the mode. • Sound Mode in Game mode, the screen shakes slightly. or † button...game mode to on Game Mode (Caution) • To disconnect the game console and connect another external device, set Game to Off in the setup menu. • If you display the TV menu in the Sound menu is available for all external input sources. • For component and HDMI input, game...
...or † button to exit. or † button to select "Setup", then press the ENTER button. 2 Press the ... If Game Mode is On • Picture Mode is automatically changed to Custom and users cannot change the mode. • Sound Mode in Game mode, the screen shakes slightly. or † button...game mode to on Game Mode (Caution) • To disconnect the game console and connect another external device, set Game to Off in the setup menu. • If you display the TV menu in the Sound menu is available for all external input sources. • For component and HDMI input, game...

Owner Instructions
Page 91
...French √ Downloadable U.S. When the rating control is displayed. The locked movie ratings are coded with objectionable ratings (either "MPAA Rating" or "TV Parental Guidelines"). 1 Press the MENU button. Press the ... English - 91 Setup Language : English √ Time √ Game Mode : Off...all movie ratings. To unlock a locked channel, press the ENTER button again. How to Set up Restrictions Using "MPAA Rating" The Movie rating system uses "MPAA" (Motion Picture Association of America) system, and its main application is for movie rating system. NOTES ...
...French √ Downloadable U.S. When the rating control is displayed. The locked movie ratings are coded with objectionable ratings (either "MPAA Rating" or "TV Parental Guidelines"). 1 Press the MENU button. Press the ... English - 91 Setup Language : English √ Time √ Game Mode : Off...all movie ratings. To unlock a locked channel, press the ENTER button again. How to Set up Restrictions Using "MPAA Rating" The Movie rating system uses "MPAA" (Motion Picture Association of America) system, and its main application is for movie rating system. NOTES ...

Owner Instructions
Page 112
... Enter Return i Image Reset is completed. or † button to select "Setup", then press the ENTER button. 3 Press the ... PC Display Initializing the Picture Settings You can replace all picture settings with the factory default values. English - 112 or † button to select "PC", then press the ENTER button. More Color Weakness √ PC...
... Enter Return i Image Reset is completed. or † button to select "Setup", then press the ENTER button. 3 Press the ... PC Display Initializing the Picture Settings You can replace all picture settings with the factory default values. English - 112 or † button to select "PC", then press the ENTER button. More Color Weakness √ PC...

Owner Instructions
Page 130
...Picture rolls vertically. Digital broadcasting screen problem. Possible Solution Try another channel. If you are using a VCR, check the tracking. If the broadcasting station converts an analog signal into "TV" mode. The TV operates erratically. Your remote control does not operate your nearest Samsung ... when switching channels or when pressing the Information button on . Adjust the picture settings. Press the "TV" button to Set Top Box built-in . Make sure the remote has batteries. Make sure the TV is off . The visual qualities of digital channels vary. English - 130...
...Picture rolls vertically. Digital broadcasting screen problem. Possible Solution Try another channel. If you are using a VCR, check the tracking. If the broadcasting station converts an analog signal into "TV" mode. The TV operates erratically. Your remote control does not operate your nearest Samsung ... when switching channels or when pressing the Information button on . Adjust the picture settings. Press the "TV" button to Set Top Box built-in . Make sure the remote has batteries. Make sure the TV is off . The visual qualities of digital channels vary. English - 130...


