User Manual (ENGLISH)
Page 3
...include 480-line interlaced (480i) and 480-line progressive (480p) video. 480i programs are essentially a digital version of our current analog TV programs, while the 480p format offers improved image detail over 480i. Using DTV, broadcasters can be combined into a single digital broadcast. ...Some 480p programs are broadcast in widescreen and are granted under certain intellectual property rights of these services can transmit high definition TV (HDTV) images, Dolby digital surround audio, and new services such as multicasting (transmitting more than this license for licensed contents...
...include 480-line interlaced (480i) and 480-line progressive (480p) video. 480i programs are essentially a digital version of our current analog TV programs, while the 480p format offers improved image detail over 480i. Using DTV, broadcasters can be combined into a single digital broadcast. ...Some 480p programs are broadcast in widescreen and are granted under certain intellectual property rights of these services can transmit high definition TV (HDTV) images, Dolby digital surround audio, and new services such as multicasting (transmitting more than this license for licensed contents...
User Manual (ENGLISH)
Page 4
...local cable service provider after a proper subscription process. When CableCARD is inserted and tries to be inserted into the slot, the TV screen will be viewable depending on your local cable service provider. The provided CableCARD from your local cable service provider needs to ... is inserted into the CableCARD slot of a new digital cable standard. During this process may take a few minutes depending on the TV screen to work with digital cable card modules (PCMCIA card modules called CableCARDs). NOTE • This television receiver supports the copy protection...
...local cable service provider after a proper subscription process. When CableCARD is inserted and tries to be inserted into the slot, the TV screen will be viewable depending on your local cable service provider. The provided CableCARD from your local cable service provider needs to ... is inserted into the CableCARD slot of a new digital cable standard. During this process may take a few minutes depending on the TV screen to work with digital cable card modules (PCMCIA card modules called CableCARDs). NOTE • This television receiver supports the copy protection...
User Manual (ENGLISH)
Page 5
...for DTV? So you need a different antenna. However, do not require as much signal as those antennas are not located in standby mode. Cable TV systems use indoor antennas to see if you won't have to pay a monthly or per-program charge to receive DTV signals indoors? Q&A 1. ... connect my DTV set both VHF and UHF channels are different than 12' in height. You will have set -top receiver to my cable TV service? However, DTV broadcast channel assignments are used for reception of neighborhood associations to each apartment. 4. The same holds true for your present ...
...for DTV? So you need a different antenna. However, do not require as much signal as those antennas are not located in standby mode. Cable TV systems use indoor antennas to see if you won't have to pay a monthly or per-program charge to receive DTV signals indoors? Q&A 1. ... connect my DTV set both VHF and UHF channels are different than 12' in height. You will have set -top receiver to my cable TV service? However, DTV broadcast channel assignments are used for reception of neighborhood associations to each apartment. 4. The same holds true for your present ...
User Manual (ENGLISH)
Page 6
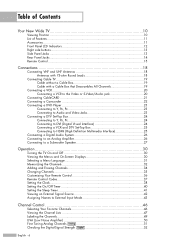
... buttons 13 Side Panel Jacks ...13 Rear Panel Jacks ...14 Remote Control...15 Connections 18 Connecting VHF and UHF Antennas 18 Antennas with 75-ohm Round Leads 18 Connecting Cable TV 19 Cable without a Cable Box 19... System 26 Connecting to an Analog Amplifier 26 Connecting to a Subwoofer Speaker 27 Operation 30 Turning the TV On and Off 30 Viewing the Menus and On-Screen Displays 30 Selecting a Menu Language 31 Memorizing the...47 Labeling the Channels 49 LNA (Low Noise Amplifier 50 Fine Tuning Analog Channels Analog 51 Checking the Digital-Signal Strength Digital 52 English - 6
... buttons 13 Side Panel Jacks ...13 Rear Panel Jacks ...14 Remote Control...15 Connections 18 Connecting VHF and UHF Antennas 18 Antennas with 75-ohm Round Leads 18 Connecting Cable TV 19 Cable without a Cable Box 19... System 26 Connecting to an Analog Amplifier 26 Connecting to a Subwoofer Speaker 27 Operation 30 Turning the TV On and Off 30 Viewing the Menus and On-Screen Displays 30 Selecting a Menu Language 31 Memorizing the...47 Labeling the Channels 49 LNA (Low Noise Amplifier 50 Fine Tuning Analog Channels Analog 51 Checking the Digital-Signal Strength Digital 52 English - 6

User Manual (ENGLISH)
Page 7
... Digital 102 Setting the Port Selection Mode 104 Using the CableCARD 105 Using the CableCARD Setup Function 106 Using Game Mode 108 Using TV Guide On ScreenTM 109 Using the D-Net 112 How to connect compatible IEEE1394 Devices 112 Connection Options 114 4-Pin and 6-Pin Connectors... control panel 118 Operating Tips ...120 Recording Tips...122 Tips on stopping recording 122 Troubleshooting (D-Net 123 PC Display 128 Using Your TV as a Computer (PC) Display 128 Adjusting the Picture Quality 131 Changing the Picture Position 132 Adjusting the Picture Quality and Position Automatically...
... Digital 102 Setting the Port Selection Mode 104 Using the CableCARD 105 Using the CableCARD Setup Function 106 Using Game Mode 108 Using TV Guide On ScreenTM 109 Using the D-Net 112 How to connect compatible IEEE1394 Devices 112 Connection Options 114 4-Pin and 6-Pin Connectors... control panel 118 Operating Tips ...120 Recording Tips...122 Tips on stopping recording 122 Troubleshooting (D-Net 123 PC Display 128 Using Your TV as a Computer (PC) Display 128 Adjusting the Picture Quality 131 Changing the Picture Position 132 Adjusting the Picture Quality and Position Automatically...
User Manual (ENGLISH)
Page 10
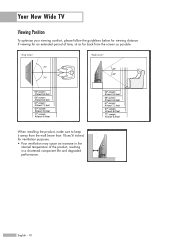
Your New Wide TV Viewing Position To optimize your viewing comfort, please follow the guidelines below for an extended period of the product, resulting in the internal temperature of time, sit as far back from the wall (more than 10cm/4 inches) for ventilation purposes. • Poor ventilation may cause an increase in a shortened component life and degraded performance. When installing the product, make sure to keep it away from the screen as possible. If viewing for viewing distance. English - 10
Your New Wide TV Viewing Position To optimize your viewing comfort, please follow the guidelines below for an extended period of the product, resulting in the internal temperature of time, sit as far back from the wall (more than 10cm/4 inches) for ventilation purposes. • Poor ventilation may cause an increase in a shortened component life and degraded performance. When installing the product, make sure to keep it away from the screen as possible. If viewing for viewing distance. English - 10
User Manual (ENGLISH)
Page 11
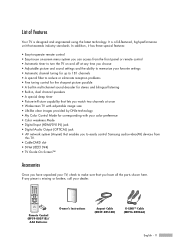
...remote control • Easy-to-use on-screen menu system you can access from this TV. • CableCARD slot • D-Net (IEEE1394) • TV Guide On Screen™ Accessories Once you to easily control Samsung audio-video(AV) devices from the front panel or remote control • Automatic timer ...to turn the TV on and off at any piece is designed and engineered using the latest technology. Remote Control (BP59-00071B)/ AAA Batteries...
...remote control • Easy-to-use on-screen menu system you can access from this TV. • CableCARD slot • D-Net (IEEE1394) • TV Guide On Screen™ Accessories Once you to easily control Samsung audio-video(AV) devices from the front panel or remote control • Automatic timer ...to turn the TV on and off at any piece is designed and engineered using the latest technology. Remote Control (BP59-00071B)/ AAA Batteries...
User Manual (ENGLISH)
Page 12
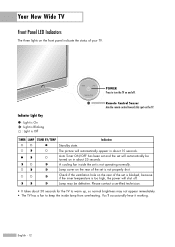
...on and off . Lamp cover on the rear of the set is blocked, because if the inner temperature is not properly shut. A cooling fan inside lamp from overheating. Please contact a certified technician. • It takes about 30 seconds for the TV to keep the inside the set is too... is Off TIMER LAMP STAND BY/TEMP Indication Standby state. The picture will shut off . Check if the ventilation hole on the rear of your TV. Your New Wide TV Front Panel LED Indicators The three lights on in about 15 seconds. You'll occasionally hear it working. English - 12
...on and off . Lamp cover on the rear of the set is blocked, because if the inner temperature is not properly shut. A cooling fan inside lamp from overheating. Please contact a certified technician. • It takes about 30 seconds for the TV to keep the inside the set is too... is Off TIMER LAMP STAND BY/TEMP Indication Standby state. The picture will shut off . Check if the ventilation hole on the rear of your TV. Your New Wide TV Front Panel LED Indicators The three lights on in about 15 seconds. You'll occasionally hear it working. English - 12
User Manual (ENGLISH)
Page 13
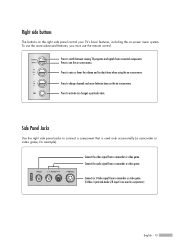
Press to raise or lower the volume and to activate (or change channels and move between viewing TV programs and signals from a camcorder or video game. (S-Video 3 jack and Audio L/R input 3 are used only occasionally (a camcorder or video game, for example). Press... video game. Press to switch between items on the on -screen menu system. Right side buttons The buttons on the right side panel control your TV's basic features, including the on -screen menu. Press to change ) a particular item. Connect an S-Video signal from connected components. Connect the audio signal from ...
Press to raise or lower the volume and to activate (or change channels and move between viewing TV programs and signals from a camcorder or video game. (S-Video 3 jack and Audio L/R input 3 are used only occasionally (a camcorder or video game, for example). Press... video game. Press to switch between items on the on -screen menu system. Right side buttons The buttons on the right side panel control your TV's basic features, including the on -screen menu. Press to change ) a particular item. Connect an S-Video signal from connected components. Connect the audio signal from ...
User Manual (ENGLISH)
Page 14
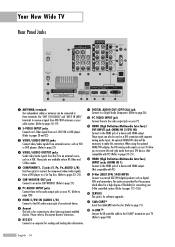
... inputs. When using the optional HDMI/DVI adapter, the DVI analog audio inputs on your TV. (Refer to external IEEE1394 digital products such as digital VCRs and camcorders. Two jacks are... page 21) ¯ G-LINKTM Connect the IR controller cable to the G-LINKTM terminal on your TV allow for a high degree of flexibility for connecting your DVI device. (Not compatible with PC) ... Component. (Refer to page 26) PC VIDEO INPUT jack Connect these terminals. Your New Wide TV Rear Panel Jacks Œ ANTENNA terminals Two independent cables or antennas can also be used as a VCR. Use...
... inputs. When using the optional HDMI/DVI adapter, the DVI analog audio inputs on your TV. (Refer to external IEEE1394 digital products such as digital VCRs and camcorders. Two jacks are... page 21) ¯ G-LINKTM Connect the IR controller cable to the G-LINKTM terminal on your TV allow for a high degree of flexibility for connecting your DVI device. (Not compatible with PC) ... Component. (Refer to page 26) PC VIDEO INPUT jack Connect these terminals. Your New Wide TV Rear Panel Jacks Œ ANTENNA terminals Two independent cables or antennas can also be used as a VCR. Use...
User Manual (ENGLISH)
Page 15
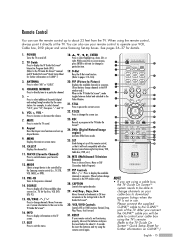
...-Top Box, VCR, DVD, DTV, PC). 15. Press to select additional channels (digital and analog) being broadcast by the Samsung remote control (i.e., TV, STB, VCR, CABLE, or DVD). 13. REC Records a program in the PIP window only.) 28. CAPTION Controls the caption decoder. 29. &#...item. 19. MTS (Multichannel Television Stereo) Press to select "AIR" or "CABLE". 4. NOTE • If you will work compatibly with other devices (some Samsung Set-top boxes. ANTENNA Press to choose Stereo, Mono or SAP (Secondary Audio Program). 27. CH.LIST Displays the channel list. 11. While using the...
...-Top Box, VCR, DVD, DTV, PC). 15. Press to select additional channels (digital and analog) being broadcast by the Samsung remote control (i.e., TV, STB, VCR, CABLE, or DVD). 13. REC Records a program in the PIP window only.) 28. CAPTION Controls the caption decoder. 29. &#...item. 19. MTS (Multichannel Television Stereo) Press to select "AIR" or "CABLE". 4. NOTE • If you will work compatibly with other devices (some Samsung Set-top boxes. ANTENNA Press to choose Stereo, Mono or SAP (Secondary Audio Program). 27. CH.LIST Displays the channel list. 11. While using the...

User Manual (ENGLISH)
Page 16
.... Make sure you won't be replaced. Make sure to match the "+" and "-" ends of the remote control. 2 Install two AAA size batteries. Your New Wide TV Installing Batteries in the Remote Control With normal use, the batteries in the remote control.
.... Make sure you won't be replaced. Make sure to match the "+" and "-" ends of the remote control. 2 Install two AAA size batteries. Your New Wide TV Installing Batteries in the Remote Control With normal use, the batteries in the remote control.
User Manual (ENGLISH)
Page 18
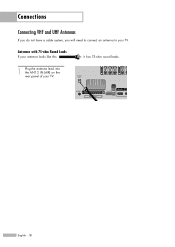
Antennas with 75-ohm Round Leads If your antenna looks like this: it has 75-ohm round leads. 1 Plug the antenna lead into the ANT 2 IN (AIR) on the rear panel of your TV. English - 18 Connections Connecting VHF and UHF Antennas If you do not have a cable system, you will need to connect an antenna to your TV.
Antennas with 75-ohm Round Leads If your antenna looks like this: it has 75-ohm round leads. 1 Plug the antenna lead into the ANT 2 IN (AIR) on the rear panel of your TV. English - 18 Connections Connecting VHF and UHF Antennas If you do not have a cable system, you will need to connect an antenna to your TV.
User Manual (ENGLISH)
Page 19
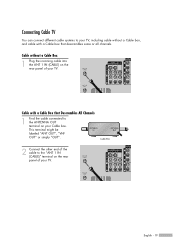
..."ANT OUT", "VHF OUT" or simply "OUT". 2 Connect the other end of the cable to the "ANT 1 IN (CABLE)" terminal on the rear panel of your TV. Cable without a Cable box, and cable with a Cable Box that descrambles some or all channels. English - 19 Cable with a Cable box that Descrambles... All Channels 1 Find the cable connected to the ANTENNA OUT terminal on your Cable box. Connecting Cable TV You can connect different cable systems to your TV, including cable without a Cable Box 1 Plug the incoming cable into the ANT 1 IN (CABLE) on the...
..."ANT OUT", "VHF OUT" or simply "OUT". 2 Connect the other end of the cable to the "ANT 1 IN (CABLE)" terminal on the rear panel of your TV. Cable without a Cable box, and cable with a Cable Box that descrambles some or all channels. English - 19 Cable with a Cable box that Descrambles... All Channels 1 Find the cable connected to the ANTENNA OUT terminal on your Cable box. Connecting Cable TV You can connect different cable systems to your TV, including cable without a Cable Box 1 Plug the incoming cable into the ANT 1 IN (CABLE) on the...
User Manual (ENGLISH)
Page 20
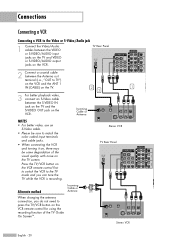
... Connecting a VCR Connecting a VCR to the Video or S-Video/Audio jack 1 Connect the Video/Audio cables between the S-VIDEO IN jack on the TV and the S-VIDEO OUT jack on the VCR. Incoming Cable or Antenna NOTES • For better video, use an S-Video cable. • Please...S-Video cable between the VIDEO or S-VIDEO/AUDIO input jacks on the TV and VIDEO or S-VIDEO/AUDIO output jacks on , there may be some degradation of the TV Guide On ScreenTM. 1 3 Stereo VCR TV Rear Panel Stereo VCR English - 20 TV Rear Panel 2 Connect a coaxial cable between the Antenna out terminal (i.e., "OUT...
... Connecting a VCR Connecting a VCR to the Video or S-Video/Audio jack 1 Connect the Video/Audio cables between the S-VIDEO IN jack on the TV and the S-VIDEO OUT jack on the VCR. Incoming Cable or Antenna NOTES • For better video, use an S-Video cable. • Please...S-Video cable between the VIDEO or S-VIDEO/AUDIO input jacks on the TV and VIDEO or S-VIDEO/AUDIO output jacks on , there may be some degradation of the TV Guide On ScreenTM. 1 3 Stereo VCR TV Rear Panel Stereo VCR English - 20 TV Rear Panel 2 Connect a coaxial cable between the Antenna out terminal (i.e., "OUT...
User Manual (ENGLISH)
Page 21
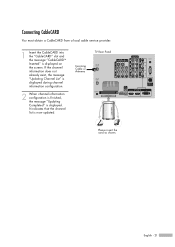
Incoming Cable or Antenna TV Rear Panel Please insert the card as shown. English - 21 Connecting CableCARD You must obtain a CableCARD from a local cable service provider. 1 Insert the CableCARD into the "CableCARD" slot and the message "CableCARDTM Inserted" is displayed. If the channel information does not already exist, the message "Updating Channel List" is displayed during channel information configuration. 2 When channel information configuration is finished, the message "Updating Completed" is displayed on the screen. It indicates that the channel list is now updated.
Incoming Cable or Antenna TV Rear Panel Please insert the card as shown. English - 21 Connecting CableCARD You must obtain a CableCARD from a local cable service provider. 1 Insert the CableCARD into the "CableCARD" slot and the message "CableCARDTM Inserted" is displayed. If the channel information does not already exist, the message "Updating Channel List" is displayed during channel information configuration. 2 When channel information configuration is finished, the message "Updating Completed" is displayed on the screen. It indicates that the channel list is now updated.
User Manual (ENGLISH)
Page 22
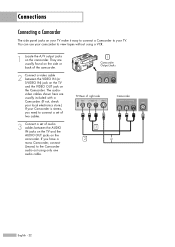
...Connect a set of audio cables between the VIDEO IN (or S-VIDEO IN) jack on the TV and the VIDEO OUT jack on the Camcorder. Connections Connecting a Camcorder The side panel jacks on your TV make it easy to connect a Camcorder to your camcorder to view tapes without using only one ...audio cable. 1 Camcorder Output Jacks TV Rear of the camcorder. 2 Connect a video cable between the AUDIO IN jacks on ...
...Connect a set of audio cables between the VIDEO IN (or S-VIDEO IN) jack on the TV and the VIDEO OUT jack on the Camcorder. Connections Connecting a Camcorder The side panel jacks on your TV make it easy to connect a Camcorder to your camcorder to view tapes without using only one ...audio cable. 1 Camcorder Output Jacks TV Rear of the camcorder. 2 Connect a video cable between the AUDIO IN jacks on ...
User Manual (ENGLISH)
Page 23
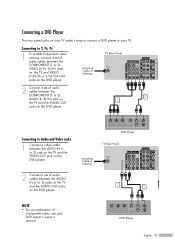
...To enable Component video viewing, connect a set of audio cables between the AUDIO IN (1 or 2) jacks on the TV and the AUDIO OUT jacks on the DVD player. DVD Player TV Rear Panel Incoming Cable or Antenna 1 2 NOTE • For an explanation of video cables between the VIDEO IN (1 or... 2) jack on the TV and the VIDEO OUT jack on the DVD player. 2 Connect a set of Component video, see your TV. TV Rear Panel Incoming Cable or Antenna 2 Connect a set of audio cables between the COMPONENT (1 or 2) AUDIO ...
...To enable Component video viewing, connect a set of audio cables between the AUDIO IN (1 or 2) jacks on the TV and the AUDIO OUT jacks on the DVD player. DVD Player TV Rear Panel Incoming Cable or Antenna 1 2 NOTE • For an explanation of video cables between the VIDEO IN (1 or... 2) jack on the TV and the VIDEO OUT jack on the DVD player. 2 Connect a set of Component video, see your TV. TV Rear Panel Incoming Cable or Antenna 2 Connect a set of audio cables between the COMPONENT (1 or 2) AUDIO ...
User Manual (ENGLISH)
Page 24
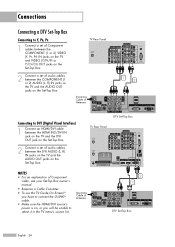
DTV Set-Top Box TV Rear Panel NOTES • For an explanation of Component video, see your Set-Top Box owner's manual. • Requires a Cable Converter. • To use the TV Guide On ScreenTM, you have to connect the G-LINKTM cable. • Make sure the HDMI/DVI source's power is on, or you ...will be unable to select it in the TV menu's source list. TV Rear Panel Incoming Cable or Antenna 1 2 Connecting to DVI (Digital Visual Interface) 1 Connect an HDMI/DVI cable between the HDMI IN2/DVI IN jack...
DTV Set-Top Box TV Rear Panel NOTES • For an explanation of Component video, see your Set-Top Box owner's manual. • Requires a Cable Converter. • To use the TV Guide On ScreenTM, you have to connect the G-LINKTM cable. • Make sure the HDMI/DVI source's power is on, or you ...will be unable to select it in the TV menu's source list. TV Rear Panel Incoming Cable or Antenna 1 2 Connecting to DVI (Digital Visual Interface) 1 Connect an HDMI/DVI cable between the HDMI IN2/DVI IN jack...
User Manual (ENGLISH)
Page 25
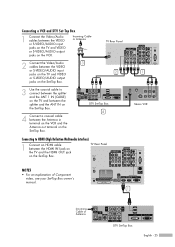
... the splitter and the ANT IN on the Set-Top Box. 4 Connect a coaxial cable between the HDMI IN1jack on the TV and the HDMI OUT jack on the Set-Top Box. TV Rear Panel 1 Stereo VCR NOTES • For an explanation of Component video, see your Set-Top Box owner's manual. 1 Incoming... Cable or Antenna DTV Set-Top Box English - 25 TV Rear Panel 2 3 Use the coaxial cable to HDMI (High Definition Multimedia Interface) 1 Connect an HDMI cable between the Antenna in terminal on the VCR and the...
... the splitter and the ANT IN on the Set-Top Box. 4 Connect a coaxial cable between the HDMI IN1jack on the TV and the HDMI OUT jack on the Set-Top Box. TV Rear Panel 1 Stereo VCR NOTES • For an explanation of Component video, see your Set-Top Box owner's manual. 1 Incoming... Cable or Antenna DTV Set-Top Box English - 25 TV Rear Panel 2 3 Use the coaxial cable to HDMI (High Definition Multimedia Interface) 1 Connect an HDMI cable between the Antenna in terminal on the VCR and the...


