User Manual (ENGLISH)
Page 2
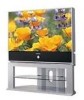
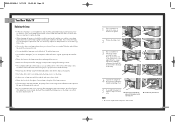
...be careful when using , and maintaining your unit. • Read all warnings on a bed, sofa, rug, or other . Your new Samsung projection TV represents the latest in violation of the manufacturer. We designed it can make sure that you for future reference. • Heed all safety and ...contact with water is equipped with easy-to rain or moisture. 2 Thank You for Choosing Samsung Thank you 've followed the manufacturer's instructions for years to replace your TV. For your TV only from overheating. REFER ALL SERVICING TO QUALIFIED SERVICE PERSONNEL. It is provided to call ...
...be careful when using , and maintaining your unit. • Read all warnings on a bed, sofa, rug, or other . Your new Samsung projection TV represents the latest in violation of the manufacturer. We designed it can make sure that you for future reference. • Heed all safety and ...contact with water is equipped with easy-to rain or moisture. 2 Thank You for Choosing Samsung Thank you 've followed the manufacturer's instructions for years to replace your TV. For your TV only from overheating. REFER ALL SERVICING TO QUALIFIED SERVICE PERSONNEL. It is provided to call ...
User Manual (ENGLISH)
Page 3
... Problems helpful. Overloading can fall into an outlet on the TV. • Ground outdoor antennas. The TV exhibits a distinct degradation in the unit, where they exit from the unit. This device complies with the limits for product compliance: SAMSUNG ELECTRONICS CO., LTD America QA Lab of the following the ...pursuant to Part 15 of the computer convenience outlet is no guarantee that have fallen into the unit - The TV does not operate normally by one or more of Samsung 85 West Tasman Drive San Jose, CA 95134 USA Tel) 408-544-5124 Fax) 408-544-5191 Provided with...
... Problems helpful. Overloading can fall into an outlet on the TV. • Ground outdoor antennas. The TV exhibits a distinct degradation in the unit, where they exit from the unit. This device complies with the limits for product compliance: SAMSUNG ELECTRONICS CO., LTD America QA Lab of the following the ...pursuant to Part 15 of the computer convenience outlet is no guarantee that have fallen into the unit - The TV does not operate normally by one or more of Samsung 85 West Tasman Drive San Jose, CA 95134 USA Tel) 408-544-5124 Fax) 408-544-5191 Provided with...
User Manual (ENGLISH)
Page 4
...27/03 10:09 AM Page 6 Table of Contents Your New Wide TV 10 Replacing the Lamp 10 List of Features ...12 Checking Parts...12 Side Panel Buttons 13 Side Panel Jacks 13 Front Panel LED Indicators 14 Rear Panel Jacks 15 Remote Control ...16 Installing Batteries in the Remote Control ... the Color Tone 53 Setting the Film Mode 53 DNIeTM (Digital Natural Image engine) 54 Digital Noise Reduction 55 Setting the Blue Screen Mode 56 Changing the Screen Size 57 Special Audio Options 59 MTS Settings: Choosing a Soundtrack 59 Dolby Virtual 60 BBE ...61 Auto Volume 62 Viewing ...
...27/03 10:09 AM Page 6 Table of Contents Your New Wide TV 10 Replacing the Lamp 10 List of Features ...12 Checking Parts...12 Side Panel Buttons 13 Side Panel Jacks 13 Front Panel LED Indicators 14 Rear Panel Jacks 15 Remote Control ...16 Installing Batteries in the Remote Control ... the Color Tone 53 Setting the Film Mode 53 DNIeTM (Digital Natural Image engine) 54 Digital Noise Reduction 55 Setting the Blue Screen Mode 56 Changing the Screen Size 57 Special Audio Options 59 MTS Settings: Choosing a Soundtrack 59 Dolby Virtual 60 BBE ...61 Auto Volume 62 Viewing ...
User Manual (ENGLISH)
Page 6
... 10:09 AM Page 10 Your New Wide TV Replacing the Lamp • A Projection TV lamp is a consumable item, and should first verify the type/model, and then use a lamp that the TV will still be damaged if you can safely remove it. HLN467W/HLN567W 11 The code for 30 minutes after turning... off TV power before changing a lamp and then unplug ...
... 10:09 AM Page 10 Your New Wide TV Replacing the Lamp • A Projection TV lamp is a consumable item, and should first verify the type/model, and then use a lamp that the TV will still be damaged if you can safely remove it. HLN467W/HLN567W 11 The code for 30 minutes after turning... off TV power before changing a lamp and then unplug ...
User Manual (ENGLISH)
Page 7
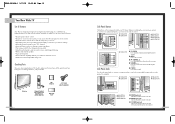
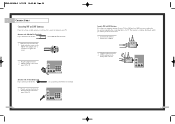
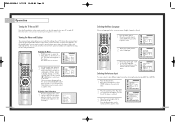
... between items on the on -screen menu system. It is used only occasionally (a camcorder or video game, for example). œ HLN467W œ HLN567W œ HLN437W œ HLN4365W œ HLN507W œ HLN617W œ HLN5065W Œ VIDEO Input jack Connect the video signal from a camcorder or...• Easy-to-use the remote control. œ HLN467W œ HLN567W œ HLN437W œ HLN507W œ HLN4365W œ HLN5065W Side Panel Jacks œ HLN617W Œ TV/VIDEO Press to switch between viewing TV programs and signals from the side panel or remote control • Automatic ...
... between items on the on -screen menu system. It is used only occasionally (a camcorder or video game, for example). œ HLN467W œ HLN567W œ HLN437W œ HLN4365W œ HLN507W œ HLN617W œ HLN5065W Œ VIDEO Input jack Connect the video signal from a camcorder or...• Easy-to-use the remote control. œ HLN467W œ HLN567W œ HLN437W œ HLN507W œ HLN4365W œ HLN5065W Side Panel Jacks œ HLN617W Œ TV/VIDEO Press to switch between viewing TV programs and signals from the side panel or remote control • Automatic ...
User Manual (ENGLISH)
Page 8
... be connected to these to connect the component video/audio signals from a set of component video input jacks on the rear panel of your TV. Lamp may not appear immediately. • The TV has a fan to an external source, such as two VCRs, Set-Top Box and a DVD player etc., because there are... AUDIO INPUT jacks Connect these terminals. " DVI (Digital Video Interface) jack Receives the digital signals from the TV to keep the inside the set Standby state. Check if the ventilation hole on the rear of the set top box or PC etc. ' RS-232C jack ˝ PC VIDEO INPUT jack Connect to...
... be connected to these to connect the component video/audio signals from a set of component video input jacks on the rear panel of your TV. Lamp may not appear immediately. • The TV has a fan to an external source, such as two VCRs, Set-Top Box and a DVD player etc., because there are... AUDIO INPUT jacks Connect these terminals. " DVI (Digital Video Interface) jack Receives the digital signals from the TV to keep the inside the set Standby state. Check if the ventilation hole on the rear of the set top box or PC etc. ' RS-232C jack ˝ PC VIDEO INPUT jack Connect to...
User Manual (ENGLISH)
Page 9
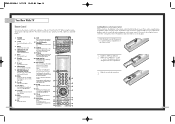
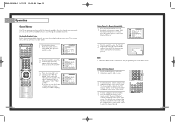
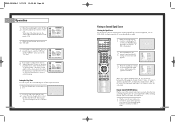
...notice a performance degradation while using the remote, always point it will work compatibly with the signal in the TV's memory. P.Mode Adjust the TV picture by the Samsung remote control (i.e., TV, VCR, Cable, or DVD). 11. Scan; Displays the available channels in sequence. (These buttons change channels...Press again to stop the action during set up and activate the parental locks. 23. Locate; Size; Surround Press to mute the TV sound. 6. Mode Selects a target device to open the battery compartment of the preset factory settings (or select your favorite channels. ...
...notice a performance degradation while using the remote, always point it will work compatibly with the signal in the TV's memory. P.Mode Adjust the TV picture by the Samsung remote control (i.e., TV, VCR, Cable, or DVD). 11. Scan; Displays the available channels in sequence. (These buttons change channels...Press again to stop the action during set up and activate the parental locks. 23. Locate; Size; Surround Press to mute the TV sound. 6. Mode Selects a target device to open the battery compartment of the preset factory settings (or select your favorite channels. ...
User Manual (ENGLISH)
Page 11
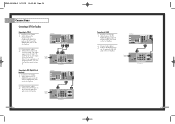
... twin leads. 1 Place the wires from the twin leads under the screws on the back panel of the TV. This requires a combiner attachment, which you will need to connect an antenna to your TV. Antennas with 75-ohm Round Leads If your antenna looks like this : it is an antenna with 75... tighten the screws. 2 Plug the adapter into the ANT-A terminal on the back panel of the TV. Use a screwdriver to the combiner. 2 Plug the combiner into the ANT-A terminal on the back panel of the TV. 21 Antennas with 300-ohm Flat Twin Leads If your antenna looks like this : 1 Plug the...
... twin leads. 1 Place the wires from the twin leads under the screws on the back panel of the TV. This requires a combiner attachment, which you will need to connect an antenna to your TV. Antennas with 75-ohm Round Leads If your antenna looks like this : it is an antenna with 75... tighten the screws. 2 Plug the adapter into the ANT-A terminal on the back panel of the TV. Use a screwdriver to the combiner. 2 Plug the combiner into the ANT-A terminal on the back panel of the TV. 21 Antennas with 300-ohm Flat Twin Leads If your antenna looks like this : 1 Plug the...
User Manual (ENGLISH)
Page 12
...and record basic and premium cable channels, as well as programming your favorite channels and blocking channels. When viewing premium channels or recording with your TV, there may be features that descrambles some or all channels. Caution: If you want to connect cable, and you do not need two ... added between the cable and ANT-A. If you have a S-VHS VCR, use the S-video connections and remove the video cable. You should keep your TV selected to ANT-A so that you can not program using only one channel while watching another channel, a splitter (not included) must be labeled "ANT...
...and record basic and premium cable channels, as well as programming your favorite channels and blocking channels. When viewing premium channels or recording with your TV, there may be features that descrambles some or all channels. Caution: If you want to connect cable, and you do not need two ... added between the cable and ANT-A. If you have a S-VHS VCR, use the S-video connections and remove the video cable. You should keep your TV selected to ANT-A so that you can not program using only one channel while watching another channel, a splitter (not included) must be labeled "ANT...
User Manual (ENGLISH)
Page 13
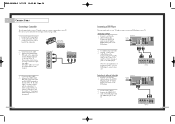
... Y, Pb and Pr (or Y, Cb, Cr) output jacks on your TV make it easy to connect a DVD player to your camera's instructions and the section on "Viewing an External Signal Source" in this manual. 24 Connecting a DVD Player The rear panel jacks on the DVD player. BP68-00142A-2 5/27/03 10:09... AM Page 24 Connections Connecting a Camcorder The side panel jacks on the camcorder. You can use your camcorder to view tapes without using a VCR. 1 Locate the A/V output jacks on your TV make it easy to...
... Y, Pb and Pr (or Y, Cb, Cr) output jacks on your TV make it easy to connect a DVD player to your camera's instructions and the section on "Viewing an External Signal Source" in this manual. 24 Connecting a DVD Player The rear panel jacks on the DVD player. BP68-00142A-2 5/27/03 10:09... AM Page 24 Connections Connecting a Camcorder The side panel jacks on the camcorder. You can use your camcorder to view tapes without using a VCR. 1 Locate the A/V output jacks on your TV make it easy to...
User Manual (ENGLISH)
Page 14
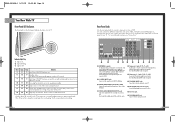
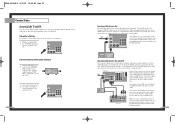
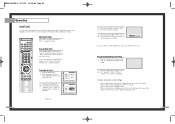
... the AUDIO OUT jacks on the Set Top Box. 2 Connect video cables between the PC IN jack on the TV and the R.G.B OUT jack on the Set Top Box. TV Rear Panel Component1 Component1/2 (480i/480p) (480p/720p/10801i) PC AUDIO Y ANT-A Pb ANT A-OUT MONITOR OUT ... AUDIO Y ANT-A Pb ANT A-OUT MONITOR OUT Pr VIDEO 2 L L ANT-B S-VIDEO 1 S-VIDEO 2 VIDEO 1 R R V L R DVI PC RS-232C DTV Set Top Box TV Rear Panel Component1 Component1/2 (480i/480p) (480p/720p/10801i) PC AUDIO Y ANT-A Pb ANT A-OUT MONITOR OUT Pr VIDEO 2 L L ANT-B S-VIDEO 1 S-VIDEO 2 VIDEO 1 R R...
... the AUDIO OUT jacks on the Set Top Box. 2 Connect video cables between the PC IN jack on the TV and the R.G.B OUT jack on the Set Top Box. TV Rear Panel Component1 Component1/2 (480i/480p) (480p/720p/10801i) PC AUDIO Y ANT-A Pb ANT A-OUT MONITOR OUT ... AUDIO Y ANT-A Pb ANT A-OUT MONITOR OUT Pr VIDEO 2 L L ANT-B S-VIDEO 1 S-VIDEO 2 VIDEO 1 R R V L R DVI PC RS-232C DTV Set Top Box TV Rear Panel Component1 Component1/2 (480i/480p) (480p/720p/10801i) PC AUDIO Y ANT-A Pb ANT A-OUT MONITOR OUT Pr VIDEO 2 L L ANT-B S-VIDEO 1 S-VIDEO 2 VIDEO 1 R R...
User Manual (ENGLISH)
Page 16
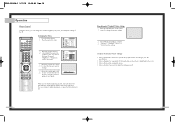
...CH( , )buttons to move between menu items, select menu items, and make some adjustments using the TV's side panel buttons. The channel setup menu will display the channel, current time, and the audio signal...Use the joystick (right) or VOL(+) buttons to display, change, or use the joystick button on your TV. The first line of your remote control to move to items in the menu. Once the on-screen ... 1 Press the Menu button. BP68-00142A-3 5/27/03 10:08 AM Page 30 Operation Turning the TV On and Off Press the Power button on the remote control or on the side panel to turn your...
...CH( , )buttons to move between menu items, select menu items, and make some adjustments using the TV's side panel buttons. The channel setup menu will display the channel, current time, and the audio signal...Use the joystick (right) or VOL(+) buttons to display, change, or use the joystick button on your TV. The first line of your remote control to move to items in the menu. Once the on-screen ... 1 Press the Menu button. BP68-00142A-3 5/27/03 10:08 AM Page 30 Operation Turning the TV On and Off Press the Power button on the remote control or on the side panel to turn your...
User Manual (ENGLISH)
Page 17
... it and then press the Add/Erase button on screen, move the joystick down to select "Auto Channel Memory." 2 Press the joystick to enter. The TV will appear. Adding and Erasing Channels 1 Use the number buttons to select the channel you must select what broadcast source your cable company.) 32 Storing... down to select "Air or CATV". 3 If you are not sure which type of cable system: "STD," "HRC," or "IRC." (If you have, contact your TV is selected, the auto programming runs on the previous page. Press the VOL+ button at any time to , either an antenna or a cable system. 1 Press...
... it and then press the Add/Erase button on screen, move the joystick down to select "Auto Channel Memory." 2 Press the joystick to enter. The TV will appear. Adding and Erasing Channels 1 Use the number buttons to select the channel you must select what broadcast source your cable company.) 32 Storing... down to select "Air or CATV". 3 If you are not sure which type of cable system: "STD," "HRC," or "IRC." (If you have, contact your TV is selected, the auto programming runs on the previous page. Press the VOL+ button at any time to , either an antenna or a cable system. 1 Press...

User Manual (ENGLISH)
Page 18
... +100 button first. To stop channel scan, press the Scan button again. Then, when you press the Fav.CH button on the remote control, the TV displays only the favorite channels you previously stored, allowing you press. Note: Only memorized channels can be displayed in memory at least three channels.) You...the remote control. Move the joystick down to select Air or CATV, then move the joystick to the right to display the type of your TV by using the number buttons. BP68-00142A-3 5/27/03 10:08 AM Page 34 Operation Changing Channels You can change channels on your favorite channels...
... +100 button first. To stop channel scan, press the Scan button again. Then, when you press the Fav.CH button on the remote control, the TV displays only the favorite channels you previously stored, allowing you press. Note: Only memorized channels can be displayed in memory at least three channels.) You...the remote control. Move the joystick down to select Air or CATV, then move the joystick to the right to display the type of your TV by using the number buttons. BP68-00142A-3 5/27/03 10:08 AM Page 34 Operation Changing Channels You can change channels on your favorite channels...

User Manual (ENGLISH)
Page 19
... joystick to the right to begin labeling. (Each label has four fields. Setting The On/Off Melody You can hear clear melody sound when the TV is a letter, a number, or a blank. Move Select Menu 36 4 Press the Menu button to exit. 37 Move the joystick down ), as above. When the DISPLAY...
... joystick to the right to begin labeling. (Each label has four fields. Setting The On/Off Melody You can hear clear melody sound when the TV is a letter, a number, or a blank. Move Select Menu 36 4 Press the Menu button to exit. 37 Move the joystick down ), as above. When the DISPLAY...
User Manual (ENGLISH)
Page 20
...press the Menu button to exit. 38 Using Automatic ("Standard") Picture Settings 1 Press the P.Mode button on -screen gauge as your TV's specifications. • Choose Dynamic for viewing the TV during the day or when there is bright light in the room. • Choose Movie when viewing the movie. • Choose ..."Sharpness", "Color" and "Tint". 3 Move the joystick up or down to select Adjust, then press the joystick to raise or lower the value of the TV. You can change . 4 Move the joystick right or left to enter. You will return. Customizing the Picture 1 Press the Menu button.
...press the Menu button to exit. 38 Using Automatic ("Standard") Picture Settings 1 Press the P.Mode button on -screen gauge as your TV's specifications. • Choose Dynamic for viewing the TV during the day or when there is bright light in the room. • Choose Movie when viewing the movie. • Choose ..."Sharpness", "Color" and "Tint". 3 Move the joystick up or down to select Adjust, then press the joystick to raise or lower the value of the TV. You can change . 4 Move the joystick right or left to enter. You will return. Customizing the Picture 1 Press the Menu button.
User Manual (ENGLISH)
Page 21
... volume. BP68-00142A-3 5/27/03 10:08 AM Page 40 Operation Sound Control You can control and customize the sound levels and settings of the TV with the VOL - to exit. You will appear in the lower left to select the "Standard", "Music", "Movie", "Speech" or "Custom" sound setting. ... the joystick down to select SOUND, then press the joystick to enter. 2 Move the joystick down to select the item you want to change the TV's bass, treble, and balance settings. Guide to Automatic Sound Settings • Choose Standard for the "factory" settings (the best choice for most people). •...
... volume. BP68-00142A-3 5/27/03 10:08 AM Page 40 Operation Sound Control You can control and customize the sound levels and settings of the TV with the VOL - to exit. You will appear in the lower left to select the "Standard", "Music", "Movie", "Speech" or "Custom" sound setting. ... the joystick down to select SOUND, then press the joystick to enter. 2 Move the joystick down to select the item you want to change the TV's bass, treble, and balance settings. Guide to Automatic Sound Settings • Choose Standard for the "factory" settings (the best choice for most people). •...

User Manual (ENGLISH)
Page 22
... select the correct minute. BP68-00142A-3 5/27/03 10:08 AM Page 42 Operation Setting the Clock This TV has a built-in clock that will appear on screen when you press the Display button on or off ....the joystick to enter. 3 Move the joystick down to exit the menus. 42 Setting the Timers This TV can be sure to select the proper time of day (am or pm). 4 Move the joystick right... to select the minute. When selecting the hours, be set the TV's clock, as described previously. Move the joystick up or down to select Time, then press the joystick to...
... select the correct minute. BP68-00142A-3 5/27/03 10:08 AM Page 42 Operation Setting the Clock This TV has a built-in clock that will appear on screen when you press the Display button on or off ....the joystick to enter. 3 Move the joystick down to exit the menus. 42 Setting the Timers This TV can be sure to select the proper time of day (am or pm). 4 Move the joystick right... to select the minute. When selecting the hours, be set the TV's clock, as described previously. Move the joystick up or down to select Time, then press the joystick to...
User Manual (ENGLISH)
Page 23
... remote control is illuminated. 2 Press TV/VIDEO on the remote control, and the following sets of jacks: Video 1, Video 2, S-video 1, S-video 2, Component 1, Component 2, Component 3, DVI or PC on the TV's rear panel, and Video 3 or S-Video 3 on the TV's side panel. Press the appropriate buttons... to control your TV to automatically turn off , then move the joystick up to access buttons that can control the...
... remote control is illuminated. 2 Press TV/VIDEO on the remote control, and the following sets of jacks: Video 1, Video 2, S-video 1, S-video 2, Component 1, Component 2, Component 3, DVI or PC on the TV's rear panel, and Video 3 or S-Video 3 on the TV's side panel. Press the appropriate buttons... to control your TV to automatically turn off , then move the joystick up to access buttons that can control the...
User Manual (ENGLISH)
Page 25
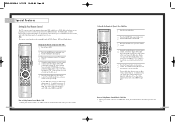
... If no other codes are listed, try one code is illuminated. 3 Press the Set button on your TV's remote control. 4 Using the number buttons on your remote control, enter three digits of the VCR code... VCR • When your remote control is in "VCR" mode, the volume buttons still control your TV's volume. 48 Setting Up the Remote to switch between these modes, and control whichever piece of equipment ... of the code, even if the first digit is illuminated. 3 Press the SET button on your TV's remote control. 4 Using the number buttons on your remote control, enter three digits of the cable...
... If no other codes are listed, try one code is illuminated. 3 Press the Set button on your TV's remote control. 4 Using the number buttons on your remote control, enter three digits of the VCR code... VCR • When your remote control is in "VCR" mode, the volume buttons still control your TV's volume. 48 Setting Up the Remote to switch between these modes, and control whichever piece of equipment ... of the code, even if the first digit is illuminated. 3 Press the SET button on your TV's remote control. 4 Using the number buttons on your remote control, enter three digits of the cable...


