
Open Source Guide (ENGLISH)
Page 2
You can redistribute and change. and each source file to most effectively convey the exclusion of warranty; To apply these terms (or, alternatively, under these terms, attach the following notices to where the full notice is safest to attach them to the start of the ordinary General Public License). IN NO EVENT UNLESS REQUIRED BY APPLICABLE LAW OR AGREED TO IN WRITING WILL ANY COPYRIGHT HOLDER, OR ANY OTHER PARTY WHO MAY MODIFY AND/OR REDISTRIBUTE THE LIBRARY AS PERMITTED ABOVE, BE LIABLE TO YOU FOR DAMAGES, INCLUDING ANY GENERAL, SPECIAL, INCIDENTAL OR CONSEQUENTIAL DAMAGES ARISING ...
You can redistribute and change. and each source file to most effectively convey the exclusion of warranty; To apply these terms (or, alternatively, under these terms, attach the following notices to where the full notice is safest to attach them to the start of the ordinary General Public License). IN NO EVENT UNLESS REQUIRED BY APPLICABLE LAW OR AGREED TO IN WRITING WILL ANY COPYRIGHT HOLDER, OR ANY OTHER PARTY WHO MAY MODIFY AND/OR REDISTRIBUTE THE LIBRARY AS PERMITTED ABOVE, BE LIABLE TO YOU FOR DAMAGES, INCLUDING ANY GENERAL, SPECIAL, INCIDENTAL OR CONSEQUENTIAL DAMAGES ARISING ...
User Manual (ENGLISH)
Page 4
Table of Contents Your New Wide TV 10 Replacing the Lamp 10 List of Features ...12 Checking Parts...12 Side Panel Buttons 13 Side Panel Jacks 13 Front Panel LED Indicators 14 Rear Panel Jacks 15 Remote Control ...16 Installing Batteries in the Remote Control 17 Connections ...20 Connecting ......38 Sound Control ...40 Setting the Clock 42 Setting the Timers 43 Viewing an External Signal Source 46 6 Special Features 50 Setting Up Your Remote Control 50 Remote Control Codes 53 Fine Tuning Channels 54 LNA (Low Noise Amplifier 55 Selecting the Color Tone 56 Setting the Film ...
Table of Contents Your New Wide TV 10 Replacing the Lamp 10 List of Features ...12 Checking Parts...12 Side Panel Buttons 13 Side Panel Jacks 13 Front Panel LED Indicators 14 Rear Panel Jacks 15 Remote Control ...16 Installing Batteries in the Remote Control 17 Connections ...20 Connecting ......38 Sound Control ...40 Setting the Clock 42 Setting the Timers 43 Viewing an External Signal Source 46 6 Special Features 50 Setting Up Your Remote Control 50 Remote Control Codes 53 Fine Tuning Channels 54 LNA (Low Noise Amplifier 55 Selecting the Color Tone 56 Setting the Film ...

User Manual (ENGLISH)
Page 20
...√ Digital NR : On √ Size √ PIP √ Move Enter Return Input Picture Sound Custom Picture Contrast 100 Brightness 50 Sharpness 50 Color 50 Tint 50 Channel Setup Move Enter Return 4 Press the œ or √ button to select "Custom Picture", then press the ENTER button. .... 2 Press P.MODE repeatedly to exit. Press the ... Dynamic Guide to Automatic Picture Settings • Choose Standard to set the TV to operate at top performance according to your guide. The level indicator will disappear and the Video menu will see the items "Contrast...
...√ Digital NR : On √ Size √ PIP √ Move Enter Return Input Picture Sound Custom Picture Contrast 100 Brightness 50 Sharpness 50 Color 50 Tint 50 Channel Setup Move Enter Return 4 Press the œ or √ button to select "Custom Picture", then press the ENTER button. .... 2 Press P.MODE repeatedly to exit. Press the ... Dynamic Guide to Automatic Picture Settings • Choose Standard to set the TV to operate at top performance according to your guide. The level indicator will disappear and the Video menu will see the items "Contrast...
User Manual (ENGLISH)
Page 21
... 4 Press the œ or √ button to exit. Operation Sound Control You can control and customize the sound levels and settings of the TV with the VOL - to adjust the settings yourself. 41 Press the ... or † button to select the item you can continue to make ...to raise or lower the value of the item, using the on the remote control to change the TV's bass, treble, and balance settings. Custom Sound Input Bass 50 Treble 50 Picture Balance L/R 50 Sound Channel Setup Move Enter Return You can change the automatic sound setting. 2 Press the S.MODE ...
... 4 Press the œ or √ button to exit. Operation Sound Control You can control and customize the sound levels and settings of the TV with the VOL - to adjust the settings yourself. 41 Press the ... or † button to select the item you can continue to make ...to raise or lower the value of the item, using the on the remote control to change the TV's bass, treble, and balance settings. Custom Sound Input Bass 50 Treble 50 Picture Balance L/R 50 Sound Channel Setup Move Enter Return You can change the automatic sound setting. 2 Press the S.MODE ...
User Manual (ENGLISH)
Page 26
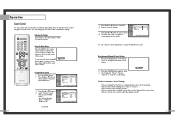
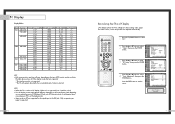
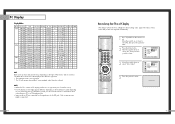
...CABLE" and "DVD". 3 On your Samsung remote control, press the SET button. 4 Enter 3 digits of the VCR code listed on Using Remote Control Modes: VCR • When your remote control is in "VCR" mode, the volume buttons still control your TV's volume. 50 Setting Up the Remote to operate your ...; When your brand of the cable box code listed below for your remote control is a "0". The remote control has five "modes": "TV", "STB", "VCR", "CABLE" and "DVD". 3 On your Samsung remote control, press the SET button. 4 Enter 3 digits of VCR. Special Features Setting Up Your Remote Control This...
...CABLE" and "DVD". 3 On your Samsung remote control, press the SET button. 4 Enter 3 digits of the VCR code listed on Using Remote Control Modes: VCR • When your remote control is in "VCR" mode, the volume buttons still control your TV's volume. 50 Setting Up the Remote to operate your ...; When your brand of the cable box code listed below for your remote control is a "0". The remote control has five "modes": "TV", "STB", "VCR", "CABLE" and "DVD". 3 On your Samsung remote control, press the SET button. 4 Enter 3 digits of VCR. Special Features Setting Up Your Remote Control This...
User Manual (ENGLISH)
Page 43
...", then press the ENTER button. Press the EXIT button to the incoming video signal. NOTES • When this TV is used as a PC display "Auto Adjust" allows the TV to self-adjust to exit the menu. The values of PC monitor and its resolution. PC Display Display Modes Mode... 75.00 60 60 60 Pixel Clock [MHz] Sync Polarity (H/V) 25.175 +/- 28.322 -/- 35.5 -/+ 25.175 -/+ 30.24 -/- 31.50 -/- 31.50 -/- 36.00 -/- 36.00 -+/- 40.00 +/+- 50.00 +/+ 49.50 +/+ 56.25 +/+ 57.284 -/+ 65.00 -/- 75.00 -/- 78.75 +/- 74.25 X 74.25 X 27 X NOTE • Both...
...", then press the ENTER button. Press the EXIT button to the incoming video signal. NOTES • When this TV is used as a PC display "Auto Adjust" allows the TV to self-adjust to exit the menu. The values of PC monitor and its resolution. PC Display Display Modes Mode... 75.00 60 60 60 Pixel Clock [MHz] Sync Polarity (H/V) 25.175 +/- 28.322 -/- 35.5 -/+ 25.175 -/+ 30.24 -/- 31.50 -/- 31.50 -/- 36.00 -/- 36.00 -+/- 40.00 +/+- 50.00 +/+ 49.50 +/+ 56.25 +/+ 57.284 -/+ 65.00 -/- 75.00 -/- 78.75 +/- 74.25 X 74.25 X 27 X NOTE • Both...

User Manual (ENGLISH)
Page 26
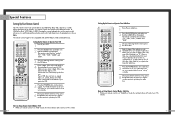
... control. If there is a "0." If your DVD does not turn on if your remote is in "DVD" mode, the volume buttons still control your TV's volume. DVD Codes 50 51 Your DVD should turn on after set up , repeat steps 2, 3, and 4, but try each code, 000 through 008. If no other codes... Your DVD 1 Turn off your DVD. 2 Press the MODE button and make sure that the DVD LED is illuminated. 3 Press the SET button on your TV's remote control. 4 Using the number buttons on your remote control, enter three digits of the DVD code listed on page 51 of this manual for...
... control. If there is a "0." If your DVD does not turn on if your remote is in "DVD" mode, the volume buttons still control your TV's volume. DVD Codes 50 51 Your DVD should turn on after set up , repeat steps 2, 3, and 4, but try each code, 000 through 008. If no other codes... Your DVD 1 Turn off your DVD. 2 Press the MODE button and make sure that the DVD LED is illuminated. 3 Press the SET button on your TV's remote control. 4 Using the number buttons on your remote control, enter three digits of the DVD code listed on page 51 of this manual for...
User Manual (ENGLISH)
Page 41
....16 kHz N/P 56.30 Hz N 36 MHz 0 0 x 800x600 1056x628 37.88 kHz P 60.30 Hz N/P 40 MHz 0 0 x 800x600 1040x666 48.08 kHz P 72.20 Hz P 50 MHz 0 0 x 800x600 1056x625 46.87 kHz P 75.00 Hz P 49.5 MHz 0 0 x 800x600 1048x6321 53.67 kHz P 85.10 Hz P 56.25 MHz 0 0 x 832x624 1152x667 ... your PC instruction book for information about connecting your particular version of the display modes that are supported: * The interlace mode is not supported. * The TV will operate abnormally if a non-standard video format is used as PC are supported for the signal input to enter. 81 NOTES • When this...
....16 kHz N/P 56.30 Hz N 36 MHz 0 0 x 800x600 1056x628 37.88 kHz P 60.30 Hz N/P 40 MHz 0 0 x 800x600 1040x666 48.08 kHz P 72.20 Hz P 50 MHz 0 0 x 800x600 1056x625 46.87 kHz P 75.00 Hz P 49.5 MHz 0 0 x 800x600 1048x6321 53.67 kHz P 85.10 Hz P 56.25 MHz 0 0 x 832x624 1152x667 ... your PC instruction book for information about connecting your particular version of the display modes that are supported: * The interlace mode is not supported. * The TV will operate abnormally if a non-standard video format is used as PC are supported for the signal input to enter. 81 NOTES • When this...


