
User Manual (ENGLISH)
Page 4
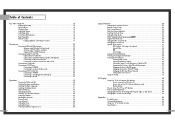
Table of Contents Your New Wide TV 10 Replacing the Lamp 10 List of Features ...12 Checking Parts...12 Side Panel Buttons 13 Side Panel Jacks 13 Front Panel LED Indicators 14 Rear Panel Jacks 15 Remote Control ...16 Installing Batteries in the Remote Control 17 Connections ...20 ...Setting the Clock 42 Setting the Timers 43 Viewing an External Signal Source 46 6 Special Features 50 Setting Up Your Remote Control 50 Remote Control Codes 53 Fine Tuning Channels 54 LNA (Low Noise Amplifier 55 Selecting the Color Tone 56 Setting the Film Mode 56 DNIeTM (Digital Natural Image ...
Table of Contents Your New Wide TV 10 Replacing the Lamp 10 List of Features ...12 Checking Parts...12 Side Panel Buttons 13 Side Panel Jacks 13 Front Panel LED Indicators 14 Rear Panel Jacks 15 Remote Control ...16 Installing Batteries in the Remote Control 17 Connections ...20 ...Setting the Clock 42 Setting the Timers 43 Viewing an External Signal Source 46 6 Special Features 50 Setting Up Your Remote Control 50 Remote Control Codes 53 Fine Tuning Channels 54 LNA (Low Noise Amplifier 55 Selecting the Color Tone 56 Setting the Film Mode 56 DNIeTM (Digital Natural Image ...

User Manual (ENGLISH)
Page 28
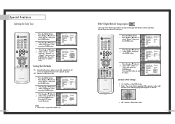
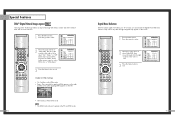
...; This function works in ANT-A mode only (not available in a weak-signal area, sometimes the LNA function can improve the reception (a low-noise preamplifier boosts the incoming signal). 1 Press the MENU button. Input Picture Sound Channel Setup Channel Antenna : A Air/CATV : Air Auto Program Favorite... Press the œ or √ button to select "Channel", then press the ENTER button. Move 0 Return Enter 54 LNA (Low Noise Amplifier) If the TV is Fine Tuned To store the fine tuning setting in a channel. 1 Using the number buttons on the remote control, select the channel...
...; This function works in ANT-A mode only (not available in a weak-signal area, sometimes the LNA function can improve the reception (a low-noise preamplifier boosts the incoming signal). 1 Press the MENU button. Input Picture Sound Channel Setup Channel Antenna : A Air/CATV : Air Auto Program Favorite... Press the œ or √ button to select "Channel", then press the ENTER button. Move 0 Return Enter 54 LNA (Low Noise Amplifier) If the TV is Fine Tuned To store the fine tuning setting in a channel. 1 Using the number buttons on the remote control, select the channel...
User Manual (ENGLISH)
Page 29
... NR Size PIP : Dynamic : Normal : OfOf ff : OnOn : On Move Enter Return 56 DNIeTM (Digital Natural Image engine) Samsung's New Technology enables an improved image with detail, contrast and white enhancement and 3D noise reduction. 1 Press the MENU button. or † button to exit the menu. Press the EXIT button to select...
... NR Size PIP : Dynamic : Normal : OfOf ff : OnOn : On Move Enter Return 56 DNIeTM (Digital Natural Image engine) Samsung's New Technology enables an improved image with detail, contrast and white enhancement and 3D noise reduction. 1 Press the MENU button. or † button to exit the menu. Press the EXIT button to select...
User Manual (ENGLISH)
Page 30
... select "On" or "Off", then press the ENTER button. If you wish to continue viewing the poor picture, you can activate the Digital Noise Reduction feature to "Off". 1 Press the MENU button. or † button to exit the menu. or † button to select "On...NR : On √ Size √ PIP √ Move Enter Return 3 Press the ... Press the ... Special Features Digital Noise Reduction If the broadcast signal received by your TV is very weak, a blue screen automatically replaces the noisy picture background. or † button to exit the menu. Input Picture ...
... select "On" or "Off", then press the ENTER button. If you wish to continue viewing the poor picture, you can activate the Digital Noise Reduction feature to "Off". 1 Press the MENU button. or † button to exit the menu. or † button to select "On...NR : On √ Size √ PIP √ Move Enter Return 3 Press the ... Press the ... Special Features Digital Noise Reduction If the broadcast signal received by your TV is very weak, a blue screen automatically replaces the noisy picture background. or † button to exit the menu. Input Picture ...
User Manual (ENGLISH)
Page 44
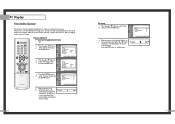
PC Display Picture Quality Adjustment The purpose of screen. Frequency Adjustment 1 Press the TV/VIDEO button to select "Setup", then press the ENTER button. or † button to select "PC". 2 Press the ... Input Picture Sound Channel Setup... not set properly, then vertical stripes will appear on the screen by fine tuning alone, then do the frequency adjustments to remove or reduce picture noise. Input Picture Sound Channel Setup Setup Time √ V-Chip √ Closed Caption √ Language : English √ Melody : On √ Blue Screen : Off √...
PC Display Picture Quality Adjustment The purpose of screen. Frequency Adjustment 1 Press the TV/VIDEO button to select "Setup", then press the ENTER button. or † button to select "PC". 2 Press the ... Input Picture Sound Channel Setup... not set properly, then vertical stripes will appear on the screen by fine tuning alone, then do the frequency adjustments to remove or reduce picture noise. Input Picture Sound Channel Setup Setup Time √ V-Chip √ Closed Caption √ Language : English √ Melody : On √ Blue Screen : Off √...
User Manual (ENGLISH)
Page 4
Table of Contents Your New Wide TV 10 Replacing the Lamp 10 List of Features ...12 Checking Parts...12 Side Panel Buttons 13 Side Panel Jacks 13 Front Panel LED Indicators 14 Rear Panel Jacks 15 Remote Control ...16 Installing Batteries in the Remote Control 17 Connections ...20 ...Codes 51 Fine Tuning Channels 52 Selecting the Color Tone 53 Setting the Film Mode 53 DNIeTM (Digital Natural Image engine) 54 Digital Noise Reduction 55 Setting the Blue Screen Mode 56 Changing the Screen Size 57 Special Audio Options 59 MTS Settings: Choosing a Soundtrack 59 Dolby...
Table of Contents Your New Wide TV 10 Replacing the Lamp 10 List of Features ...12 Checking Parts...12 Side Panel Buttons 13 Side Panel Jacks 13 Front Panel LED Indicators 14 Rear Panel Jacks 15 Remote Control ...16 Installing Batteries in the Remote Control 17 Connections ...20 ...Codes 51 Fine Tuning Channels 52 Selecting the Color Tone 53 Setting the Film Mode 53 DNIeTM (Digital Natural Image engine) 54 Digital Noise Reduction 55 Setting the Blue Screen Mode 56 Changing the Screen Size 57 Special Audio Options 59 MTS Settings: Choosing a Soundtrack 59 Dolby...
User Manual (ENGLISH)
Page 28
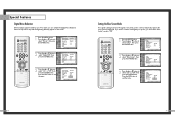
..." or "Off". NOTE • The DNIe function doesn't operate in the PC and DVI modes. 54 Digital Noise Reduction If the broadcast signal received by your TV is weak, you can activate the Digital Noise Reduction feature to exit. Press the joystick to enter. 2 Move the joystick down to select Digital NR, then... that may appear on the left to select "On" or "Off". 3 Press the Menu button to exit. 55 Special Features DNIeTM (Digital Natural Image engine) Samsung's New Technology enables an improved image with detail, contrast and white enhancement and 3D...
..." or "Off". NOTE • The DNIe function doesn't operate in the PC and DVI modes. 54 Digital Noise Reduction If the broadcast signal received by your TV is weak, you can activate the Digital Noise Reduction feature to exit. Press the joystick to enter. 2 Move the joystick down to select Digital NR, then... that may appear on the left to select "On" or "Off". 3 Press the Menu button to exit. 55 Special Features DNIeTM (Digital Natural Image engine) Samsung's New Technology enables an improved image with detail, contrast and white enhancement and 3D...

User Manual (ENGLISH)
Page 42
...joystick down to select PC, then press the joystick to enter. 2 Press the Menu button. Move the joystick up and down) After connecting the TV to select "Fine". Remove picture noise (vertical stripes) on the center of screen. NOTE • If a PC signal is to remove or reduce picture... to DVI, you can't adjust the quality and position of picture. Press the Menu to initialize the screen position and picture quality. Remove picture noise (vertical stripes) on the screen by moving the joystick right or left. (If phase is not set properly, then vertical stripes will become black...
...joystick down to select PC, then press the joystick to enter. 2 Press the Menu button. Move the joystick up and down) After connecting the TV to select "Fine". Remove picture noise (vertical stripes) on the center of screen. NOTE • If a PC signal is to remove or reduce picture... to DVI, you can't adjust the quality and position of picture. Press the Menu to initialize the screen position and picture quality. Remove picture noise (vertical stripes) on the screen by moving the joystick right or left. (If phase is not set properly, then vertical stripes will become black...

