User Manual (ENGLISH)
Page 4
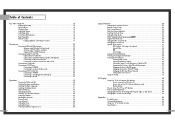
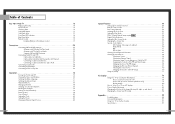
... Your New Wide TV 10 Replacing the Lamp 10 List of Features ...12 Checking Parts...12 Side Panel Buttons 13 Side Panel Jacks 13 Front Panel LED Indicators 14 Rear Panel Jacks 15 Remote... Channels 37 Picture Control ...38 Sound Control ...40 Setting the Clock 42 Setting the Timers 43 Viewing an External Signal Source 46 6 Special Features 50 Setting Up Your Remote Control 50 ...Remote Control Codes 53 Fine Tuning Channels 54 LNA (Low Noise Amplifier 55 Selecting the Color Tone 56 Setting the Film Mode 56 DNIeTM (Digital Natural Image engine) 57 Digital Noise ...
... Your New Wide TV 10 Replacing the Lamp 10 List of Features ...12 Checking Parts...12 Side Panel Buttons 13 Side Panel Jacks 13 Front Panel LED Indicators 14 Rear Panel Jacks 15 Remote... Channels 37 Picture Control ...38 Sound Control ...40 Setting the Clock 42 Setting the Timers 43 Viewing an External Signal Source 46 6 Special Features 50 Setting Up Your Remote Control 50 ...Remote Control Codes 53 Fine Tuning Channels 54 LNA (Low Noise Amplifier 55 Selecting the Color Tone 56 Setting the Film Mode 56 DNIeTM (Digital Natural Image engine) 57 Digital Noise ...
User Manual (ENGLISH)
Page 16
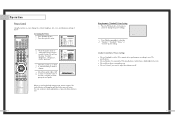
... the menu. or † button to select to exit the menu. Input Picture Sound Channel Setup Picture Picture Mode : Dynamic √ Custom Picture √ Color Tone : Normal √ Film Mode : Off √ DNIe : On √ Digital NR : On √ Size √ PIP √ Move...Enter Exit Channel Input Antenna :A A √ Air/CATV : AirB √ Picture Auto Program √ 3 Press the ... Operation Turning the TV On and Off Press the POWER button on the remote control or on the side panel to select "A" or "B", then press ENTER button. Displaying the...
... the menu. or † button to select to exit the menu. Input Picture Sound Channel Setup Picture Picture Mode : Dynamic √ Custom Picture √ Color Tone : Normal √ Film Mode : Off √ DNIe : On √ Digital NR : On √ Size √ PIP √ Move...Enter Exit Channel Input Antenna :A A √ Air/CATV : AirB √ Picture Auto Program √ 3 Press the ... Operation Turning the TV On and Off Press the POWER button on the remote control or on the side panel to select "A" or "B", then press ENTER button. Displaying the...

User Manual (ENGLISH)
Page 20
... Video menu will see the items "Contrast", "Brightness", "Sharpness", "Color" or "Tint". 3 Press the ... Dynamic Guide to Automatic Picture Settings • Choose Standard to set the TV to operate at top performance according to your TV's specifications. • Choose Dynamic for viewing the TV during the day or when there is bright light in...
... Video menu will see the items "Contrast", "Brightness", "Sharpness", "Color" or "Tint". 3 Press the ... Dynamic Guide to Automatic Picture Settings • Choose Standard to set the TV to operate at top performance according to your TV's specifications. • Choose Dynamic for viewing the TV during the day or when there is bright light in...
User Manual (ENGLISH)
Page 29
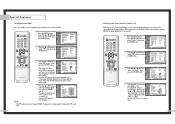
...press the ENTER button. Picture Picture Mode Custom Picture Color Tone Film Mode DNIe Digital NR Size PIP : Dynamic : Normal : OfOf ff : OnOn : On Move Enter Return 56 DNIeTM (Digital Natural Image engine) Samsung's New Technology enables an improved image with detail, ...contrast and white enhancement and 3D noise reduction. 1 Press the MENU button. Input Picture Sound Channel Setup Picture Picture Mode : Dynamic √ Custom Picture √ Color Tone : Normal √ ...
...press the ENTER button. Picture Picture Mode Custom Picture Color Tone Film Mode DNIe Digital NR Size PIP : Dynamic : Normal : OfOf ff : OnOn : On Move Enter Return 56 DNIeTM (Digital Natural Image engine) Samsung's New Technology enables an improved image with detail, ...contrast and white enhancement and 3D noise reduction. 1 Press the MENU button. Input Picture Sound Channel Setup Picture Picture Mode : Dynamic √ Custom Picture √ Color Tone : Normal √ ...
User Manual (ENGLISH)
Page 30
... "Off". 1 Press the MENU button. or † button to exit the menu. Input Picture Sound Channel Setup Picture Picture Mode : Dynamic √ Custom Picture √ Color Tone : Normal √ Film Mode : Off √ DNIe : On √ Digital NR : On √ Size √ PIP √ Move Enter Return 2 Press the ... Screen : Off √ PC Setup √ Move Enter Return 3 Press the ... Special Features Digital Noise Reduction If the broadcast signal received by your TV is very weak, a blue screen automatically replaces the noisy picture background.
... "Off". 1 Press the MENU button. or † button to exit the menu. Input Picture Sound Channel Setup Picture Picture Mode : Dynamic √ Custom Picture √ Color Tone : Normal √ Film Mode : Off √ DNIe : On √ Digital NR : On √ Size √ PIP √ Move Enter Return 2 Press the ... Screen : Off √ PC Setup √ Move Enter Return 3 Press the ... Special Features Digital Noise Reduction If the broadcast signal received by your TV is very weak, a blue screen automatically replaces the noisy picture background.
User Manual (ENGLISH)
Page 34
..., so prerecorded video tapes can 't be changed when the PIP is active in -Picture One of the most best features of your TV program-schedule. All VCRs record the closed -caption information. or † button to Caption Mode 3 Press the ... Press the ...... Text1~Text4: In text mode, information unrelated to select "Closed Caption". Input Picture Sound Channel Setup Picture Picture Mode : Dynamic √ Custom Picture √ Color Tone : Normal √ Film Mode : Off √ DNIe : On √ Digital NR : On √ Size √ PIP √ Move Enter...
..., so prerecorded video tapes can 't be changed when the PIP is active in -Picture One of the most best features of your TV program-schedule. All VCRs record the closed -caption information. or † button to Caption Mode 3 Press the ... Press the ...... Text1~Text4: In text mode, information unrelated to select "Closed Caption". Input Picture Sound Channel Setup Picture Picture Mode : Dynamic √ Custom Picture √ Color Tone : Normal √ Film Mode : Off √ DNIe : On √ Digital NR : On √ Size √ PIP √ Move Enter...
User Manual (ENGLISH)
Page 35
...VCR. 1 Press the MENU button. NOTE 4 Press the ... You can choose between "TV", "Video1~3" or "S-Video1~3". Press the ... Input Picture Sound Channel Setup Picture Picture Mode : Dynamic √ Custom Picture √ Color Tone : Normal √ Film Mode : Off √ DNIe : On √ ... signals, see "Viewing an External Signal Source" (See page 46). Input If a Cable TV system is "Air". Input Picture Sound Channel Setup Picture Picture Mode : Dynamic √ Custom Picture √ Color Tone : Normal √ Film Mode : Off √ DNIe : On √ Digital...
...VCR. 1 Press the MENU button. NOTE 4 Press the ... You can choose between "TV", "Video1~3" or "S-Video1~3". Press the ... Input Picture Sound Channel Setup Picture Picture Mode : Dynamic √ Custom Picture √ Color Tone : Normal √ Film Mode : Off √ DNIe : On √ ... signals, see "Viewing an External Signal Source" (See page 46). Input If a Cable TV system is "Air". Input Picture Sound Channel Setup Picture Picture Mode : Dynamic √ Custom Picture √ Color Tone : Normal √ Film Mode : Off √ DNIe : On √ Digital...

User Manual (ENGLISH)
Page 36
...8730; Select Sound : Main √ Move Enter Return 4 Press the ... Input Picture Sound Channel Setup Picture Picture Mode : Dynamic √ Custom Picture √ Color Tone : Normal √ Film Mode : Off √ DNIe : On √ Digital NR : On √ Size √ PIP √ Move Enter...the SIZE button on the remote control. 1 Press the MENU button. Input Picture Sound Channel Setup PIP PIP : On √ PIP Source : TV √ PIP Swap PIP Size : Large √ PIP Position √ PIP Channel : Air 11 √ Air/CATV : Air √...
...8730; Select Sound : Main √ Move Enter Return 4 Press the ... Input Picture Sound Channel Setup Picture Picture Mode : Dynamic √ Custom Picture √ Color Tone : Normal √ Film Mode : Off √ DNIe : On √ Digital NR : On √ Size √ PIP √ Move Enter...the SIZE button on the remote control. 1 Press the MENU button. Input Picture Sound Channel Setup PIP PIP : On √ PIP Source : TV √ PIP Swap PIP Size : Large √ PIP Position √ PIP Channel : Air 11 √ Air/CATV : Air √...

User Manual (ENGLISH)
Page 37
...8730; Size √ PIP √ Move Enter Return 3 Press the ... Input Picture Sound Channel Setup PIP PIP : On √ PIP Source : TV √ PIP Swap PIP Size : Large √ PIP Position √ PIP Channel : Air 11 √ Air/CATV : Air √ Select ... Main √ Move Enter Return 4 Press the ... Press the ... Input Picture Sound Channel Setup Picture Picture Mode : Dynamic √ Custom Picture √ Color Tone : Normal √ Film Mode : Off √ DNIe : On √ Digital NR : On √ Size √ PIP √ Move ...
...8730; Size √ PIP √ Move Enter Return 3 Press the ... Input Picture Sound Channel Setup PIP PIP : On √ PIP Source : TV √ PIP Swap PIP Size : Large √ PIP Position √ PIP Channel : Air 11 √ Air/CATV : Air √ Select ... Main √ Move Enter Return 4 Press the ... Press the ... Input Picture Sound Channel Setup Picture Picture Mode : Dynamic √ Custom Picture √ Color Tone : Normal √ Film Mode : Off √ DNIe : On √ Digital NR : On √ Size √ PIP √ Move ...
User Manual (ENGLISH)
Page 38
...8730; Size √ PIP √ Move Enter Return 3 Press the ... Input Picture Sound Channel Setup PIP PIP : On √ PIP Source : TV √ PIP Swap PIP Size : Large √ PIP Position √ PIP Channel : Air 11 √ Air/CATV : Air √ Select...; 8 → 2 → 4 → POWER ON. Press the ... Input Picture Sound Channel Setup Picture Picture Mode : Dynamic √ Custom Picture √ Color Tone : Normal √ Film Mode : Off √ DNIe : On √ Digital NR : On √ Size √ PIP √ Move Enter Return...
...8730; Size √ PIP √ Move Enter Return 3 Press the ... Input Picture Sound Channel Setup PIP PIP : On √ PIP Source : TV √ PIP Swap PIP Size : Large √ PIP Position √ PIP Channel : Air 11 √ Air/CATV : Air √ Select...; 8 → 2 → 4 → POWER ON. Press the ... Input Picture Sound Channel Setup Picture Picture Mode : Dynamic √ Custom Picture √ Color Tone : Normal √ Film Mode : Off √ DNIe : On √ Digital NR : On √ Size √ PIP √ Move Enter Return...

User Manual (ENGLISH)
Page 42
...the display dialog-box. The correct settings for these two variables are: * Screen area (sometimes called "resolution"): 1024 x 768 pixels * Color: "24-bit" color (might also be different, depending upon your particular version of Windows and your PC will probably be expressed as a Computer (PC) Display..." and a display dialogbox will apply in almost all cases. (If not, contact your TV may be different, depending on the Windows start menu. The actual configuration on your computer manufacturer or Samsung Dealer.) First, click on "Settings" on the model. 15Pin(D-Sub) Cable Audio Cable ...
...the display dialog-box. The correct settings for these two variables are: * Screen area (sometimes called "resolution"): 1024 x 768 pixels * Color: "24-bit" color (might also be different, depending upon your particular version of Windows and your PC will probably be expressed as a Computer (PC) Display..." and a display dialogbox will apply in almost all cases. (If not, contact your TV may be different, depending on the Windows start menu. The actual configuration on your computer manufacturer or Samsung Dealer.) First, click on "Settings" on the model. 15Pin(D-Sub) Cable Audio Cable ...
User Manual (ENGLISH)
Page 43
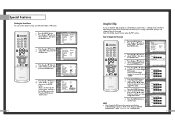
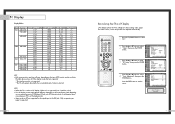
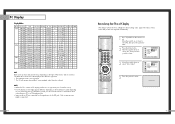
... 483p Horizontal Frequency [KHz] 31.47 31.47 37.93 31.47 35.00 37.86 37.50 43.27 35.16 37.88 48.08 46.87 53.67 49.73 48.36 56.40 60.02... Only a separate sync signal is supported. 84 How to Set up Your TV as a PC display, 32-bit color is supported (over 16 million colors). • Your PC display screen might appear different, depending on the manufacturer...PC Setup", then press the ENTER button. 4 Press the ... NOTES • When this TV is not supported. * The TV will vary, depending on your PC to a TV display-monitor. • Same modes as PC are adjusted automatically. 1 Press the...
... 483p Horizontal Frequency [KHz] 31.47 31.47 37.93 31.47 35.00 37.86 37.50 43.27 35.16 37.88 48.08 46.87 53.67 49.73 48.36 56.40 60.02... Only a separate sync signal is supported. 84 How to Set up Your TV as a PC display, 32-bit color is supported (over 16 million colors). • Your PC display screen might appear different, depending on the manufacturer...PC Setup", then press the ENTER button. 4 Press the ... NOTES • When this TV is not supported. * The TV will vary, depending on your PC to a TV display-monitor. • Same modes as PC are adjusted automatically. 1 Press the...
User Manual (ENGLISH)
Page 48
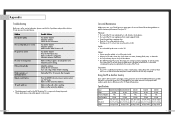
... sure the program is composed of the cabinet. • This DLP Projection TV projects the image onto a large screen by applying an optical system. A TV designed for the DLP Projection TV is broadcasted in . No picture or sound. No color or wrong colors. Picture rolls vertically. TV won't switch on top of many years of Operation 60Hz 60Hz 60Hz...
... sure the program is composed of the cabinet. • This DLP Projection TV projects the image onto a large screen by applying an optical system. A TV designed for the DLP Projection TV is broadcasted in . No picture or sound. No color or wrong colors. Picture rolls vertically. TV won't switch on top of many years of Operation 60Hz 60Hz 60Hz...
User Manual (ENGLISH)
Page 4
...Contents Your New Wide TV 10 Replacing the Lamp 10 List of Features ...12 Checking Parts...12 Side Panel Buttons 13 Side Panel Jacks 13 Front Panel LED Indicators 14 Rear Panel Jacks 15 Remote... Melody 36 Picture Control ...38 Sound Control ...40 Setting the Clock 42 Setting the Timers 43 Viewing an External Signal Source 45 6 Special Features 48 Setting Up Your Remote Control 48 ...Remote Control Codes 51 Fine Tuning Channels 52 Selecting the Color Tone 53 Setting the Film Mode 53 DNIeTM (Digital Natural Image engine) 54 Digital Noise ...
...Contents Your New Wide TV 10 Replacing the Lamp 10 List of Features ...12 Checking Parts...12 Side Panel Buttons 13 Side Panel Jacks 13 Front Panel LED Indicators 14 Rear Panel Jacks 15 Remote... Melody 36 Picture Control ...38 Sound Control ...40 Setting the Clock 42 Setting the Timers 43 Viewing an External Signal Source 45 6 Special Features 48 Setting Up Your Remote Control 48 ...Remote Control Codes 51 Fine Tuning Channels 52 Selecting the Color Tone 53 Setting the Film Mode 53 DNIeTM (Digital Natural Image engine) 54 Digital Noise ...
User Manual (ENGLISH)
Page 20
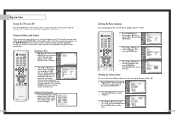
...to change. 4 Move the joystick right or left to raise or lower the value of the TV. The level indicator will disappear and the Video menu will see the items "Contrast", "Brightness", "Sharpness", "Color" and "Tint". 3 Move the joystick up or down to select Adjust, then press the ...joystick to enter. Customizing the Picture 1 Press the Menu button. You can change the contrast, brightness, tint, color, and sharpness settings of the item, using the on the remote control to change the picture settings. 2 Press P.Mode repeatedly to select the "Dynamic...
...to change. 4 Move the joystick right or left to raise or lower the value of the TV. The level indicator will disappear and the Video menu will see the items "Contrast", "Brightness", "Sharpness", "Color" and "Tint". 3 Move the joystick up or down to select Adjust, then press the ...joystick to enter. Customizing the Picture 1 Press the Menu button. You can change the contrast, brightness, tint, color, and sharpness settings of the item, using the on the remote control to change the picture settings. 2 Press P.Mode repeatedly to select the "Dynamic...
User Manual (ENGLISH)
Page 27
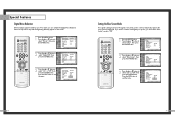
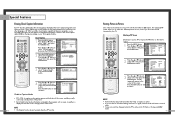
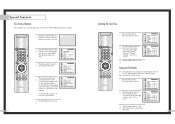
...Menu button to exit. Off: Switches off the Film mode. 1 Press the Menu button. Press the joystick to enter. 2 Move the joystick down to select Color Tone, then move the joystick right or left to select "On" or "Off". 3 Press the Menu button to exit. Setting the Film Mode On: ...processes film signals from all sources and adjusts the picture for optimum quality. Special Features Fine Tuning Channels Fine tuning lets you manually adjust the TV's tuner if you want to fine tune. 2 Press the Menu button on the remote control, select the channel you have difficulty tuning in ...
...Menu button to exit. Off: Switches off the Film mode. 1 Press the Menu button. Press the joystick to enter. 2 Move the joystick down to select Color Tone, then move the joystick right or left to select "On" or "Off". 3 Press the Menu button to exit. Setting the Film Mode On: ...processes film signals from all sources and adjusts the picture for optimum quality. Special Features Fine Tuning Channels Fine tuning lets you manually adjust the TV's tuner if you want to fine tune. 2 Press the Menu button on the remote control, select the channel you have difficulty tuning in ...

User Manual (ENGLISH)
Page 40
The actual screens on the display dialog-box. Shown at left is highlighted. Navigate to the TV-PC interface are : * Screen area (sometimes called "resolution"): 1024 x 768 pixels * Color: "24-bit" color (might also be expressed as a Computer (PC) Display How to connect Your PC to... is a typical screen for these two variables are "resolution" and "colors." PC Display Using Your TV as "16 million colors"). The correct settings for "Display" dialog box. The actual configuration on your computer manufacturer or Samsung Dealer.) First, click on "Settings" on the model. 15Pin(D-Sub) ...
The actual screens on the display dialog-box. Shown at left is highlighted. Navigate to the TV-PC interface are : * Screen area (sometimes called "resolution"): 1024 x 768 pixels * Color: "24-bit" color (might also be expressed as a Computer (PC) Display How to connect Your PC to... is a typical screen for these two variables are "resolution" and "colors." PC Display Using Your TV as "16 million colors"). The correct settings for "Display" dialog box. The actual configuration on your computer manufacturer or Samsung Dealer.) First, click on "Settings" on the model. 15Pin(D-Sub) ...
User Manual (ENGLISH)
Page 41
... the Menu button. The values of Windows). Move the joystick up Your TV as a PC display, 32-bit color is selected. PC Display Display Modes Mode Resolution Total Hor. Freq Polarity ....80 Hz N 31.5 MHz 0 0 x 640x480 840x500 37.50 kHz N 75.00 Hz N 31.5 MHz 0 0 x 640x480 832x509 43.27 kHz N 85.00 Hz N 36 MHz 0 0 x SVGA 800x600 1024x625 35.16 kHz N/P 56.30 Hz N 36 MHz 0... position and size will operate abnormally if a non-standard video format is supported (over 16 million colors). • Your PC display screen might appear different, depending on the manufacturer (and depending on ...
... the Menu button. The values of Windows). Move the joystick up Your TV as a PC display, 32-bit color is selected. PC Display Display Modes Mode Resolution Total Hor. Freq Polarity ....80 Hz N 31.5 MHz 0 0 x 640x480 840x500 37.50 kHz N 75.00 Hz N 31.5 MHz 0 0 x 640x480 832x509 43.27 kHz N 85.00 Hz N 36 MHz 0 0 x SVGA 800x600 1024x625 35.16 kHz N/P 56.30 Hz N 36 MHz 0... position and size will operate abnormally if a non-standard video format is supported (over 16 million colors). • Your PC display screen might appear different, depending on the manufacturer (and depending on ...
User Manual (ENGLISH)
Page 45
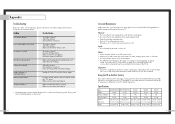
...35.2 Kg / 77.6 lbs 46.2 Kg / 101.9 lbs 33.5 Kg / 73.8 lbs 41.5 Kg / 91.5lbs 89 No color or wrong colors. Erratic operation, or intermittent failure. Poor sound quality or no sound. Check the antenna connections. Try another channel. Never use around the ... put the TV near or on . TV won't switch on the TV. Press the TV/Video button. Specifications Model HLN4365W/HLN437W HLN5065W/HLN507W HLN617W HLN467W HLN567W Voltage AC 120V AC 120V AC 120V AC 120V AC 120V Frequency of the cabinet. • This DLP Projection TV projects the image onto...
...35.2 Kg / 77.6 lbs 46.2 Kg / 101.9 lbs 33.5 Kg / 73.8 lbs 41.5 Kg / 91.5lbs 89 No color or wrong colors. Erratic operation, or intermittent failure. Poor sound quality or no sound. Check the antenna connections. Try another channel. Never use around the ... put the TV near or on . TV won't switch on the TV. Press the TV/Video button. Specifications Model HLN4365W/HLN437W HLN5065W/HLN507W HLN617W HLN467W HLN567W Voltage AC 120V AC 120V AC 120V AC 120V AC 120V Frequency of the cabinet. • This DLP Projection TV projects the image onto...


