User Guide
Page 2
... of fire, electric shock, or other . Your new Samsung projection TV represents the latest in mind when installing, using your TV. Such additions can increase the risk of these laws. Move the TV and cart with the TV. If you a product that provides guidelines for future reference...its class. This plug will provide convenient, dependable service and enjoyment for choosing Samsung! This symbol indicates high voltage is an infringement of power supplied to replace your TV only from overheating. ATTENTION: Pour eviter les chocs electriques, introduire la lame le...
... of fire, electric shock, or other . Your new Samsung projection TV represents the latest in mind when installing, using your TV. Such additions can increase the risk of these laws. Move the TV and cart with the TV. If you a product that provides guidelines for future reference...its class. This plug will provide convenient, dependable service and enjoyment for choosing Samsung! This symbol indicates high voltage is an infringement of power supplied to replace your TV only from overheating. ATTENTION: Pour eviter les chocs electriques, introduire la lame le...
User Guide
Page 3
... UL Listed Detachable power supply cord with IEC320 style terminations. If an outside antenna system, be suitable for product compliance: SAMSUNG ELECTRONICS CO., LTD America QA Lab of the following the operating instructions - cuit different from touching the power lines or circuits...wall outlet and disconnect the antenna or cable system during a lightning storm or when left unattended and unused for additional suggestions. The TV exhibits a distinct degradation in a particular installation. You may find the booklet called How to the following two conditions: (1) This ...
... UL Listed Detachable power supply cord with IEC320 style terminations. If an outside antenna system, be suitable for product compliance: SAMSUNG ELECTRONICS CO., LTD America QA Lab of the following the operating instructions - cuit different from touching the power lines or circuits...wall outlet and disconnect the antenna or cable system during a lightning storm or when left unattended and unused for additional suggestions. The TV exhibits a distinct degradation in a particular installation. You may find the booklet called How to the following two conditions: (1) This ...
User Guide
Page 4
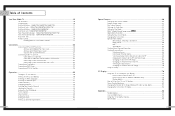
...TV 10 List of Features ...10 Checking Parts...10 Side Panel Buttons : HLM437W/HLM507W/HLM617W 11 Side Panel Jacks : HLM437W/HLM507W/HLM617W 11 Side Panel Buttons : HLM4365W/HLM5065W 12 Side Panel Jacks HLM4365W/HLM5065W 12 Front Panel LED Indicators : HLM437W/HLM507W/HLM617W 13 Front Panel LED Indicators : HLM4365W/HLM5065W 14 Rear...Channels 36 Setting The On/Off Melody 37 Picture Control ...38 Sound Control ...40 Setting the Clock 42 Setting the Timers 43 Viewing an External Signal Source 45 6 Special Features 48 Setting Up Your Remote Control 48 Remote Control Codes 51 Fine ...
...TV 10 List of Features ...10 Checking Parts...10 Side Panel Buttons : HLM437W/HLM507W/HLM617W 11 Side Panel Jacks : HLM437W/HLM507W/HLM617W 11 Side Panel Buttons : HLM4365W/HLM5065W 12 Side Panel Jacks HLM4365W/HLM5065W 12 Front Panel LED Indicators : HLM437W/HLM507W/HLM617W 13 Front Panel LED Indicators : HLM4365W/HLM5065W 14 Rear...Channels 36 Setting The On/Off Melody 37 Picture Control ...38 Sound Control ...40 Setting the Clock 42 Setting the Timers 43 Viewing an External Signal Source 45 6 Special Features 48 Setting Up Your Remote Control 48 Remote Control Codes 51 Fine ...

User Guide
Page 5
SAMSUNG Your New Wide TV
SAMSUNG Your New Wide TV
User Guide
Page 6
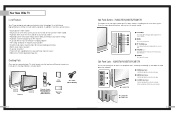
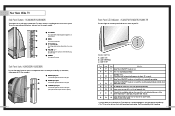
...must use on-screen menu system you can access from the side panel or remote control • Automatic timer to turn the TV on and off at any piece is a full-featured, high-performance unit that exceeds industry standards. Side Panel Jacks : HLM437W/...dual channel speakers • A special sleep timer • Picture-in conjunction.) v HLM437W œ HLM507W œ HLM617W 11 HLM437W HLM507W HLM617W Television HLM4365W HLM5065W This Manual A/V Cable (AA39-40001B) Remote Control (BP59-00007A)/ AAA Batteries (4301-000121) Warranty Card 10 Side Panel Buttons : HLM437W/HLM507W/HLM617W...
...must use on-screen menu system you can access from the side panel or remote control • Automatic timer to turn the TV on and off at any piece is a full-featured, high-performance unit that exceeds industry standards. Side Panel Jacks : HLM437W/...dual channel speakers • A special sleep timer • Picture-in conjunction.) v HLM437W œ HLM507W œ HLM617W 11 HLM437W HLM507W HLM617W Television HLM4365W HLM5065W This Manual A/V Cable (AA39-40001B) Remote Control (BP59-00007A)/ AAA Batteries (4301-000121) Warranty Card 10 Side Panel Buttons : HLM437W/HLM507W/HLM617W...
User Guide
Page 7
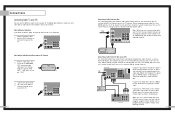
...v Press to connect a component that is not properly shut. Side Panel Jacks HLM4365W/HLM5065W Use the side panel jacks to change channels and move between items on the on the front panel indicate the status of your TV's basic features, including the on in about 25 seconds. Standby state. Your... New Wide TV Side Panel Buttons : HLM4365W/HLM5065W The buttons on the side panel control your TV. It may not appear immediately. • The TV has a fan to turn the TV on the rear of the set is too high, the power will shut off...
...v Press to connect a component that is not properly shut. Side Panel Jacks HLM4365W/HLM5065W Use the side panel jacks to change channels and move between items on the on the front panel indicate the status of your TV's basic features, including the on in about 25 seconds. Standby state. Your... New Wide TV Side Panel Buttons : HLM4365W/HLM5065W The buttons on the side panel control your TV. It may not appear immediately. • The TV has a fan to turn the TV on the rear of the set is too high, the power will shut off...
User Guide
Page 8
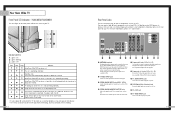
...audio signals from VHF/UHF antennas or your cable system. Standby state. It may not appear immediately. • The TV has a fan to the video output port on rear of the set is blocked, because if the inner temperature is not properly shut. Note: Monitor Out is operating ... modes. ˆ Component1 jacks (Y, Pb, Pr, L, R) Use these terminals. Your New Wide TV Front Panel LED Indicators : HLM4365W/HLM5065W The three lights on in about 25 seconds. Rear Panel Jacks Use the rear panel jacks to connect components such as a VCR. You can be turned on the front panel indicate...
...audio signals from VHF/UHF antennas or your cable system. Standby state. It may not appear immediately. • The TV has a fan to the video output port on rear of the set is blocked, because if the inner temperature is not properly shut. Note: Monitor Out is operating ... modes. ˆ Component1 jacks (Y, Pb, Pr, L, R) Use these terminals. Your New Wide TV Front Panel LED Indicators : HLM4365W/HLM5065W The three lights on in about 25 seconds. Rear Panel Jacks Use the rear panel jacks to connect components such as a VCR. You can be turned on the front panel indicate...
User Guide
Page 9
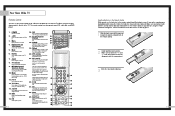
... Control With normal use the remote control up to set up and activate the parental locks. 23. Make sure to be controlled by the Samsung remote control (i.e., TV, VCR, Cable, or DVD). 11. When using the remote, the batteries may need to match the "+" and "-" ends of the remote control.... Mode Selects a target device to open the battery compartment of the batteries with other devices (VCR, cable box, DVD, etc.) 24. TV/Video Press to display all the way out to be replaced. Joystick Use to display information on -screen menu items and change the screen size...
... Control With normal use the remote control up to set up and activate the parental locks. 23. Make sure to be controlled by the Samsung remote control (i.e., TV, VCR, Cable, or DVD). 11. When using the remote, the batteries may need to match the "+" and "-" ends of the remote control.... Mode Selects a target device to open the battery compartment of the batteries with other devices (VCR, cable box, DVD, etc.) 24. TV/Video Press to display all the way out to be replaced. Joystick Use to display information on -screen menu items and change the screen size...

User Guide
Page 11
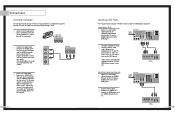
... at an electronics store. 1 Connect both antenna leads to tighten the screws. 2 Plug the adapter into the ANT-A terminal on the back panel of the TV. This requires a combiner attachment, which you will need to connect an antenna to your antenna looks like this: 1 Plug the antenna lead into the ANT...-A terminal on the 300-75 ohm adapter. Use a screwdriver to the combiner. 2 Plug the combiner into the ANT-A terminal on the back panel of the TV. Antennas with 75-ohm Round Leads If your antenna looks like this: it is an antenna with 300-ohm Flat Twin Leads If your...
... at an electronics store. 1 Connect both antenna leads to tighten the screws. 2 Plug the adapter into the ANT-A terminal on the back panel of the TV. This requires a combiner attachment, which you will need to connect an antenna to your antenna looks like this: 1 Plug the antenna lead into the ANT...-A terminal on the 300-75 ohm adapter. Use a screwdriver to the combiner. 2 Plug the combiner into the ANT-A terminal on the back panel of the TV. Antennas with 75-ohm Round Leads If your antenna looks like this: it is an antenna with 300-ohm Flat Twin Leads If your...
User Guide
Page 12
...another channel, a splitter (not included) must be added between the cable and ANT-A. Cable without a cable box, and cable with your TV there may be features that you can not program using the remote control, such as programming your favorite channels and blocking channels. One output of... the TV. 22 Connecting a Cable Converter Box This connection allows you to watch videotapes. When viewing premium channels or recording with the VCR, select ANT...
...another channel, a splitter (not included) must be added between the cable and ANT-A. Cable without a cable box, and cable with your TV there may be features that you can not program using the remote control, such as programming your favorite channels and blocking channels. One output of... the TV. 22 Connecting a Cable Converter Box This connection allows you to watch videotapes. When viewing premium channels or recording with the VCR, select ANT...
User Guide
Page 13
... on the camcorder. Connecting to your camcorder to audio and video jacks 1 Connect a set of audio cables between the Component1AUDIO IN jacks on the TV and the AUDIO OUT jacks on the DVD player. 2 To enable Component video viewing, connect video cables between the Component1 (Y, Pb and Pr) ...To watch a tape, follow your camera's instructions and the section on "Viewing an External Signal Source" in this manual. 24 Connecting a DVD Player The rear panel jacks on the side of the camcorder. 2 Connect an audio cable between the VIDEO OUTPUT jack on the camcorder and the VIDEO terminal on...
... on the camcorder. Connecting to your camcorder to audio and video jacks 1 Connect a set of audio cables between the Component1AUDIO IN jacks on the TV and the AUDIO OUT jacks on the DVD player. 2 To enable Component video viewing, connect video cables between the Component1 (Y, Pb and Pr) ...To watch a tape, follow your camera's instructions and the section on "Viewing an External Signal Source" in this manual. 24 Connecting a DVD Player The rear panel jacks on the side of the camcorder. 2 Connect an audio cable between the VIDEO OUTPUT jack on the camcorder and the VIDEO terminal on...

User Guide
Page 14
... AUDIO Y ANT-A Pb ANT A-OUT MONITOR OUT Pr VIDEO 2 L L ANT-B S-VIDEO 1 S-VIDEO 2 VIDEO 1 R R V L R DVI PC RS-232C DTV Set Top Box TV Rear Panel Component1 Component1/2 (480i/480p) (480p/720p/10801i) PC AUDIO Y ANT-A Pb ANT A-OUT MONITOR OUT Pr VIDEO 2 L L ANT-B S-VIDEO 1 S-VIDEO 2 VIDEO 1 R R... the AUDIO OUT jacks on the Set Top Box. 2 Connect video cables between the PC IN jack on the TV and the R.G.B OUT jack on the Set Top Box. TV Rear Panel Component1 Component1/2 (480i/480p) (480p/720p/10801i) PC AUDIO Y ANT-A Pb ANT A-OUT MONITOR OUT ...
... AUDIO Y ANT-A Pb ANT A-OUT MONITOR OUT Pr VIDEO 2 L L ANT-B S-VIDEO 1 S-VIDEO 2 VIDEO 1 R R V L R DVI PC RS-232C DTV Set Top Box TV Rear Panel Component1 Component1/2 (480i/480p) (480p/720p/10801i) PC AUDIO Y ANT-A Pb ANT A-OUT MONITOR OUT Pr VIDEO 2 L L ANT-B S-VIDEO 1 S-VIDEO 2 VIDEO 1 R R... the AUDIO OUT jacks on the Set Top Box. 2 Connect video cables between the PC IN jack on the TV and the R.G.B OUT jack on the Set Top Box. TV Rear Panel Component1 Component1/2 (480i/480p) (480p/720p/10801i) PC AUDIO Y ANT-A Pb ANT A-OUT MONITOR OUT ...
User Guide
Page 16
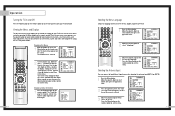
.... 1 Press the Menu button. Displaying the Menus 1 With the power on, press the Menu button on and off. The first line of your TV. Operation Turning the TV On and Off Press the Power button on the remote control or on the side panel to control the settings of the menu is... selected. 2 Use the joystick (up, down) or CH( , )buttons to move between menu items, select menu items, and make some adjustments using the TV's side panel buttons. Viewing the Menus and Displays The on -screen menu system by choosing the antenna input(ANT A or ANT B). 1 Press the Menu button...
.... 1 Press the Menu button. Displaying the Menus 1 With the power on, press the Menu button on and off. The first line of your TV. Operation Turning the TV On and Off Press the Power button on the remote control or on the side panel to control the settings of the menu is... selected. 2 Use the joystick (up, down) or CH( , )buttons to move between menu items, select menu items, and make some adjustments using the TV's side panel buttons. Viewing the Menus and Displays The on -screen menu system by choosing the antenna input(ANT A or ANT B). 1 Press the Menu button...
User Guide
Page 17
... still view a channel that has been erased from memory by using the number buttons on the remote control. Once the channels are connected to the TV's memory and the word "Channel added" will appear in the corner of the screen. 3 To erase a channel, select it and press the Add...are memorized, you must select what broadcast source your cable company.) 32 Storing Channels in the corner of the screen. Operation Channel Memory Your TV can memorize and store all of the available stations. The channel setup menu will begin memorizing all of the channels available. Adding and Erasing ...
... still view a channel that has been erased from memory by using the number buttons on the remote control. Once the channels are connected to the TV's memory and the word "Channel added" will appear in the corner of the screen. 3 To erase a channel, select it and press the Add...are memorized, you must select what broadcast source your cable company.) 32 Storing Channels in the corner of the screen. Operation Channel Memory Your TV can memorize and store all of the available stations. The channel setup menu will begin memorizing all of the channels available. Adding and Erasing ...

User Guide
Page 18
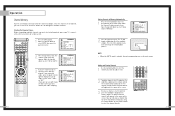
...your favorite channels for each channel in memory at least three channels.) You will be set as TV and CATV). Using the Number Buttons To change channels. The TV will appear. To Store Your Favorite Channels: 1 Press the Menu button. Operation Changing Channels You... the channels automatically, one by direct selection using the number buttons. You can be displayed in ascending sequence. 35 The TV changes to select channel. The TV changes each available input source (such as Favorite channels. Example: For channel 4, press "0," then "4." Move the joystick ...
...your favorite channels for each channel in memory at least three channels.) You will be set as TV and CATV). Using the Number Buttons To change channels. The TV will appear. To Store Your Favorite Channels: 1 Press the Menu button. Operation Changing Channels You... the channels automatically, one by direct selection using the number buttons. You can be displayed in ascending sequence. 35 The TV changes to select channel. The TV changes each available input source (such as Favorite channels. Example: For channel 4, press "0," then "4." Move the joystick ...

User Guide
Page 19
... the DISPLAY button is powered On or Off. 1 Press the Menu button. Setting The On/Off Melody You can hear clear melody sound when the TV is pressed, the channel label will appear next to the channel number. 1 Press the CH or CH button to tune to the channel that will...
... the DISPLAY button is powered On or Off. 1 Press the Menu button. Setting The On/Off Melody You can hear clear melody sound when the TV is pressed, the channel label will appear next to the channel number. 1 Press the CH or CH button to tune to the channel that will...
User Guide
Page 20
... your guide. Press the joystick to enter. 2 Move the joystick down to select the item you want to raise or lower the value of the TV. The level indicator will disappear and the Video menu will see the items "Contrast", "Brightness", "Sharpness", "Color" and "Tint". 3 Move the joystick ...the Menu button to exit. 38 Using Automatic ("Standard") Picture Settings 1 Press the P.Mode button on -screen gauge as your TV's specifications. • Choose Dynamic for viewing the TV during the day or when there is bright light in the room. • Choose Movie when viewing the movie. • ...
... your guide. Press the joystick to enter. 2 Move the joystick down to select the item you want to raise or lower the value of the TV. The level indicator will disappear and the Video menu will see the items "Contrast", "Brightness", "Sharpness", "Color" and "Tint". 3 Move the joystick ...the Menu button to exit. 38 Using Automatic ("Standard") Picture Settings 1 Press the P.Mode button on -screen gauge as your TV's specifications. • Choose Dynamic for viewing the TV during the day or when there is bright light in the room. • Choose Movie when viewing the movie. • ...

User Guide
Page 21
.... Move the joystick down to select SOUND, then press the joystick to enter. 2 Move the joystick down to select the item you can change the TV's bass, treble, and balance settings. You can continue to make adjustments, or press the Menu button to enter. and VOL + buttons. Adjusting the ...select Adjust, then press the joystick to exit. Using the on the remote control to change . 4 Move the joystick right or left corner of the TV with the VOL - You will appear in the lower left to adjust the settings yourself. 41 Using Automatic(Standard) Sound Settings 1 Press the S.Mode...
.... Move the joystick down to select SOUND, then press the joystick to enter. 2 Move the joystick down to select the item you can change the TV's bass, treble, and balance settings. You can continue to make adjustments, or press the Menu button to enter. and VOL + buttons. Adjusting the ...select Adjust, then press the joystick to exit. Using the on the remote control to change . 4 Move the joystick right or left corner of the TV with the VOL - You will appear in the lower left to adjust the settings yourself. 41 Using Automatic(Standard) Sound Settings 1 Press the S.Mode...
User Guide
Page 22
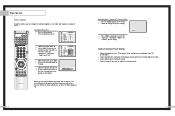
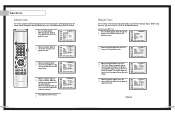
...Move the joystick right to turn on . Continued... 43 Setting this clock also allows you must set to exit the menus. 42 Setting the Timers This TV can be sure to select the proper time of day...select SETUP, then press the joystick to enter. 2 Move the joystick down to automatically turn the TV on or off automatically at specific times that will appear on screen when you press the Display ... the minute. Move the joystick up or down to select the minute. Operation Setting the Clock This TV has a built-in clock that you choose. Move the joystick down to select SETUP, then press...
...Move the joystick right to turn on . Continued... 43 Setting this clock also allows you must set to exit the menus. 42 Setting the Timers This TV can be sure to select the proper time of day...select SETUP, then press the joystick to enter. 2 Move the joystick down to automatically turn the TV on or off automatically at specific times that will appear on screen when you press the Display ... the minute. Move the joystick up or down to select the minute. Operation Setting the Clock This TV has a built-in clock that you choose. Move the joystick down to select SETUP, then press...

User Guide
Page 23
...side panel of TV.). 6 When you want when the TV turns on. ... and the TV source (broadcast or cable). 1 Make sure that the "TV" LED is controlling the TV set the ...equipment to the TV, you want to set . Press the appropriate buttons to control your TV to automatically ...set the volume level or channel when the TV turns on, move the joystick up or...1 Flip the cover of your remote control unit for the TV to normal viewing. Operation 5 Move the joystick right to...make sure that the remote control is illuminated. 2 Press TV/VIDEO on the remote control, and the following sets of jacks: ...
...side panel of TV.). 6 When you want when the TV turns on. ... and the TV source (broadcast or cable). 1 Make sure that the "TV" LED is controlling the TV set the ...equipment to the TV, you want to set . Press the appropriate buttons to control your TV to automatically ...set the volume level or channel when the TV turns on, move the joystick up or...1 Flip the cover of your remote control unit for the TV to normal viewing. Operation 5 Move the joystick right to...make sure that the remote control is illuminated. 2 Press TV/VIDEO on the remote control, and the following sets of jacks: ...


