
User Manual (ENGLISH)
Page 4
... the Function Help 57 ■ Upgrading the Software 58 PC DISPLAY ■ Using Your TV as a Computer (PC) Display .......... 59 ■ Display Modes 60 ■ Setting up the TV with your PC 61 ■ Changing the Picture Size (PC Mode 63 ■ Setting the Home Theater PC...Connecting a Digital Audio System 15 ■ Connecting an Amplifier/ DVD Home Theater - Analog 15 ■ Connecting a PC 16 OPERATION ■ Turning the TV On and Off 16 ■ Plug & Play Feature 17 ■ Changing Channels 18 ■ Adjusting the Volume 19 ■ Viewing the Display 19 ...
... the Function Help 57 ■ Upgrading the Software 58 PC DISPLAY ■ Using Your TV as a Computer (PC) Display .......... 59 ■ Display Modes 60 ■ Setting up the TV with your PC 61 ■ Changing the Picture Size (PC Mode 63 ■ Setting the Home Theater PC...Connecting a Digital Audio System 15 ■ Connecting an Amplifier/ DVD Home Theater - Analog 15 ■ Connecting a PC 16 OPERATION ■ Turning the TV On and Off 16 ■ Plug & Play Feature 17 ■ Changing Channels 18 ■ Adjusting the Volume 19 ■ Viewing the Display 19 ...

User Manual (ENGLISH)
Page 5
... on-screen menu system you can access from the screen as far back from the side panel or remote control ● Automatic timer to turn the TV on and off at any time you choose ● Adjustable picture and sound settings and the ability to memorize your favorite settings ● ...and degraded performance. 50˝ screen : At least 5.9 feet 56˝ screen : At least 6.6 feet 61˝ screen : At least 7.2 feet ➢ For optimal picture quality, do not place components on top of the TV. If viewing for viewing distance. List of time, sit as possible. < Top view> < Side view> 50...
... on-screen menu system you can access from the screen as far back from the side panel or remote control ● Automatic timer to turn the TV on and off at any time you choose ● Adjustable picture and sound settings and the ability to memorize your favorite settings ● ...and degraded performance. 50˝ screen : At least 5.9 feet 56˝ screen : At least 6.6 feet 61˝ screen : At least 7.2 feet ➢ For optimal picture quality, do not place components on top of the TV. If viewing for viewing distance. List of time, sit as possible. < Top view> < Side view> 50...
User Manual (ENGLISH)
Page 7
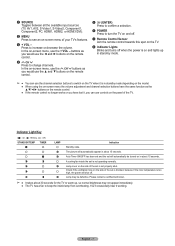
... the remote control. 5 (ENTER) Press to confirm a selection. 6 POWER Press to turn the TV on and off. 7 Remote Control Sensor Aim the remote control towards this spot on the TV. 8 Indicator Lights Blinks and turns off . In the on in about 15 seconds. Indication The picture will automatically be defective.... Lamp may not appear immediately. ● The TV has a fan to keep the inside the set is ...
... the remote control. 5 (ENTER) Press to confirm a selection. 6 POWER Press to turn the TV on and off. 7 Remote Control Sensor Aim the remote control towards this spot on the TV. 8 Indicator Lights Blinks and turns off . In the on in about 15 seconds. Indication The picture will automatically be defective.... Lamp may not appear immediately. ● The TV has a fan to keep the inside the set is ...

User Manual (ENGLISH)
Page 9
... VCR. * SOURCE Press to display all of the available video sources. ( Press to activate the backlight of the VOL, CH and the active source button (TV, DVD, CABLE, STB, VCR) on and off. 2 Numeric Buttons Press to directly select a channel. 3 - Press to increase or decrease the volume. 7 MUTE Press to ... Control You can also use your remote control to operate your VCR, Cable box, DVD player, or Set-Top Box. 1 POWER Turns the TV on the remote control. ) PRE-CH Tunes to the previous channel. Rewind - j P.SIZE Press to change the batteries and press the RESET button for the ...
... VCR. * SOURCE Press to display all of the available video sources. ( Press to activate the backlight of the VOL, CH and the active source button (TV, DVD, CABLE, STB, VCR) on and off. 2 Numeric Buttons Press to directly select a channel. 3 - Press to increase or decrease the volume. 7 MUTE Press to ... Control You can also use your remote control to operate your VCR, Cable box, DVD player, or Set-Top Box. 1 POWER Turns the TV on the remote control. ) PRE-CH Tunes to the previous channel. Rewind - j P.SIZE Press to change the batteries and press the RESET button for the ...

User Manual (ENGLISH)
Page 16
... It may take a while when your computer. You can also use the POWER button on the TV and the Audio Out jack of the connection terminal to the cable. TV Side Panel TV Side Panel Operation Turning the TV On and Off Press the POWER button on your computer. Using the D-Sub Cable PC 2 PC... Audio Cable (Not supplied) 1 D-Sub Cable (Not supplied) Using the HDMI/DVI Cable 1 Connect a HDMI/DVI Cable between the HDMI3/DVI IN jack on the TV and the...
... It may take a while when your computer. You can also use the POWER button on the TV and the Audio Out jack of the connection terminal to the cable. TV Side Panel TV Side Panel Operation Turning the TV On and Off Press the POWER button on your computer. Using the D-Sub Cable PC 2 PC... Audio Cable (Not supplied) 1 D-Sub Cable (Not supplied) Using the HDMI/DVI Cable 1 Connect a HDMI/DVI Cable between the HDMI3/DVI IN jack on the TV and the...

User Manual (ENGLISH)
Page 19
No Time Information Air 3 Viewing the Menus 1 With the power on the screen. 2 To turn mute off . The main menu will appear at the bottom of certain audio-video settings. Press the EXIT button to the previous menu. Viewing the ...
No Time Information Air 3 Viewing the Menus 1 With the power on the screen. 2 To turn mute off . The main menu will appear at the bottom of certain audio-video settings. Press the EXIT button to the previous menu. Viewing the ...

User Manual (ENGLISH)
Page 21
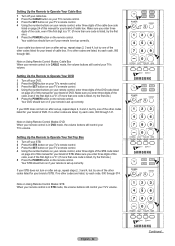
... the Air+Cable. ➢ If you choose. ➢ The remote control might not be connected to exit. ➢ The TV must be compatible with all available stations. Your VCR should turn on the remote control. ➢ All available DTV and analog channels are automatically stored in five different modes...Cable Air+Cable Enter Return 5 Press the ◄ or ► to Operate Your VCR 1 Turn off your VCR. 2 Press the VCR button on your TV's remote control. 3 Press the SET button on your TV's remote control. 4 Using the number buttons on your remote control, enter three digits of the VCR...
... the Air+Cable. ➢ If you choose. ➢ The remote control might not be connected to exit. ➢ The TV must be compatible with all available stations. Your VCR should turn on the remote control. ➢ All available DTV and analog channels are automatically stored in five different modes...Cable Air+Cable Enter Return 5 Press the ◄ or ► to Operate Your VCR 1 Turn off your VCR. 2 Press the VCR button on your TV's remote control. 3 Press the SET button on your TV's remote control. 4 Using the number buttons on your remote control, enter three digits of the VCR...
User Manual (ENGLISH)
Page 22
... codes are listed, try each code, 000 through 141. Setting Up the Remote to Operate Your DVD 1 Turn off your STB. 2 Press the STB button on your TV's remote control. 3 Press the SET button on your TV's remote control. 4 Using the number buttons on your remote control, enter three digits of the STB...manual for your brand of cable box. Setting Up the Remote to Operate Your Set Top Box 1 Turn off your DVD. 2 Press the DVD button on your TV's remote control. 3 Press the SET button on your TV's remote control. 4 Using the number buttons on your remote control, enter three digits of the DVD...
... codes are listed, try each code, 000 through 141. Setting Up the Remote to Operate Your DVD 1 Turn off your STB. 2 Press the STB button on your TV's remote control. 3 Press the SET button on your TV's remote control. 4 Using the number buttons on your remote control, enter three digits of the STB...manual for your brand of cable box. Setting Up the Remote to Operate Your Set Top Box 1 Turn off your DVD. 2 Press the DVD button on your TV's remote control. 3 Press the SET button on your TV's remote control. 4 Using the number buttons on your remote control, enter three digits of the DVD...
User Manual (ENGLISH)
Page 26
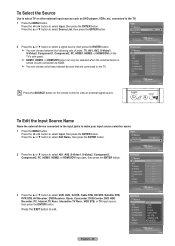
..., AV2, S-Video1, S-Video2, Component1, Component2, PC, HDMI1, HDMI2, or HDMI3/DVI on the TV's side panel. ➢ HDMI1, HDMI2, or HDMI3/DVI input can only be selected when the external device is turned on the remote control to select Source List, then press the ENTER button. To Edit the Input Source Name... Name the external device connected to the input jacks to the TV. Press the ▲ or ▼ button to view an ...
..., AV2, S-Video1, S-Video2, Component1, Component2, PC, HDMI1, HDMI2, or HDMI3/DVI on the TV's side panel. ➢ HDMI1, HDMI2, or HDMI3/DVI input can only be selected when the external device is turned on the remote control to select Source List, then press the ENTER button. To Edit the Input Source Name... Name the external device connected to the input jacks to the TV. Press the ▲ or ▼ button to view an ...

User Manual (ENGLISH)
Page 32
... the value of sRGB format. When the Picture Mode is set to Dynamic, the Active Color is not available in PC mode. ➢ When you turn on this option, the colors of Red, Green and Blue. 1 Press the MENU button. Picture Enter Picture Tint G50 R50 Color Tone Cool1 Detailed Settings...
... the value of sRGB format. When the Picture Mode is set to Dynamic, the Active Color is not available in PC mode. ➢ When you turn on this option, the colors of Red, Green and Blue. 1 Press the MENU button. Picture Enter Picture Tint G50 R50 Color Tone Cool1 Detailed Settings...
User Manual (ENGLISH)
Page 45
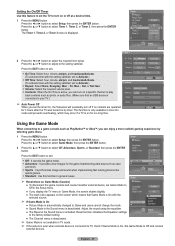
.../Activate. (To activate timer with the selected source. ➢ If Game Mode is On ● Picture Mode is connected to your TV.) ➢ Auto Power Off When you can turn off at a desired time. 1 Press the MENU button. Adjust the sound using the equalizer. ● The Reset in the Sound...3 Music None Photo None Adjust Return Using the Game Mode When connecting to a game console such as PlayStationTM or XboxTM, you set the TV to turn on or off if no controls are operated for too long time. Reset function initializes the Equalizer settings to select Setup, then press the ...
.../Activate. (To activate timer with the selected source. ➢ If Game Mode is On ● Picture Mode is connected to your TV.) ➢ Auto Power Off When you can turn off at a desired time. 1 Press the MENU button. Adjust the sound using the equalizer. ● The Reset in the Sound...3 Music None Photo None Adjust Return Using the Game Mode When connecting to a game console such as PlayStationTM or XboxTM, you set the TV to turn on or off if no controls are operated for too long time. Reset function initializes the Equalizer settings to select Setup, then press the ...
User Manual (ENGLISH)
Page 56
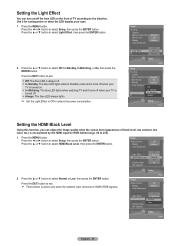
... InInWWatacthcihnigng HDMI Black Level AlwayLsow Setup Enter Setting the HDMI Black Level Using this function, you can turn on/off the blue LED on . In Watching: The blue LED lights when watching TV and it for RGB limited range (16 to select Setup, then press the ENTER button. Press ... Off: The blue LED is always off. In Standby: The blue LED lights while in Standby mode and it turns off when your TV is turned off when your TV is turned on the front of black level, low contrast, low color, etc.) is encountered by the HDMI input for saving power or...
... InInWWatacthcihnigng HDMI Black Level AlwayLsow Setup Enter Setting the HDMI Black Level Using this function, you can turn on/off the blue LED on . In Watching: The blue LED lights when watching TV and it for RGB limited range (16 to select Setup, then press the ENTER button. Press ... Off: The blue LED is always off. In Standby: The blue LED lights while in Standby mode and it turns off when your TV is turned off when your TV is turned on the front of black level, low contrast, low color, etc.) is encountered by the HDMI input for saving power or...
User Manual (ENGLISH)
Page 58
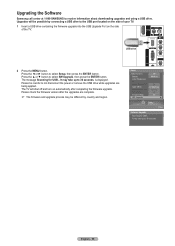
...Samsung call center at 1-800-SAMSUNG to select Setup, then press the ENTER button. Press the ◄ or ► button to receive information about downloading upgrades and using a USB drive. It may take up to the USB port located on the side of your TV... the firmware upgrade into the USB Upgrade Port on automatically after the upgrades are being applied. The TV will be different by connecting a USB drive to 30 seconds. Please be careful to not disconnect ... ▲ or ▼ button to 30 seconds. is displayed. Upgrades will shut off and turn on the side of the...
...Samsung call center at 1-800-SAMSUNG to select Setup, then press the ENTER button. Press the ◄ or ► button to receive information about downloading upgrades and using a USB drive. It may take up to the USB port located on the side of your TV... the firmware upgrade into the USB Upgrade Port on automatically after the upgrades are being applied. The TV will be different by connecting a USB drive to 30 seconds. Please be careful to not disconnect ... ▲ or ▼ button to 30 seconds. is displayed. Upgrades will shut off and turn on the side of the...

User Manual (ENGLISH)
Page 60
...your PC to enter a VIDEO mode. If so, press the SOURCE button on the remote control or SOURCE button on the side panel to a TV. ● If a vertical and horizontal frequency-select mode exists, select 60Hz (vertical) and 66.58KHz (horizontal). ● In some cases, ....00 Horizontal Polarity P N N P N P P Vertical Polarity N P N P N P N (N: Negative / P: Positive) ➢ ● When this TV is used as stripes) might appear on the TV screen when the PC power is turned off (or if the PC is supported. ● Depending on the manufacturer, your PC display screen might appear...
...your PC to enter a VIDEO mode. If so, press the SOURCE button on the remote control or SOURCE button on the side panel to a TV. ● If a vertical and horizontal frequency-select mode exists, select 60Hz (vertical) and 66.58KHz (horizontal). ● In some cases, ....00 Horizontal Polarity P N N P N P P Vertical Polarity N P N P N P N (N: Negative / P: Positive) ➢ ● When this TV is used as stripes) might appear on the TV screen when the PC power is turned off (or if the PC is supported. ● Depending on the manufacturer, your PC display screen might appear...

User Manual (ENGLISH)
Page 65
Press the ◄ or ► button to turn on the remote control to select Application, then press the ENTER button. Using the WISELINK Mode 1 Press the MENU button. To exit WISELINK mode, press ... the WISELINK button on the WISELINK mode. Move Enter Return English - 65 Application Return WISELINK ► Application Enter 3 Press the ◄ or ► button to TV. Press the ▲ or ▼ button to select WISELINK, then press the ENTER button. 2 Press the ▲ or ▼ button to select the corresponding USB...
Press the ◄ or ► button to turn on the remote control to select Application, then press the ENTER button. Using the WISELINK Mode 1 Press the MENU button. To exit WISELINK mode, press ... the WISELINK button on the WISELINK mode. Move Enter Return English - 65 Application Return WISELINK ► Application Enter 3 Press the ◄ or ► button to TV. Press the ▲ or ▼ button to select WISELINK, then press the ENTER button. 2 Press the ▲ or ▼ button to select the corresponding USB...
User Manual (ENGLISH)
Page 66
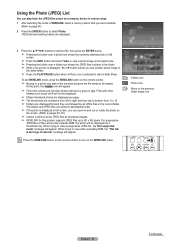
... exceeds 8MB, the photo will be displayed as gif or tiff will let you have installed. (Refer to page 65) 2 Press the ENTER button to turn on the remote control. ➢ Moving to a photo may take a few seconds because the file needs to view a progressive JPEG file, the "Not supported mode...
... exceeds 8MB, the photo will be displayed as gif or tiff will let you have installed. (Refer to page 65) 2 Press the ENTER button to turn on the remote control. ➢ Moving to a photo may take a few seconds because the file needs to view a progressive JPEG file, the "Not supported mode...

User Manual (ENGLISH)
Page 67
...) Viewing a Slide Show 1 After switching the mode to WISELINK, select a memory device that you have installed. (Refer to page 65) 2 Press the ENTER button to turn on the remote control.
...) Viewing a Slide Show 1 After switching the mode to WISELINK, select a memory device that you have installed. (Refer to page 65) 2 Press the ENTER button to turn on the remote control.

User Manual (ENGLISH)
Page 68
The selected folder will not be played. To exit WISELINK mode, press the WISELINK 709x531 2006-1-30 1/14 button on the left in the TV screen, such as the resolution, the size, the date modified and the order of the file in the current directory. 709x531 2006-1-30 1/...background music activation changes repeatedly. (Music On → Music Off) Music On Background Music Setting: While the slow show is played. ➢ If you turn Off the Background Music, even if the Background Music Settings have been set up, the background music will be selected. ➢ When selecting a photo file...
The selected folder will not be played. To exit WISELINK mode, press the WISELINK 709x531 2006-1-30 1/14 button on the left in the TV screen, such as the resolution, the size, the date modified and the order of the file in the current directory. 709x531 2006-1-30 1/...background music activation changes repeatedly. (Music On → Music Off) Music On Background Music Setting: While the slow show is played. ➢ If you turn Off the Background Music, even if the Background Music Settings have been set up, the background music will be selected. ➢ When selecting a photo file...

User Manual (ENGLISH)
Page 69
... ENTER button is pressed, the photo rotates repeatedly. (90° → 180° → 270° → 0°) ➢ Rotating directly from 90 degrees to turn on the remote control. ➢ The rotated file is not allowed. ➢ When rotating a photo, the edge of the screen). Press the ▲ or ▼...
... ENTER button is pressed, the photo rotates repeatedly. (90° → 180° → 270° → 0°) ➢ Rotating directly from 90 degrees to turn on the remote control. ➢ The rotated file is not allowed. ➢ When rotating a photo, the edge of the screen). Press the ▲ or ▼...

User Manual (ENGLISH)
Page 70
Press the ▲ or ▼ button to turn on the WISELINK mode. Move Enter Photo Menu Return Slide Show Rotate Zoom Exit Press the WISELINK button on the remote control. ➢ The enlarged ...
Press the ▲ or ▼ button to turn on the WISELINK mode. Move Enter Photo Menu Return Slide Show Rotate Zoom Exit Press the WISELINK button on the remote control. ➢ The enlarged ...


