
Quick Guide (easy Manual) (ver.1.0) (English)
Page 1
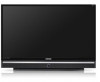
DLP TV Owner's Instructions HL-T5055W HL-T5655W Register your product at www.samsung.com/global/register Record your Model and Serial number here for future reference. ▪ Model Serial No
DLP TV Owner's Instructions HL-T5055W HL-T5655W Register your product at www.samsung.com/global/register Record your Model and Serial number here for future reference. ▪ Model Serial No
Quick Guide (easy Manual) (ver.1.0) (English)
Page 2
...high definition TV (HDTV)...5,878,080, and under certain intellectual property rights of our current analog TV programs, while the 480p format offers improved image detail over 480i. Some... much higher picture quality than one program on the same TV channel) and datacasting. U.S.A Only The product unit accompanying ...contents. A Guide to Dolby Digital 5.1 surround, using your TV set. Other countries The product unit accompanying this product unit ... of Dolby digital audio formats from Dolby Surround 2.0 to Digital TV • What is licensed under this product unit to encode and...
...high definition TV (HDTV)...5,878,080, and under certain intellectual property rights of our current analog TV programs, while the 480p format offers improved image detail over 480i. Some... much higher picture quality than one program on the same TV channel) and datacasting. U.S.A Only The product unit accompanying ...contents. A Guide to Dolby Digital 5.1 surround, using your TV set. Other countries The product unit accompanying this product unit ... of Dolby digital audio formats from Dolby Surround 2.0 to Digital TV • What is licensed under this product unit to encode and...
Quick Guide (easy Manual) (ver.1.0) (English)
Page 3
...www.10000watts.com, and www.fcc.gov. 2. Note that the landlord of an apartment complex can provide broadcast DTV signals via a master TV antenna system to put up outside antennas for DTV broadcasts. The Federal Communications Commission's OTARD Rule (part of the Telecommunications Act of 1996) ...programs. The good news is that is an antenna and a DTV set -top receivers. So you need is currently incompatible with many existing TV antennas. Residents of neighborhood associations to each apartment. 4. Can I use an outdoor or indoor antenna to receive DTV broadcasts. This depends ...
...www.10000watts.com, and www.fcc.gov. 2. Note that the landlord of an apartment complex can provide broadcast DTV signals via a master TV antenna system to put up outside antennas for DTV broadcasts. The Federal Communications Commission's OTARD Rule (part of the Telecommunications Act of 1996) ...programs. The good news is that is an antenna and a DTV set -top receivers. So you need is currently incompatible with many existing TV antennas. Residents of neighborhood associations to each apartment. 4. Can I use an outdoor or indoor antenna to receive DTV broadcasts. This depends ...

Quick Guide (easy Manual) (ver.1.0) (English)
Page 4
... Analog 41 ■ Checking the Digital-Signal Strength - Digital 41 ■ LNA (Low Noise Amplifier 42 PC DISPLAY ■ Using Your TV as a Computer (PC) Display 42 ■ Display Modes 42 ■ Setting up DNSe (Digital Natural Sound engine)........34 ■ Choosing a Multi-Channel... a Digital Audio System 14 ■ Connecting an Amplifier/DVD Home Theater 15 ■ Connecting a PC 15 OPERATION ■ Turning the TV On and Off 16 ■ Plug & Play Feature 16 ■ Changing Channels 17 ■ Adjusting the Volume 18 ■ Viewing the Display ...
... Analog 41 ■ Checking the Digital-Signal Strength - Digital 41 ■ LNA (Low Noise Amplifier 42 PC DISPLAY ■ Using Your TV as a Computer (PC) Display 42 ■ Display Modes 42 ■ Setting up DNSe (Digital Natural Sound engine)........34 ■ Choosing a Multi-Channel... a Digital Audio System 14 ■ Connecting an Amplifier/DVD Home Theater 15 ■ Connecting a PC 15 OPERATION ■ Turning the TV On and Off 16 ■ Plug & Play Feature 16 ■ Changing Channels 17 ■ Adjusting the Volume 18 ■ Viewing the Display ...
Quick Guide (easy Manual) (ver.1.0) (English)
Page 5
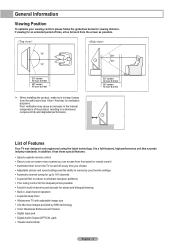
... please follow the guidelines below for stereo and bilingual listening • Built-in, dual channel speakers • A special sleep timer • Widescreen TV with adjustable image size • Life-like clear images provided by DNle technology • Color Weakness Enhancement Feature • Digital Input jack •...jack • Theater Game Mode English - 5 In addition, it away from front panel or remote control • Automatic timer to turn the TV on and off at any time you can access from the wall (more than 10cm / 4inches) for ventilation purposes. List of the product, ...
... please follow the guidelines below for stereo and bilingual listening • Built-in, dual channel speakers • A special sleep timer • Widescreen TV with adjustable image size • Life-like clear images provided by DNle technology • Color Weakness Enhancement Feature • Digital Input jack •...jack • Theater Game Mode English - 5 In addition, it away from front panel or remote control • Automatic timer to turn the TV on and off at any time you can access from the wall (more than 10cm / 4inches) for ventilation purposes. List of the product, ...
Quick Guide (easy Manual) (ver.1.0) (English)
Page 6
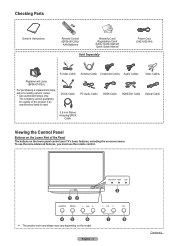
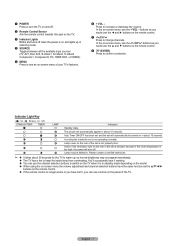
... the product if an unauthorized lamp is used. The company cannot guarantee the quality of the Panel The buttons on the lower panel control your TV's basic features, including the on the model. Checking Parts Owner's Instructions Remote Control (BP59-00123A)/ AAA Batteries Warranty Card/ Registration Card/ Safety Guide Manual/ Quick...
... the product if an unauthorized lamp is used. The company cannot guarantee the quality of the Panel The buttons on the lower panel control your TV's basic features, including the on the model. Checking Parts Owner's Instructions Remote Control (BP59-00123A)/ AAA Batteries Warranty Card/ Registration Card/ Safety Guide Manual/ Quick...
Quick Guide (easy Manual) (ver.1.0) (English)
Page 7
... fan inside lamp from overheating. Please contact a certified technician. ➢ ◆ It takes about 30 seconds for the TV to warm up in stand-by mode. 4 SOURCE Toggles between all the available input sources (TV, AV1, AV2, AV3, S-Video1, S-Video2, S-Video3 Component1, Component2, PC, HDMI1/DVI, or HDMI2). 5 MENU ... In the on-screen menu, use the CH buttons as you have lost it working. ◆ You can use controls on the panel of your TV's features. 6 + VOL - Press to keep the inside the set is blocked, because if the inner temperature is too high, the power will...
... fan inside lamp from overheating. Please contact a certified technician. ➢ ◆ It takes about 30 seconds for the TV to warm up in stand-by mode. 4 SOURCE Toggles between all the available input sources (TV, AV1, AV2, AV3, S-Video1, S-Video2, S-Video3 Component1, Component2, PC, HDMI1/DVI, or HDMI2). 5 MENU ... In the on-screen menu, use the CH buttons as you have lost it working. ◆ You can use controls on the panel of your TV's features. 6 + VOL - Press to keep the inside the set is blocked, because if the inner temperature is too high, the power will...
Quick Guide (easy Manual) (ver.1.0) (English)
Page 8
An optional HDMI/DVI cable will be connected continuously, such as VCR or DVD players. The product color and shape may vary depending on your TV allow you to receive left and right audio from a camcorder or video game. For more information on connecting equipment, see pages 12-15. ➢ The ...
An optional HDMI/DVI cable will be connected continuously, such as VCR or DVD players. The product color and shape may vary depending on your TV allow you to receive left and right audio from a camcorder or video game. For more information on connecting equipment, see pages 12-15. ➢ The ...

Quick Guide (easy Manual) (ver.1.0) (English)
Page 9
...off the sound. 8 MENU Displays the main on-screen menu. 9 RETURN Returns to the previous menu. 0 S.MODE Press to display information on the TV screen. Rewind - f INFO Press to select the sound mode. ! Press again to change channels. i Color buttons Press to add or delete channels and... mode directly. l DNSe DNSe enhances the sound quality, automatically controls output, and prevents sound distortion. Press this button to set it directly at the TV. English - 9 d EXIT Press to page 34) m RESET When your remote control does not work, change menu values. Remote Control You can ...
...off the sound. 8 MENU Displays the main on-screen menu. 9 RETURN Returns to the previous menu. 0 S.MODE Press to display information on the TV screen. Rewind - f INFO Press to select the sound mode. ! Press again to change channels. i Color buttons Press to add or delete channels and... mode directly. l DNSe DNSe enhances the sound quality, automatically controls output, and prevents sound distortion. Press this button to set it directly at the TV. English - 9 d EXIT Press to page 34) m RESET When your remote control does not work, change menu values. Remote Control You can ...
Quick Guide (easy Manual) (ver.1.0) (English)
Page 10
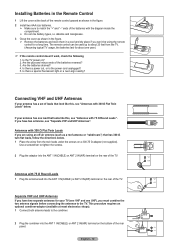
... as shown in the figure. ➢ Remove the batteries and store them in a cool and dry place if you won't be used up to the TV. Is there a special fluorescent light or a neon sign nearby? Antennas with 300 Ω Flat Twin Leads If you are using the remote control for about... cord unplugged? 5. Use a screwdriver to the combiner. 2 Plug the combiner into the ANT 1 IN(CABLE) or ANT 2 IN(AIR) terminal on the rear of the TV. Installing Batteries in the Remote Control 1 Lift the cover at most electronics shops). 1 Connect both antenna leads to tighten the screws. 2 Plug the adaptor into...
... as shown in the figure. ➢ Remove the batteries and store them in a cool and dry place if you won't be used up to the TV. Is there a special fluorescent light or a neon sign nearby? Antennas with 300 Ω Flat Twin Leads If you are using the remote control for about... cord unplugged? 5. Use a screwdriver to the combiner. 2 Plug the combiner into the ANT 1 IN(CABLE) or ANT 2 IN(AIR) terminal on the rear of the TV. Installing Batteries in the Remote Control 1 Lift the cover at most electronics shops). 1 Connect both antenna leads to tighten the screws. 2 Plug the adaptor into...
Quick Guide (easy Manual) (ver.1.0) (English)
Page 11
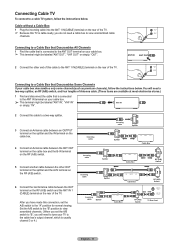
...(CABLE) terminal on your cable box. ➢ This terminal might be labeled "ANT IN", "VHF IN" or simply, "IN". After you have made this TV is cable-ready, you will need a two-way splitter, an RF (A/B) switch, and four lengths of Antenna cable. (These items are available at most electronics.... 6 Connect the last Antenna cable between the OUT terminal on the RF (A/B) switch and the ANT IN 1 (CABLE) terminal on the rear of the TV. ➢ Because this connection, set the A/B switch to "B", you do not need to tune your cable box descrambles only some channels(such as premium channels...
...(CABLE) terminal on your cable box. ➢ This terminal might be labeled "ANT IN", "VHF IN" or simply, "IN". After you have made this TV is cable-ready, you will need a two-way splitter, an RF (A/B) switch, and four lengths of Antenna cable. (These items are available at most electronics.... 6 Connect the last Antenna cable between the OUT terminal on the RF (A/B) switch and the ANT IN 1 (CABLE) terminal on the rear of the TV. ➢ Because this connection, set the A/B switch to "B", you do not need to tune your cable box descrambles only some channels(such as premium channels...

Quick Guide (easy Manual) (ver.1.0) (English)
Page 12
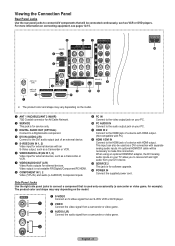
... antenna or cable to your VCR and your VCR is connected to a game player. S-Video Connection Your Samsung TV can be displayed with a cut off picture when the TV is stereo, you must connect two cables. TV Rear Panel VCR 5 Audio Cable(Not supplied) 2 4 Video Cable(Not supplied) 3 Antenna cable(Not supplied) ➢ Each... cable. Skip step 1 if you have not yet connected to an antenna or a cable system. 1 Unplug the cable or antenna from the rear of the TV 2 Connect the cable or antenna to the ANT IN terminal on the back of the VCR. 3 Connect an Antenna Cable between the ANT OUT terminal...
... antenna or cable to your VCR and your VCR is connected to a game player. S-Video Connection Your Samsung TV can be displayed with a cut off picture when the TV is stereo, you must connect two cables. TV Rear Panel VCR 5 Audio Cable(Not supplied) 2 4 Video Cable(Not supplied) 3 Antenna cable(Not supplied) ➢ Each... cable. Skip step 1 if you have not yet connected to an antenna or a cable system. 1 Unplug the cable or antenna from the rear of the TV 2 Connect the cable or antenna to the ANT IN terminal on the back of the VCR. 3 Connect an Antenna Cable between the ANT OUT terminal...
Quick Guide (easy Manual) (ver.1.0) (English)
Page 13
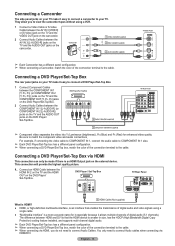
...10146; When connecting a DVD Player/Set-Top box, match the color of the connection terminal to connect Audio Cables. DVD Player / Set-Top Box TV Rear Panel 1 HDMI Cable (Not supplied) What is HDMI? ● HDMI, or high-definition multimedia interface, is an interface that the HDMI ...jack on the DVD Player/ Set-Top Box. Camcorder 1 S-Video Cable(Not supplied) or 1 Video Cable(Not supplied) 2 Audio Cable(Not supplied) TV Side Panel ➢ Each Camcorder has a different panel configuration. ➢ When connecting a Camcorder, match the color of the connection terminal to view ...
...10146; When connecting a DVD Player/Set-Top box, match the color of the connection terminal to connect Audio Cables. DVD Player / Set-Top Box TV Rear Panel 1 HDMI Cable (Not supplied) What is HDMI? ● HDMI, or high-definition multimedia interface, is an interface that the HDMI ...jack on the DVD Player/ Set-Top Box. Camcorder 1 S-Video Cable(Not supplied) or 1 Video Cable(Not supplied) 2 Audio Cable(Not supplied) TV Side Panel ➢ Each Camcorder has a different panel configuration. ➢ When connecting a Camcorder, match the color of the connection terminal to view ...

Quick Guide (easy Manual) (ver.1.0) (English)
Page 14
... on the DVD Player/Set-Top Box. When a Digital Audio System is connected to the HDMI 1/DVI IN terminal on the TV. English - 14 S/PDIF is a transmission system of digital audio in the form of the TV, and adjust the volume level with the system's volume control. DVD Player/Set-Top Box... there is a DVI Output jack on the external device. 1 Connect a HDMI/DVI Cable or DVI-HDMI Adapter between the HDMI 1/DVI IN jack on the TV and the DVI jack on the DVD Player/ Set-Top Box. 2 Connect Audio Cables between the DIGITAL AUDIO OUT (OPTICAL) jack on the...
... on the DVD Player/Set-Top Box. When a Digital Audio System is connected to the HDMI 1/DVI IN terminal on the TV. English - 14 S/PDIF is a transmission system of digital audio in the form of the TV, and adjust the volume level with the system's volume control. DVD Player/Set-Top Box... there is a DVI Output jack on the external device. 1 Connect a HDMI/DVI Cable or DVI-HDMI Adapter between the HDMI 1/DVI IN jack on the TV and the DVI jack on the DVD Player/ Set-Top Box. 2 Connect Audio Cables between the DIGITAL AUDIO OUT (OPTICAL) jack on the...
Quick Guide (easy Manual) (ver.1.0) (English)
Page 15
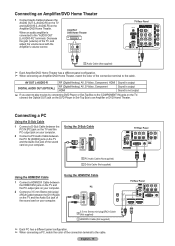
...of the connection terminal to the cable. Connecting an Amplifier/DVD Home Theater 1 Connect Audio Cables between the PC IN [AUDIO] jack on the TV and the Audio Out jack of the sound card on your computer. Connecting a PC Using the D-Sub Cable 1 Connect a D-Sub Cable ... Connect a 3.5 mm Stereo mini-plug/ 2RCA Cable between the DVI IN jack on the Amplifier/DVD Home Theater. English - 15 TV Rear Panel TV Rear Panel Amplifier/ DVD Home Theater TV Rear Panel 1 Audio Cable (Not supplied) ➢ Each Amplifier/DVD Home Theater has a different panel configuration. ➢ When connecting...
...of the connection terminal to the cable. Connecting an Amplifier/DVD Home Theater 1 Connect Audio Cables between the PC IN [AUDIO] jack on the TV and the Audio Out jack of the sound card on your computer. Connecting a PC Using the D-Sub Cable 1 Connect a D-Sub Cable ... Connect a 3.5 mm Stereo mini-plug/ 2RCA Cable between the DVI IN jack on the Amplifier/DVD Home Theater. English - 15 TV Rear Panel TV Rear Panel Amplifier/ DVD Home Theater TV Rear Panel 1 Audio Cable (Not supplied) ➢ Each Amplifier/DVD Home Theater has a different panel configuration. ➢ When connecting...

Quick Guide (easy Manual) (ver.1.0) (English)
Page 16
... language of the OSD. Air 16 15% Stop Enter Skip Plug & Play Set the Clock Mode. Plug & Play Feature When the TV is accidentally set . The message Menu language, Shop Mode, Channels and Time will automatically disappear after several seconds. is connected to step ...9. (If you can set . The message Select Home Mode when installing this TV at home. After all of the selected connection. Press the ENTER button when channel memorization is displayed. Clock Mode menu is automatically ...
... language of the OSD. Air 16 15% Stop Enter Skip Plug & Play Set the Clock Mode. Plug & Play Feature When the TV is accidentally set . The message Menu language, Shop Mode, Channels and Time will automatically disappear after several seconds. is connected to step ...9. (If you can set . The message Select Home Mode when installing this TV at home. After all of the selected connection. Press the ENTER button when channel memorization is displayed. Clock Mode menu is automatically ...
Quick Guide (easy Manual) (ver.1.0) (English)
Page 17
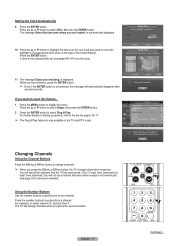
... on setting up options, refer to display the menu. Using the Number Buttons Use the number buttons to quickly tune to select Plug & Play. The TV will see all the channels that were either erased or not memorized. Press the ▲ or ▼ button to select channel 27, press 2, then 7....number buttons to go directly to daylight saving time. Plug & Play Set to a channel. See page 19 to set , see channels that the TV has memorized. (The TV must have finished, press the ENTER button. ➢ Even if the ENTER button is displayed. If clock is not automatically set the clock. 11...
... on setting up options, refer to display the menu. Using the Number Buttons Use the number buttons to quickly tune to select Plug & Play. The TV will see all the channels that were either erased or not memorized. Press the ▲ or ▼ button to select channel 27, press 2, then 7....number buttons to go directly to daylight saving time. Plug & Play Set to a channel. See page 19 to set , see channels that the TV has memorized. (The TV must have finished, press the ENTER button. ➢ Even if the ENTER button is displayed. If clock is not automatically set the clock. 11...
Quick Guide (easy Manual) (ver.1.0) (English)
Page 18
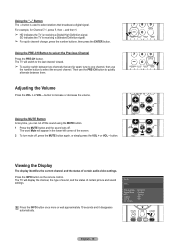
...alternate between them. The word Mute will display the channel, the type of sound, and the status of certain picture and sound settings. The TV will appear in the lower-left corner of certain audio-video settings. button is receiving a Digital High Definition signal. SD indicates the...00 am : Dynamic : Custom : Stereo : Off : Off English - 18 Using the "-" Button The - button to select the Previous Channel Press the PRE-CH button. The TV will switch to select the second channel. Using the MUTE Button At any time, you can cut off the sound using the MUTE button. 1 Press...
...alternate between them. The word Mute will display the channel, the type of sound, and the status of certain picture and sound settings. The TV will appear in the lower-left corner of certain audio-video settings. button is receiving a Digital High Definition signal. SD indicates the...00 am : Dynamic : Custom : Stereo : Off : Off English - 18 Using the "-" Button The - button to select the Previous Channel Press the PRE-CH button. The TV will switch to select the second channel. Using the MUTE Button At any time, you can cut off the sound using the MUTE button. 1 Press...
Quick Guide (easy Manual) (ver.1.0) (English)
Page 19
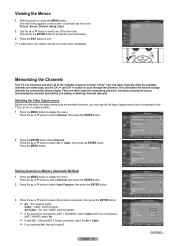
... the antennas to change channels by entering the channel digits. This eliminates the need to memorize. Input Source List : TV ► Edit Name ► Move Enter Exit Memorizing the Channels Your TV can begin memorizing the available channels, you must specify the type of the available channels for memorizing channels: selecting a ...power on the screen. English - 19 Its left side has five icons: Picture, Sound, Channel, Setup, Input. 2 Use the ▲ or ▼ button to the TV(i.e. Air Cable Air + Cable Start Start Start Move Enter Return Continued...
... the antennas to change channels by entering the channel digits. This eliminates the need to memorize. Input Source List : TV ► Edit Name ► Move Enter Exit Memorizing the Channels Your TV can begin memorizing the available channels, you must specify the type of the available channels for memorizing channels: selecting a ...power on the screen. English - 19 Its left side has five icons: Picture, Sound, Channel, Setup, Input. 2 Use the ▲ or ▼ button to the TV(i.e. Air Cable Air + Cable Start Start Start Move Enter Return Continued...
Quick Guide (easy Manual) (ver.1.0) (English)
Page 20
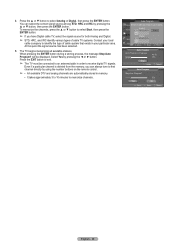
... the ENTER button. When pressing the ENTER button during a storing process, the message Stop Auto Program? Press the EXIT button to receive digital TV signals. Analog STD HRC IRC Digital STD HRC IRC Move Start Enter Return Auto Program Auto Program in Progress. will be connected to an antenna.../cable in order to exit. ➢ The TV must be displayed. Auto Program Selects a cable signal type for both Analog and Digital. ➢ STD, HRC, and IRC identify various types ...
... the ENTER button. When pressing the ENTER button during a storing process, the message Stop Auto Program? Press the EXIT button to receive digital TV signals. Analog STD HRC IRC Digital STD HRC IRC Move Start Enter Return Auto Program Auto Program in Progress. will be connected to an antenna.../cable in order to exit. ➢ The TV must be displayed. Auto Program Selects a cable signal type for both Analog and Digital. ➢ STD, HRC, and IRC identify various types ...


