
User Manual (ENGLISH)
Page 4
...Front Panel LED Indicators 11 Rear Panel Jacks ...12 Remote Control...13 Connections 16 Connecting VHF and UHF Antennas 16 Antennas with 75-ohm Round Leads 16 Connecting Cable TV 17 Cable without a Cable... Interface 23 Connecting a Digital Audio System 23 Connecting to an Analog Amplifier 24 Operation 26 Turning the TV On and Off 26 Plug & Play Feature 26 Viewing the Menus and On-Screen Displays ...Input Mode 46 Channel Control 48 Selecting Your Favorite Channels 48 Viewing the Channel Lists 50 Editing the Channel Lists 51 Default List mode 53 Labeling the Channels 54 Fine Tuning...
...Front Panel LED Indicators 11 Rear Panel Jacks ...12 Remote Control...13 Connections 16 Connecting VHF and UHF Antennas 16 Antennas with 75-ohm Round Leads 16 Connecting Cable TV 17 Cable without a Cable... Interface 23 Connecting a Digital Audio System 23 Connecting to an Analog Amplifier 24 Operation 26 Turning the TV On and Off 26 Plug & Play Feature 26 Viewing the Menus and On-Screen Displays ...Input Mode 46 Channel Control 48 Selecting Your Favorite Channels 48 Viewing the Channel Lists 50 Editing the Channel Lists 51 Default List mode 53 Labeling the Channels 54 Fine Tuning...

User Manual (ENGLISH)
Page 9
...Digital Input jack • Digital Audio Output (OPTICAL) jack • Game Mode • WISELINK enables you have unpacked your TV, check to turn the TV on and off at most electronics stores. Owner's Instructions Warranty Card/ Registration Card/ Safety Guide Manual/ Quick Guide Manual/ Remote ...channel sound decoder for stereo and bilingual listening • Built-in, dual channel speakers • A special sleep timer • Widescreen TV with adjustable image size • Life-like clear images provided by DNle technology • My Color Control Mode for corresponding with your ...
...Digital Input jack • Digital Audio Output (OPTICAL) jack • Game Mode • WISELINK enables you have unpacked your TV, check to turn the TV on and off at most electronics stores. Owner's Instructions Warranty Card/ Registration Card/ Safety Guide Manual/ Quick Guide Manual/ Remote ...channel sound decoder for stereo and bilingual listening • Built-in, dual channel speakers • A special sleep timer • Widescreen TV with adjustable image size • Life-like clear images provided by DNle technology • My Color Control Mode for corresponding with your ...
User Manual (ENGLISH)
Page 11
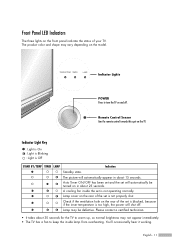
... set is blocked, because if the inner temperature is too high, the power will shut off . The product color and shape may be turned on the rear of your TV. A cooling fan inside lamp from overheating. Indicator Light Key : Light is On : Light is Blinking : Light is not operating normally....Check if the ventilation hole on in about 30 seconds for the TV to warm up, so normal brightness may not appear immediately. • The TV has a fan to turn the TV on the TV. Lamp may vary depending on the rear of the set will automatically appear in about 25 seconds. Auto ...
... set is blocked, because if the inner temperature is too high, the power will shut off . The product color and shape may be turned on the rear of your TV. A cooling fan inside lamp from overheating. Indicator Light Key : Light is On : Light is Blinking : Light is not operating normally....Check if the ventilation hole on in about 30 seconds for the TV to warm up, so normal brightness may not appear immediately. • The TV has a fan to turn the TV on the TV. Lamp may vary depending on the rear of the set will automatically appear in about 25 seconds. Auto ...
User Manual (ENGLISH)
Page 13
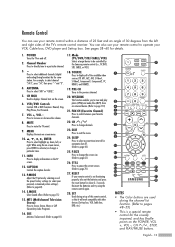
.../STB/CABLE/VCR) Selects a target device to page 70) 27. STILL Press to pause the current screen. (Refer to be controlled by the Samsung remote control (i.e., TV, DVD, STB, CABLE, or VCR). 18. SET Used during the channel list function. (Refer to pages 48~53) • This is not functioning ... photo (JPEG) and audio files (MP3) from the left , or right. You can use your VCR, Cable box, DVD player and Set-top box. POWER Turns the TV on the POWER, VOL +, VOL -, CH / , STOP, and PLAY/PAUSE buttons. Press to select channel "54-3", press "54", then press "-" and "3". 4. For ...
.../STB/CABLE/VCR) Selects a target device to page 70) 27. STILL Press to pause the current screen. (Refer to be controlled by the Samsung remote control (i.e., TV, DVD, STB, CABLE, or VCR). 18. SET Used during the channel list function. (Refer to pages 48~53) • This is not functioning ... photo (JPEG) and audio files (MP3) from the left , or right. You can use your VCR, Cable box, DVD player and Set-top box. POWER Turns the TV on the POWER, VOL +, VOL -, CH / , STOP, and PLAY/PAUSE buttons. Press to select channel "54-3", press "54", then press "-" and "3". 4. For ...

User Manual (ENGLISH)
Page 26
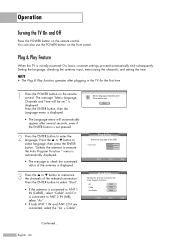
...connection. Start Plug & Play Select the language of the antenna is automatically displayed. • The message to execute the Auto Program Function." Operation Turning the TV On and Off Press the POWER button on the front panel. NOTE • The Plug & Play function operates after several seconds, even if ... IN (AIR), select "Air". • If both ANT 1 IN and ANT 2 IN are connected, select the "Air + Cable". Plug & Play Feature When the TV is displayed. Press the ENTER button to select "Start". • If the antenna is connected to ANT 1 IN (CABLE), select "Cable" and if it is...
...connection. Start Plug & Play Select the language of the antenna is automatically displayed. • The message to execute the Auto Program Function." Operation Turning the TV On and Off Press the POWER button on the front panel. NOTE • The Plug & Play function operates after several seconds, even if ... IN (AIR), select "Air". • If both ANT 1 IN and ANT 2 IN are connected, select the "Air + Cable". Plug & Play Feature When the TV is displayed. Press the ENTER button to select "Start". • If the antenna is connected to ANT 1 IN (CABLE), select "Cable" and if it is...

User Manual (ENGLISH)
Page 34
... after set-up properly, your brand of equipment you choose. If your VCR does not turn on if your remote is in five different modes: TV, VCR, Cable, DVD, or Set-Top Box. English - 34 NOTE • The remote control might not be compatible with all DVD Players, VCRs, Cable boxes, ... one .) 5 Press the POWER button on the remote control. Make sure you to Operate Your VCR 1 Turn off your VCR. 2 Press the VCR button on your TV's remote control. 3 Press the SET button on your TV's remote control. 4 Using the number buttons on your remote control, enter three digits of the VCR code...
... after set-up properly, your brand of equipment you choose. If your VCR does not turn on if your remote is in five different modes: TV, VCR, Cable, DVD, or Set-Top Box. English - 34 NOTE • The remote control might not be compatible with all DVD Players, VCRs, Cable boxes, ... one .) 5 Press the POWER button on the remote control. Make sure you to Operate Your VCR 1 Turn off your VCR. 2 Press the VCR button on your TV's remote control. 3 Press the SET button on your TV's remote control. 4 Using the number buttons on your remote control, enter three digits of the VCR code...
User Manual (ENGLISH)
Page 35
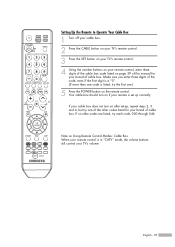
Note on the remote control. Setting Up the Remote to Operate Your Cable Box 1 Turn off your cable box. 2 Press the CABLE button on your TV's remote control. 3 Press the SET button on your TV's remote control. 4 Using the number buttons on your remote control, enter three digits of the cable box code listed... 39 of this manual for your brand of cable box. If your cable box does not turn on if your remote is in "CATV" mode, the volume buttons still control your TV's volume. Your cable box should turn on after set up , repeat steps 2, 3 and 4, but try each code, 000 through 046. If...
Note on the remote control. Setting Up the Remote to Operate Your Cable Box 1 Turn off your cable box. 2 Press the CABLE button on your TV's remote control. 3 Press the SET button on your TV's remote control. 4 Using the number buttons on your remote control, enter three digits of the cable box code listed... 39 of this manual for your brand of cable box. If your cable box does not turn on if your remote is in "CATV" mode, the volume buttons still control your TV's volume. Your cable box should turn on after set up , repeat steps 2, 3 and 4, but try each code, 000 through 046. If...

User Manual (ENGLISH)
Page 36
... code, even if the first digit is a "0". (If more than one code is in "DVD" mode, the volume buttons still control your TV's volume. If your DVD does not turn on if your remote is set -up correctly. If no other codes listed for your brand of DVD. Note on Using Remote... .) 5 Press the POWER button on the remote control. Operation Setting Up the Remote to Operate Your DVD 1 Turn off your DVD. 2 Press the DVD button on your TV's remote control. 3 Press the SET button on your TV's remote control. 4 Using the number buttons on your remote control, enter three digits of the DVD...
... code, even if the first digit is a "0". (If more than one code is in "DVD" mode, the volume buttons still control your TV's volume. If your DVD does not turn on if your remote is set -up correctly. If no other codes listed for your brand of DVD. Note on Using Remote... .) 5 Press the POWER button on the remote control. Operation Setting Up the Remote to Operate Your DVD 1 Turn off your DVD. 2 Press the DVD button on your TV's remote control. 3 Press the SET button on your TV's remote control. 4 Using the number buttons on your remote control, enter three digits of the DVD...

User Manual (ENGLISH)
Page 37
If no other codes listed for your brand of STB. Your STB should turn on after set up , repeat steps 2, 3 and 4, but try one of the other codes are listed, ... your remote control is listed, try each code, 000 through 074. If your STB does not turn on if your remote is set -up correctly. Setting Up the Remote to Operate Your Set Top Box... 1 Turn off your STB. 2 Press the STB button on your TV's remote control. 3 Press the SET button on your TV's remote control. 4 Using the number buttons on your remote control, enter ...
If no other codes listed for your brand of STB. Your STB should turn on after set up , repeat steps 2, 3 and 4, but try one of the other codes are listed, ... your remote control is listed, try each code, 000 through 074. If your STB does not turn on if your remote is set -up correctly. Setting Up the Remote to Operate Your Set Top Box... 1 Turn off your STB. 2 Press the STB button on your TV's remote control. 3 Press the SET button on your TV's remote control. 4 Using the number buttons on your remote control, enter ...
User Manual (ENGLISH)
Page 43
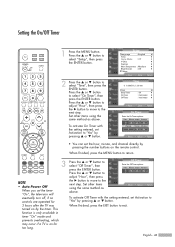
...Volume Activation 3 10 No Move Adjust Return • You can set Activation to "Yes" by the timer. or † button. 3 hours after the TV was When finished, press the EXIT button to select "On Timer", then press the ENTER button. Press the ... or † button to adjust "Hour",... the ... To activate On Timer with the setting entered, set the hour, minute, and channel directly by pressing ... English - 43 Press the ... turned on for To activate Off Timer with the setting entered, set the timer "On", the television will the √ button to move to the next...
...Volume Activation 3 10 No Move Adjust Return • You can set Activation to "Yes" by the timer. or † button. 3 hours after the TV was When finished, press the EXIT button to select "On Timer", then press the ENTER button. Press the ... or † button to adjust "Hour",... the ... To activate On Timer with the setting entered, set the hour, minute, and channel directly by pressing ... English - 43 Press the ... turned on for To activate Off Timer with the setting entered, set the timer "On", the television will the √ button to move to the next...

User Manual (ENGLISH)
Page 45
... such as a VCR, DVD, Set-Top Box or the TV source (broadcast or cable). NOTES • Only connected devices can be selected only when the external device is turned on the AV1 remote control repeatedly to select an external signal ...source. Setting the Signal Source 1 Press the MENU button. Viewing an External Signal Source Use the remote control to switch between the following sets of jacks: "AV1", "AV2", "S-VIDEO1", "S-VIDEO2", "COMPONENT1", "COMPONENT2", "PC", "HDMI1", or "HDMI2" on the TV's rear...
... such as a VCR, DVD, Set-Top Box or the TV source (broadcast or cable). NOTES • Only connected devices can be selected only when the external device is turned on the AV1 remote control repeatedly to select an external signal ...source. Setting the Signal Source 1 Press the MENU button. Viewing an External Signal Source Use the remote control to switch between the following sets of jacks: "AV1", "AV2", "S-VIDEO1", "S-VIDEO2", "COMPONENT1", "COMPONENT2", "PC", "HDMI1", or "HDMI2" on the TV's rear...

User Manual (ENGLISH)
Page 74
The message "Mute" is displayed and the sound cuts off , press the MUTE button again or press either the VOL+ or VOL- Mute To turn mute off . Sound Mode : Custom √ Equalizer √ SRS TruSurround XT : Off √ Multi-Track Options √ Auto Volume : Off √ ...press the ENTER button. Press the MUTE button on the remote control. Continued... Customizing the Sound The sound settings can use one of the TV with the remote control. Press the ... or † button to suit your personal preference. (Alternatively, you can control and customize the...
The message "Mute" is displayed and the sound cuts off , press the MUTE button again or press either the VOL+ or VOL- Mute To turn mute off . Sound Mode : Custom √ Equalizer √ SRS TruSurround XT : Off √ Multi-Track Options √ Auto Volume : Off √ ...press the ENTER button. Press the MUTE button on the remote control. Continued... Customizing the Sound The sound settings can use one of the TV with the remote control. Press the ... or † button to suit your personal preference. (Alternatively, you can control and customize the...

User Manual (ENGLISH)
Page 118
...: Select to choose whether you want to change the sub option, press the INFO button again to open the options window and select option you turn Off the Background Music, even if the Background Music Settings have been set the option(Slide Show Speed, Background Music On/Off, Background Music Setting...
...: Select to choose whether you want to change the sub option, press the INFO button again to open the options window and select option you turn Off the Background Music, even if the Background Music Settings have been set the option(Slide Show Speed, Background Music On/Off, Background Music Setting...

User Manual (ENGLISH)
Page 128
...cable box or other source, it will not allow for proper cool down time. The lamp used in a DLP TV has a limited lifespan. After replacing the lamp, the screen quality will be the same code number and type. ... the correct code numbered lamp to avoid damage to a Samsung Service center. • Caution 1. It should be replaced periodically. Be sure to connect this TV directly to be replaced when the screen becomes darker, less...bare hands or insert any foreign object inside the cover as it ? Turn the power off and wait for the lamp, give the code number to the store where you purchased ...
...cable box or other source, it will not allow for proper cool down time. The lamp used in a DLP TV has a limited lifespan. After replacing the lamp, the screen quality will be the same code number and type. ... the correct code numbered lamp to avoid damage to a Samsung Service center. • Caution 1. It should be replaced periodically. Be sure to connect this TV directly to be replaced when the screen becomes darker, less...bare hands or insert any foreign object inside the cover as it ? Turn the power off and wait for the lamp, give the code number to the store where you purchased ...
User Manual (ENGLISH)
Page 129
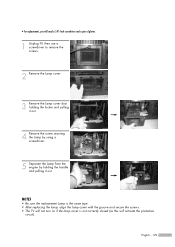
... the replacement Lamp is the same type. • After replacing the lamp, align the lamp cover with the groove and secure the screws. • The TV will not turn on if the lamp cover is not correctly closed (as this will need a 5.91-Inch screwdriver and a pair of gloves. 1 Unplug... TV, then use a screwdriver to remove the screws. 2 Remove the Lamp cover. 3 Remove the Lamp cover duct holding the locker and pulling it out. 4 Remove the ...
... the replacement Lamp is the same type. • After replacing the lamp, align the lamp cover with the groove and secure the screws. • The TV will not turn on if the lamp cover is not correctly closed (as this will need a 5.91-Inch screwdriver and a pair of gloves. 1 Unplug... TV, then use a screwdriver to remove the screws. 2 Remove the Lamp cover. 3 Remove the Lamp cover duct holding the locker and pulling it out. 4 Remove the ...

User Manual (ENGLISH)
Page 4
...Front Panel LED Indicators 11 Rear Panel Jacks ...12 Remote Control...13 Connections 16 Connecting VHF and UHF Antennas 16 Antennas with 75-ohm Round Leads 16 Connecting Cable TV 17 Cable without a Cable... Interface 23 Connecting a Digital Audio System 23 Connecting to an Analog Amplifier 24 Operation 26 Turning the TV On and Off 26 Plug & Play Feature 26 Viewing the Menus and On-Screen Displays ...Input Mode 46 Channel Control 48 Selecting Your Favorite Channels 48 Viewing the Channel Lists 50 Editing the Channel Lists 51 Default List mode 53 Labeling the Channels 54 Fine Tuning...
...Front Panel LED Indicators 11 Rear Panel Jacks ...12 Remote Control...13 Connections 16 Connecting VHF and UHF Antennas 16 Antennas with 75-ohm Round Leads 16 Connecting Cable TV 17 Cable without a Cable... Interface 23 Connecting a Digital Audio System 23 Connecting to an Analog Amplifier 24 Operation 26 Turning the TV On and Off 26 Plug & Play Feature 26 Viewing the Menus and On-Screen Displays ...Input Mode 46 Channel Control 48 Selecting Your Favorite Channels 48 Viewing the Channel Lists 50 Editing the Channel Lists 51 Default List mode 53 Labeling the Channels 54 Fine Tuning...
User Manual (ENGLISH)
Page 9
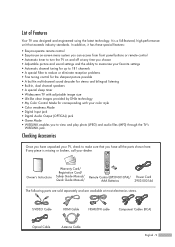
... Digital Audio Output (OPTICAL) jack • Game Mode • WISELINK enables you have all the parts shown here. List of Features Your TV was designed and engineered using the latest technology. In addition, it has these special features: • Easy-to-operate remote control • ...Easy-to-use on-screen menu system you can access from front panel buttons or remote control • Automatic timer to turn the TV on and off at most electronics stores. Owner's Instructions Warranty Card/ Registration Card/ Safety Guide Manual/ Quick Guide Manual/ Remote Control ...
... Digital Audio Output (OPTICAL) jack • Game Mode • WISELINK enables you have all the parts shown here. List of Features Your TV was designed and engineered using the latest technology. In addition, it has these special features: • Easy-to-operate remote control • ...Easy-to-use on-screen menu system you can access from front panel buttons or remote control • Automatic timer to turn the TV on and off at most electronics stores. Owner's Instructions Warranty Card/ Registration Card/ Safety Guide Manual/ Quick Guide Manual/ Remote Control ...
User Manual (ENGLISH)
Page 11
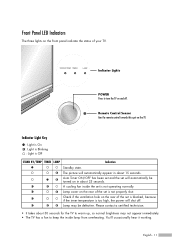
Check if the ventilation hole on the rear of the set is not properly shut. English - 11 The picture will automatically be defective. Please contact a certified technician. • It takes about 30 seconds for the TV to warm up, so normal brightness may be turned on in about 25 seconds. A cooling fan inside lamp...
Check if the ventilation hole on the rear of the set is not properly shut. English - 11 The picture will automatically be defective. Please contact a certified technician. • It takes about 30 seconds for the TV to warm up, so normal brightness may be turned on in about 25 seconds. A cooling fan inside lamp...

User Manual (ENGLISH)
Page 13
...decoder. 13. P.SIZE Press to change ) a particular item. 11. You can use your remote control to displays Channel Lists on the TV screen. 12. POWER Turns the TV on the buttons. For example, to increase or decrease the volume. 8. CH MGR Used to operate your VCR, Cable box, DVD player... or some Samsung Set-top boxes. P.MODE Adjust the TV picture by selecting one of the available video sources (TV, AV1, AV2, AV3, S-Video1, S-Video2, ...
...decoder. 13. P.SIZE Press to change ) a particular item. 11. You can use your remote control to displays Channel Lists on the TV screen. 12. POWER Turns the TV on the buttons. For example, to increase or decrease the volume. 8. CH MGR Used to operate your VCR, Cable box, DVD player... or some Samsung Set-top boxes. P.MODE Adjust the TV picture by selecting one of the available video sources (TV, AV1, AV2, AV3, S-Video1, S-Video2, ...
User Manual (ENGLISH)
Page 26
... IN and ANT 2 IN are connected, select the "Air + Cable". English - 26 i Menu language, Channels and Time will automatically appear after plugging in the TV for the first time. 1 Press the POWER button on the remote control. menu is automatically displayed. • The message to enter the language. Press the...to check the connected status of the OSD. Air Cable Air+Cable Start Start Start Move Enter Skip Continued... Plug & Play Feature When the TV is displayed. 3 Press the ... Operation Turning the TV On and Off Press the POWER button on the front panel.
... IN and ANT 2 IN are connected, select the "Air + Cable". English - 26 i Menu language, Channels and Time will automatically appear after plugging in the TV for the first time. 1 Press the POWER button on the remote control. menu is automatically displayed. • The message to enter the language. Press the...to check the connected status of the OSD. Air Cable Air+Cable Start Start Start Move Enter Skip Continued... Plug & Play Feature When the TV is displayed. 3 Press the ... Operation Turning the TV On and Off Press the POWER button on the front panel.


