

User Manual
Page 1
E-MANUAL imagine the possibilities Thank you for purchasing this Samsung product. To receive more complete service, please register your product at www.samsung.com/register Model Serial No
E-MANUAL imagine the possibilities Thank you for purchasing this Samsung product. To receive more complete service, please register your product at www.samsung.com/register Model Serial No

User Manual
Page 7
Press the button to set a desired channel to be displayed automatically at the intended time. ■■ Schedule Manager Cancel or set the Timer Viewing to display the channel you want at the intended time. English Using Timer Viewing You can set the Antenna, Channel, Repeat, Date, ◀ Start Time. ▶ ●● Antenna: Select the desired broadcasting signal. ●● Channel: Select the desired channel. Set the current time first to schedule manually. 2. Press the ENTERE button to add programme to use this function. 1.
Press the button to set a desired channel to be displayed automatically at the intended time. ■■ Schedule Manager Cancel or set the Timer Viewing to display the channel you want at the intended time. English Using Timer Viewing You can set the Antenna, Channel, Repeat, Date, ◀ Start Time. ▶ ●● Antenna: Select the desired broadcasting signal. ●● Channel: Select the desired channel. Set the current time first to schedule manually. 2. Press the ENTERE button to add programme to use this function. 1.
User Manual
Page 8
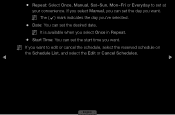
If you select Manual, you can set at your convenience. NN If you want . NN It is available when you select Once in Repeat. ●● Start Time: You can set the start time you 've selected. ●● Date: You can set the day you want to set the desired date. NN The (c) mark indicates the day you want . ●● Repeat: Select Once, Manual, Sat~Sun, Mon~Fri or Everyday to edit or cancel the schedule, select the reserved schedule on the Schedule List, and select the Edit or Cancel Schedules. ◀ ▶ English
If you select Manual, you can set at your convenience. NN If you want . NN It is available when you select Once in Repeat. ●● Start Time: You can set the start time you 've selected. ●● Date: You can set the day you want to set the desired date. NN The (c) mark indicates the day you want . ●● Repeat: Select Once, Manual, Sat~Sun, Mon~Fri or Everyday to edit or cancel the schedule, select the reserved schedule on the Schedule List, and select the Edit or Cancel Schedules. ◀ ▶ English
User Manual
Page 22
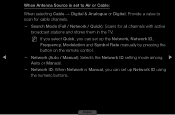
... the Network ID setting mode among ▶ Auto or Manual. -- Network ID: When Network is set to Air or Cable: When selecting Cable → Digital & Analogue or Digital: Provide a value to scan for all channels ... stations and stores them in the TV. NN If you select Quick, you can set up the Network, Network ID, Frequency, Modulation and Symbol Rate manually by pressing the button on the remote control. ◀ -- English Search Mode (Full / Network / Quick): Scans for cable channels. -- When Antenna Source is...
... the Network ID setting mode among ▶ Auto or Manual. -- Network ID: When Network is set to Air or Cable: When selecting Cable → Digital & Analogue or Digital: Provide a value to scan for all channels ... stations and stores them in the TV. NN If you select Quick, you can set up the Network, Network ID, Frequency, Modulation and Symbol Rate manually by pressing the button on the remote control. ◀ -- English Search Mode (Full / Network / Quick): Scans for cable channels. -- When Antenna Source is...
User Manual
Page 24
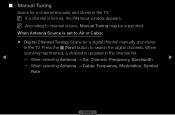
... may be supported. NN According to Air or Cable: ●● Digital Channel Tuning: Scans for a channel manually and stores in the channel list. ◀ -- Press thCe A (NB ew) Dbutton to search the digital channels. When scanning has finished, a channel is locked, the ...
... may be supported. NN According to Air or Cable: ●● Digital Channel Tuning: Scans for a channel manually and stores in the channel list. ◀ -- Press thCe A (NB ew) Dbutton to search the digital channels. When scanning has finished, a channel is locked, the ...
User Manual
Page 27
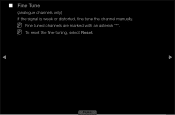
NN To reset the fine-tuning, select Reset. ◀ ▶ English ■■ Fine Tune (analogue channels only) If the signal is weak or distorted, fine tune the channel manually. NN Fine tuned channels are marked with an asterisk "*".
NN To reset the fine-tuning, select Reset. ◀ ▶ English ■■ Fine Tune (analogue channels only) If the signal is weak or distorted, fine tune the channel manually. NN Fine tuned channels are marked with an asterisk "*".

User Manual
Page 61
To get these values through your TV needs to enter them manually. ADSL modems that support DHCP also let you use ADSL modems that support DHCP automatically provide the IP address, subnet mask, gateway, and DNS values .... Some networks require a Static IP address. If your network requires a Static IP address, you must enter the IP address, subnet mask, gateway, and DNS values manually on your Internet Service Provider (ISP). English Modems and routers that support DHCP if your network requires a Static IP address. NN A network speed of lower...
To get these values through your TV needs to enter them manually. ADSL modems that support DHCP also let you use ADSL modems that support DHCP automatically provide the IP address, subnet mask, gateway, and DNS values .... Some networks require a Static IP address. If your network requires a Static IP address, you must enter the IP address, subnet mask, gateway, and DNS values manually on your Internet Service Provider (ISP). English Modems and routers that support DHCP if your network requires a Static IP address. NN A network speed of lower...
User Manual
Page 63
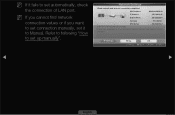
... or if you have a problem with using Internet service, contact your Internet service provider. Refer to following "How to Manual. If you want to set connection manually, set it fails to set up manually". IP Settings Retry OK a Previous L Move E Enter R Return ◀ ▶ English MAC Address 00:40:30:30:20:10...
... or if you have a problem with using Internet service, contact your Internet service provider. Refer to following "How to Manual. If you want to set connection manually, set it fails to set up manually". IP Settings Retry OK a Previous L Move E Enter R Return ◀ ▶ English MAC Address 00:40:30:30:20:10...

User Manual
Page 64
Getting the Network Connection Values To get the Network connection values on the bottom right of the screen. 2. In the pop-up menu that appears, click the Support tab. ▶ 4. On the dialog that appears, click Status. ◀ 3. On the Support Tab, click the Details button. English The Network connection values are displayed. ■■ Network Setup (Manual) Use the Manual Network Setup when connecting your TV to a network that requires a Static IP address. Right click the Network icon on most Windows computers, follow these steps: 1.
Getting the Network Connection Values To get the Network connection values on the bottom right of the screen. 2. In the pop-up menu that appears, click the Support tab. ▶ 4. On the dialog that appears, click Status. ◀ 3. On the Support Tab, click the Details button. English The Network connection values are displayed. ■■ Network Setup (Manual) Use the Manual Network Setup when connecting your TV to a network that requires a Static IP address. Right click the Network icon on most Windows computers, follow these steps: 1.
User Manual
Page 65
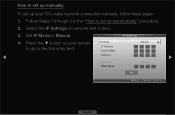
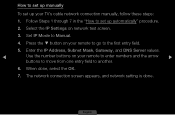
Select the IP Settings on your TV's cable network connection manually, follow these steps: 1. IP Settings 4. Set IP Mode to the first entry field. Press the ▼ button on network test screen. 3. Follow Steps 1 through 2 in the "How to set up manually To set up your remote to go to Manual. IP Mode IP Address Subnet Mask ◀ Gateway DSN Mode DNS Server Manual ► 0 . 0 . 0 . 0 0 . 0 . 0 . 0 0 . 0 . 0 . 0 ▶ Manual 0 . 0 . 0 . 0 OK U Move E Enter R Return English How to set up automatically" procedure. 2.
Select the IP Settings on your TV's cable network connection manually, follow these steps: 1. IP Settings 4. Set IP Mode to the first entry field. Press the ▼ button on network test screen. 3. Follow Steps 1 through 2 in the "How to set up manually To set up your remote to go to Manual. IP Mode IP Address Subnet Mask ◀ Gateway DSN Mode DNS Server Manual ► 0 . 0 . 0 . 0 0 . 0 . 0 . 0 0 . 0 . 0 . 0 ▶ Manual 0 . 0 . 0 . 0 OK U Move E Enter R Return English How to set up automatically" procedure. 2.

User Manual
Page 71
..., it may not be recognized when using a connection via a USB hub or via the "Samsung Wireless LAN Adapter." ●● Ensure the TV is turned off before you connect the Samsung Wireless LAN Adapter. ●● Connection Methods: You can setup the wireless network connection on five... ways. -- Ad hoc ●● The Samsung Wireless LAN Adapter may not connect to the TV via a USB extension cable other than the cable supplied. One Foot Connection -- English WPS...
..., it may not be recognized when using a connection via a USB hub or via the "Samsung Wireless LAN Adapter." ●● Ensure the TV is turned off before you connect the Samsung Wireless LAN Adapter. ●● Connection Methods: You can setup the wireless network connection on five... ways. -- Ad hoc ●● The Samsung Wireless LAN Adapter may not connect to the TV via a USB extension cable other than the cable supplied. One Foot Connection -- English WPS...
User Manual
Page 76
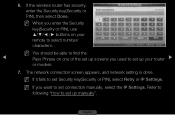
... on one of the set up screens you want to set up your remote to select number/ characters. NN If you used to set connection manually, select the IP Settings. Refer to following "How to set Security key(Security or PIN), select Retry or IP Settings. The network connection screen appears... PIN), then select Done. Network Settings Enter security key. 0 entered a b g h m n s t a/A c d e i j k o p q u v w F Delete f 1 l 4 r 7 x y Space 2 3 5 6 8 9 z 0 Done a Previous n Move E Enter R Return NN You should be able to set up manually".
... on one of the set up screens you want to set up your remote to select number/ characters. NN If you used to set connection manually, select the IP Settings. Refer to following "How to set Security key(Security or PIN), select Retry or IP Settings. The network connection screen appears... PIN), then select Done. Network Settings Enter security key. 0 entered a b g h m n s t a/A c d e i j k o p q u v w F Delete f 1 l 4 r 7 x y Space 2 3 5 6 8 9 z 0 Done a Previous n Move E Enter R Return NN You should be able to set up manually".
User Manual
Page 77
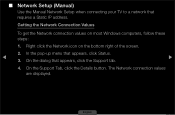
Right click the Network icon on most Windows computers, follow these steps: 1. The Network connection values are displayed. On the dialog that requires a Static IP address. ■■ Network Setup (Manual) Use the Manual Network Setup when connecting your TV to a network that appears, click the Support tab. ▶ 4. In the pop-up menu that appears, click Status. ◀ 3. On the Support Tab, click the Details button. English Getting the Network Connection Values To get the Network connection values on the bottom right of the screen. 2.
Right click the Network icon on most Windows computers, follow these steps: 1. The Network connection values are displayed. On the dialog that requires a Static IP address. ■■ Network Setup (Manual) Use the Manual Network Setup when connecting your TV to a network that appears, click the Support tab. ▶ 4. In the pop-up menu that appears, click Status. ◀ 3. On the Support Tab, click the Details button. English Getting the Network Connection Values To get the Network connection values on the bottom right of the screen. 2.
User Manual
Page 78
... done, select the OK. 7. Set IP Mode to set up manually To set up your TV's cable network connection manually, follow these steps: 1. English Enter the IP Address, Subnet Mask, Gateway, and DNS Server values. ◀ Use the number buttons on your remote to go ...
... done, select the OK. 7. Set IP Mode to set up manually To set up your TV's cable network connection manually, follow these steps: 1. English Enter the IP Address, Subnet Mask, Gateway, and DNS Server values. ◀ Use the number buttons on your remote to go ...
User Manual
Page 85
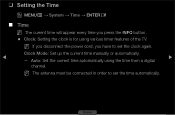
... the INFO button. ●● Clock: Setting the clock is for using the time from a digital ▶ channel. Clock Mode: Set up the current time manually or automatically. ◀ --
... the INFO button. ●● Clock: Setting the clock is for using the time from a digital ▶ channel. Clock Mode: Set up the current time manually or automatically. ◀ --

User Manual
Page 86
Manual: Set the current time manually. Clock Set: Set the Day, Month, Year, Hour and Minute manually. Time Zone (depending on the broadcast station and signal, the auto time set to Manual. NN This function is only available when the Clock Mode is set the time manually. NN Depending on the country): Select your time zone. NN Available only when Clock Mode is set up may not be activated. ▶ English -- In this case, set to Auto. ◀ NN When selecting Manual in Time Zone, GMT and DST will be correct.
Manual: Set the current time manually. Clock Set: Set the Day, Month, Year, Hour and Minute manually. Time Zone (depending on the broadcast station and signal, the auto time set to Manual. NN This function is only available when the Clock Mode is set the time manually. NN Depending on the country): Select your time zone. NN Available only when Clock Mode is set up may not be activated. ▶ English -- In this case, set to Auto. ◀ NN When selecting Manual in Time Zone, GMT and DST will be correct.

User Manual
Page 88
...; your convenience. English Setup: Select Off, Once, On Time 04 Volume 00 20 Everyday, Mon~Fri, Mon~Sat, Source Antenna Channel ◀ Sat~Sun or Manual to activate the timer. ❑❑ Setting the On / Off Timer OOMENUm → System → Time → On Timer Off Timer → ENTERE ●●... Timer On Timer 1 3: Three different on timer settings can set the clock Setup Once Sun Mon Tue Wed Thu Fri Sat first. -- If you select Manual, you can be made. You must set up the day U Adjust L Move E Enter R Return you 've selected.
...; your convenience. English Setup: Select Off, Once, On Time 04 Volume 00 20 Everyday, Mon~Fri, Mon~Sat, Source Antenna Channel ◀ Sat~Sun or Manual to activate the timer. ❑❑ Setting the On / Off Timer OOMENUm → System → Time → On Timer Off Timer → ENTERE ●●... Timer On Timer 1 3: Three different on timer settings can set the clock Setup Once Sun Mon Tue Wed Thu Fri Sat first. -- If you select Manual, you can be made. You must set up the day U Adjust L Move E Enter R Return you 've selected.

User Manual
Page 91
NN The c mark indicates the day ◀ you want to set at your convenience. English If you select Manual, you can be made. You must set up the day you 've selected. L Move U Adjust E Enter R Return ▶ Off Time: Set the hour, minute. ●● Off Timer 1 / Off Timer 2 / Off Timer 3: Three different off timer settings can set the clock first. Setup Once Off Timer 1 Sun Mon Tue Wed Thu Fri Sat Setup: Select Off, Once, Everyday, Off Time Mon~Fri, Mon~Sat, Sat~Sun or 04 00 Manual to activate the timer.
NN The c mark indicates the day ◀ you want to set at your convenience. English If you select Manual, you can be made. You must set up the day you 've selected. L Move U Adjust E Enter R Return ▶ Off Time: Set the hour, minute. ●● Off Timer 1 / Off Timer 2 / Off Timer 3: Three different off timer settings can set the clock first. Setup Once Off Timer 1 Sun Mon Tue Wed Thu Fri Sat Setup: Select Off, Once, Everyday, Off Time Mon~Fri, Mon~Sat, Sat~Sun or 04 00 Manual to activate the timer.

User Manual
Page 96
... you select Picture Off, the screen is On, the minimum screen brightness can be set to reduce power consumption. the picture settings will be adjusted manually. If you adjust the Backlight, the Eco Sensor will automatically adapt to the light in order to Off. Min Backlight: When Eco sensor is turned...
... you select Picture Off, the screen is On, the minimum screen brightness can be set to reduce power consumption. the picture settings will be adjusted manually. If you adjust the Backlight, the Eco Sensor will automatically adapt to the light in order to Off. Min Backlight: When Eco sensor is turned...
User Manual
Page 104
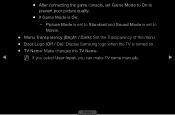
Picture Mode is set to Standard and Sound Mode is set Game Mode to On to Movie. ●● Menu Transparency (Bright / Dark): Set the Transparency of the menu. ●● Boot Logo (Off / On): Display Samsung logo when the TV is On: -- ●● After connecting the game console, set to prevent poor picture quality. ●● If Game Mode is turned on. ●● TV Name: Make changes the TV Name. ◀ NN If you select User Input, you can make TV name manually. ▶ English
Picture Mode is set to Standard and Sound Mode is set Game Mode to On to Movie. ●● Menu Transparency (Bright / Dark): Set the Transparency of the menu. ●● Boot Logo (Off / On): Display Samsung logo when the TV is On: -- ●● After connecting the game console, set to prevent poor picture quality. ●● If Game Mode is turned on. ●● TV Name: Make changes the TV Name. ◀ NN If you select User Input, you can make TV name manually. ▶ English

