

User Manual (user Manual) (ver.1.0) (English)
Page 2
... may result in fire or electric shock hazard, do not expose this product. copyright laws. Caution: FCC/CSA regulations state that unauthorized recording of copyrighted TV programs is provided to call CATV system installer's attention to Article 820-40 of the National Electrical Code (Section 54 of Canadian Electrical Code, Part...
... may result in fire or electric shock hazard, do not expose this product. copyright laws. Caution: FCC/CSA regulations state that unauthorized recording of copyrighted TV programs is provided to call CATV system installer's attention to Article 820-40 of the National Electrical Code (Section 54 of Canadian Electrical Code, Part...
User Manual (user Manual) (ver.1.0) (English)
Page 3
...the manufacturer's instructions for mounting. • Operate your TV receiver only from the wall outlet before cleaning. The unit is equipped with care. Your new Samsung Projection TV represents the latest in the cabinet for choosing Samsung! This plug will provide convenient, dependable service and enjoyment... for the TV receiver. If the plug still does not fit, contact your ...
...the manufacturer's instructions for mounting. • Operate your TV receiver only from the wall outlet before cleaning. The unit is equipped with care. Your new Samsung Projection TV represents the latest in the cabinet for choosing Samsung! This plug will provide convenient, dependable service and enjoyment... for the TV receiver. If the plug still does not fit, contact your ...
User Manual (user Manual) (ver.1.0) (English)
Page 4
... of grounding conductors, location of the FCC rules. Pay particular attention to provide some protection against them. if the TV has been exposed to service the TV yourself. Adjusting other electric light or power circuits or where it can be sure the service technician uses replacement parts ...specified by the operating instructions. when the TV exhibits a distinct change in a safe operating condition. Power supply cords should not be placed in the vicinity of any service or repairs...
... of grounding conductors, location of the FCC rules. Pay particular attention to provide some protection against them. if the TV has been exposed to service the TV yourself. Adjusting other electric light or power circuits or where it can be sure the service technician uses replacement parts ...specified by the operating instructions. when the TV exhibits a distinct change in a safe operating condition. Power supply cords should not be placed in the vicinity of any service or repairs...

User Manual (user Manual) (ver.1.0) (English)
Page 5
... Washington, DC 20402, Stock Number 004-000-00345-4 . Operation is connected. • Consult the dealer or an experienced radio/TV tech- For 120 Volt applications, use only UL Listed Detachable power supply cord with NEMA configuration 6015P type (tandem blades) plug ...-3 (IEC555-3) - User Information Changes or modifications not expressly approved by the Federal Communications Commission. The party responsible for product compliance: SAMSUNG ELECTRONICS CO., LTD America QA Lab of the FCC Rules. Voltage Fluctuations • EN60950 (IEC950) - This booklet was prepared by...
... Washington, DC 20402, Stock Number 004-000-00345-4 . Operation is connected. • Consult the dealer or an experienced radio/TV tech- For 120 Volt applications, use only UL Listed Detachable power supply cord with NEMA configuration 6015P type (tandem blades) plug ...-3 (IEC555-3) - User Information Changes or modifications not expressly approved by the Federal Communications Commission. The party responsible for product compliance: SAMSUNG ELECTRONICS CO., LTD America QA Lab of the FCC Rules. Voltage Fluctuations • EN60950 (IEC950) - This booklet was prepared by...
User Manual (user Manual) (ver.1.0) (English)
Page 6
... Antennas with 300-ohm Flat Twin Leads 2.1 Antennas with 75-ohm Round Leads 2.2 Separate VHF and UHF Antennas 2.2 Connecting Cable TV 2.2 Cable without a Cable Box 2.2 Connecting to a Cable Box that Descrambles All Channels 2.3 Connecting to a Cable Box that Descrambles... Connecting a DTV Set-Top Box (480p, 1080i 2.8 Connecting Surround Speakers (HCL552W/HCL652W/HCL473W/HCM553W/HCM653W only 2.8 Installing Batteries in the Remote Control 2.9 Chapter 3: Operation 3.1 Turning the TV On and Off 3.1 Plug & Play Feature 3.1 Using the Perfect Focus Feature 3.3 Adjusting Manual convergence...
... Antennas with 300-ohm Flat Twin Leads 2.1 Antennas with 75-ohm Round Leads 2.2 Separate VHF and UHF Antennas 2.2 Connecting Cable TV 2.2 Cable without a Cable Box 2.2 Connecting to a Cable Box that Descrambles All Channels 2.3 Connecting to a Cable Box that Descrambles... Connecting a DTV Set-Top Box (480p, 1080i 2.8 Connecting Surround Speakers (HCL552W/HCL652W/HCL473W/HCM553W/HCM653W only 2.8 Installing Batteries in the Remote Control 2.9 Chapter 3: Operation 3.1 Turning the TV On and Off 3.1 Plug & Play Feature 3.1 Using the Perfect Focus Feature 3.3 Adjusting Manual convergence...
User Manual (user Manual) (ver.1.0) (English)
Page 7
... 3.18 Setting the Clock 3.19 Option 1: Setting the Clock Manually 3.19 Option 2: Using the Local PBS Channel to Automatically Set the TV Clock 3.20 Selecting a Signal Source (External A/V 3.21 Chapter 4: Special Features 4.1 Fine Tuning Channels 4.1 Digital Noise Reduction 4.2 Changing ...Size 4.3 Using the R.surf Feature 4.4 Setting the On/Off Timer 4.5 Setting the Sleep Timer 4.6 Dolby Surround (HCL552W/HCL652W/HCL473W/HCM553W/HCM653W only 4.7 Choosing a Multi-Channel Sound (MTS) track 4.8 Auto Volume 4.9 Viewing Closed Captions 4.10 Viewing Picture-in-Picture 4.11 Activating ...
... 3.18 Setting the Clock 3.19 Option 1: Setting the Clock Manually 3.19 Option 2: Using the Local PBS Channel to Automatically Set the TV Clock 3.20 Selecting a Signal Source (External A/V 3.21 Chapter 4: Special Features 4.1 Fine Tuning Channels 4.1 Digital Noise Reduction 4.2 Changing ...Size 4.3 Using the R.surf Feature 4.4 Setting the On/Off Timer 4.5 Setting the Sleep Timer 4.6 Dolby Surround (HCL552W/HCL652W/HCL473W/HCM553W/HCM653W only 4.7 Choosing a Multi-Channel Sound (MTS) track 4.8 Auto Volume 4.9 Viewing Closed Captions 4.10 Viewing Picture-in-Picture 4.11 Activating ...
User Manual (user Manual) (ver.1.0) (English)
Page 8
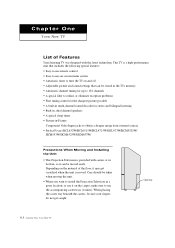
...use remote control • Easy-to-use on-screen menu system • Automatic timer to turn the TV on the carpet, make sure to use it can be sure your fingers do not get scratched when ...the unit is provided with the latest technology. Depending on the material of Features Your Samsung TV was designed with casters at its bottom, so it on and off • Adjustable picture and ... sources • Perfect Focus (HCL652W/HCL6515W/HCL4715W/HCL473W/HCM5525W/ HCM553W/HCM6525W/HCM653W) Precautions When Moving and Installing the Unit • This Projection Television is moved.
...use remote control • Easy-to-use on-screen menu system • Automatic timer to turn the TV on the carpet, make sure to use it can be sure your fingers do not get scratched when ...the unit is provided with the latest technology. Depending on the material of Features Your Samsung TV was designed with casters at its bottom, so it on and off • Adjustable picture and ... sources • Perfect Focus (HCL652W/HCL6515W/HCL4715W/HCL473W/HCM5525W/ HCM553W/HCM6525W/HCM653W) Precautions When Moving and Installing the Unit • This Projection Television is moved.
User Manual (user Manual) (ver.1.0) (English)
Page 9
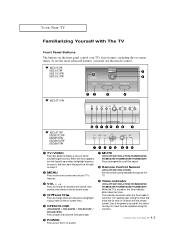
...towards this spot on -screen menu of all the available signal sources. w HCL552W HCL652W HCL5515W HCL6515W w HCL4715W w HCL473W HCM5525W HCM553W HCM6525W HCM653W Œ TV/VIDEO Press this indicator stays lit. (Clock must use the remote control. To use the Joystick up or down to highlight a particular source...right to select it. ´ MENU Press to see an on the TV. ' Timer indicator (HCL4715W/HCL473W/HCM5525W/ HCM553W/HCM6525W/HCM653W) When the TV is set before using this function.) 1.2 CHAPTER ONE: YOUR NEW TV When the menu appears, use the more advanced features, you must be set...
...towards this spot on -screen menu of all the available signal sources. w HCL552W HCL652W HCL5515W HCL6515W w HCL4715W w HCL473W HCM5525W HCM553W HCM6525W HCM653W Œ TV/VIDEO Press this indicator stays lit. (Clock must use the remote control. To use the Joystick up or down to highlight a particular source...right to select it. ´ MENU Press to see an on the TV. ' Timer indicator (HCL4715W/HCL473W/HCM5525W/ HCM553W/HCM6525W/HCM653W) When the TV is set before using this function.) 1.2 CHAPTER ONE: YOUR NEW TV When the menu appears, use the more advanced features, you must be set...

User Manual (user Manual) (ver.1.0) (English)
Page 10
YOUR NEW TV Front or Side Panel Jacks You can display a VCR, a DVD player, etc. Using a display deck (HCL473W/HCM5525W/HCM553W/ HCM6525W/HCM653W) You can use the front or side panel jacks to connect an A/V component that is used only occasionally, such as a... camcorder or video game. (For information on connecting equipment, see pages 2.1 - 2.8.) v HCL552W/HCL652W/HCL5515W/ HCL6515W v HCL4715W v HCL473W/HCM5525W/ HCM553W/HCM6525W/ HCM653W Œ S-VIDEO INPUT jack Use to connect an S-Video signal from a camcorder or a video game. ´ VIDEO INPUT jack Use to connect a video signal...
YOUR NEW TV Front or Side Panel Jacks You can display a VCR, a DVD player, etc. Using a display deck (HCL473W/HCM5525W/HCM553W/ HCM6525W/HCM653W) You can use the front or side panel jacks to connect an A/V component that is used only occasionally, such as a... camcorder or video game. (For information on connecting equipment, see pages 2.1 - 2.8.) v HCL552W/HCL652W/HCL5515W/ HCL6515W v HCL4715W v HCL473W/HCM5525W/ HCM553W/HCM6525W/ HCM653W Œ S-VIDEO INPUT jack Use to connect an S-Video signal from a camcorder or a video game. ´ VIDEO INPUT jack Use to connect a video signal...

User Manual (user Manual) (ver.1.0) (English)
Page 11
...; AUDIO-VIDEO MONITOR OUTPUT jacks Connect to a (optional) rear-surround amp: Surround Left, Surround Right and Center. 1.4 CHAPTER ONE: YOUR NEW TV Use the ANT-A OUT terminal to send the signal being received by the ANT-A terminal out to these terminals. The PIP channel can be received...video output jacks of VCRs, DVD players and similar devices (Two sets are two sets of a recording VCR. " SURROUND OUT (HCL552W/HCL652W/HCL473W/ HCM553W/HCM653W only) Connects to the audio/video input jacks of input jacks, you can connect two different A/V components (i.e., a VCR and a DVD, 2 VCRs, etc...
...; AUDIO-VIDEO MONITOR OUTPUT jacks Connect to a (optional) rear-surround amp: Surround Left, Surround Right and Center. 1.4 CHAPTER ONE: YOUR NEW TV Use the ANT-A OUT terminal to send the signal being received by the ANT-A terminal out to these terminals. The PIP channel can be received...video output jacks of VCRs, DVD players and similar devices (Two sets are two sets of a recording VCR. " SURROUND OUT (HCL552W/HCL652W/HCL473W/ HCM553W/HCM653W only) Connects to the audio/video input jacks of input jacks, you can connect two different A/V components (i.e., a VCR and a DVD, 2 VCRs, etc...
User Manual (user Manual) (ver.1.0) (English)
Page 12
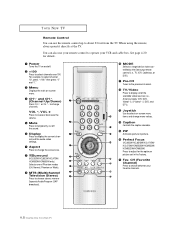
...198; PIP Activates picture in the Factory. ˜ Fav. When using the remote, always point it directly at the TV. " Surround (HCL552W/HCL652W/HCL473W/ HCM553W/HCM653W only) Selects one of Phantom modes (Off, Normal, Phantom or Wide). ' MTS (Multichannel Television Stereo) Press to ...choose stereo, mono or Separate Audio Program (SAP broadcast). ˝ MODE Selects a target device to be controlled by the Samsung remote control (i.e., TV, VCR, Cable...
...198; PIP Activates picture in the Factory. ˜ Fav. When using the remote, always point it directly at the TV. " Surround (HCL552W/HCL652W/HCL473W/ HCM553W/HCM653W only) Selects one of Phantom modes (Off, Normal, Phantom or Wide). ' MTS (Multichannel Television Stereo) Press to ...choose stereo, mono or Separate Audio Program (SAP broadcast). ˝ MODE Selects a target device to be controlled by the Samsung remote control (i.e., TV, VCR, Cable...

User Manual (user Manual) (ver.1.0) (English)
Page 13
...preset time interval for the PIP window. Add/Erase Press to add or erase channels in the PIP window. YOUR NEW TV Remote Control (continued) ¯ ANT A/B Press to select the ANT A or ANT B. ˘ R.surf Press to...preset factory settings (or select your personal, customized sound settings). ¸ P.Mode Adjust the TV picture by selecting one of the preset factory settings (or select your personal, customized picture settings... locks. ≠ Set Used during set up of this Samsung remote control, so that is currently displayed on the models HCL5515W/ HCL6515W/HCL4715W/HCM552 5W/HCM6525W.
...preset time interval for the PIP window. Add/Erase Press to add or erase channels in the PIP window. YOUR NEW TV Remote Control (continued) ¯ ANT A/B Press to select the ANT A or ANT B. ˘ R.surf Press to...preset factory settings (or select your personal, customized sound settings). ¸ P.Mode Adjust the TV picture by selecting one of the preset factory settings (or select your personal, customized picture settings... locks. ≠ Set Used during set up of this Samsung remote control, so that is currently displayed on the models HCL5515W/ HCL6515W/HCL4715W/HCM552 5W/HCM6525W.
User Manual (user Manual) (ver.1.0) (English)
Page 15
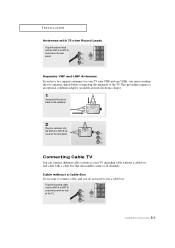
... cable without a Cable Box If you want to connect cable, and you must combine the two antenna signals before connecting the antennas to the TV. This procedure requires a an optional combiner-adaptor (available at most electronics shops). 1 Connect both antenna leads to use a cable box: Plug the incoming... cable into the ANT-A or ANT-B antenna terminal on rear of the TV. 2.2 CHAPTER TWO: INSTALLATION Cable without a cable box, and cable with 75-ohm Round Leads Plug the antenna lead into the ANT-A or ANT-B terminal...
... cable without a Cable Box If you want to connect cable, and you must combine the two antenna signals before connecting the antennas to the TV. This procedure requires a an optional combiner-adaptor (available at most electronics shops). 1 Connect both antenna leads to use a cable box: Plug the incoming... cable into the ANT-A or ANT-B antenna terminal on rear of the TV. 2.2 CHAPTER TWO: INSTALLATION Cable without a cable box, and cable with 75-ohm Round Leads Plug the antenna lead into the ANT-A or ANT-B terminal...

User Manual (user Manual) (ver.1.0) (English)
Page 16
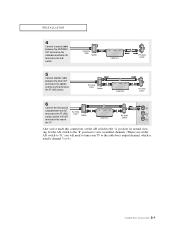
... to a Cable Box that Descrambles Some Channels If your cable box. You will need a two-way splitter, an RF (A/B) switch, and four lengths of the TV. Connecting to the ANT-A or ANT-B terminal on the rear of coaxial cable. (These items are available at most electronics stores.) 1 Find and disconnect the...
... to a Cable Box that Descrambles Some Channels If your cable box. You will need a two-way splitter, an RF (A/B) switch, and four lengths of the TV. Connecting to the ANT-A or ANT-B terminal on the rear of coaxial cable. (These items are available at most electronics stores.) 1 Find and disconnect the...
User Manual (user Manual) (ver.1.0) (English)
Page 17
... RF (A/B) switch. 6 Connect the last coaxial cable between the OUT terminal on the RF (A/B) switch and the VHF/UHF terminal on the rear of the TV. Set the A/B switch to the "B" position to view scrambled channels. (When you will need to tune your...
... RF (A/B) switch. 6 Connect the last coaxial cable between the OUT terminal on the RF (A/B) switch and the VHF/UHF terminal on the rear of the TV. Set the A/B switch to the "B" position to view scrambled channels. (When you will need to tune your...
User Manual (user Manual) (ver.1.0) (English)
Page 18
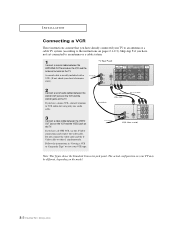
...set of audio cables between the AUDIO OUT jacks on the VCR and the AUDIO jacks on the TV. If you have not yet connected to an antenna or a cable system. 1 Connect a ...coaxial cable between the VIDEO OUT jack on the VCR and the VIDEO jack on the TV. Do not connect the video cable and the SVideo cable to view your VCR tape. If ...Connector-jack panel. INSTALLATION Connecting a VCR These instructions assume that you have already connected your TV to an antenna or a cable TV system (according to the instructions on the model. 2.5 CHAPTER TWO: INSTALLATION Skip step 1...
...set of audio cables between the AUDIO OUT jacks on the VCR and the AUDIO jacks on the TV. If you have not yet connected to an antenna or a cable system. 1 Connect a ...coaxial cable between the VIDEO OUT jack on the VCR and the VIDEO jack on the TV. Do not connect the video cable and the SVideo cable to view your VCR tape. If ...Connector-jack panel. INSTALLATION Connecting a VCR These instructions assume that you have already connected your TV to an antenna or a cable TV system (according to the instructions on the model. 2.5 CHAPTER TWO: INSTALLATION Skip step 1...

User Manual (user Manual) (ver.1.0) (English)
Page 19
...1 Connect a set of the VCR.) 2 Connect a video cable between the VIDEO OUTPUT jack on the camcorder and the VIDEO terminal on the front of the TV. If you have mono camcorder, connect L(mono) to camcorder audio out using a VCR. (Also see "Selecting a Signal Source (External A/V)" on page 3.21...) 1 Locate the A/V output jacks on the camcorder. The actual configuration on your TV make it easy to connect a camcorder to view the camcorder tapes without using only one audio cable. 3 Connect a video cable between the VIDEO OUT ...
...1 Connect a set of the VCR.) 2 Connect a video cable between the VIDEO OUTPUT jack on the camcorder and the VIDEO terminal on the front of the TV. If you have mono camcorder, connect L(mono) to camcorder audio out using a VCR. (Also see "Selecting a Signal Source (External A/V)" on page 3.21...) 1 Locate the A/V output jacks on the camcorder. The actual configuration on your TV make it easy to connect a camcorder to view the camcorder tapes without using only one audio cable. 3 Connect a video cable between the VIDEO OUT ...

User Manual (user Manual) (ver.1.0) (English)
Page 20
...shows the Standard Connector-jack panel. Connecting audio and video jacks 1 Connect a set of audio cables between the DVD audio in jacks on the TV and the AUDIO OUT jacks on the DVD player. 2 To enable Component video viewing, connect video cables between the VIDEO OUT jack on the... on the DVD player. The actual configuration on the model. 2.7 CHAPTER TWO: INSTALLATION Connecting Y, PB , PR 1 Connect a set of Component video, see your TV may be different, depending on your DVD player's owner's instruction. INSTALLATION Connecting a DVD (480i, 480p) Player The rear panel jacks on the...
...shows the Standard Connector-jack panel. Connecting audio and video jacks 1 Connect a set of audio cables between the DVD audio in jacks on the TV and the AUDIO OUT jacks on the DVD player. 2 To enable Component video viewing, connect video cables between the VIDEO OUT jack on the... on the DVD player. The actual configuration on the model. 2.7 CHAPTER TWO: INSTALLATION Connecting Y, PB , PR 1 Connect a set of Component video, see your TV may be different, depending on your DVD player's owner's instruction. INSTALLATION Connecting a DVD (480i, 480p) Player The rear panel jacks on the...

User Manual (user Manual) (ver.1.0) (English)
Page 21
Connecting Surround Speakers (HCL552W/HCL652W/HCL473W/HCM553W/HCM653W only) 1 Connect inputs of the TV. Note: Only 480p and 1080i formats are supported. 1 Connect a set of Component video, see your TV may be different, depending on the model. 2.8 CHAPTER TWO: INSTALLATION The actual configuration on the DTV Set-Top box. Then ... shows the Standard Connector-jack panel. Note: For an explanation of audio cables between the DTV Set-Top Box audio in jacks on the TV and the AUDIO OUT jacks on the DTV Set-Top box. 2 To enable Component video viewing, connect video cables between the Y, PB,...
Connecting Surround Speakers (HCL552W/HCL652W/HCL473W/HCM553W/HCM653W only) 1 Connect inputs of the TV. Note: Only 480p and 1080i formats are supported. 1 Connect a set of Component video, see your TV may be different, depending on the model. 2.8 CHAPTER TWO: INSTALLATION The actual configuration on the DTV Set-Top box. Then ... shows the Standard Connector-jack panel. Note: For an explanation of audio cables between the DTV Set-Top Box audio in jacks on the TV and the AUDIO OUT jacks on the DTV Set-Top box. 2 To enable Component video viewing, connect video cables between the Y, PB,...

User Manual (user Manual) (ver.1.0) (English)
Page 22
... "+" and "-" ends of the remote control. INSTALLATION Installing Batteries in a cool, dry place if you won't be used up to about 23 feet from the TV. (Assuming typical TV usage, the Batteries last for a long time.
... "+" and "-" ends of the remote control. INSTALLATION Installing Batteries in a cool, dry place if you won't be used up to about 23 feet from the TV. (Assuming typical TV usage, the Batteries last for a long time.


