

User Manual (user Manual) (ver.1.0) (English)
Page 3
Your new Samsung Projection TV represents the latest in the operating instructions. • Follow all operating and use instructions. • Unplug the TV receiver from the wall outlet before operating your appliance dealer or local power company. • Use only a grounded or polarized outlet. To reduce the risk of power supplied to your home, consult your TV. • Keep the safety and operating instructions for future reference. • Heed all...
Your new Samsung Projection TV represents the latest in the operating instructions. • Follow all operating and use instructions. • Unplug the TV receiver from the wall outlet before operating your appliance dealer or local power company. • Use only a grounded or polarized outlet. To reduce the risk of power supplied to your home, consult your TV. • Keep the safety and operating instructions for future reference. • Heed all...

User Manual (user Manual) (ver.1.0) (English)
Page 4
... periods of antenna discharge unit, connection to qualified service personnel under the following the operating instructions - This television receiver provides display of television closed captioning in wire to an antenna discharge unit, size of grounding conductors, location of time. When installing an outside antenna or cable system is damaged - If an outside antenna system, be sure the antenna or cable system is in the vicinity of overhead power lines or other controls may result...
... periods of antenna discharge unit, connection to qualified service personnel under the following the operating instructions - This television receiver provides display of television closed captioning in wire to an antenna discharge unit, size of grounding conductors, location of time. When installing an outside antenna or cable system is damaged - If an outside antenna system, be sure the antenna or cable system is in the vicinity of overhead power lines or other controls may result...

User Manual (user Manual) (ver.1.0) (English)
Page 6
...Set-Top Box (480p, 1080i 2.8 Installing Batteries in the Remote Control 2.9 Chapter 3: Operation 3.1 Turning the TV On and Off 3.1 Plug & Play Feature 3.1 Using the Perfect Focus Feature 3.3 Adjusting Manual convergence 3.4 Adjust Red Convergence 3.5 Viewing the Menus and On-Screen Displays 3.6 Viewing the Menus 3.6 Viewing the Display 3.6 Selecting a Menu Language 3.7 Selecting the Antenna Input 3.7 Memorizing the Channels 3.8 Selecting the Video Signal-source 3.8 Storing Channels in Memory (Automatic Method 3.9 Adding and Erasing Channels (Manual Method 3.9 Changing Channels...
...Set-Top Box (480p, 1080i 2.8 Installing Batteries in the Remote Control 2.9 Chapter 3: Operation 3.1 Turning the TV On and Off 3.1 Plug & Play Feature 3.1 Using the Perfect Focus Feature 3.3 Adjusting Manual convergence 3.4 Adjust Red Convergence 3.5 Viewing the Menus and On-Screen Displays 3.6 Viewing the Menus 3.6 Viewing the Display 3.6 Selecting a Menu Language 3.7 Selecting the Antenna Input 3.7 Memorizing the Channels 3.8 Selecting the Video Signal-source 3.8 Storing Channels in Memory (Automatic Method 3.9 Adding and Erasing Channels (Manual Method 3.9 Changing Channels...

User Manual (user Manual) (ver.1.0) (English)
Page 7
...the Sleep Timer 4.6 Extra sound settings 4.7 Choosing a Multi-Channel Sound (MTS) track 4.8 Viewing Closed Captions 4.9 Viewing Picture-in-Picture 4.10 Activating Picture-in-Picture 4.10 Selecting a Signal Source (Antenna or Cable) for PIP . . . . .4.11 Selecting a Signal Source (External A/V) for PIP 4.11 Swapping the Contents of the PIP image and Main image .4.12 Changing the Size of the PIP Window 4.12 Changing the PIP Channel 4.13 Changing the Location (Rotating) the PIP mode 4.13 Scanning the Available Channels 4.13 Using the V-Chip 4.14 Setting Up Your Personal ID Number (PIN...
...the Sleep Timer 4.6 Extra sound settings 4.7 Choosing a Multi-Channel Sound (MTS) track 4.8 Viewing Closed Captions 4.9 Viewing Picture-in-Picture 4.10 Activating Picture-in-Picture 4.10 Selecting a Signal Source (Antenna or Cable) for PIP . . . . .4.11 Selecting a Signal Source (External A/V) for PIP 4.11 Swapping the Contents of the PIP image and Main image .4.12 Changing the Size of the PIP Window 4.12 Changing the PIP Channel 4.13 Changing the Location (Rotating) the PIP mode 4.13 Scanning the Available Channels 4.13 Using the V-Chip 4.14 Setting Up Your Personal ID Number (PIN...

User Manual (user Manual) (ver.1.0) (English)
Page 9
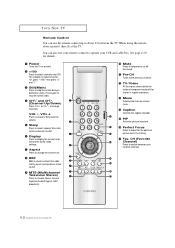
... Off timer, with The TV Front Panel Buttons The buttons on the front panel control your TV's features. ¨ VOL - , + Press to see an on -screen menu. Ø Remote Control Sensor Aim the remote control towards this function.). YOUR NEW TV Familiarizing Yourself with the remote control. HCM4215W / HCM4216W / HCM422W HCM5525W / HCM653W / HCM553W / HCL473W PCL5415R / PCL545R HCL4715W Œ TV/VIDEO All the inputs connected to the external component jacks will be set to change channels. To use...
... Off timer, with The TV Front Panel Buttons The buttons on the front panel control your TV's features. ¨ VOL - , + Press to see an on -screen menu. Ø Remote Control Sensor Aim the remote control towards this function.). YOUR NEW TV Familiarizing Yourself with the remote control. HCM4215W / HCM4216W / HCM422W HCM5525W / HCM653W / HCM553W / HCL473W PCL5415R / PCL545R HCL4715W Œ TV/VIDEO All the inputs connected to the external component jacks will be set to change channels. To use...
User Manual (user Manual) (ver.1.0) (English)
Page 10
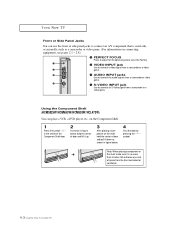
... shown in the Factory. ´ VIDEO INPUT jack Use to connect a video signal from a camcorder or a video game. ˇ AUDIO INPUT jacks Use to connect the audio signals from a camcorder or video game. ¨ S-VIDEO INPUT jack Use to connect an S-Video signal from the front and sides for ventilation. 1.3 CHAPTER ONE: YOUR NEW TV Using the Component Shelf (HCM5525W/HCM653W/HCM553W/HCL473W) You can use the front or side panel jacks to connect an A/V component that...
... shown in the Factory. ´ VIDEO INPUT jack Use to connect a video signal from a camcorder or a video game. ˇ AUDIO INPUT jacks Use to connect the audio signals from a camcorder or video game. ¨ S-VIDEO INPUT jack Use to connect an S-Video signal from the front and sides for ventilation. 1.3 CHAPTER ONE: YOUR NEW TV Using the Component Shelf (HCM5525W/HCM653W/HCM553W/HCL473W) You can use the front or side panel jacks to connect an A/V component that...
User Manual (user Manual) (ver.1.0) (English)
Page 11
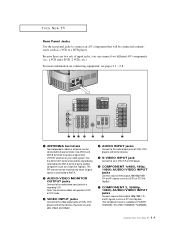
... TV Rear Panel Jacks Use the rear panel jacks to an S-VHS VCR or DVD player. Ø COMPONENT 1(480i, 480p, 1080i) AUDIO/VIDEO INPUT jacks Connect a source that outputs 480i/480p/1080i Y,PB and PR signals, such as a DVD (or DTV SetTop Box. ∏ COMPONENT 2, 3(480p, 1080i) AUDIO/VIDEO INPUT jacks Connect a source that will be connected continuously, such as a Cable Set Top Box). Note: The monitor out does not operate in DVD or DTV mode. ˇ VIDEO INPUT jacks Connect...
... TV Rear Panel Jacks Use the rear panel jacks to an S-VHS VCR or DVD player. Ø COMPONENT 1(480i, 480p, 1080i) AUDIO/VIDEO INPUT jacks Connect a source that outputs 480i/480p/1080i Y,PB and PR signals, such as a DVD (or DTV SetTop Box. ∏ COMPONENT 2, 3(480p, 1080i) AUDIO/VIDEO INPUT jacks Connect a source that will be connected continuously, such as a Cable Set Top Box). Note: The monitor out does not operate in DVD or DTV mode. ˇ VIDEO INPUT jacks Connect...
User Manual (user Manual) (ver.1.0) (English)
Page 12
...; Power Turns the TV on and off the sound. Ô Pre-CH Tunes to the previous channel. TV/Video All the inputs connected to the external component jacks will be shown in regular sequence. Ò Menu Displays the main on-screen menu. Ú Caption Controls the caption decoder. Æ PIP Activates picture in picture. ı Perfect Focus Press to adjust for automatic shutoff. Ø Display Press to display the current channel and the audio-video settings. ∏ Aspect...
...; Power Turns the TV on and off the sound. Ô Pre-CH Tunes to the previous channel. TV/Video All the inputs connected to the external component jacks will be shown in regular sequence. Ò Menu Displays the main on-screen menu. Ú Caption Controls the caption decoder. Æ PIP Activates picture in picture. ı Perfect Focus Press to adjust for automatic shutoff. Ø Display Press to display the current channel and the audio-video settings. ∏ Aspect...
User Manual (user Manual) (ver.1.0) (English)
Page 18
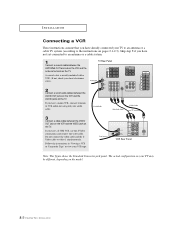
... the AUDIO jacks on the TV. The actual configuration on your TV to an antenna or a cable TV system (according to an antenna or a cable system. 1 Connect a coaxial cable between the VIDEO OUT jack on the VCR and the VIDEO jack on the TV. If you have a S-VHS VCR, use the S-Video connections and remove the video cable. Skip step 1 if you have not yet connected to the instructions on pages 2.1-2.3). INSTALLATION Connecting...
... the AUDIO jacks on the TV. The actual configuration on your TV to an antenna or a cable TV system (according to an antenna or a cable system. 1 Connect a coaxial cable between the VIDEO OUT jack on the VCR and the VIDEO jack on the TV. If you have a S-VHS VCR, use the S-Video connections and remove the video cable. Skip step 1 if you have not yet connected to the instructions on pages 2.1-2.3). INSTALLATION Connecting...

User Manual (user Manual) (ver.1.0) (English)
Page 19
... using only one audio cable. 3 Connect a video cable between the VIDEO OUTPUT jack on the camcorder and the VIDEO terminal on the side of connection. The actual configuration on your second VCR as follows: 1 Connect a set of two cables. INSTALLATION Connecting a Second VCR to Record from the TV Your TV can send out signals of its picture and sound to be different, depending on the model. 2.6 CHAPTER TWO: INSTALLATION They allow you need...
... using only one audio cable. 3 Connect a video cable between the VIDEO OUTPUT jack on the camcorder and the VIDEO terminal on the side of connection. The actual configuration on your second VCR as follows: 1 Connect a set of two cables. INSTALLATION Connecting a Second VCR to Record from the TV Your TV can send out signals of its picture and sound to be different, depending on the model. 2.6 CHAPTER TWO: INSTALLATION They allow you need...

User Manual (user Manual) (ver.1.0) (English)
Page 20
... your DVD player's (or DTV Set-Top Box) owner's instruction. Connecting to Y, PB, PR 1 Connect a set of audio cables between the AUDIO IN jacks on the TV and the AUDIO OUT jacks on the DVD player (or DTV Set-Top Box). 2 Connect video cables between the Y, PB, and PR inputs on the TV and Y, PB, and PR (or Y, CB, CR) outputs on the DVD player (or DTV Set-Top Box). Note: This figure shows the Standard Connector-jack panel...
... your DVD player's (or DTV Set-Top Box) owner's instruction. Connecting to Y, PB, PR 1 Connect a set of audio cables between the AUDIO IN jacks on the TV and the AUDIO OUT jacks on the DVD player (or DTV Set-Top Box). 2 Connect video cables between the Y, PB, and PR inputs on the TV and Y, PB, and PR (or Y, CB, CR) outputs on the DVD player (or DTV Set-Top Box). Note: This figure shows the Standard Connector-jack panel...

User Manual (user Manual) (ver.1.0) (English)
Page 21
... video viewing, connect video cables between the Y, PB, and PR inputs on the TV and Y, PB, and PR (or Y, CB, CR) outputs on the DTV Set-Top box. INSTALLATION Connecting a DTV Set-Top Box (480p, 1080i) When switching to the DTV mode, either 480p or 1080i format is automatically selected according to the input signal. Note: Only 480p and 1080i formats are supported. 1 Connect a set of Component video, see your DTV Settop box's owner's instruction...
... video viewing, connect video cables between the Y, PB, and PR inputs on the TV and Y, PB, and PR (or Y, CB, CR) outputs on the DTV Set-Top box. INSTALLATION Connecting a DTV Set-Top Box (480p, 1080i) When switching to the DTV mode, either 480p or 1080i format is automatically selected according to the input signal. Note: Only 480p and 1080i formats are supported. 1 Connect a set of Component video, see your DTV Settop box's owner's instruction...

User Manual (user Manual) (ver.1.0) (English)
Page 25
... select "Function", then press the VOL + button. Press Menu button to adjust for the optimum picture size set , use the Perfect Focus feature to exit. Language Plug & Play Convergence Caption Time Auto Clock Set V-Chip Function : English w You can 't make adjustments after Perfect Focus, then make adjustments, contact your Service Center. • The Perfect Focus function doesn't operate when component input is distorted after moving the TV set in the following sequence: Green ➝ Red ➝ Blue.
... select "Function", then press the VOL + button. Press Menu button to adjust for the optimum picture size set , use the Perfect Focus feature to exit. Language Plug & Play Convergence Caption Time Auto Clock Set V-Chip Function : English w You can 't make adjustments after Perfect Focus, then make adjustments, contact your Service Center. • The Perfect Focus function doesn't operate when component input is distorted after moving the TV set in the following sequence: Green ➝ Red ➝ Blue.

User Manual (user Manual) (ver.1.0) (English)
Page 26
... Adjusting Manual Convergence If the color appears spread out or "smeared" on the screen, the convergence probably needs alignment. Convergence Manual Convergence Red Blue Perfect Focus continued... 3.4 CHAPTER THREE: TV OPERATION Language Plug & Play Convergence Caption Time Auto Clock Set V-Chip Function : English 3 The "Manual Convergence" screen will appear, and the word "Red" will be highlighted. Language Plug & Play Convergence Caption Time Auto Clock Set V-Chip Function : English 2 Press the CH button to use the remote control for the convergence adjustments...
... Adjusting Manual Convergence If the color appears spread out or "smeared" on the screen, the convergence probably needs alignment. Convergence Manual Convergence Red Blue Perfect Focus continued... 3.4 CHAPTER THREE: TV OPERATION Language Plug & Play Convergence Caption Time Auto Clock Set V-Chip Function : English 3 The "Manual Convergence" screen will appear, and the word "Red" will be highlighted. Language Plug & Play Convergence Caption Time Auto Clock Set V-Chip Function : English 2 Press the CH button to use the remote control for the convergence adjustments...

User Manual (user Manual) (ver.1.0) (English)
Page 28
...: Picture, Sound, Channel, Function and PIP. Mode Adjust Size Digital NR Color tone Demonstration Picture : Custom : Wide : Off : Normal w The on the control panel of the TV to make selections. 3 Press the Menu button to enter items in the menu (the icons blink when highlighted). w The on the screen. Press the VOL + or VOL - button to display, change, or use the Menu, CHANNEL, and VOLUME buttons on -screen menus disappear from the screen after ten seconds. The TV will display...
...: Picture, Sound, Channel, Function and PIP. Mode Adjust Size Digital NR Color tone Demonstration Picture : Custom : Wide : Off : Normal w The on the control panel of the TV to make selections. 3 Press the Menu button to enter items in the menu (the icons blink when highlighted). w The on the screen. Press the VOL + or VOL - button to display, change, or use the Menu, CHANNEL, and VOLUME buttons on -screen menus disappear from the screen after ten seconds. The TV will display...
User Manual (user Manual) (ver.1.0) (English)
Page 37
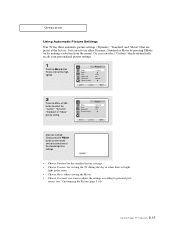
... (see "Customizing the Picture, page 3.14). 3.15 CHAPTER THREE: TV OPERATION Mode Size Digital NR Demonstration Picture : Dynamic : Wide : Off Alternate method: Simply press the P.Mode button on the remote control to select one of the standard picture settings. You can select "Custom" which automatically recalls your personalized picture settings. 1 Press the Menu button. OPERATION Using Automatic Picture Settings Your TV has three automatic picture settings ("Dynamic", "Standard" and "Movie") that are preset at the factory.
... (see "Customizing the Picture, page 3.14). 3.15 CHAPTER THREE: TV OPERATION Mode Size Digital NR Demonstration Picture : Dynamic : Wide : Off Alternate method: Simply press the P.Mode button on the remote control to select one of the standard picture settings. You can select "Custom" which automatically recalls your personalized picture settings. 1 Press the Menu button. OPERATION Using Automatic Picture Settings Your TV has three automatic picture settings ("Dynamic", "Standard" and "Movie") that are preset at the factory.
User Manual (user Manual) (ver.1.0) (English)
Page 52
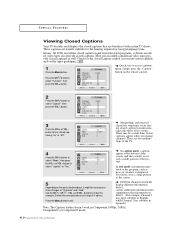
... displayed. Caption Mode Channels Field Caption : On : Caption : 1 : 1 w Misspellings and unusual characters sometimes occur during closed caption symbol in your television schedule and on " or "off". button to turn closed captioning "on the tape's packaging: . 1 Press the Menu button. lations. Language Plug & Play Convergence Caption Time Auto Clock Set V-Chip Function : English 3 Press the VOL + or VOL button to select "Caption" or "Text." Text often covers a large portion of the TV. 4 Press the CH button to "Channels...
... displayed. Caption Mode Channels Field Caption : On : Caption : 1 : 1 w Misspellings and unusual characters sometimes occur during closed caption symbol in your television schedule and on " or "off". button to turn closed captioning "on the tape's packaging: . 1 Press the Menu button. lations. Language Plug & Play Convergence Caption Time Auto Clock Set V-Chip Function : English 3 Press the VOL + or VOL button to select "Caption" or "Text." Text often covers a large portion of the TV. 4 Press the CH button to "Channels...
User Manual (user Manual) (ver.1.0) (English)
Page 53
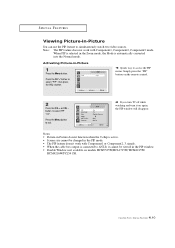
... ANT/CATV Channel PIP : On : TV : Double Screen : ANT : ANT 4 w If you turn TV off while watching and turn it cannot be changed in the PIP mode. • The PIP feature doesn't work with Component1, Component2, Component3 mode. Press the CH button to exit. Note: The PIP feature does not work with Component1 or Component2, 3 signals. • When the cable box output is active. • Screen size cannot be viewed in -Picture 1 Press the Menu button.
... ANT/CATV Channel PIP : On : TV : Double Screen : ANT : ANT 4 w If you turn TV off while watching and turn it cannot be changed in the PIP mode. • The PIP feature doesn't work with Component1, Component2, Component3 mode. Press the CH button to exit. Note: The PIP feature does not work with Component1 or Component2, 3 signals. • When the cable box output is active. • Screen size cannot be viewed in -Picture 1 Press the Menu button.

User Manual (user Manual) (ver.1.0) (English)
Page 66
... service center. Identifying Problems Problem Poor picture. Picture rolls vertically. Possible Solution Try another channel. Check all wire connections. Check the antenna connections. The TV operates erratically. Adjust the antenna. Adjust the picture settings. Press the "MODE" button to have a problem, first try operating it again. Chapter Five TROUBLESHOOTING If the TV seems to put your TV. Try another channel. Make sure the program is broadcast in . Unplug the TV for a long time, images may be burned onto the screen. 5.1 CHAPTER FIVE: TROUBLESHOOTING...
... service center. Identifying Problems Problem Poor picture. Picture rolls vertically. Possible Solution Try another channel. Check all wire connections. Check the antenna connections. The TV operates erratically. Adjust the antenna. Adjust the picture settings. Press the "MODE" button to have a problem, first try operating it again. Chapter Five TROUBLESHOOTING If the TV seems to put your TV. Try another channel. Make sure the program is broadcast in . Unplug the TV for a long time, images may be burned onto the screen. 5.1 CHAPTER FIVE: TROUBLESHOOTING...
User Manual (user Manual) (ver.1.0) (English)
Page 67
... a warm place, unplug the power cord, and allow at least two hours for one system may have formed inside . • Wipe your TV with another system due to dry completely. Cabinet • Never open the cabinet or touch the parts inside the unit to differences in the TV channel frequencies Specifications Model Voltage Frequency of Operation Power Consumption Dimensions Weight HCM653W / HCM553W / HCL473W / HCM422W / HCM5525W / HCL4715W...
... a warm place, unplug the power cord, and allow at least two hours for one system may have formed inside . • Wipe your TV with another system due to dry completely. Cabinet • Never open the cabinet or touch the parts inside the unit to differences in the TV channel frequencies Specifications Model Voltage Frequency of Operation Power Consumption Dimensions Weight HCM653W / HCM553W / HCL473W / HCM422W / HCM5525W / HCL4715W...


