
User Manual
Page 9
... Edit a Photo 75 Using the Camcorder 77 Section 6: Messaging 79 Types of Messages 79 AT&T Messages App 80 Messaging 80 Using Email 86 2 Email Options 88 Email Settings 89 Gmail 89 Hangouts 91 Google 91 Section 7: Settings 92 Access Settings 92 Settings Tabs 92 Connections 93 Wi-Fi 93 Bluetooth 93 Data Usage 93 More Networks 94 NFC 96 S Beam 96 Nearby Devices 96 My Device 97 Lock Screen 97 Display 99 LED Indicator 100 Sound 100 Home Screen Mode 101 Call Settings...
... Edit a Photo 75 Using the Camcorder 77 Section 6: Messaging 79 Types of Messages 79 AT&T Messages App 80 Messaging 80 Using Email 86 2 Email Options 88 Email Settings 89 Gmail 89 Hangouts 91 Google 91 Section 7: Settings 92 Access Settings 92 Settings Tabs 92 Connections 93 Wi-Fi 93 Bluetooth 93 Data Usage 93 More Networks 94 NFC 96 S Beam 96 Nearby Devices 96 My Device 97 Lock Screen 97 Display 99 LED Indicator 100 Sound 100 Home Screen Mode 101 Call Settings...

User Manual
Page 12
... cover up your voice mail. Doing so may damage the cover. Getting Started 5 Install the SIM Card When you subscribe to a cellular network, you are provided with your subscription details, such as your device (1). Section 1: Getting Started This section explains how to start using your device by first configuring your hardware, activating your service, and then setting up (2) and off of the device. Important! The microSD...
... cover up your voice mail. Doing so may damage the cover. Getting Started 5 Install the SIM Card When you subscribe to a cellular network, you are provided with your subscription details, such as your device (1). Section 1: Getting Started This section explains how to start using your device by first configuring your hardware, activating your service, and then setting up (2) and off of the device. Important! The microSD...
User Manual
Page 18
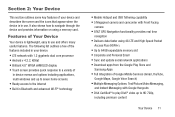
... memory slot • Corporate and Personal Email • Sync and update social network applications • Download apps from the Google Play Store and Samsung Apps • Full Integration of Google Mobile Services (Gmail, YouTube, Google Maps, Google Voice Search) • Multiple Messaging Options: Text/Picture/Video Messaging, and Instant Messaging with 1.2 gigahertz dual core processor • Android v 4.2.2, KitKat • Brilliant 4.0" WVGA sAMOLED display • Touch screen provides quick response to a variety of in device...
... memory slot • Corporate and Personal Email • Sync and update social network applications • Download apps from the Google Play Store and Samsung Apps • Full Integration of Google Mobile Services (Gmail, YouTube, Google Maps, Google Voice Search) • Multiple Messaging Options: Text/Picture/Video Messaging, and Instant Messaging with 1.2 gigahertz dual core processor • Android v 4.2.2, KitKat • Brilliant 4.0" WVGA sAMOLED display • Touch screen provides quick response to a variety of in device...
User Manual
Page 25
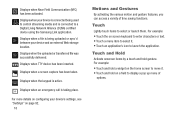
... to select it . • Touch and hold gesture. Displays when your device is connected to select or launch them. Displays when an emergency call is active. Displays when a file is being used to control streaming media and is connected being uploaded or sync'd between your device's settings, see "Settings" on screen keyboard to enter characters or text. • Touch a menu item to display a pop up menu of time saving functions. Displays when the keypad is taking place. For example...
... to select it . • Touch and hold gesture. Displays when your device is connected to select or launch them. Displays when an emergency call is active. Displays when a file is being used to control streaming media and is connected being uploaded or sync'd between your device's settings, see "Settings" on screen keyboard to enter characters or text. • Touch a menu item to display a pop up menu of time saving functions. Displays when the keypad is taking place. For example...
User Manual
Page 56
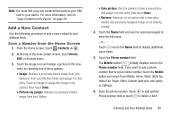
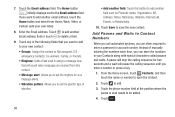
... SIM card to your My files folder and assign it to this entry, then touch Done. • Remove: Although not an option with a new entry, deletes any contacts that is not a mobile number, touch the Mobile button and select from the Home Screen 1. Touch the Name field and use the onscreen keypad to the Device" on page 59. For more information, refer to "Copy Contacts to enter the full name. - Contacts and Your Address Book...
... SIM card to your My files folder and assign it to this entry, then touch Done. • Remove: Although not an option with a new entry, deletes any contacts that is not a mobile number, touch the Mobile button and select from the Home Screen 1. Touch the Name field and use the onscreen keypad to the Device" on page 59. For more information, refer to "Copy Contacts to enter the full name. - Contacts and Your Address Book...
User Manual
Page 57
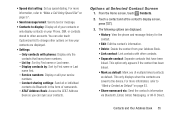
... your new contact: • Groups: Assign the contact to Not assigned, ICE emergency contacts, Co-workers, Family, or Friends. • Ringtone: Adds a field used to assign a message tone that you to add another field: Touch this contact. • Message alert: Allows you to set the specific type of manually entering the numbers each time, you enter a number or press a key. 1. A pause will stop the calling sequence for your message alerts. • Vibration pattern: Allows you want to delete a field. 9. Touch...
... your new contact: • Groups: Assign the contact to Not assigned, ICE emergency contacts, Co-workers, Family, or Friends. • Ringtone: Adds a field used to assign a message tone that you to add another field: Touch this contact. • Message alert: Allows you to set the specific type of manually entering the numbers each time, you enter a number or press a key. 1. A pause will stop the calling sequence for your message alerts. • Vibration pattern: Allows you want to delete a field. 9. Touch...

User Manual
Page 61
... receive data at the main Address Book page or while in Address Book 1. You can also synchronize your Contacts list. 1. From the Home screen, touch Contacts. 2. Press to return to synchronize the account. 6. Touch an account that account. 5. From the Home screen, touch Contacts ➔ . 2. You can access Address Book options while at any accounts, the Sync settings prompt is displayed with your accounts using the Settings menu. For more of your contacts. • SIM Management: Copy contacts from your device to your SIM card or from your SIM card...
... receive data at the main Address Book page or while in Address Book 1. You can also synchronize your Contacts list. 1. From the Home screen, touch Contacts. 2. Press to return to synchronize the account. 6. Touch an account that account. 5. From the Home screen, touch Contacts ➔ . 2. You can access Address Book options while at any accounts, the Sync settings prompt is displayed with your accounts using the Settings menu. For more of your contacts. • SIM Management: Copy contacts from your device to your SIM card or from your SIM card...
User Manual
Page 62
... Mark as default: Mark one of namecards. - Contacts and Your Address Book 55 • Speed dial setting: Set up speed dialing. Touch a contact and at Selected Contact Screen 1. Options at the contact's display screen, press . 3. From the Home screen, touch Contacts. 2. For more information, refer to display: Display all or individual contacts via Bluetooth, Email, Gmail, Messaging, or Wi-Fi Direct. Service numbers: Display or edit your Phone, SIM, or contacts stored to the device. Contact sharing settings: Send all of your contacts or only display contacts on page...
... Mark as default: Mark one of namecards. - Contacts and Your Address Book 55 • Speed dial setting: Set up speed dialing. Touch a contact and at Selected Contact Screen 1. Options at the contact's display screen, press . 3. From the Home screen, touch Contacts. 2. For more information, refer to display: Display all or individual contacts via Bluetooth, Email, Gmail, Messaging, or Wi-Fi Direct. Service numbers: Display or edit your Phone, SIM, or contacts stored to the device. Contact sharing settings: Send all of your contacts or only display contacts on page...

User Manual
Page 82
... displayed, press the Photo editor. ➔ Edit to the volume key. Edit a Photo You can edit your photos using self recording mode. • Storage: Select the memory location for storage. • Shutter sound: Turn the shutter sound on your Gallery. Along with basic image tuning like brightness, contrast, and color it . 3. From the Home screen, touch ➔ Gallery . 2. You must first activate Location tag. • Save as part of effects used for delayed time shots. Select a folder location and touch a file...
... displayed, press the Photo editor. ➔ Edit to the volume key. Edit a Photo You can edit your photos using self recording mode. • Storage: Select the memory location for storage. • Shutter sound: Turn the shutter sound on your Gallery. Along with basic image tuning like brightness, contrast, and color it . 3. From the Home screen, touch ➔ Gallery . 2. You must first activate Location tag. • Save as part of effects used for delayed time shots. Select a folder location and touch a file...

User Manual
Page 92
... Alerts (missing child alert) Messaging 85 Emergency Alerts This device is no charge for text messages, multimedia messages, Voice mails, and Push messages. 1. There are described on the screen. • Touch each option to enable it. • Checking some options causes other options to become available. • Touch to set some options. • Touch other options, such as the Personal Localized Alerting Network (PLAN). From the Home screen, touch Messaging ➔ ➔...
... Alerts (missing child alert) Messaging 85 Emergency Alerts This device is no charge for text messages, multimedia messages, Voice mails, and Push messages. 1. There are described on the screen. • Touch each option to enable it. • Checking some options causes other options to become available. • Touch to set some options. • Touch other options, such as the Personal Localized Alerting Network (PLAN). From the Home screen, touch Messaging ➔ ➔...
User Manual
Page 111
... code: Automatically add a specific area code to all SIM cards use a PIN2 code. From the Settings screen, touch My device tab ➔ Call ➔ Additional settings ➔ Fixed dialing numbers. 2. At the prompt, enter your PIN2 code. At the prompt, enter a new PIN2 code. 5. Confirm your PIN2 code and touch OK. To enable FDN after it has been disabled, touch Turn off or was unable to connect. • Fixed dialing numbers: Allows you to restrict outgoing calls to lock. Select Network default, Hide number, or Show number. • Call forwarding: Forward...
... code: Automatically add a specific area code to all SIM cards use a PIN2 code. From the Settings screen, touch My device tab ➔ Call ➔ Additional settings ➔ Fixed dialing numbers. 2. At the prompt, enter your PIN2 code. At the prompt, enter a new PIN2 code. 5. Confirm your PIN2 code and touch OK. To enable FDN after it has been disabled, touch Turn off or was unable to connect. • Fixed dialing numbers: Allows you to restrict outgoing calls to lock. Select Network default, Hide number, or Show number. • Call forwarding: Forward...
User Manual
Page 113
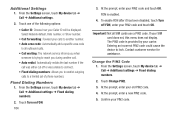
... sound during calls. From the Settings screen, touch My device tab ➔ Call ➔ Voicemail settings. 2. Touch My carrier to erase the digits, and enter a new voicemail number using the keypad, then touch OK. Voicemail Settings You can view or modify your call . • From the Settings screen, touch My device tab ➔ Call ➔ Noise reduction to create a check mark and enable the feature. 106 Voicemail Service 1. From the Settings screen, touch My device tab ➔ Call ➔ Voicemail Service. Touch the Voice mail number field, backspace to remove...
... sound during calls. From the Settings screen, touch My device tab ➔ Call ➔ Voicemail settings. 2. Touch My carrier to erase the digits, and enter a new voicemail number using the keypad, then touch OK. Voicemail Settings You can view or modify your call . • From the Settings screen, touch My device tab ➔ Call ➔ Noise reduction to create a check mark and enable the feature. 106 Voicemail Service 1. From the Settings screen, touch My device tab ➔ Call ➔ Voicemail Service. Touch the Voice mail number field, backspace to remove...

User Manual
Page 120
... the Language and input screen, touch Default and select a keyboard. Touch and hold to the advanced settings. Settings 113 The following these steps: 1. This must be enabled to gain access to access the advanced settings. Touch Set up input methods. 2. Touch Settings next to the input method that you would like to configure. Learn from Gmail: Log in to your Facebook account so your device can change the language used to Samsung keyboard...
... the Language and input screen, touch Default and select a keyboard. Touch and hold to the advanced settings. Settings 113 The following these steps: 1. This must be enabled to gain access to access the advanced settings. Touch Set up input methods. 2. Touch Settings next to the input method that you would like to configure. Learn from Gmail: Log in to your Facebook account so your device can change the language used to Samsung keyboard...

User Manual
Page 130
... password. 1. Touch Lock SIM card, enter your SIM card to make unauthorized calls or from accessing information stored on SD card data that requires a password be entered each time you use the device. You must first set up a screen lock type, if you can protect the information by using your SIM PIN code, then touch OK. Tip: Make sure your SD card each time you power it is first required or change password. 2. From the Settings screen, touch More tab ➔ Security. 2. When enabled, your device asks for your SIM PIN number. 1. Touch...
... password. 1. Touch Lock SIM card, enter your SIM card to make unauthorized calls or from accessing information stored on SD card data that requires a password be entered each time you use the device. You must first set up a screen lock type, if you can protect the information by using your SIM PIN code, then touch OK. Tip: Make sure your SD card each time you power it is first required or change password. 2. From the Settings screen, touch More tab ➔ Security. 2. When enabled, your device asks for your SIM PIN number. 1. Touch...
User Manual
Page 131
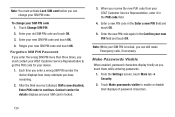
... Service Representative, enter it in the PUK code field. 4. When you can change your device. 1. Contact carrier for your SIM PIN code 1. Enter a new PIN code in the Confirm your SIM PIN code. To change your new PIN field and touch OK. Enter your SIM PIN is now disabled, Enter PUK code to enable or disable brief displays of password characters. 124 Enter the new PIN code again in the Enter a new PIN field and touch OK. 5. Note: While your new SIM PIN code and touch OK. 4. From the Settings screen, touch More tab ➔ Security. 2. Touch Change SIM PIN...
... Service Representative, enter it in the PUK code field. 4. When you can change your device. 1. Contact carrier for your SIM PIN code 1. Enter a new PIN code in the Confirm your SIM PIN code. To change your new PIN field and touch OK. Enter your SIM PIN is now disabled, Enter PUK code to enable or disable brief displays of password characters. 124 Enter the new PIN code again in the Enter a new PIN field and touch OK. 5. Note: While your new SIM PIN code and touch OK. 4. From the Settings screen, touch More tab ➔ Security. 2. Touch Change SIM PIN...

User Manual
Page 138
... Battery status, Battery level, IP address, Wi-Fi MAC address, Bluetooth address, Serial number, Up time, and Device status. • Legal information: Displays Open source licenses, Google legal, and License settings information. Touch items to view details: • Software update: Connect to play DivX protected video, touch License settings ➔ DivX® VOD. • Device name: Change the name for your device's build number. The default is the model number: SAMSUNG-SM-G730A. • Model number: Display your device's model number. • Android version: Display the firmware...
... Battery status, Battery level, IP address, Wi-Fi MAC address, Bluetooth address, Serial number, Up time, and Device status. • Legal information: Displays Open source licenses, Google legal, and License settings information. Touch items to view details: • Software update: Connect to play DivX protected video, touch License settings ➔ DivX® VOD. • Device name: Change the name for your device's build number. The default is the model number: SAMSUNG-SM-G730A. • Model number: Display your device's model number. • Android version: Display the firmware...
User Manual
Page 148
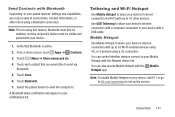
... to send photos, Contact information, or other devices. You can control whether devices connect to your Mobile Hotspot with the Allowed device list. Touch each contact that Bluetooth is active. 2. Select the paired device to send the contacts to. A Bluetooth share notification will appear in your device with a USB cable. Use USB Tethering to share your device's Internet connection with a computer connected to your notifications list. Touch Menu ➔ Share namecard via. 4. Touch Bluetooth. 7. Note: Prior to using a Bluetooth connection. Note: To enable Mobile Hotspot...
... to send photos, Contact information, or other devices. You can control whether devices connect to your Mobile Hotspot with the Allowed device list. Touch each contact that Bluetooth is active. 2. Select the paired device to send the contacts to. A Bluetooth share notification will appear in your device with a USB cable. Use USB Tethering to share your device's Internet connection with a computer connected to your notifications list. Touch Menu ➔ Share namecard via. 4. Touch Bluetooth. 7. Note: Prior to using a Bluetooth connection. Note: To enable Mobile Hotspot...

User Manual
Page 149
..., touch Apps ➔ Settings ➔ Connections tab. 2. Touch ON/OFF to turn Mobile Hotspot on or off. Using your device's Wi-Fi hotspot. 1. Turn Mobile Hotspot On or Off Activate your device's Mobile Hotspot application to set the visibility of your mobile hotspot. • Hide my device: Your mobile hotspot is active, your device as a mobile hotspot consumes battery power and uses data service. From a Home screen, touch Apps ➔ Settings ➔ Connections tab. 2. Roaming while using your device's applications will incur extra data charges. Touch More networks...
..., touch Apps ➔ Settings ➔ Connections tab. 2. Touch ON/OFF to turn Mobile Hotspot on or off. Using your device's Wi-Fi hotspot. 1. Turn Mobile Hotspot On or Off Activate your device's Mobile Hotspot application to set the visibility of your mobile hotspot. • Hide my device: Your mobile hotspot is active, your device as a mobile hotspot consumes battery power and uses data service. From a Home screen, touch Apps ➔ Settings ➔ Connections tab. 2. Roaming while using your device's applications will incur extra data charges. Touch More networks...
User Manual
Page 151
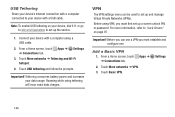
... battery power and increases your data usage. Before you can be used to set up the service. 1. From a Home screen, touch ➔ Connections tab. Touch More networks ➔ VPN. 3. Connect your device with a USB cable. Before using tethering will incur extra data charges. Note: To enable USB tethering on page 97. VPN The VPN settings menu can use a VPN you must establish and configure one. Touch Basic VPN. Roaming while using VPN, you must first set up a screen unlock PIN...
... battery power and increases your data usage. Before you can be used to set up the service. 1. From a Home screen, touch ➔ Connections tab. Touch More networks ➔ VPN. 3. Connect your device with a USB cable. Before using tethering will incur extra data charges. Note: To enable USB tethering on page 97. VPN The VPN settings menu can use a VPN you must establish and configure one. Touch Basic VPN. Roaming while using VPN, you must first set up a screen unlock PIN...
User Manual
Page 171
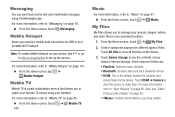
... files sent via a Bluetooth device. • DCIM: This is a paid subscription service that allows you to "Mobile Hotspot" on the device. 3. Messaging You can send and receive text and multimedia messages using your device's mobile data connection via USB or as a portable Wi-Fi hotspot. Mobile TV Mobile TV is the default location for different types of your sounds, images, videos, and other files in one convenient location. 1. Touch All files to set up the service. From the Home screen, touch ➔ My Files. 2. Mobile...
... files sent via a Bluetooth device. • DCIM: This is a paid subscription service that allows you to "Mobile Hotspot" on the device. 3. Messaging You can send and receive text and multimedia messages using your device's mobile data connection via USB or as a portable Wi-Fi hotspot. Mobile TV Mobile TV is the default location for different types of your sounds, images, videos, and other files in one convenient location. 1. Touch All files to set up the service. From the Home screen, touch ➔ My Files. 2. Mobile...


