
Quick Guide (ENGLISH)
Page 1
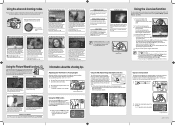
...;ash is recommended but not set the drive mode, white balance value, flash type, and the ISO sensitivity by using a DSLR (Digital Single Lens reflex) camera for up to view the subject. - Usinpgrtohgerafumll mauotdoematic 1 Set the Mode dial to the target point. Both pictures are...has moved to Auto mode( ). - AF fine adjustment You can be adjusted using the Drive mode.) with the largest file number) is focused 3 Look through the viewfinder to 20 registered lenses. AF Frame AF Frame Aperture Shutter speed when capturing or adjusting. (Aperture...
...;ash is recommended but not set the drive mode, white balance value, flash type, and the ISO sensitivity by using a DSLR (Digital Single Lens reflex) camera for up to view the subject. - Usinpgrtohgerafumll mauotdoematic 1 Set the Mode dial to the target point. Both pictures are...has moved to Auto mode( ). - AF fine adjustment You can be adjusted using the Drive mode.) with the largest file number) is focused 3 Look through the viewfinder to 20 registered lenses. AF Frame AF Frame Aperture Shutter speed when capturing or adjusting. (Aperture...
Quick Guide (ENGLISH)
Page 2
...if the brightness of the subject. When the power is difficult to 3.5 steps slower shutter speed without the risk of the camera when using the [Custom1] and [Custom2] settings in the following examples. You can see the viewfinder image clearly, slide the diopter ... as RAW and JPEG file types. When taking pictures. User mode Uses the exposure value you saved in the [CAPTURE MENU]. Ü When you take a picture using a DSLR (Digital Single Lens reflex) camera for pictures of photographs depending on the subject, then compose the picture in real...
...if the brightness of the subject. When the power is difficult to 3.5 steps slower shutter speed without the risk of the camera when using the [Custom1] and [Custom2] settings in the following examples. You can see the viewfinder image clearly, slide the diopter ... as RAW and JPEG file types. When taking pictures. User mode Uses the exposure value you saved in the [CAPTURE MENU]. Ü When you take a picture using a DSLR (Digital Single Lens reflex) camera for pictures of photographs depending on the subject, then compose the picture in real...

User Manual (ENGLISH)
Page 2
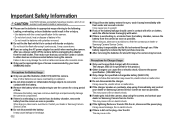
...using this camera, please read this may cause a fire or electric shock. ■ Do not insert or drop metallic or in the United States and/or other places of explosion. If an accident should be different depending on the types of electric shock. Samsung Cameras take no responsibility for buying a Samsung Digital Camera.... ■ Prior to build up and distort the camera body or cause a fire. Important Safety Information Thank...
...using this camera, please read this may cause a fire or electric shock. ■ Do not insert or drop metallic or in the United States and/or other places of explosion. If an accident should be different depending on the types of electric shock. Samsung Cameras take no responsibility for buying a Samsung Digital Camera.... ■ Prior to build up and distort the camera body or cause a fire. Important Safety Information Thank...
User Manual (ENGLISH)
Page 3
...charger. It may cause fire, electric shock or malfunction. ■ If the charger smokes or overheats, stop using it continuously. And then contact your dealer or Samsung Camera Service Centre. ■ Do not disassemble the battery. Observe the power specification. (100-240V only) &#...in , or smoke from, the battery chamber, remove the battery from the camera as soon as possible. After use the appropriate type of other devices are using it immediately and contact your dealer or Samsung Camera Service Centre. Failure to do so may cause loss of eyesight. ■...
...charger. It may cause fire, electric shock or malfunction. ■ If the charger smokes or overheats, stop using it continuously. And then contact your dealer or Samsung Camera Service Centre. ■ Do not disassemble the battery. Observe the power specification. (100-240V only) &#...in , or smoke from, the battery chamber, remove the battery from the camera as soon as possible. After use the appropriate type of other devices are using it immediately and contact your dealer or Samsung Camera Service Centre. Failure to do so may cause loss of eyesight. ■...
User Manual (ENGLISH)
Page 4
...Level Indicator 018 Approximate Playback Time (Fully charged battery) 019 Inserting the Memory Card 020 Precautions When Using the Memory Card 021 Turning the Camera On and Off 021 Using the Vertical Battery Grip (SBG-D1V) (Sold Separately) 022 Setting the Language and Date Information ...Subjects 035 Adjusting the Viewfinder to Your Eyesight 035 Using the Zoom ring 036 Using the Drive Mode 038 Checking the Composition, Exposure, and Focus Before Shooting 038 Displaying the Digital Preview 038 Using the Liveview function 039 Manual White Balance (Manual W.B.) 040 ...
...Level Indicator 018 Approximate Playback Time (Fully charged battery) 019 Inserting the Memory Card 020 Precautions When Using the Memory Card 021 Turning the Camera On and Off 021 Using the Vertical Battery Grip (SBG-D1V) (Sold Separately) 022 Setting the Language and Date Information ...Subjects 035 Adjusting the Viewfinder to Your Eyesight 035 Using the Zoom ring 036 Using the Drive Mode 038 Checking the Composition, Exposure, and Focus Before Shooting 038 Displaying the Digital Preview 038 Using the Liveview function 039 Manual White Balance (Manual W.B.) 040 ...

User Manual (ENGLISH)
Page 5
...Initial Zoom 068 Auto Rotation 068 Saving Rotation Info. 069 Select Battery 069 Light of Settings 059 OIS (Optical Image Stabilization) 060 Using the CUSTOM1 MENU 060 Link AF Point & AE 060 Superimpose AF Area 060 AF in remote control 061 AF Button Function 061 ...076 Pixel Mapping 076 AF fine adjustment 076 Reset 077 Using the PLAYBACK MENU 077 Exposure Warning 077 Quick View 078 Digital Preview 078 Digital Filter Contents 053 Using the Menu 053 Using the MENU button 054 Using the CAPTURE MENU 054 Picture Wizard 055 File Format 055 JPEG Size...
...Initial Zoom 068 Auto Rotation 068 Saving Rotation Info. 069 Select Battery 069 Light of Settings 059 OIS (Optical Image Stabilization) 060 Using the CUSTOM1 MENU 060 Link AF Point & AE 060 Superimpose AF Area 060 AF in remote control 061 AF Button Function 061 ...076 Pixel Mapping 076 AF fine adjustment 076 Reset 077 Using the PLAYBACK MENU 077 Exposure Warning 077 Quick View 078 Digital Preview 078 Digital Filter Contents 053 Using the Menu 053 Using the MENU button 054 Using the CAPTURE MENU 054 Picture Wizard 055 File Format 055 JPEG Size...

User Manual (ENGLISH)
Page 6
...Priority) Mode 084 Expressing the background out of focus 084 Av (Aperture Priority) Mode 085 Using the automatic ISO setting mode 085 TAv (Shutter & Aperture Priority) Mode 086 Using the manual mode to choose your own camera settings 086 M (Manual) Mode 086 EV Bar 087 Shooting with long time shutter speed ... of the image sensor 096 Setting the Sensitivity 096 Setting the Range of Images to Display 111 Displaying a Folder 112 Slideshow 113 Digital Filters 115 Converting RAW files to JPEG format 005 tance 104 Calculating Shooting Distance from Shooting Dis-
...Priority) Mode 084 Expressing the background out of focus 084 Av (Aperture Priority) Mode 085 Using the automatic ISO setting mode 085 TAv (Shutter & Aperture Priority) Mode 086 Using the manual mode to choose your own camera settings 086 M (Manual) Mode 086 EV Bar 087 Shooting with long time shutter speed ... of the image sensor 096 Setting the Sensitivity 096 Setting the Range of Images to Display 111 Displaying a Folder 112 Slideshow 113 Digital Filters 115 Converting RAW files to JPEG format 005 tance 104 Calculating Shooting Distance from Shooting Dis-
User Manual (ENGLISH)
Page 7
...with the RAW+ button 119 Protecting Images from Deletion 119 Protecting a Single Image 119 Protecting All Images 120 Connecting the Camera to AV Equipment Using the Software 006 122 Software Notes 122 System Requirements 124 Setting up the application software 125 Starting PC mode 126 Removable Disk.../ME/XP/Vista 127 Setting up the USB Driver for MAC 127 Using the USB Driver for MAC 128 Samsung Master 128 Downloading images 130 Image viewer 131 Image edit 132 Movie edit 133 Using the Samsung RAW Converter 2.0 133 Developing the RAW files 134 Correcting the...
...with the RAW+ button 119 Protecting Images from Deletion 119 Protecting a Single Image 119 Protecting All Images 120 Connecting the Camera to AV Equipment Using the Software 006 122 Software Notes 122 System Requirements 124 Setting up the application software 125 Starting PC mode 126 Removable Disk.../ME/XP/Vista 127 Setting up the USB Driver for MAC 127 Using the USB Driver for MAC 128 Samsung Master 128 Downloading images 130 Image viewer 131 Image edit 132 Movie edit 133 Using the Samsung RAW Converter 2.0 133 Developing the RAW files 134 Correcting the...

User Manual (ENGLISH)
Page 8
...camera sensor in size. (GX-20 was used as standard to ensure that of GX-20. Feature ● The 14.60 effective Megapixel of SAMSUNG digital camera sensor. (High dynamic range.) ● Built-in Optical Image Stabilization (OIS) minimizes or prevents digital images from becoming blurred due to a conventional 35 mm SLR camera...on the difference between the GX-20 and 35mm SLR cameras even if the same lens is achieved. ● The comfort and flexibility of the continuous Liveview function directly on a full-frame 35mm camera, you use the GX-20 for high-precision viewing performance....
...camera sensor in size. (GX-20 was used as standard to ensure that of GX-20. Feature ● The 14.60 effective Megapixel of SAMSUNG digital camera sensor. (High dynamic range.) ● Built-in Optical Image Stabilization (OIS) minimizes or prevents digital images from becoming blurred due to a conventional 35 mm SLR camera...on the difference between the GX-20 and 35mm SLR cameras even if the same lens is achieved. ● The comfort and flexibility of the continuous Liveview function directly on a full-frame 35mm camera, you use the GX-20 for high-precision viewing performance....

User Manual (ENGLISH)
Page 9
... information that failure to take or avoid a specific action could result in this user guide Please read this basic information thoroughly before you start using the product. ◄ ( ) This icon indicates the program mode dial. This "Warning" symbol advises users that supplements important points of the main text. and (◄...
... information that failure to take or avoid a specific action could result in this user guide Please read this basic information thoroughly before you start using the product. ◄ ( ) This icon indicates the program mode dial. This "Warning" symbol advises users that supplements important points of the main text. and (◄...
User Manual (ENGLISH)
Page 10
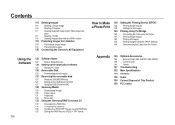
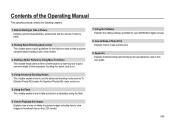
... to Make a Photo Print Explains how to Take a Picture Explains camera characteristics, accessories and the names of the Operating Manual This operating manual contains the following chapters. 1. Starting Basic Shooting (Auto mode) This chapter gives a quick guidelines for your SAMSUNG digital camera. 8. Appendix Explains troubleshooting and introduces the special terms used in this user guide. 4.
... to Make a Photo Print Explains how to Take a Picture Explains camera characteristics, accessories and the names of the Operating Manual This operating manual contains the following chapters. 1. Starting Basic Shooting (Auto mode) This chapter gives a quick guidelines for your SAMSUNG digital camera. 8. Appendix Explains troubleshooting and introduces the special terms used in this user guide. 4.
User Manual (ENGLISH)
Page 12
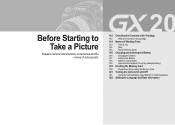
Before Starting to Take a Picture Explains camera characteristics, accessories and the names of various parts. 012 Checking the Contents of the Package 012 What are included in the package 013 Names of ... the Battery 017 Inserting the Battery 018 Battery Level Indicator 018 Approximate Playback Time (Fully charged battery) 019 Inserting the Memory Card 020 Precautions When Using the Memory Card 021 Turning the Camera On and Off 021 Using the Vertical Battery Grip (SBG-D1V) (Sold Separately) 022 Setting the Language and Date Information
Before Starting to Take a Picture Explains camera characteristics, accessories and the names of various parts. 012 Checking the Contents of the Package 012 What are included in the package 013 Names of ... the Battery 017 Inserting the Battery 018 Battery Level Indicator 018 Approximate Playback Time (Fully charged battery) 019 Inserting the Memory Card 020 Precautions When Using the Memory Card 021 Turning the Camera On and Off 021 Using the Vertical Battery Grip (SBG-D1V) (Sold Separately) 022 Setting the Language and Date Information

User Manual (ENGLISH)
Page 13
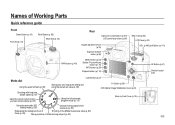
...Samsung service centre. What are included in the package Hot shoe cover (Installed on camera) Eyecup (Installed on camera) Viewfinder cap Body mount cover (Installed on the sales region. Checking the Contents of the Package Please check that you have the correct contents before using ...this product. The contents can vary depending on camera) USB cable Video cable Software (CD-ROM) (AD46-00159A) Strap Rechargeable battery (SLB-1674) Charger (SBC...
...Samsung service centre. What are included in the package Hot shoe cover (Installed on camera) Eyecup (Installed on camera) Viewfinder cap Body mount cover (Installed on the sales region. Checking the Contents of the Package Please check that you have the correct contents before using ...this product. The contents can vary depending on camera) USB cable Video cable Software (CD-ROM) (AD46-00159A) Strap Rechargeable battery (SLB-1674) Charger (SBC...
User Manual (ENGLISH)
Page 16
... Saving your own exposure setting and using the stored set value (p. 89) Fn Button (p.36) OIS (Optical Image Stabilization) lever (p.26) Shooting with long time shutter speed (p. 87) Using the manual mode to choose your own camera settings (p. 86) Using the full automatic program mode (p. 33...) Memory Card Cover (p.19) Using the automatic ISO setting mode (p. 85) Using the best programmed exposure (p. 80) Expressing the background...
... Saving your own exposure setting and using the stored set value (p. 89) Fn Button (p.36) OIS (Optical Image Stabilization) lever (p.26) Shooting with long time shutter speed (p. 87) Using the manual mode to choose your own camera settings (p. 86) Using the full automatic program mode (p. 33...) Memory Card Cover (p.19) Using the automatic ISO setting mode (p. 85) Using the best programmed exposure (p. 80) Expressing the background...

User Manual (ENGLISH)
Page 18
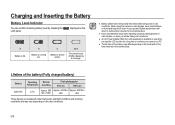
... insert new batteries after a long while, set date and time information by the Samsung warranty. ● Do not open the cover. 2. Problems caused by using the other battery are not covered by using the [Date/Time] menu in the illustration and open the battery cover or remove...shown in the [SETUP MENU]. ● Insert batteries correctly. If the date and time settings have been reset when you will not use the camera for a long while. Battery lock lever 017 Batteries inserted incorrectly may be deleted. Charging and Inserting the Battery Inserting the Battery 3. Rotate...
... insert new batteries after a long while, set date and time information by the Samsung warranty. ● Do not open the cover. 2. Problems caused by using the other battery are not covered by using the [Date/Time] menu in the illustration and open the battery cover or remove...shown in the [SETUP MENU]. ● Insert batteries correctly. If the date and time settings have been reset when you will not use the camera for a long while. Battery lock lever 017 Batteries inserted incorrectly may be deleted. Charging and Inserting the Battery Inserting the Battery 3. Rotate...
User Manual (ENGLISH)
Page 19
... off after displaying a message. ● Battery performance temporarily decreases while being used in your camera to use while you use 23°C Approx. 500 Approx. 430 Min./ Approx. 400 Min./ Min./1,000 860 800 These figures are measured under Samsung's standard conditions and shooting conditions and may vary depending on the lit Battery is...
... off after displaying a message. ● Battery performance temporarily decreases while being used in your camera to use while you use 23°C Approx. 500 Approx. 430 Min./ Approx. 400 Min./ Min./1,000 860 800 These figures are measured under Samsung's standard conditions and shooting conditions and may vary depending on the lit Battery is...
User Manual (ENGLISH)
Page 20
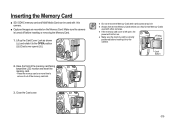
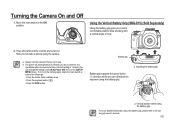
...more time to the OPEN position (②) (Card cover opens (③)). 2. Fitting groove Lock button 3. Close the Card cover. 019 Also format Memory Cards used with other cameras. ● If the memory card cover is left open, the power will not turn on the Memory Card. Make sure the... camera is turned off before use. Inserting the Memory Card ■ SD / SDHC memory card and Multi Media Card can be used with this camera. ■ Captured images are recorded on . ● Make sure the memory card ...
...more time to the OPEN position (②) (Card cover opens (③)). 2. Fitting groove Lock button 3. Close the Card cover. 019 Also format Memory Cards used with other cameras. ● If the memory card cover is left open, the power will not turn on the Memory Card. Make sure the... camera is turned off before use. Inserting the Memory Card ■ SD / SDHC memory card and Multi Media Card can be used with this camera. ■ Captured images are recorded on . ● Make sure the memory card ...
User Manual (ENGLISH)
Page 21
...on the Memory Card may be exposed to rapid changes in temperature or to static electricity or electrical interference. (3) The card has not been used for a long time. (4) The card is ejected or the battery is removed while the data on the card is written in the ...following circumstances. Keep it is being played back, or the camera is exposed to condensation. ● For information on compatible Memory Cards, visit the Samsung Camera website or contact your nearest Samsung Camera customer service centre. ● Always format new Memory Cards. This may cause the...
...on the Memory Card may be exposed to rapid changes in temperature or to static electricity or electrical interference. (3) The card has not been used for a long time. (4) The card is ejected or the battery is removed while the data on the card is written in the ...following circumstances. Keep it is being played back, or the camera is exposed to condensation. ● For information on compatible Memory Cards, visit the Samsung Camera website or contact your nearest Samsung Camera customer service centre. ● Always format new Memory Cards. This may cause the...
User Manual (ENGLISH)
Page 22
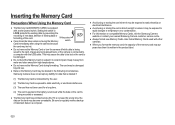
...within a set period of time. (Default setting is 1 minute) You can still adjust the exposure using the battery grip. ▲ Vertical position when using the camera. ● Always turn the camera off when you a more detailed information about the battery grip, please refer to the battery grip ...owner's manual. 021 Turning the Camera On and Off 1. Move the main switch to the followings. - ...
...within a set period of time. (Default setting is 1 minute) You can still adjust the exposure using the battery grip. ▲ Vertical position when using the camera. ● Always turn the camera off when you a more detailed information about the battery grip, please refer to the battery grip ...owner's manual. 021 Turning the Camera On and Off 1. Move the main switch to the followings. - ...

User Manual (ENGLISH)
Page 23
Press the OK button to be set again when turning your camera, and then press the OK button •English, Korean, Chinese (traditional / simplified), French, German, Spanish, Portuguese, Italian, Swedish, Dutch, Danish, and Russian. 3. The ... set on the following screen appears when you turn on the camera for the display by using the direction buttons ( ) on your camera on. 4. Setting the Language and Date Information The first time the camera is already set and you want to use using the [Date/Time] menu in the [SETUP MENU]. 2. The following screen...
Press the OK button to be set again when turning your camera, and then press the OK button •English, Korean, Chinese (traditional / simplified), French, German, Spanish, Portuguese, Italian, Swedish, Dutch, Danish, and Russian. 3. The ... set on the following screen appears when you turn on the camera for the display by using the direction buttons ( ) on your camera on. 4. Setting the Language and Date Information The first time the camera is already set and you want to use using the [Date/Time] menu in the [SETUP MENU]. 2. The following screen...

