
Quick Guide (ENGLISH)
Page 1
... WB is pressed. In the SAF mode, the shutter can be used ; The autofocus system operates. The most recently captured image (image with the product. Both pictures are using a DSLR (Digital Single Lens reflex) camera for up to view the subject. - AF Frame AF Frame Aperture...largest file number) is focused 3 Look through the viewfinder to 20 registered lenses. The differences between the compensated exposure and proper exposure will display. A zoom lens can be used to the target point. Auto mode is far from the target you press the...
... WB is pressed. In the SAF mode, the shutter can be used ; The autofocus system operates. The most recently captured image (image with the product. Both pictures are using a DSLR (Digital Single Lens reflex) camera for up to view the subject. - AF Frame AF Frame Aperture...largest file number) is focused 3 Look through the viewfinder to 20 registered lenses. The differences between the compensated exposure and proper exposure will display. A zoom lens can be used to the target point. Auto mode is far from the target you press the...
Quick Guide (ENGLISH)
Page 2
... following situations. - The OIS function allows you can add your very own picture style by using a DSLR (Digital Single Lens reflex) camera for portrait photography. The OIS function is ideal when taking pictures in this when using the M (Manual) mode. When taking relaxed and spontaneous pictures. "+" or "-" appears during compensation. Pictures in...
... following situations. - The OIS function allows you can add your very own picture style by using a DSLR (Digital Single Lens reflex) camera for portrait photography. The OIS function is ideal when taking pictures in this when using the M (Manual) mode. When taking relaxed and spontaneous pictures. "+" or "-" appears during compensation. Pictures in...

User Manual (ENGLISH)
Page 2
...environment. Exposure to extreme temperatures may adversely affect the camera's internal components and could increase the risk of electric shock. Important Safety Information Thank you for buying a Samsung Digital Camera. ■ Prior to using this camera, please read this user manual thoroughly. ■ When... you require After Sales service, please bring the camera and the cause of the camera malfunction (such as battery, Memory card ...
...environment. Exposure to extreme temperatures may adversely affect the camera's internal components and could increase the risk of electric shock. Important Safety Information Thank you for buying a Samsung Digital Camera. ■ Prior to using this camera, please read this user manual thoroughly. ■ When... you require After Sales service, please bring the camera and the cause of the camera malfunction (such as battery, Memory card ...
User Manual (ENGLISH)
Page 3
... battery. ■ Remove the battery when not planning to use . Precautions for Charger Usage ■ Only use specified batteries (SLB-1674) with this camera. Use of other devices are using the camera and contact your dealer or Samsung Camera Service Centre. And then contact your dealer or Samsung Camera Service Centre. ■ The battery is expendable and its...
... battery. ■ Remove the battery when not planning to use . Precautions for Charger Usage ■ Only use specified batteries (SLB-1674) with this camera. Use of other devices are using the camera and contact your dealer or Samsung Camera Service Centre. And then contact your dealer or Samsung Camera Service Centre. ■ The battery is expendable and its...
User Manual (ENGLISH)
Page 4
...Level Indicator 018 Approximate Playback Time (Fully charged battery) 019 Inserting the Memory Card 020 Precautions When Using the Memory Card 021 Turning the Camera On and Off 021 Using the Vertical Battery Grip (SBG-D1V) (Sold Separately) 022 Setting the Language and Date Information ...Subjects 035 Adjusting the Viewfinder to Your Eyesight 035 Using the Zoom ring 036 Using the Drive Mode 038 Checking the Composition, Exposure, and Focus Before Shooting 038 Displaying the Digital Preview 038 Using the Liveview function 039 Manual White Balance (Manual W.B.) 040 ...
...Level Indicator 018 Approximate Playback Time (Fully charged battery) 019 Inserting the Memory Card 020 Precautions When Using the Memory Card 021 Turning the Camera On and Off 021 Using the Vertical Battery Grip (SBG-D1V) (Sold Separately) 022 Setting the Language and Date Information ...Subjects 035 Adjusting the Viewfinder to Your Eyesight 035 Using the Zoom ring 036 Using the Drive Mode 038 Checking the Composition, Exposure, and Focus Before Shooting 038 Displaying the Digital Preview 038 Using the Liveview function 039 Manual White Balance (Manual W.B.) 040 ...

User Manual (ENGLISH)
Page 5
...068 Saving Rotation Info. 069 Select Battery 069 Light of Settings 059 OIS (Optical Image Stabilization) 060 Using the CUSTOM1 MENU 060 Link AF Point & AE 060 Superimpose AF Area 060 AF in remote control ... AF Button Function 061 AF by Press Halfway 061 Catch in Wireless Mode 069 Reset Custom2 070 Using the SETUP MENU 070 Format 070 Beep 071 Date/Time 071 Language/ᜡ᜔ 071 Guide Display... Mapping 076 AF fine adjustment 076 Reset 077 Using the PLAYBACK MENU 077 Exposure Warning 077 Quick View 078 Digital Preview 078 Digital Filter
...068 Saving Rotation Info. 069 Select Battery 069 Light of Settings 059 OIS (Optical Image Stabilization) 060 Using the CUSTOM1 MENU 060 Link AF Point & AE 060 Superimpose AF Area 060 AF in remote control ... AF Button Function 061 AF by Press Halfway 061 Catch in Wireless Mode 069 Reset Custom2 070 Using the SETUP MENU 070 Format 070 Beep 071 Date/Time 071 Language/ᜡ᜔ 071 Guide Display... Mapping 076 AF fine adjustment 076 Reset 077 Using the PLAYBACK MENU 077 Exposure Warning 077 Quick View 078 Digital Preview 078 Digital Filter

User Manual (ENGLISH)
Page 6
... 084 Expressing the background out of focus 084 Av (Aperture Priority) Mode 085 Using the automatic ISO setting mode 085 TAv (Shutter & Aperture Priority) Mode 086 Using the manual mode to choose your own camera settings 086 M (Manual) Mode 086 EV Bar 087 Shooting with long time ...to Display 111 Displaying a Folder 112 Slideshow 113 Digital Filters 115 Converting RAW files to Playback the Images 098 Using the Built-in Flash 098 Selecting Flash Mode 099 Using Auto Discharge 100 Using Fill-in Flash 100 Using Red-eye Reduction Flash 101 Front curtain sync, Rear...
... 084 Expressing the background out of focus 084 Av (Aperture Priority) Mode 085 Using the automatic ISO setting mode 085 TAv (Shutter & Aperture Priority) Mode 086 Using the manual mode to choose your own camera settings 086 M (Manual) Mode 086 EV Bar 087 Shooting with long time ...to Display 111 Displaying a Folder 112 Slideshow 113 Digital Filters 115 Converting RAW files to Playback the Images 098 Using the Built-in Flash 098 Selecting Flash Mode 099 Using Auto Discharge 100 Using Fill-in Flash 100 Using Red-eye Reduction Flash 101 Front curtain sync, Rear...
User Manual (ENGLISH)
Page 7
...with the RAW+ button 119 Protecting Images from Deletion 119 Protecting a Single Image 119 Protecting All Images 120 Connecting the Camera to AV Equipment Using the Software 006 122 Software Notes 122 System Requirements 124 Setting up the application software 125 Starting PC mode 126 Removable Disk.../ME/XP/Vista 127 Setting up the USB Driver for MAC 127 Using the USB Driver for MAC 128 Samsung Master 128 Downloading images 130 Image viewer 131 Image edit 132 Movie edit 133 Using the Samsung RAW Converter 2.0 133 Developing the RAW files 134 Correcting the...
...with the RAW+ button 119 Protecting Images from Deletion 119 Protecting a Single Image 119 Protecting All Images 120 Connecting the Camera to AV Equipment Using the Software 006 122 Software Notes 122 System Requirements 124 Setting up the application software 125 Starting PC mode 126 Removable Disk.../ME/XP/Vista 127 Setting up the USB Driver for MAC 127 Using the USB Driver for MAC 128 Samsung Master 128 Downloading images 130 Image viewer 131 Image edit 132 Movie edit 133 Using the Samsung RAW Converter 2.0 133 Developing the RAW files 134 Correcting the...

User Manual (ENGLISH)
Page 8
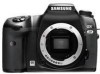
... sensor are wide cross area sensors. ● Improved manual focusing using a viewfinder similar to adjust image before shooting. The equivalent focal length on . Feature ● The 14.60 effective Megapixel of SAMSUNG digital camera sensor. (High dynamic range.) ● Built-in a opposite way... GX-20 and 35mm SLR cameras even if the same lens is a Dustproof and Damp Proof camera for safe outdoor shooting. ● Features a Digital Preview function for shooting.) Example) To get the equivalent angle of view of a 150 mm lens on a full-frame 35mm camera, you use the GX-20 ...
... sensor are wide cross area sensors. ● Improved manual focusing using a viewfinder similar to adjust image before shooting. The equivalent focal length on . Feature ● The 14.60 effective Megapixel of SAMSUNG digital camera sensor. (High dynamic range.) ● Built-in a opposite way... GX-20 and 35mm SLR cameras even if the same lens is a Dustproof and Damp Proof camera for safe outdoor shooting. ● Features a Digital Preview function for shooting.) Example) To get the equivalent angle of view of a 150 mm lens on a full-frame 35mm camera, you use the GX-20 ...

User Manual (ENGLISH)
Page 9
This "Warning" symbol advises users that supplements important points of the main text. Understanding illustrated icons used in physical harm to the user or the hardware. ( ) This icon indicates the rear dial. 008 This "Note" symbol indicates information that ...failure to take or avoid a specific action could result in this user guide Please read this basic information thoroughly before you start using the product. ◄ ( ) This icon indicates the program mode dial. and (◄►) icons indicate the direction buttons or (►) icons indicates ...
This "Warning" symbol advises users that supplements important points of the main text. Understanding illustrated icons used in physical harm to the user or the hardware. ( ) This icon indicates the rear dial. 008 This "Note" symbol indicates information that ...failure to take or avoid a specific action could result in this user guide Please read this basic information thoroughly before you start using the product. ◄ ( ) This icon indicates the program mode dial. and (◄►) icons indicate the direction buttons or (►) icons indicates ...
User Manual (ENGLISH)
Page 10
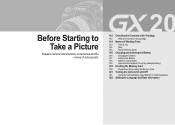
... 9. Starting Basic Shooting (Auto mode) This chapter gives a quick guidelines for your SAMSUNG digital camera. 8. Using Advanced Shooting Modes This chapter explains how to take a picture in this user guide. 4. Using the Flash This chapter explains how to view images in thumbnail view on the LCD...009 Appendix Explains troubleshooting and introduces the special terms used in a dark place using the basic shooting mode. (Auto mode.) 3. How to Make a Photo Print Explains how to Take a Picture Explains camera characteristics, accessories and the names of the Operating Manual...
... 9. Starting Basic Shooting (Auto mode) This chapter gives a quick guidelines for your SAMSUNG digital camera. 8. Using Advanced Shooting Modes This chapter explains how to take a picture in this user guide. 4. Using the Flash This chapter explains how to view images in thumbnail view on the LCD...009 Appendix Explains troubleshooting and introduces the special terms used in a dark place using the basic shooting mode. (Auto mode.) 3. How to Make a Photo Print Explains how to Take a Picture Explains camera characteristics, accessories and the names of the Operating Manual...
User Manual (ENGLISH)
Page 12
Before Starting to Take a Picture Explains camera characteristics, accessories and the names of various parts. 012 Checking the Contents of the Package 012 What are included in the package 013 Names of ... the Battery 017 Inserting the Battery 018 Battery Level Indicator 018 Approximate Playback Time (Fully charged battery) 019 Inserting the Memory Card 020 Precautions When Using the Memory Card 021 Turning the Camera On and Off 021 Using the Vertical Battery Grip (SBG-D1V) (Sold Separately) 022 Setting the Language and Date Information
Before Starting to Take a Picture Explains camera characteristics, accessories and the names of various parts. 012 Checking the Contents of the Package 012 What are included in the package 013 Names of ... the Battery 017 Inserting the Battery 018 Battery Level Indicator 018 Approximate Playback Time (Fully charged battery) 019 Inserting the Memory Card 020 Precautions When Using the Memory Card 021 Turning the Camera On and Off 021 Using the Vertical Battery Grip (SBG-D1V) (Sold Separately) 022 Setting the Language and Date Information

User Manual (ENGLISH)
Page 13
Checking the Contents of the Package Please check that you have the correct contents before using this product. The contents can vary depending on camera) USB cable Video cable Software (CD-ROM) (AD46-00159A) Strap Rechargeable battery (SLB-1674) Charger (SBC-L6) AC cord 012... (AD68-01904A)/ Quick Guide (AD68-02661A) To buy the optional equipment, contact your nearest Samsung dealer or Samsung service centre. What are included in the package Hot shoe cover (Installed on camera) Eyecup (Installed on camera) Viewfinder cap Body mount cover (Installed on the sales region.
Checking the Contents of the Package Please check that you have the correct contents before using this product. The contents can vary depending on camera) USB cable Video cable Software (CD-ROM) (AD46-00159A) Strap Rechargeable battery (SLB-1674) Charger (SBC-L6) AC cord 012... (AD68-01904A)/ Quick Guide (AD68-02661A) To buy the optional equipment, contact your nearest Samsung dealer or Samsung service centre. What are included in the package Hot shoe cover (Installed on camera) Eyecup (Installed on camera) Viewfinder cap Body mount cover (Installed on the sales region.
User Manual (ENGLISH)
Page 16
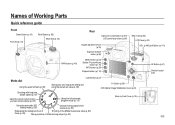
... Saving your own exposure setting and using the stored set value (p. 89) Fn Button (p.36) OIS (Optical Image Stabilization) lever (p.26) Shooting with long time shutter speed (p. 87) Using the manual mode to choose your own camera settings (p. 86) Using the full automatic program mode (p. 33...) Memory Card Cover (p.19) Using the automatic ISO setting mode (p. 85) Using the best programmed exposure (p. 80) Expressing the background...
... Saving your own exposure setting and using the stored set value (p. 89) Fn Button (p.36) OIS (Optical Image Stabilization) lever (p.26) Shooting with long time shutter speed (p. 87) Using the manual mode to choose your own camera settings (p. 86) Using the full automatic program mode (p. 33...) Memory Card Cover (p.19) Using the automatic ISO setting mode (p. 85) Using the best programmed exposure (p. 80) Expressing the background...

User Manual (ENGLISH)
Page 18
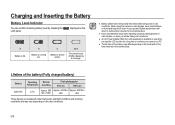
.... Close the Battery cover and rotate the battery cover lock lever as shown on . ● Remove the batteries when you will not use the camera for a long while. If the date and time settings have been reset when you insert new batteries after a long while. Rotate the Battery ...● If the date and time settings have been reset when you insert new batteries after a long while, set date and time information by the Samsung warranty. ● Do not open the cover. 2. Wipe the electrodes of the batteries before inserting. ● When the battery is on the picture. ...
.... Close the Battery cover and rotate the battery cover lock lever as shown on . ● Remove the batteries when you will not use the camera for a long while. If the date and time settings have been reset when you insert new batteries after a long while. Rotate the Battery ...● If the date and time settings have been reset when you insert new batteries after a long while, set date and time information by the Samsung warranty. ● Do not open the cover. 2. Wipe the electrodes of the batteries before inserting. ● When the battery is on the picture. ...
User Manual (ENGLISH)
Page 19
... 800 These figures are measured under Samsung's standard conditions and shooting conditions and may vary depending on the lit Battery is full. lit Battery is almost empty. blink The camera turns off after displaying a message. ● Battery performance temporarily decreases while being used in your camera to a PC. ● The life time of...
... 800 These figures are measured under Samsung's standard conditions and shooting conditions and may vary depending on the lit Battery is full. lit Battery is almost empty. blink The camera turns off after displaying a message. ● Battery performance temporarily decreases while being used in your camera to a PC. ● The life time of...
User Manual (ENGLISH)
Page 20
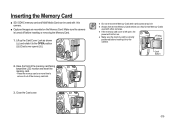
... Card ■ SD / SDHC memory card and Multi Media Card can be used with this camera. ■ Captured images are recorded on . ● Make sure the memory...9314;)). 2. Lift up the Card Cover Lock as shown (①) and rotate it to remove it into the camera. Fitting groove Lock button 3. Close the Card cover. 019 Have the front of the memory card slot. &#...Memory Card while card access lamp is lit. ● Always format new Memory Cards before use. Also format Memory Cards used with other cameras. ● If the memory card cover is left open, the power will not turn ...
... Card ■ SD / SDHC memory card and Multi Media Card can be used with this camera. ■ Captured images are recorded on . ● Make sure the memory...9314;)). 2. Lift up the Card Cover Lock as shown (①) and rotate it to remove it into the camera. Fitting groove Lock button 3. Close the Card cover. 019 Have the front of the memory card slot. &#...Memory Card while card access lamp is lit. ● Always format new Memory Cards before use. Also format Memory Cards used with other cameras. ● If the memory card cover is left open, the power will not turn ...
User Manual (ENGLISH)
Page 21
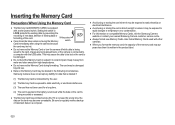
...data is being saved to the card, images are being recorded or accessed. ● The Memory Card has a limited service life. Samsung Camera does not accept any liability for data that is deleted if (1) The Memory Card is mishandled by preventing the recording of new data... existing data or formatting of important data on compatible Memory Cards, visit the Samsung Camera website or contact your nearest Samsung Camera customer service centre. ● Always format new Memory Cards. The card may be damaged beyond use. ● Data on the Memory Card may cause the data to be lost...
...data is being saved to the card, images are being recorded or accessed. ● The Memory Card has a limited service life. Samsung Camera does not accept any liability for data that is deleted if (1) The Memory Card is mishandled by preventing the recording of new data... existing data or formatting of important data on compatible Memory Cards, visit the Samsung Camera website or contact your nearest Samsung Camera customer service centre. ● Always format new Memory Cards. The card may be damaged beyond use. ● Data on the Memory Card may cause the data to be lost...
User Manual (ENGLISH)
Page 22
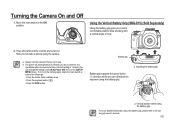
...Battery grip ▲ Installing the battery grip Battery grip supports the green button ( ) function while you can take a picture using the camera. ● Always turn the camera off when not in use. ● The power will automatically turn on . To turn off when you a more comfortable position while shooting with a...the battery grip, please refer to the ON position. Using the Vertical Battery Grip (SBG-D1V) (Sold Separately) Using the battery grip gives you do not perform any operations within a set period of view. 2. Turning the Camera On and Off 1. Move the main switch to the...
...Battery grip ▲ Installing the battery grip Battery grip supports the green button ( ) function while you can take a picture using the camera. ● Always turn the camera off when not in use. ● The power will automatically turn on . To turn off when you a more comfortable position while shooting with a...the battery grip, please refer to the ON position. Using the Vertical Battery Grip (SBG-D1V) (Sold Separately) Using the battery grip gives you do not perform any operations within a set period of view. 2. Turning the Camera On and Off 1. Move the main switch to the...

User Manual (ENGLISH)
Page 23
... mm/dd/yy 24h Date 01 01 2008 Time : Set 00 00 : Cancel 022 Follow the procedure below to be set again when turning your camera, and then press the OK button •English, Korean, Chinese (traditional / simplified), French, German, Spanish, Portuguese, Italian, Swedish, Dutch... and Date Information The first time the camera is turned on after purchasing, the [INITIAL SETTINGS] screen appears on your camera on the camera for the display by using the direction buttons ( ) on the LCD monitor. Press the OK button to use using the [Date/Time] menu in the [SETUP ...
... mm/dd/yy 24h Date 01 01 2008 Time : Set 00 00 : Cancel 022 Follow the procedure below to be set again when turning your camera, and then press the OK button •English, Korean, Chinese (traditional / simplified), French, German, Spanish, Portuguese, Italian, Swedish, Dutch... and Date Information The first time the camera is turned on after purchasing, the [INITIAL SETTINGS] screen appears on your camera on the camera for the display by using the direction buttons ( ) on the LCD monitor. Press the OK button to use using the [Date/Time] menu in the [SETUP ...

