
User Manual
Page 13
... Installation instructions Remove all packaging materials from the oven and/or lower drawer. Make sure the burners are located behind the range, under the oven control panel, at the top and bottom of the cabinets. important safety instructions Locate the range out of the range. Remove any combustible stuff around the range...
... Installation instructions Remove all packaging materials from the oven and/or lower drawer. Make sure the burners are located behind the range, under the oven control panel, at the top and bottom of the cabinets. important safety instructions Locate the range out of the range. Remove any combustible stuff around the range...
User Manual
Page 19
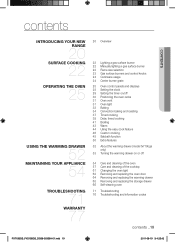
... 22 Lighting a gas surface burner 22 Manually lighting a gas surface burner 22 Flame size selection 23 Gas surface burners and control knobs 24 Cookware usage 24 Center burner grate 25 Oven control panels and displays 28 Setting the clock 29 Setting the timer on/off 30 Positioning the oven racks 31 Oven vent... 41 Broiling 43 Warm 44 Using the easy cook feature 46 Custom cooking 48 Sabbath function 50 Extra features 52 About the warming drawer (model fx710bgs only) 53 Turning the warming drawer on or off 54 Care and cleaning of the oven 57 Care and cleaning of the cooktop 61 Changing...
... 22 Lighting a gas surface burner 22 Manually lighting a gas surface burner 22 Flame size selection 23 Gas surface burners and control knobs 24 Cookware usage 24 Center burner grate 25 Oven control panels and displays 28 Setting the clock 29 Setting the timer on/off 30 Positioning the oven racks 31 Oven vent... 41 Broiling 43 Warm 44 Using the easy cook feature 46 Custom cooking 48 Sabbath function 50 Extra features 52 About the warming drawer (model fx710bgs only) 53 Turning the warming drawer on or off 54 Care and cleaning of the oven 57 Care and cleaning of the cooktop 61 Changing...
User Manual
Page 20
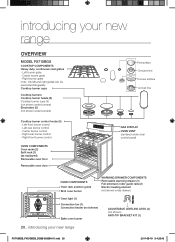
...(not shown) ANTI-TIP BRACKET KIT (1) 20_ introducing your new range Overview MODEL FX710BGS COOKTOP COMPONENTS Heavy duty, continuous cast grates - Left-rear burner control - Center burner control - introducing your new range FX710BGS_FX510BGS_DG68-00356A-01.indd 20 2011-08-19 �&#... oven floor Removable oven door Flat surface Concave line Convex surface Convex line GAS DISPLAY OVEN VENT (centered under oven control panel) OVEN COMPONENTS Oven rack position guide Broil oven burner WARMING DRAWER COMPONENTS Removable warming drawer (1) Full-extension roller guide rails...
...(not shown) ANTI-TIP BRACKET KIT (1) 20_ introducing your new range Overview MODEL FX710BGS COOKTOP COMPONENTS Heavy duty, continuous cast grates - Left-rear burner control - Center burner control - introducing your new range FX710BGS_FX510BGS_DG68-00356A-01.indd 20 2011-08-19 �&#... oven floor Removable oven door Flat surface Concave line Convex surface Convex line GAS DISPLAY OVEN VENT (centered under oven control panel) OVEN COMPONENTS Oven rack position guide Broil oven burner WARMING DRAWER COMPONENTS Removable warming drawer (1) Full-extension roller guide rails...
User Manual
Page 21
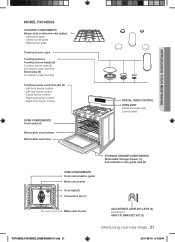
Right burner grate Cooktop burner caps Cooktop burners Cooktop burner heads (5) Cooktop burner cups (5) (not shown under burners) Electrodes (5) (not shown under oven control panel) OVEN COMPONENTS Oven rack position guide Broil oven burner Oven light (1) Convection fan (1) STORAGE DRAWER COMPONENTS Removable Storage drawer (1) Full-extension roller guide rails (2) Bake ...
Right burner grate Cooktop burner caps Cooktop burners Cooktop burner heads (5) Cooktop burner cups (5) (not shown under burners) Electrodes (5) (not shown under oven control panel) OVEN COMPONENTS Oven rack position guide Broil oven burner Oven light (1) Convection fan (1) STORAGE DRAWER COMPONENTS Removable Storage drawer (1) Full-extension roller guide rails (2) Bake ...
User Manual
Page 25
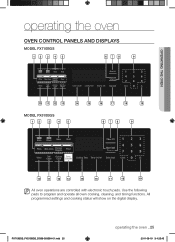
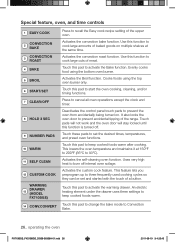
All programmed settings and cooking status will show on the digital display. operating the oven operating the oven Oven control panels and displays MODEL FX710BGS 12 3 4 5 678 9 10 11 12 13 14 15 16 17 18 19 MODEL FX510BGS 12 3 4 5 678 9 10 11 12 14 15 16 17 18 19 All oven operations are controlled with electronic touch pads. FX710BGS_FX510BGS_DG68-00356A-01.indd 25 operating the oven _25 2011-08-19 �� 4:25:45 Use the following pads to program and operate all oven cooking, cleaning, and timing functions.
All programmed settings and cooking status will show on the digital display. operating the oven operating the oven Oven control panels and displays MODEL FX710BGS 12 3 4 5 678 9 10 11 12 13 14 15 16 17 18 19 MODEL FX510BGS 12 3 4 5 678 9 10 11 12 14 15 16 17 18 19 All oven operations are controlled with electronic touch pads. FX710BGS_FX510BGS_DG68-00356A-01.indd 25 operating the oven _25 2011-08-19 �� 4:25:45 Use the following pads to program and operate all oven cooking, cleaning, and timing functions.
User Manual
Page 26
... this pad to cook large cuts of meat. Touch this function to start the oven cooking, cleaning, and/or timing functions. Deactivates the control panel touch pads to prevent accidental tipping of the range. It also locks the oven door to prevent the oven from accidentally being turned on multiple... 3 ROAST 4 BAKE 5 BROIL 6 START/SET 7 CLEAR/OFF 8 HOLD 3 SEC 9 NUMBER PADS 10 WARM 11 SELF CLEAN 12 CUSTOM COOK WARMING DRAWER 13 (MODEL FX710BGS) 14 CONV.CONVERT Press to set and started with the touch of a button. Touch these pads to recall the Easy cook recipe setting of baked...
... this pad to cook large cuts of meat. Touch this function to start the oven cooking, cleaning, and/or timing functions. Deactivates the control panel touch pads to prevent accidental tipping of the range. It also locks the oven door to prevent the oven from accidentally being turned on multiple... 3 ROAST 4 BAKE 5 BROIL 6 START/SET 7 CLEAR/OFF 8 HOLD 3 SEC 9 NUMBER PADS 10 WARM 11 SELF CLEAN 12 CUSTOM COOK WARMING DRAWER 13 (MODEL FX710BGS) 14 CONV.CONVERT Press to set and started with the touch of a button. Touch these pads to recall the Easy cook recipe setting of baked...
User Manual
Page 31
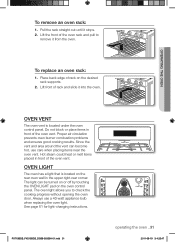
... rack and pull to check the cooking progress without opening the oven door. Oven light The oven has a light that is located under the oven control panel. Lift the front of the oven vent. See page 61 for light-changing instructions. FX710BGS_FX510BGS_DG68-00356A-01.indd 31 Oven vent Oven light operating the... oven _31 2011-08-19 �� 4:25:47 Lift front of rack on the oven control panel. Since the vent and area around the vent can be turned on or off by touching the OVEN LIGHT pad on the desired rack supports...
... rack and pull to check the cooking progress without opening the oven door. Oven light The oven has a light that is located under the oven control panel. Lift the front of the oven vent. See page 61 for light-changing instructions. FX710BGS_FX510BGS_DG68-00356A-01.indd 31 Oven vent Oven light operating the... oven _31 2011-08-19 �� 4:25:47 Lift front of rack on the oven control panel. Since the vent and area around the vent can be turned on or off by touching the OVEN LIGHT pad on the desired rack supports...

User Manual
Page 49
... the oven _49 2011-08-19 �� 4:25:54 In approximately 20 seconds, the control panel will "click" and the oven will continue to set time. The oven signals, display LEDs, and all oven controls except the number, BAKE, COOK TIME, START, and CLEAR/OFF pads will shut off the... oven, press the CLEAR/OFF pad. In approximately 20 seconds, the control panel will "click" and the oven will show SAb. The display will start the lighting and preheating process. The display will still be deactivated. The ...
... the oven _49 2011-08-19 �� 4:25:54 In approximately 20 seconds, the control panel will "click" and the oven will continue to set time. The oven signals, display LEDs, and all oven controls except the number, BAKE, COOK TIME, START, and CLEAR/OFF pads will shut off the... oven, press the CLEAR/OFF pad. In approximately 20 seconds, the control panel will "click" and the oven will show SAb. The display will start the lighting and preheating process. The display will still be deactivated. The ...
User Manual
Page 54
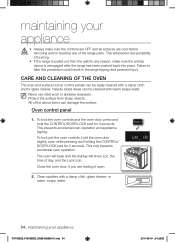
... to take this precaution could result in the range tipping and personal injury. Care and cleaning of the oven The oven and surface burner control panels can damage the surface. All of burning. • If the range is reengaged after the range has been pushed back into place. The...cleaner, or warm, soapy water. 54_ maintaining your appliance • Always make sure the anti-tip device is pulled out from sharp objects. Oven control panel 1. This only prevents accidental oven operation. This will show Loc, the time of the range parts. Close the oven door, if you are cool...
... to take this precaution could result in the range tipping and personal injury. Care and cleaning of the oven The oven and surface burner control panels can damage the surface. All of burning. • If the range is reengaged after the range has been pushed back into place. The...cleaner, or warm, soapy water. 54_ maintaining your appliance • Always make sure the anti-tip device is pulled out from sharp objects. Oven control panel 1. This only prevents accidental oven operation. This will show Loc, the time of the range parts. Close the oven door, if you are cool...
User Manual
Page 55
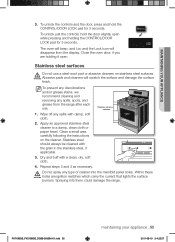
...65533;� 4:25:57 Clean a small area carefully following the instructions on stainless steel surfaces. Within these WARNING holes are holding the CONTROL/DOOR LOCK pad for 3 seconds. FX710BGS_FX510BGS_DG68-00356A-01.indd 55 maintaining your appliance 3. Close the oven door, if you are ignition .... Dry and buff with the grain in the stainless steel, if applicable. 3. To unlock just the controls, hold the CONTROL/DOOR LOCK pad for 3 seconds. Spraying into the manifold panel holes. Wipe off any type of cleaner into them could damage the range. To unlock the...
...65533;� 4:25:57 Clean a small area carefully following the instructions on stainless steel surfaces. Within these WARNING holes are holding the CONTROL/DOOR LOCK pad for 3 seconds. FX710BGS_FX510BGS_DG68-00356A-01.indd 55 maintaining your appliance 3. Close the oven door, if you are ignition .... Dry and buff with the grain in the stainless steel, if applicable. 3. To unlock just the controls, hold the CONTROL/DOOR LOCK pad for 3 seconds. Spraying into the manifold panel holes. Wipe off any type of cleaner into them could damage the range. To unlock the...

User Manual
Page 57
... in death, personal injury, or product damage. 4. Clean stainless steel surfaces with stainless steel cleaner on surface burner control WARNING panel. They CAUTION are in the OFF position. 2. Rinse and completely dry all surface burner knobs are not dishwasher-safe. 3. Spray entering the valve holes could ...
... in death, personal injury, or product damage. 4. Clean stainless steel surfaces with stainless steel cleaner on surface burner control WARNING panel. They CAUTION are in the OFF position. 2. Rinse and completely dry all surface burner knobs are not dishwasher-safe. 3. Spray entering the valve holes could ...
User Manual
Page 61
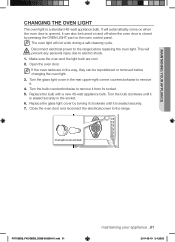
... and off when the oven door is seated securely. 7. Replace the bulb with a new 40-watt appliance bulb. It can be turned on the oven control panel. Make sure the oven and the light bulb are in the socket. 6. Disconnect electrical power to the range. Close the oven door and reconnect the...
... and off when the oven door is seated securely. 7. Replace the bulb with a new 40-watt appliance bulb. It can be turned on the oven control panel. Make sure the oven and the light bulb are in the socket. 6. Disconnect electrical power to the range. Close the oven door and reconnect the...

User Manual
Page 68
... once for a 2-hour cleaning cycle, twice for a 3-hour cleaning cycle, or three times for self-cleaning 1. Then the Lock icon will stay on the oven control panel. The display will blink until the cycle is over and the oven temperature is below 350°F (177°C), the door unlocks and the Lock...
... once for a 2-hour cleaning cycle, twice for a 3-hour cleaning cycle, or three times for self-cleaning 1. Then the Lock icon will stay on the oven control panel. The display will blink until the cycle is over and the oven temperature is below 350°F (177°C), the door unlocks and the Lock...

User Manual
Page 69
... sure the oven door is reached, the oven will show the Delay Start time and the Lock icon. The display will turn on the oven control panel. Press the START pad. The display will show Clean, and the Start indicator will engage automatically. The oven door lock will blink under the selected...
... sure the oven door is reached, the oven will show the Delay Start time and the Lock icon. The display will turn on the oven control panel. Press the START pad. The display will show Clean, and the Start indicator will engage automatically. The oven door lock will blink under the selected...
User Manual
Page 75
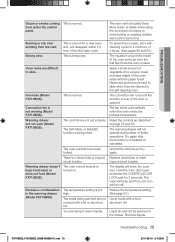
...new oven and will disappear within 1/2 hour of the oven racks with the paper towel. Burning or oily odor emitting from under the control panel. This is too high. This is normal. This is temporary. Convection fan is being warmed are not set a selfcleaning cycle for 3 seconds... liquids. The foods being used . troubleshooting Steam or smoke coming This is located there. More steam is opened. Fan noise (Model FX710BGS). The convection fan runs until the function is over or the door is visible when using the convection functions or when baking or roasting...
...new oven and will disappear within 1/2 hour of the oven racks with the paper towel. Burning or oily odor emitting from under the control panel. This is too high. This is normal. This is temporary. Convection fan is being warmed are not set a selfcleaning cycle for 3 seconds... liquids. The foods being used . troubleshooting Steam or smoke coming This is located there. More steam is opened. Fan noise (Model FX710BGS). The convection fan runs until the function is over or the door is visible when using the convection functions or when baking or roasting...


