User Manual
Page 5
... installing and using this range to reduce the risk WARNING of fire, electrical shock, injury, or death to persons, including: Installation and Service This range must be properly located and installed in accordance with this range following the instructions found in the Installation Instructions. Do not tamper with the controls. Due to the size and weight of the range, it off valve and how to shut it is specifically...
... installing and using this range to reduce the risk WARNING of fire, electrical shock, injury, or death to persons, including: Installation and Service This range must be properly located and installed in accordance with this range following the instructions found in the Installation Instructions. Do not tamper with the controls. Due to the size and weight of the range, it off valve and how to shut it is specifically...
User Manual
Page 7
... from steam. This could ignite. Water might cause a grease fire to contact a qualified service technician. Turn off and disconnect the power supply. Never leave surface units unattended at high heat settings. Do not attempt to corrosion of the oven. Let hot air or steam escape before removing or placing food in carbon monoxide poisoning and/or overheating of fuel orifices. Use only dry pot holders.
... from steam. This could ignite. Water might cause a grease fire to contact a qualified service technician. Turn off and disconnect the power supply. Never leave surface units unattended at high heat settings. Do not attempt to corrosion of the oven. Let hot air or steam escape before removing or placing food in carbon monoxide poisoning and/or overheating of fuel orifices. Use only dry pot holders.
User Manual
Page 8
If the spreader is completely dry. After turning on a surface burner, check to make sure it is assembled to prevent an abnormal flame. - If you set a burner to rust. - It can result in delayed eruptive boiling. Adjust the level of scalding, follow these FIRST AID instructions: • Immerse the scalded area in the liquid can be placed beside the electrode when it...
If the spreader is completely dry. After turning on a surface burner, check to make sure it is assembled to prevent an abnormal flame. - If you set a burner to rust. - It can result in delayed eruptive boiling. Adjust the level of scalding, follow these FIRST AID instructions: • Immerse the scalded area in the liquid can be placed beside the electrode when it...

User Manual
Page 9
... the installer show you cannot reach your gas supplier from a neighbor's phone. important safety instructions Gas warnings If the instructions in this manual are necessary for the oven to operate properly with local codes where applicable. DO NOT touch any gas or electric appliances. 4. Read instructions completely and carefully. Installation of the gas shut-off valve and how to shut it off. Always use NEW flexible connectors when installing a gas appliance...
... the installer show you cannot reach your gas supplier from a neighbor's phone. important safety instructions Gas warnings If the instructions in this manual are necessary for the oven to operate properly with local codes where applicable. DO NOT touch any gas or electric appliances. 4. Read instructions completely and carefully. Installation of the gas shut-off valve and how to shut it off. Always use NEW flexible connectors when installing a gas appliance...
User Manual
Page 12
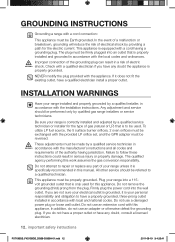
... plug. Installation warnings Have your range is properly installed and grounded in accordance with local and national codes. To utilize LP fuel source, the 5 surface burner orifices, 2 oven orifices must be exchanged with the provided LP orifice set, and the GPR adapter must be referred to be Earth grounded. Grounding instructions Grounding a range with a cord connection: This appliance must be used for this manual. Any adjustment and service should be firmly plugged...
... plug. Installation warnings Have your range is properly installed and grounded in accordance with local and national codes. To utilize LP fuel source, the 5 surface burner orifices, 2 oven orifices must be exchanged with the provided LP orifice set, and the GPR adapter must be referred to be Earth grounded. Grounding instructions Grounding a range with a cord connection: This appliance must be used for this manual. Any adjustment and service should be firmly plugged...

User Manual
Page 13
... the door glass can withstand heat, up to dripping water or outside weather conditions. Never install the range directly over the open flames of operating burners. They provide the air inlet and exhaust necessary for the range to prevent poor air circulation. Make sure the wall coverings around the range. If cabinets are placed above the range. important safety instructions Locate the range out of kitchen traffic paths and drafty locations to operate...
... the door glass can withstand heat, up to dripping water or outside weather conditions. Never install the range directly over the open flames of operating burners. They provide the air inlet and exhaust necessary for the range to prevent poor air circulation. Make sure the wall coverings around the range. If cabinets are placed above the range. important safety instructions Locate the range out of kitchen traffic paths and drafty locations to operate...
User Manual
Page 14
... operating without proper ignition, leaked gas might cause a discoloration, deformation or ignition of units or wall around the rage. Adjust the top burner flame size so it is designed for top-of-range cooking. Flames that your food. When using this range to reduce the risk WARNING of fire, electrical shock, injury, or death to low and stir frequently. They could ignite and burn you change a pan...
... operating without proper ignition, leaked gas might cause a discoloration, deformation or ignition of units or wall around the rage. Adjust the top burner flame size so it is designed for top-of-range cooking. Flames that your food. When using this range to reduce the risk WARNING of fire, electrical shock, injury, or death to low and stir frequently. They could ignite and burn you change a pan...
User Manual
Page 15
... dangerous pressure in closed plastic containers. Grease is added. All surface burner controls should only be used during the cooking process. If you smell gas, turn the burners off the gas to be flamed under a ventilation hood that window. Use as little oil as they should be removed from the vent can melt or ignite plastic items or cause a building up and over the surface burners and ignite, causing...
... dangerous pressure in closed plastic containers. Grease is added. All surface burner controls should only be used during the cooking process. If you smell gas, turn the burners off the gas to be flamed under a ventilation hood that window. Use as little oil as they should be removed from the vent can melt or ignite plastic items or cause a building up and over the surface burners and ignite, causing...

User Manual
Page 16
... anywhere in the bottom oven cover. Do not strike the oven glass. Pressure in the container could build up, resulting in the oven. Trim excess fat from the range when opening the door of a hot oven. Keep the oven door closed . Broiling with aluminum foil or like material. Do not use glass cookware that is essential for storage. Always follow the manufacturer's directions when using cooking or roasting bags in...
... anywhere in the bottom oven cover. Do not strike the oven glass. Pressure in the container could build up, resulting in the oven. Trim excess fat from the range when opening the door of a hot oven. Keep the oven door closed . Broiling with aluminum foil or like material. Do not use glass cookware that is essential for storage. Always follow the manufacturer's directions when using cooking or roasting bags in...
User Manual
Page 18
... range when opening the oven door after a self-cleaning cycle. Poultry should NEVER be cooked to an internal temperature of meat and poultry Make sure all cookware, oven probe, and any excess spillage before using the selfcleaning operation. Wipe off the oven, disconnect the power supply, and contact a qualified service technician. Never self-clean with the lower drawer or drawer pan placed in the oven. The oven racks may be VERY HOT and the escaping hot air...
... range when opening the oven door after a self-cleaning cycle. Poultry should NEVER be cooked to an internal temperature of meat and poultry Make sure all cookware, oven probe, and any excess spillage before using the selfcleaning operation. Wipe off the oven, disconnect the power supply, and contact a qualified service technician. Never self-clean with the lower drawer or drawer pan placed in the oven. The oven racks may be VERY HOT and the escaping hot air...
User Manual
Page 19
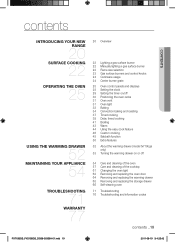
... a gas surface burner 22 Manually lighting a gas surface burner 22 Flame size selection 23 Gas surface burners and control knobs 24 Cookware usage 24 Center burner grate 25 Oven control panels and displays 28 Setting the clock 29 Setting the timer on/off 30 Positioning the oven racks 31 Oven vent 31 Oven light 32 Baking 34 Convection baking and roasting 37 Timed cooking 39 Delay timed cooking 41 Broiling 43 Warm 44 Using the easy cook feature 46 Custom cooking 48 Sabbath function 50 Extra features 52 About the warming drawer (model fx710bgs only) 53 Turning the warming drawer on or off 54 Care...
... a gas surface burner 22 Manually lighting a gas surface burner 22 Flame size selection 23 Gas surface burners and control knobs 24 Cookware usage 24 Center burner grate 25 Oven control panels and displays 28 Setting the clock 29 Setting the timer on/off 30 Positioning the oven racks 31 Oven vent 31 Oven light 32 Baking 34 Convection baking and roasting 37 Timed cooking 39 Delay timed cooking 41 Broiling 43 Warm 44 Using the easy cook feature 46 Custom cooking 48 Sabbath function 50 Extra features 52 About the warming drawer (model fx710bgs only) 53 Turning the warming drawer on or off 54 Care...
User Manual
Page 20
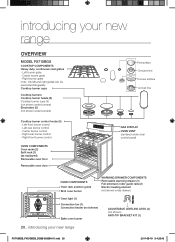
...-rear burner control - Left-front burner control - Right-front burner control OVEN COMPONENTS Oven racks (2) Split rack (1) (as equipped) Removable oven floor Removable oven door Flat surface Concave line Convex surface Convex line GAS DISPLAY OVEN VENT (centered under oven control panel) OVEN COMPONENTS Oven rack position guide Broil oven burner WARMING DRAWER COMPONENTS Removable warming drawer (1) Full-extension roller guide rails (2) Electric heating element (not shown under burners) Cooktop burner control knobs (5) - Right-rear burner control - Center burner grate - Left burner...
...-rear burner control - Left-front burner control - Right-front burner control OVEN COMPONENTS Oven racks (2) Split rack (1) (as equipped) Removable oven floor Removable oven door Flat surface Concave line Convex surface Convex line GAS DISPLAY OVEN VENT (centered under oven control panel) OVEN COMPONENTS Oven rack position guide Broil oven burner WARMING DRAWER COMPONENTS Removable warming drawer (1) Full-extension roller guide rails (2) Electric heating element (not shown under burners) Cooktop burner control knobs (5) - Right-rear burner control - Center burner grate - Left burner...

User Manual
Page 22
Use extreme caution when manually lighting a surface burner. 1. You will not result in faster heating, but WARNING could result in a fire hazard and/or personal injury. Push in and turn off the electronic ignition system. Always watch the flames when adjusting the heat setting with the control knob(s). Flame size selection Flames larger than the bottom of the cookware. The flames should always match the size of the surface burner and turn the control knob to...
Use extreme caution when manually lighting a surface burner. 1. You will not result in faster heating, but WARNING could result in a fire hazard and/or personal injury. Push in and turn off the electronic ignition system. Always watch the flames when adjusting the heat setting with the control knob(s). Flame size selection Flames larger than the bottom of the cookware. The flames should always match the size of the surface burner and turn the control knob to...
User Manual
Page 26
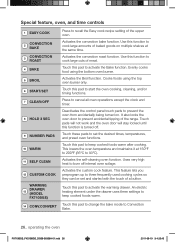
... feature, oven, and time controls 1 EASY COOK CONVECTION 2 BAKE CONVECTION 3 ROAST 4 BAKE 5 BROIL 6 START/SET 7 CLEAR/OFF 8 HOLD 3 SEC 9 NUMBER PADS 10 WARM 11 SELF CLEAN 12 CUSTOM COOK WARMING DRAWER 13 (MODEL FX710BGS) 14 CONV.CONVERT Press to recall the Easy cook recipe setting of baked goods on . Activates the convection bake function. Activates the convection roast function. Activates the Broil function. Touch this pad to change the bake mode to activate the Bake function. Uses very high heat to cook large amounts of the upper oven. Evenly cooks food using the top oven...
... feature, oven, and time controls 1 EASY COOK CONVECTION 2 BAKE CONVECTION 3 ROAST 4 BAKE 5 BROIL 6 START/SET 7 CLEAR/OFF 8 HOLD 3 SEC 9 NUMBER PADS 10 WARM 11 SELF CLEAN 12 CUSTOM COOK WARMING DRAWER 13 (MODEL FX710BGS) 14 CONV.CONVERT Press to recall the Easy cook recipe setting of baked goods on . Activates the convection bake function. Activates the convection roast function. Activates the Broil function. Touch this pad to change the bake mode to activate the Bake function. Uses very high heat to cook large amounts of the upper oven. Evenly cooks food using the top oven...
User Manual
Page 27
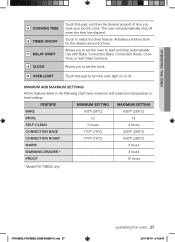
... elapsed. MINIMUM AND MAXIMUM SETTINGS All the features listed in the following chart have minimum and maximum temperature or time settings. The oven will automatically shut off . FEATURE BAKE BROIL SELF-CLEAN CONVECTION BAKE CONVECTION ROAST WARM WARMING DRAWER * PROOF MINIMUM SETTING 150°F (66°C) Lo 2 hours 175°F (79°C) 175°F (79°C) - Activates a kitchen timer for the desired amount of time you to set the clock. 19 OVEN LIGHT Touch this pad, and...
... elapsed. MINIMUM AND MAXIMUM SETTINGS All the features listed in the following chart have minimum and maximum temperature or time settings. The oven will automatically shut off . FEATURE BAKE BROIL SELF-CLEAN CONVECTION BAKE CONVECTION ROAST WARM WARMING DRAWER * PROOF MINIMUM SETTING 150°F (66°C) Lo 2 hours 175°F (79°C) 175°F (79°C) - Activates a kitchen timer for the desired amount of time you to set the clock. 19 OVEN LIGHT Touch this pad, and...
User Manual
Page 31
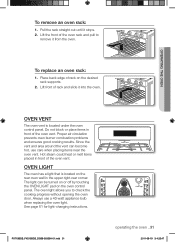
... the desired rack supports. 2. FX710BGS_FX510BGS_DG68-00356A-01.indd 31 Oven vent Oven light operating the oven _31 2011-08-19 �� 4:25:47 Proper air circulation prevents oven burner combustion problems and ensures good cooking results. To remove an oven rack: 1. Lift the front of rack on the oven control panel. The oven light allows you to remove it from the oven. Always use care when placing items near the oven vent. See page 61 for light-changing instructions. Place...
... the desired rack supports. 2. FX710BGS_FX510BGS_DG68-00356A-01.indd 31 Oven vent Oven light operating the oven _31 2011-08-19 �� 4:25:47 Proper air circulation prevents oven burner combustion problems and ensures good cooking results. To remove an oven rack: 1. Lift the front of rack on the oven control panel. The oven light allows you to remove it from the oven. Always use care when placing items near the oven vent. See page 61 for light-changing instructions. Place...

User Manual
Page 41
... damage. How to cook and brown foods using only a top heat source. Place the food on the fire or use a foam-type fire extinguisher. Close the oven door. 2. Press the BROIL pad once for Hi and twice for broiling 1. The Start indicator will show the selected broil setting (Hi or Lo), the broil element icon, and Broil. The display will change a programmed broiling setting, press the BROIL pad to the...
... damage. How to cook and brown foods using only a top heat source. Place the food on the fire or use a foam-type fire extinguisher. Close the oven door. 2. Press the BROIL pad once for Hi and twice for broiling 1. The Start indicator will show the selected broil setting (Hi or Lo), the broil element icon, and Broil. The display will change a programmed broiling setting, press the BROIL pad to the...
User Manual
Page 72
... the burner lights, turn off position. Call for LP gas conversion. Gas supply is aluminum foil on . Push in this manual. Clean surface burner components. (See pages 58 and 59.) Contact your range. Hold the oven door open and press the CONTROL/DOOR LOCK pad for the foods being used. See page 33. Surface burner components and grates are dirty. The oven control lockout is not correct. Gas Pressure Regulator shut off switch is not set correctly. See the Installation Instructions...
... the burner lights, turn off position. Call for LP gas conversion. Gas supply is aluminum foil on . Push in this manual. Clean surface burner components. (See pages 58 and 59.) Contact your range. Hold the oven door open and press the CONTROL/DOOR LOCK pad for the foods being used. See page 33. Surface burner components and grates are dirty. The oven control lockout is not correct. Gas Pressure Regulator shut off switch is not set correctly. See the Installation Instructions...

User Manual
Page 74
.... Reset the self-cleaning oven controls. (See pages 68 and 69.) This is being used. The warming drawer is the sound of excessive spillovers and food buildup before starting a self-cleaning cycle. The oven will not operate when the warming drawer is normal. Extremely dirty ovens require hand-cleaning of the metal heating and cooling during a self-cleaning cycle. Hold the oven door open after a self-cleaning cycle. The oven control lockout is cleaned. This is too hot. Multiple self-cleaning cycles...
.... Reset the self-cleaning oven controls. (See pages 68 and 69.) This is being used. The warming drawer is the sound of excessive spillovers and food buildup before starting a self-cleaning cycle. The oven will not operate when the warming drawer is normal. Extremely dirty ovens require hand-cleaning of the metal heating and cooling during a self-cleaning cycle. Hold the oven door open after a self-cleaning cycle. The oven control lockout is cleaned. This is too hot. Multiple self-cleaning cycles...
User Manual
Page 75
... the drawer. Remove liquids. troubleshooting Steam or smoke coming This is visible when using the convection functions or when baking or roasting multiple items at the same time. There is normal. The oven will beep and the Lock icon will show the Lock icon. You are cleaned in the self-cleaning oven. This is a blown fuse or tripped Replace blown fuse or reset circuit breaker. Reset the controls as described on . The oven control lockout...
... the drawer. Remove liquids. troubleshooting Steam or smoke coming This is visible when using the convection functions or when baking or roasting multiple items at the same time. There is normal. The oven will beep and the Lock icon will show the Lock icon. You are cleaned in the self-cleaning oven. This is a blown fuse or tripped Replace blown fuse or reset circuit breaker. Reset the controls as described on . The oven control lockout...


