Owner Instructions
Page 4
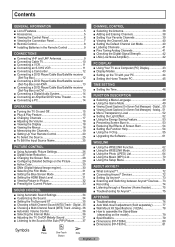
...78 ■ How to assemble the Stand-Base (depending on the Picture 29 ■ Using the WISELINK Function 62 ■ Using the WISELINK Mode 63 ■ Using the Photo (JPEG) List 64 ■ Using the Music (MP3) List 70 ■ Using the Setup Menu 71 ■ ...■ Setting the Blue Screen Mode 31 ■ Setting the HDMI Black Level 31 ■ Viewing Picture-in the Remote Control 9 CONNECTIONS ■ Connecting VHF and UHF Antennas 9 ■ Connecting Cable TV 10 ■ Connecting a VCR 11 ■ Connecting an S-VHS VCR 11 ■ Connecting a Camcorder 12 ■...
...78 ■ How to assemble the Stand-Base (depending on the Picture 29 ■ Using the WISELINK Function 62 ■ Using the WISELINK Mode 63 ■ Using the Photo (JPEG) List 64 ■ Using the Music (MP3) List 70 ■ Using the Setup Menu 71 ■ ...■ Setting the Blue Screen Mode 31 ■ Setting the HDMI Black Level 31 ■ Viewing Picture-in the Remote Control 9 CONNECTIONS ■ Connecting VHF and UHF Antennas 9 ■ Connecting Cable TV 10 ■ Connecting a VCR 11 ■ Connecting an S-VHS VCR 11 ■ Connecting a Camcorder 12 ■...
Owner Instructions
Page 5
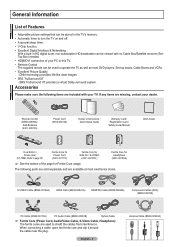
...needed. • HDMI/DVI connection of the page for Headphone (3301-001456) ➢ See the bottom of your dealer. RETURN FAV.CH Remote Control (BN59-00599A) / AAA Batteries (4301-000103) Power Cord (3903-000144) Owner's Instructions / Quick Setup Guide Warranty Card / Registration ...(BN39-00333A) Accessories Please make sure the following parts are sold separately and are missing, contact your PC to this TV. • Remote Control The supplied remote can be used to shield the cables from interference. DNIe technology provides life-like clear images. • SRS TruSurround ...
...needed. • HDMI/DVI connection of the page for Headphone (3301-001456) ➢ See the bottom of your dealer. RETURN FAV.CH Remote Control (BN59-00599A) / AAA Batteries (4301-000103) Power Cord (3903-000144) Owner's Instructions / Quick Setup Guide Warranty Card / Registration ...(BN39-00333A) Accessories Please make sure the following parts are sold separately and are missing, contact your PC to this TV. • Remote Control The supplied remote can be used to shield the cables from interference. DNIe technology provides life-like clear images. • SRS TruSurround ...
Owner Instructions
Page 6
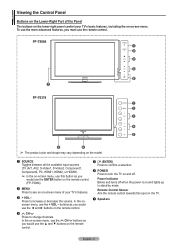
...see an on-screen menu of the Panel The buttons on the lower-right panel control your TV's features. 3 + VOL - English - 6 Remote Control Sensor Aim the remote control towards this button as you would use the ▲ and ▼ buttons on the remote control. In the onscreen menu, use the ENTER button on the... remote control. (FP-T5084) 2 MENU Press to turn the TV on and off when the power is on and lights up in stand-by mode. FP-T5084...
...see an on-screen menu of the Panel The buttons on the lower-right panel control your TV's features. 3 + VOL - English - 6 Remote Control Sensor Aim the remote control towards this button as you would use the ▲ and ▼ buttons on the remote control. In the onscreen menu, use the ENTER button on the... remote control. (FP-T5084) 2 MENU Press to turn the TV on and off when the power is on and lights up in stand-by mode. FP-T5084...

Owner Instructions
Page 7
... angle using an optional HDMI/DVI adapter, the DVI analog audio inputs on your TV allow you wish to watch a television program without disturbing other people in the room. The EX-LINK jack on the model. 1 HDMI IN 3 Connect to ... play audio files (MP3). 3 S-VIDEO (AV IN 2) S-Video input for external devices with an HDMI output. (HDMI 1 supports HDMI-DVI IN and connection from your remote control. ➢ The model FP-T6374 cannot be connected continuously, such as VCR or DVD players.
... angle using an optional HDMI/DVI adapter, the DVI analog audio inputs on your TV allow you wish to watch a television program without disturbing other people in the room. The EX-LINK jack on the model. 1 HDMI IN 3 Connect to ... play audio files (MP3). 3 S-VIDEO (AV IN 2) S-Video input for external devices with an HDMI output. (HDMI 1 supports HDMI-DVI IN and connection from your remote control. ➢ The model FP-T6374 cannot be connected continuously, such as VCR or DVD players.

Owner Instructions
Page 8
... Anynet+ functions and sets up to a distance of about 23 feet from an external device. (Refer to pages 63 (JPEG) and 69 (MP3)) c REC This remote can also use your remote control to operate your TV, DVD player, STB, CABLE (box), or VCR. ( Press to backlight the VOL, CH, and active source... button (TV, DVD, CABLE, STB, VCR) on and off the sound. 9 MENU Displays the main on-screen menu. 0 S.MODE Press to display information on Samsung ...
... Anynet+ functions and sets up to a distance of about 23 feet from an external device. (Refer to pages 63 (JPEG) and 69 (MP3)) c REC This remote can also use your remote control to operate your TV, DVD player, STB, CABLE (box), or VCR. ( Press to backlight the VOL, CH, and active source... button (TV, DVD, CABLE, STB, VCR) on and off the sound. 9 MENU Displays the main on-screen menu. 0 S.MODE Press to display information on Samsung ...
Owner Instructions
Page 9
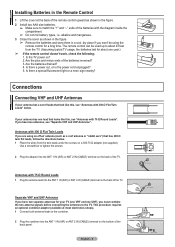
..., follow the directions below . Separate VHF and UHF Antennas If you must combine the two antenna signals before connecting the antennas to the TV. Installing Batteries in the Remote Control 1 Lift the cover at most electronics shops). 1 Connect both antenna leads to tighten the screws. 2 Plug the adaptor into the ANT... 1 IN (AIR) or ANT 2 IN (CABLE) terminal on the back of the TV. The remote control can be using an off-air antenna (such as shown in the figure. ➢ Remove the batteries and store them in the figure. 2 ...
..., follow the directions below . Separate VHF and UHF Antennas If you must combine the two antenna signals before connecting the antennas to the TV. Installing Batteries in the Remote Control 1 Lift the cover at most electronics shops). 1 Connect both antenna leads to tighten the screws. 2 Plug the adaptor into the ANT... 1 IN (AIR) or ANT 2 IN (CABLE) terminal on the back of the TV. The remote control can be using an off-air antenna (such as shown in the figure. ➢ Remove the batteries and store them in the figure. 2 ...

Owner Instructions
Page 15
... the ENTER button. ➢ The default selection is initially powered On, basic settings proceed automatically and subsequently: 1 Press the POWER button on the remote control. Shop Home Move Enter Skip 4 Press the ▲ or ▼ button to memorize. is displayed. 2 Press the ENTER button, the...the antennas to memorize the channels of the OSD. Operation Turning the TV On and Off Press the POWER button on the remote control. Plug & Play Feature When the TV is Home. ➢ We recommend setting the TV to select language, then press the ENTER button. The message Menu ...
... the ENTER button. ➢ The default selection is initially powered On, basic settings proceed automatically and subsequently: 1 Press the POWER button on the remote control. Shop Home Move Enter Skip 4 Press the ▲ or ▼ button to memorize. is displayed. 2 Press the ENTER button, the...the antennas to memorize the channels of the OSD. Operation Turning the TV On and Off Press the POWER button on the remote control. Plug & Play Feature When the TV is Home. ➢ We recommend setting the TV to select language, then press the ENTER button. The message Menu ...

Owner Instructions
Page 16
...; button, then press the MENU button. ➢ You can set the Month, Day, Year, Hour, and Minute directly by pressing the number buttons on the remote control. 8 The message Enjoy your local area. Air : 9 , Cable : 5. OK Setting the Clock Automatically 9 Press the ▲ or ▼ button...Daylight Savings Time O:n Off 10 Press the ▲ or ▼ button to select Manual if you want to daylight savings time. 5 The TV will automatically disappear after several seconds. After all of the available channels. is automatically displayed. ➢ To stop the search before it has ...
...; button, then press the MENU button. ➢ You can set the Month, Day, Year, Hour, and Minute directly by pressing the number buttons on the remote control. 8 The message Enjoy your local area. Air : 9 , Cable : 5. OK Setting the Clock Automatically 9 Press the ▲ or ▼ button...Daylight Savings Time O:n Off 10 Press the ▲ or ▼ button to select Manual if you want to daylight savings time. 5 The TV will automatically disappear after several seconds. After all of the available channels. is automatically displayed. ➢ To stop the search before it has ...

Owner Instructions
Page 18
... sound cuts off , press the MUTE button again, or simply press the VOL + or VOL - Its left corner of certain picture and sound settings. The TV will appear in the lower-left side has five icons: Picture, Sound, Channel, Setup, Input. 2 Use the ▲ or ▼ button to select one ...minute until the on the remote control. Then press the ENTER button to access the icon's sub-menu. 3 Press the EXIT button to increase or decrease the volume. button to exit...
... sound cuts off , press the MUTE button again, or simply press the VOL + or VOL - Its left corner of certain picture and sound settings. The TV will appear in the lower-left side has five icons: Picture, Sound, Channel, Setup, Input. 2 Use the ▲ or ▼ button to select one ...minute until the on the remote control. Then press the ENTER button to access the icon's sub-menu. 3 Press the EXIT button to increase or decrease the volume. button to exit...
Owner Instructions
Page 19
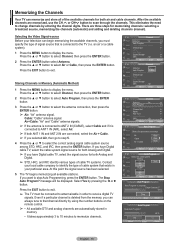
... type of signal source that is deleted from the memory, you can always tune to that channel directly by using the number buttons on the remote control. ➢ • All available DTV and analog channels are connected, select the Air + Cable. ➢ If you want to receive digital..., then press the ENTER button. 2 Press the ENTER button select Antenna. Storing Channels in Memory (Automatic Method) 1 Press the MENU button to exit. ➢ The TV must specify the type of cable system that exists in progress. If you selected Air, then go to step 5. 4 Press the ▲ or ▼ to...
... type of signal source that is deleted from the memory, you can always tune to that channel directly by using the number buttons on the remote control. ➢ • All available DTV and analog channels are connected, select the Air + Cable. ➢ If you want to receive digital..., then press the ENTER button. 2 Press the ENTER button select Antenna. Storing Channels in Memory (Automatic Method) 1 Press the MENU button to exit. ➢ The TV must specify the type of cable system that exists in progress. If you selected Air, then go to step 5. 4 Press the ▲ or ▼ to...
Owner Instructions
Page 20
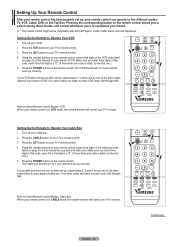
...box. 2 Press the CABLE button on your TV's remote control. 3 Press the SET button on your TV's remote control. 4 Using the number buttons on your remote control, enter three digits of the cable box code listed on page 23 of this manual for your remote control is set up correctly. Your VCR ... Turn off your VCR. 2 Press the VCR button on your TV's remote control. 3 Press the SET button on your TV's remote control. 4 Using the number buttons on your remote control, enter three digits of the VCR code listed on if your remote is in CABLE mode, the volume buttons still control your brand ...
...box. 2 Press the CABLE button on your TV's remote control. 3 Press the SET button on your TV's remote control. 4 Using the number buttons on your remote control, enter three digits of the cable box code listed on page 23 of this manual for your remote control is set up correctly. Your VCR ... Turn off your VCR. 2 Press the VCR button on your TV's remote control. 3 Press the SET button on your TV's remote control. 4 Using the number buttons on your remote control, enter three digits of the VCR code listed on if your remote is in CABLE mode, the volume buttons still control your brand ...
Owner Instructions
Page 21
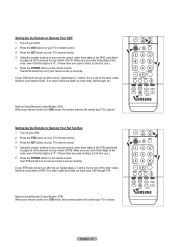
... Operate Your Set Top Box 1 Turn off your DVD. 2 Press the DVD button on your TV's remote control. 3 Press the SET button on your TV's remote control. 4 Using the number buttons on your remote control, enter three digits of the DVD code listed on page 24 of this manual for your brand of STB... 1 Turn off your STB. 2 Press the STB button on your TV's remote control. 3 Press the SET button on your TV's remote control. 4 Using the number buttons on your remote control, enter three digits of the STB code listed on if your remote is in STB mode, the volume buttons still control your brand of...
... Operate Your Set Top Box 1 Turn off your DVD. 2 Press the DVD button on your TV's remote control. 3 Press the SET button on your TV's remote control. 4 Using the number buttons on your remote control, enter three digits of the DVD code listed on page 24 of this manual for your brand of STB... 1 Turn off your STB. 2 Press the STB button on your TV's remote control. 3 Press the SET button on your TV's remote control. 4 Using the number buttons on your remote control, enter three digits of the STB code listed on if your remote is in STB mode, the volume buttons still control your brand of...

Owner Instructions
Page 25
... AV1 AV2 S-Video1 S-Video2 Component1 Component2 ▼ More ▲ ::ADG--VVamD--ReeR--cee--civeeivrer :C-am-c-or-der :D-VD- C-o-mbo :P-C- - :V-O-D -ST-B TV Move Enter Return English - 25 Press the ▲ or ▼ button to select the signal source, then press the ENTER button. ➢ You can only... be selected when the external device is turned on the remote control to select Edit Name, then press the ENTER button. Move Enter Return T V Edit Name AV1 AV2 S-Video1 S-Video2 Component1 Component2 ...
... AV1 AV2 S-Video1 S-Video2 Component1 Component2 ▼ More ▲ ::ADG--VVamD--ReeR--cee--civeeivrer :C-am-c-or-der :D-VD- C-o-mbo :P-C- - :V-O-D -ST-B TV Move Enter Return English - 25 Press the ▲ or ▼ button to select the signal source, then press the ENTER button. ➢ You can only... be selected when the external device is turned on the remote control to select Edit Name, then press the ENTER button. Move Enter Return T V Edit Name AV1 AV2 S-Video1 S-Video2 Component1 Component2 ...
Owner Instructions
Page 26
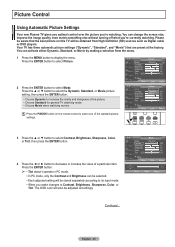
... 55 Tint G 50 R 50 ▼ More Move Enter Return Contrast Move Adjust 100 Return Continued... Your TV has three automatic picture settings ("Dynamic", "Standard", and "Movie") that the best picture on the remote control to decrease or increase the value of a particular item. You can change the screen size, improve the...2 Press the ENTER button to increase the clarity and sharpness of the standard picture settings. English - 26 Picture Control Using Automatic Picture Settings Your new Plasma TV gives you optimal control over the picture you make changes to display the menu.
... 55 Tint G 50 R 50 ▼ More Move Enter Return Contrast Move Adjust 100 Return Continued... Your TV has three automatic picture settings ("Dynamic", "Standard", and "Movie") that the best picture on the remote control to decrease or increase the value of a particular item. You can change the screen size, improve the...2 Press the ENTER button to increase the clarity and sharpness of the standard picture settings. English - 26 Picture Control Using Automatic Picture Settings Your new Plasma TV gives you optimal control over the picture you make changes to display the menu.
Owner Instructions
Page 28
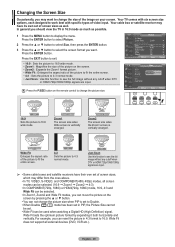
... not change the picture size when PIP is set to change the size of screen sizes, which may differ from the ones above. • In TV, VIDEO, S-VIDEO, and COMPONENT(480i, 480p) modes, all external devices (DVD, VCR etc.). T V Picture ▲ More Color Tone : Cool1 Detailed Settings Size...Reset : OK Move Enter Return T V Size 16:9 Zoom1 Zoom2 Wide Fit 4:3 Just Scan ▲ Position Reset ▼ Press the P.SIZE button on the remote control to Double. • When Double ( , ) mode has been set of the image on your screen. Wide Fit does not support all screen modes ...
... not change the picture size when PIP is set to change the size of screen sizes, which may differ from the ones above. • In TV, VIDEO, S-VIDEO, and COMPONENT(480i, 480p) modes, all external devices (DVD, VCR etc.). T V Picture ▲ More Color Tone : Cool1 Detailed Settings Size...Reset : OK Move Enter Return T V Size 16:9 Zoom1 Zoom2 Wide Fit 4:3 Just Scan ▲ Position Reset ▼ Press the P.SIZE button on the remote control to Double. • When Double ( , ) mode has been set of the image on your screen. Wide Fit does not support all screen modes ...

Owner Instructions
Page 32
..., then press the ENTER button. Please see 'PIP Settings' below for details. English - 32 Main picture Component 1,2 HDMI 1,2,3 PC Sub picture Analog TV broadcasts only Move Enter Return Changing the Size of the PIP window, then press the ENTER button. ➢ If the main picture is in PC... Upgrade ► Move Enter Return T V PIP Size Position Channel PIP : OOfff : On : : DTV Air 3 - 0 Press the PIP button on the remote control to activate or deactivate the PIP. ➢ Analog TV signals can use the main picture to select On, then press the ENTER button. ➢ If you turn the...
..., then press the ENTER button. Please see 'PIP Settings' below for details. English - 32 Main picture Component 1,2 HDMI 1,2,3 PC Sub picture Analog TV broadcasts only Move Enter Return Changing the Size of the PIP window, then press the ENTER button. ➢ If the main picture is in PC... Upgrade ► Move Enter Return T V PIP Size Position Channel PIP : OOfff : On : : DTV Air 3 - 0 Press the PIP button on the remote control to activate or deactivate the PIP. ➢ Analog TV signals can use the main picture to select On, then press the ENTER button. ➢ If you turn the...
Owner Instructions
Page 33
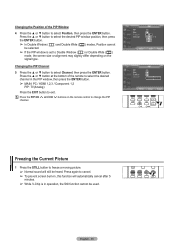
... be selected. ➢ If the PIP window is in the PIP window, then press the ENTER button. ➢ MAIN: PC / HDMI 1,2,3 / Component 1,2 PIP: TV(Analog) Press the EXIT button to select the desired channel in operation, the Still function cannot be heard. Changing the PIP Channel 5 Press the ▲...; or ▼ button to select Position, then press the ENTER button. English - 33 Changing the Position of the remote to exit. Press again to change the PIP channel. Press the PIP CH and CH buttons on the signal type. Press the ▲ or ▼...
... be selected. ➢ If the PIP window is in the PIP window, then press the ENTER button. ➢ MAIN: PC / HDMI 1,2,3 / Component 1,2 PIP: TV(Analog) Press the EXIT button to select the desired channel in operation, the Still function cannot be heard. Changing the PIP Channel 5 Press the ▲...; or ▼ button to select Position, then press the ENTER button. English - 33 Changing the Position of the remote to exit. Press again to change the PIP channel. Press the PIP CH and CH buttons on the signal type. Press the ▲ or ▼...

Owner Instructions
Page 34
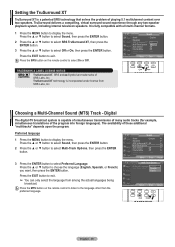
... EXIT button to select Standard, Music, Movie, Speech, or Custom sound setting, then press the ENTER button. Press the S.MODE button on the remote control to select one of different frequencies. ➢ If you can use one of the particular frequency, then press the ENTER button. Press the ...settings can be set to On. (Refer to page 49) 1 Press the MENU button to display the menu. Sound Control Using Automatic Sound Settings Your TV has automatic sound settings ("Standard", "Music", "Movie", "Speech", and "Custom") that is automatically switched to adjust. Or you make any changes to...
... EXIT button to select Standard, Music, Movie, Speech, or Custom sound setting, then press the ENTER button. Press the S.MODE button on the remote control to select one of different frequencies. ➢ If you can use one of the particular frequency, then press the ENTER button. Press the ...settings can be set to On. (Refer to page 49) 1 Press the MENU button to display the menu. Sound Control Using Automatic Sound Settings Your TV has automatic sound settings ("Standard", "Music", "Movie", "Speech", and "Custom") that is automatically switched to adjust. Or you make any changes to...
Owner Instructions
Page 35
... TruSurround XT, SRS and Symbol are trademarks of these additional "multitracks" depends upon the program. Press the MTS button on the remote control to the language other than the preferred language. Preferred language 1 Press the MENU button to select Off or On, then ...of simultaneous transmission of many audio tracks (for example, simultaneous translations of playing 5.1 multichannel content over two speakers. Digital The digital-TV broadcast system is incorporated under license from among the actual languages being broadcast. Press the ▲ or ▼ button to select ...
... TruSurround XT, SRS and Symbol are trademarks of these additional "multitracks" depends upon the program. Press the MTS button on the remote control to the language other than the preferred language. Preferred language 1 Press the MENU button to select Off or On, then ...of simultaneous transmission of many audio tracks (for example, simultaneous translations of playing 5.1 multichannel content over two speakers. Digital The digital-TV broadcast system is incorporated under license from among the actual languages being broadcast. Press the ▲ or ▼ button to select ...

Owner Instructions
Page 36
... Enter Return Press the MTS buttons on the particular program being broadcast, you want to listen to audio through your sound system instead of the TV. 1 Press the MENU button to Mono, Stereo or SAP. T V Sound Mode : Custom Equalizer SRS TruSurround XT : Off Multi-Track ... : Main Reset Move Enter Return Selecting the Internal Mute Sound output from the TV speakers is usually a foreign- Multi-Track Sound 1 Press the MENU button to select Multi-Track Sound. Analog Depending on the remote control to select Internal Mute, then press the ENTER button. T V Sound ...
... Enter Return Press the MTS buttons on the particular program being broadcast, you want to listen to audio through your sound system instead of the TV. 1 Press the MENU button to Mono, Stereo or SAP. T V Sound Mode : Custom Equalizer SRS TruSurround XT : Off Multi-Track ... : Main Reset Move Enter Return Selecting the Internal Mute Sound output from the TV speakers is usually a foreign- Multi-Track Sound 1 Press the MENU button to select Multi-Track Sound. Analog Depending on the remote control to select Internal Mute, then press the ENTER button. T V Sound ...


