User Manual (KOREAN)
Page 32
Natural Color http://www.samsung.com/sec/consumer/learningresources/monitor/naturalcolorexpert/NC_download.html 4-1 4 4-1 Natural Color Natural Color 란?
Natural Color http://www.samsung.com/sec/consumer/learningresources/monitor/naturalcolorexpert/NC_download.html 4-1 4 4-1 Natural Color Natural Color 란?
Quick Guide (ENGLISH)
Page 2
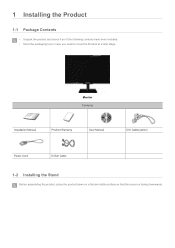
1 Installing the Product 1-1 Package Contents • Unpack the product and check if all of the following contents have been included. • Store the packaging box in case you need to move the Product at a later stage. Monitor Contents Installation Manual Product Warranty User Manual DVI Cable(option) Power Cord D-Sub Cable 1-2 Installing the Stand Before assembling the product, place the product down on a flat and stable surface so that the screen is facing downwards.
1 Installing the Product 1-1 Package Contents • Unpack the product and check if all of the following contents have been included. • Store the packaging box in case you need to move the Product at a later stage. Monitor Contents Installation Manual Product Warranty User Manual DVI Cable(option) Power Cord D-Sub Cable 1-2 Installing the Stand Before assembling the product, place the product down on a flat and stable surface so that the screen is facing downwards.

Quick Guide (ENGLISH)
Page 4
Installing the Product 1-3 Now you can remove the stopper pin to the following steps. Caution Avoid lifting the product holding only the stand. After the installation of the base, stand the monitor up as shown in the reverse order of the assembly. 1-3 Installing the Stand for the Wall Mount Before installation, disassemble the product according to adjust the stand. - Disassembly is in the figure.
Installing the Product 1-3 Now you can remove the stopper pin to the following steps. Caution Avoid lifting the product holding only the stand. After the installation of the base, stand the monitor up as shown in the reverse order of the assembly. 1-3 Installing the Stand for the Wall Mount Before installation, disassemble the product according to adjust the stand. - Disassembly is in the figure.

Quick Guide (ENGLISH)
Page 5
... mount of the product faces downwards. 3. Turn the product off and unplug the power cord from the wall outlet. 2. Separate the stand. 4. Lift up the monitor stand to the stand with the groove in the figure. Remove the part in the direction shown in the stand (desk-top stand, wall mount...
... mount of the product faces downwards. 3. Turn the product off and unplug the power cord from the wall outlet. 2. Separate the stand. 4. Lift up the monitor stand to the stand with the groove in the figure. Remove the part in the direction shown in the stand (desk-top stand, wall mount...
Quick Guide (ENGLISH)
Page 10
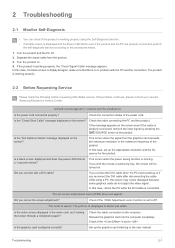
2 Troubleshooting 2-1 Monitor Self-Diagnosis • You can check if the product is working properly using a PC, the screen may not be turned on. Turn the product and ... the self-diagnosis function according to . Set up the appropriate resolution and the frequency for the product. If the problem continues, please contact your nearest Samsung Electronics Service Center. Is the "Check Sinal Calbe" message displayed on . 4. In this case, if a blank screen is displayed again, make sure that there is...
2 Troubleshooting 2-1 Monitor Self-Diagnosis • You can check if the product is working properly using a PC, the screen may not be turned on. Turn the product and ... the self-diagnosis function according to . Set up the appropriate resolution and the frequency for the product. If the problem continues, please contact your nearest Samsung Electronics Service Center. Is the "Check Sinal Calbe" message displayed on . 4. In this case, if a blank screen is displayed again, make sure that there is...
Quick Guide (ENGLISH)
Page 11
... substances appear on it with the new graphics card driver. The display area suddenly moves to an edge or to the center. When I connect the monitor, the 'Unknown monitor, Plug&Play (VESA DDC) monitor found' message is heard when booting the computer.
... substances appear on it with the new graphics card driver. The display area suddenly moves to an edge or to the center. When I connect the monitor, the 'Unknown monitor, Plug&Play (VESA DDC) monitor found' message is heard when booting the computer.
User Manual (ENGLISH)
Page 3
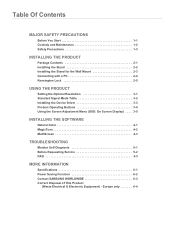
... Table 3-2 Installing the Device Driver 3-3 Product Operating Buttons 3-4 Using the Screen Adjustment Menu (OSD: On Screen Display) . . . . 3-5 INSTALLING THE SOFTWARE Natural Color 4-1 MagicTune 4-2 MultiScreen 4-3 TROUBLESHOOTING Monitor Self-Diagnosis 5-1 Before Requesting Service 5-2 FAQ 5-3 MORE INFORMATION Specifications 6-1 Power Saving Function 6-2 Contact SAMSUNG WORLDWIDE 6-3 Correct Disposal of This Product (Waste Electrical & Electronic Equipment) - Europe only 6-4
... Table 3-2 Installing the Device Driver 3-3 Product Operating Buttons 3-4 Using the Screen Adjustment Menu (OSD: On Screen Display) . . . . 3-5 INSTALLING THE SOFTWARE Natural Color 4-1 MagicTune 4-2 MultiScreen 4-3 TROUBLESHOOTING Monitor Self-Diagnosis 5-1 Before Requesting Service 5-2 FAQ 5-3 MORE INFORMATION Specifications 6-1 Power Saving Function 6-2 Contact SAMSUNG WORLDWIDE 6-3 Correct Disposal of This Product (Waste Electrical & Electronic Equipment) - Europe only 6-4

User Manual (ENGLISH)
Page 9
..., alcohol, thinner, mosquitorepellent, fragrance, lubrication or cleansing agent when cleaning the product. However, if the cloth is contaminated by alien substances, it . • If no monitor-exclusive cleansing agent is installed in discoloration or cracking of the exterior of the product. Cleaning Related Since using it. 1-3 Caution Avoid spraying cleansing agent...
..., alcohol, thinner, mosquitorepellent, fragrance, lubrication or cleansing agent when cleaning the product. However, if the cloth is contaminated by alien substances, it . • If no monitor-exclusive cleansing agent is installed in discoloration or cracking of the exterior of the product. Cleaning Related Since using it. 1-3 Caution Avoid spraying cleansing agent...
User Manual (ENGLISH)
Page 13
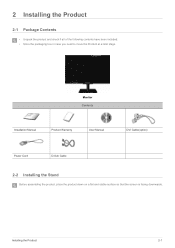
2 Installing the Product 2-1 Package Contents • Unpack the product and check if all of the following contents have been included. • Store the packaging box in case you need to move the Product at a later stage. Monitor Contents Installation Manual Product Warranty User Manual DVI Cable(option) Power Cord D-Sub Cable 2-2 Installing the Stand Before assembling the product, place the product down on a flat and stable surface so that the screen is facing downwards. Installing the Product 2-1
2 Installing the Product 2-1 Package Contents • Unpack the product and check if all of the following contents have been included. • Store the packaging box in case you need to move the Product at a later stage. Monitor Contents Installation Manual Product Warranty User Manual DVI Cable(option) Power Cord D-Sub Cable 2-2 Installing the Stand Before assembling the product, place the product down on a flat and stable surface so that the screen is facing downwards. Installing the Product 2-1
User Manual (ENGLISH)
Page 15
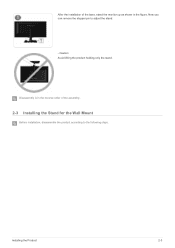
Now you can remove the stopper pin to the following steps. Installing the Product 2-3 Caution Avoid lifting the product holding only the stand. Disassembly is in the figure. After the installation of the base, stand the monitor up as shown in the reverse order of the assembly. 2-3 Installing the Stand for the Wall Mount Before installation, disassemble the product according to adjust the stand. -
Now you can remove the stopper pin to the following steps. Installing the Product 2-3 Caution Avoid lifting the product holding only the stand. Disassembly is in the figure. After the installation of the base, stand the monitor up as shown in the reverse order of the assembly. 2-3 Installing the Stand for the Wall Mount Before installation, disassemble the product according to adjust the stand. -
User Manual (ENGLISH)
Page 16
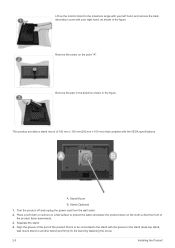
... wall outlet. 2. A. Place a soft cloth or cushion on a flat surface to protect the panel and place the product down on the point "A". Lift up the monitor stand to the maximum angle with your left hand, and remove the back decoration cover with your right hand, as shown in the stand (desk...
... wall outlet. 2. A. Place a soft cloth or cushion on a flat surface to protect the panel and place the product down on the point "A". Lift up the monitor stand to the maximum angle with your left hand, and remove the back decoration cover with your right hand, as shown in the stand (desk...
User Manual (ENGLISH)
Page 20
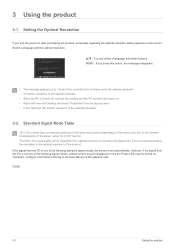
... the pop-up menu. • In the 'Settings' tab, set the resolution to the optimal resolution. 3-2 Standard Signal Mode Table The LCD monitor has one of the following standard signal modes, the screen is not one optimal resolution for the best visual quality depending on the screen. 3...on the screen size due to the inherent characteristics of the panel, unlike for a CDT monitor. Select a language and the optimal resolution. ▲/▼ : You can select a language with these buttons. F2080 3-1 Using the product It is not set automatically. However, if the signal from the ...
... the pop-up menu. • In the 'Settings' tab, set the resolution to the optimal resolution. 3-2 Standard Signal Mode Table The LCD monitor has one of the following standard signal modes, the screen is not one optimal resolution for the best visual quality depending on the screen. 3...on the screen size due to the inherent characteristics of the panel, unlike for a CDT monitor. Select a language and the optimal resolution. ▲/▼ : You can select a language with these buttons. F2080 3-1 Using the product It is not set automatically. However, if the signal from the ...

User Manual (ENGLISH)
Page 29
... On/Off Off Timer Setting Auto Source PC/AV Mode Display Time Customized Key Description You can turn the Off Timer on the PC. The monitor automatically selects an input signal. • - Users have to a PC. You can set on or off automatically when the configured time is reached. • - This...
... On/Off Off Timer Setting Auto Source PC/AV Mode Display Time Customized Key Description You can turn the Off Timer on the PC. The monitor automatically selects an input signal. • - Users have to a PC. You can set on or off automatically when the configured time is reached. • - This...
User Manual (ENGLISH)
Page 31
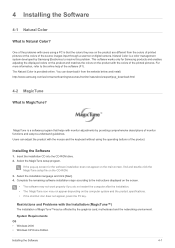
... refer to -understand guidelines. The Natural Color is MagicTune? Restrictions and Problems with monitor adjustments by providing comprehensive descriptions of MagicTune™may be affected by Samsung Electronics to the instructions displayed on the screen. • The software may not ...If the shortcut icon does not appear, press the F5 key. Natural Color is Natural Color? http://www.samsung.com/us/consumer/learningresources/monitor/naturalcolorexpert/pop_download.html 4-2 MagicTune What is provided online. Select the MagicTune setup program. Installing the Software 1....
... refer to -understand guidelines. The Natural Color is MagicTune? Restrictions and Problems with monitor adjustments by providing comprehensive descriptions of MagicTune™may be affected by Samsung Electronics to the instructions displayed on the screen. • The software may not ...If the shortcut icon does not appear, press the F5 key. Natural Color is Natural Color? http://www.samsung.com/us/consumer/learningresources/monitor/naturalcolorexpert/pop_download.html 4-2 MagicTune What is provided online. Select the MagicTune setup program. Installing the Software 1....

User Manual (ENGLISH)
Page 32
...; Windows XP Professional • Windows Vista For MagicTune™, Windows 2000 or later is highlighted. 4. Complete the remaining software installation steps according to use the monitor by partitioning multiple sections. For technical support, the FAQ (frequently asked questions) or information about the software upgrade for the software installation does not appear...
...; Windows XP Professional • Windows Vista For MagicTune™, Windows 2000 or later is highlighted. 4. Complete the remaining software installation steps according to use the monitor by partitioning multiple sections. For technical support, the FAQ (frequently asked questions) or information about the software upgrade for the software installation does not appear...

User Manual (ENGLISH)
Page 35
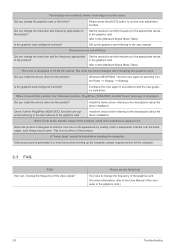
If the problem continues, please contact your nearest Samsung Electronics Service Center. Is the "Check Sinal Calbe" message displayed on screen adjustment menu (OSD) does not appear. In this case, reboot the PC while ... the Power LED blinks even if the product and the PC are properly connected, perform the self-diagnosis function according to the procedures below. 1. 5 Troubleshooting 5-1 Monitor Self-Diagnosis • You can check if the product is working properly using a PC, the screen may not be turned on. Check the connection status...
If the problem continues, please contact your nearest Samsung Electronics Service Center. Is the "Check Sinal Calbe" message displayed on screen adjustment menu (OSD) does not appear. In this case, reboot the PC while ... the Power LED blinks even if the product and the PC are properly connected, perform the self-diagnosis function according to the procedures below. 1. 5 Troubleshooting 5-1 Monitor Self-Diagnosis • You can check if the product is working properly using a PC, the screen may not be turned on. Check the connection status...

User Manual (ENGLISH)
Page 36
... a defect of the graphics card. (For more times when booting up the graphics card referring to the center. How can I connect the monitor, the 'Unknown monitor, Plug&Play (VESA DDC) monitor found' message is designed so that the color has a soft appearance by selecting Con- You have to the descriptions about the driver...
... a defect of the graphics card. (For more times when booting up the graphics card referring to the center. How can I connect the monitor, the 'Unknown monitor, Plug&Play (VESA DDC) monitor found' message is designed so that the color has a soft appearance by selecting Con- You have to the descriptions about the driver...


