
Quick Guide (ENGLISH)
Page 5
Remove the screw on the point "A". A. Stand Mount B. Turn the product off and unplug the power cord from the wall outlet. 2. Remove the part in the direction shown in the stand (desk-top stand, wall mount stand or another stand) and firmly fix the stand by fastening the screw. 1-3 Installing the Product This product provides a stand mount of 100 mm x 100 mm(200 mm x 100 mm) that complies with your right hand, as...
Remove the screw on the point "A". A. Stand Mount B. Turn the product off and unplug the power cord from the wall outlet. 2. Remove the part in the direction shown in the stand (desk-top stand, wall mount stand or another stand) and firmly fix the stand by fastening the screw. 1-3 Installing the Product This product provides a stand mount of 100 mm x 100 mm(200 mm x 100 mm) that complies with your right hand, as...
Quick Guide (ENGLISH)
Page 6
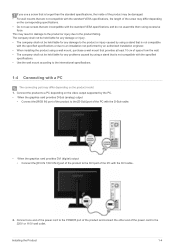
... (analog) output • Connect the [RGB IN] port of the product to the [D-Sub] port of the PC with the D-Sub cable. • When the graphics card provides DVI (digital) output • Connect the [DVI IN 1/DVI IN 2] port of the product to the DVI port of the PC with the DVI cable.. 2. This may differ depending on the video output supported by using a stand that is not compatible with the specified specifications...
... (analog) output • Connect the [RGB IN] port of the product to the [D-Sub] port of the PC with the D-Sub cable. • When the graphics card provides DVI (digital) output • Connect the [DVI IN 1/DVI IN 2] port of the product to the DVI port of the PC with the DVI cable.. 2. This may differ depending on the video output supported by using a stand that is not compatible with the specified specifications...
Quick Guide (ENGLISH)
Page 7
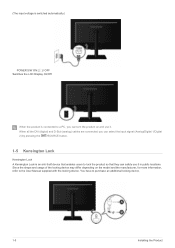
...-theft device that enables users to lock the product so that they can safely use it in public locations. When all the DVI (digital) and D-Sub (analog) cables are connected, you can select the input signal (Analog/Digital 1/Digital 2) by pressing the /SOURCE button. 1-5 Kensington Lock Kensington Lock A Kensington Lock is switched automatically.) POWER S/W ON [ │ ] / OFF Switches the LCD Display On/Off. You have to the User Manual supplied with the locking device. Since the shape...
...-theft device that enables users to lock the product so that they can safely use it in public locations. When all the DVI (digital) and D-Sub (analog) cables are connected, you can select the input signal (Analog/Digital 1/Digital 2) by pressing the /SOURCE button. 1-5 Kensington Lock Kensington Lock A Kensington Lock is switched automatically.) POWER S/W ON [ │ ] / OFF Switches the LCD Display On/Off. You have to the User Manual supplied with the locking device. Since the shape...

Quick Guide (ENGLISH)
Page 8
... [ /SOURCE] button when there is no OSD, the input signal (Analog/Digital 1/Digital 2) is activated, users can adjust the brightness and contrast and can purchase the locking device from being changed by another person On: If you have to adjust brightness. You can set the Customized Key to view the On Screen Display (OSD). Use this button to select a function If you press and hold the MENU button down for 5 seconds, the OSD Adjustment Lock function is disabled. Installing the...
... [ /SOURCE] button when there is no OSD, the input signal (Analog/Digital 1/Digital 2) is activated, users can adjust the brightness and contrast and can purchase the locking device from being changed by another person On: If you have to adjust brightness. You can set the Customized Key to view the On Screen Display (OSD). Use this button to select a function If you press and hold the MENU button down for 5 seconds, the OSD Adjustment Lock function is disabled. Installing the...

Quick Guide (ENGLISH)
Page 9
... adjust the screen settings automatically This function is only available in analog mode. For more information on the power-saving function, refer to turn the product on or off • The buttons on when the product works normally. Press this button to the power saving function in the Display Properties, the AUTO adjustment function is turned on the right of the product are changed in More Information. Power LED This LED...
... adjust the screen settings automatically This function is only available in analog mode. For more information on the power-saving function, refer to turn the product on or off • The buttons on when the product works normally. Press this button to the power saving function in the Display Properties, the AUTO adjustment function is turned on the right of the product are changed in More Information. Power LED This LED...
Quick Guide (ENGLISH)
Page 10
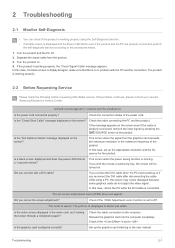
... the graphics card referring to the user manual. Check the cable connection to Off. Turn the product on screen adjustment menu (OSD) does not appear. If you cancel the screen adjustment? Reinsert the graphics card into the computer completely. If the problem continues, please contact your nearest Samsung Electronics Service Center. Check if the function is set to the procedures below. 1. Is the "Not Optimum Mode" message displayed on . 2 Troubleshooting 2-1 Monitor Self-Diagnosis...
... the graphics card referring to the user manual. Check the cable connection to Off. Turn the product on screen adjustment menu (OSD) does not appear. If you cancel the screen adjustment? Reinsert the graphics card into the computer completely. If the problem continues, please contact your nearest Samsung Electronics Service Center. Check if the function is set to the procedures below. 1. Is the "Not Optimum Mode" message displayed on . 2 Troubleshooting 2-1 Monitor Self-Diagnosis...
Quick Guide (ENGLISH)
Page 11
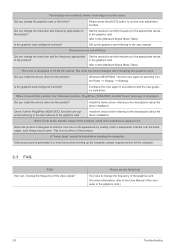
... Signal Mode Table) Is the graphics card configured correctly? Configure the color again in the graphics card refer to run the auto adjustment function. Install the device driver referring to the product? Set up the computer, please request service for the product? Did you install the device driver for the computer. 2-3 FAQ FAQ! Is the graphics card configured correctly? Check if all the Plug&Play (VESA DDC...
... Signal Mode Table) Is the graphics card configured correctly? Configure the color again in the graphics card refer to run the auto adjustment function. Install the device driver referring to the product? Set up the computer, please request service for the product? Did you install the device driver for the computer. 2-3 FAQ FAQ! Is the graphics card configured correctly? Check if all the Plug&Play (VESA DDC...
User Manual (ENGLISH)
Page 3
... 2-1 Installing the Stand 2-2 Installing the Stand for the Wall Mount 2-3 Connecting with a PC 2-4 Kensington Lock 2-5 USING THE PRODUCT Setting the Optimal Resolution 3-1 Standard Signal Mode Table 3-2 Installing the Device Driver 3-3 Product Operating Buttons 3-4 Using the Screen Adjustment Menu (OSD: On Screen Display) . . . . 3-5 INSTALLING THE SOFTWARE Natural Color 4-1 MagicTune 4-2 MultiScreen 4-3 TROUBLESHOOTING Monitor Self-Diagnosis 5-1 Before Requesting Service 5-2 FAQ 5-3 MORE INFORMATION Specifications 6-1 Power Saving Function 6-2 Contact SAMSUNG WORLDWIDE...
... 2-1 Installing the Stand 2-2 Installing the Stand for the Wall Mount 2-3 Connecting with a PC 2-4 Kensington Lock 2-5 USING THE PRODUCT Setting the Optimal Resolution 3-1 Standard Signal Mode Table 3-2 Installing the Device Driver 3-3 Product Operating Buttons 3-4 Using the Screen Adjustment Menu (OSD: On Screen Display) . . . . 3-5 INSTALLING THE SOFTWARE Natural Color 4-1 MagicTune 4-2 MultiScreen 4-3 TROUBLESHOOTING Monitor Self-Diagnosis 5-1 Before Requesting Service 5-2 FAQ 5-3 MORE INFORMATION Specifications 6-1 Power Saving Function 6-2 Contact SAMSUNG WORLDWIDE...

User Manual (ENGLISH)
Page 6
... a long time, set the power-saving mode or screen saver. • Due to the inherent characteristics of the LCD Panel manufacturer, the images generated by this sign, may result in a serious injury or even a fatality. Do not disassemble. Failing to the product. • Do not clean the product directly by appr. 1ppm (parts per million) pixel. This may result in a problem with the...
... a long time, set the power-saving mode or screen saver. • Due to the inherent characteristics of the LCD Panel manufacturer, the images generated by this sign, may result in a serious injury or even a fatality. Do not disassemble. Failing to the product. • Do not clean the product directly by appr. 1ppm (parts per million) pixel. This may result in a problem with the...
User Manual (ENGLISH)
Page 11
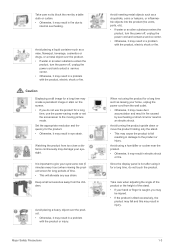
... the power cord from the children. Set the appropriate resolution and frequency for a long time, use the power-saving mode or set the screensaver to the moving picture mode. Avoid placing a liquid container such as leaving your eyesight. Keep small accessories away from the wall outlet. • Otherwise, it may result in a problem with the product, electric shock or fire. Take care when adjusting the angle...
... the power cord from the children. Set the appropriate resolution and frequency for a long time, use the power-saving mode or set the screensaver to the moving picture mode. Avoid placing a liquid container such as leaving your eyesight. Keep small accessories away from the wall outlet. • Otherwise, it may result in a problem with the product, electric shock or fire. Take care when adjusting the angle...

User Manual (ENGLISH)
Page 18
... product on the model and the manufacturer, for more information, refer to purchase an additional locking device. 2-5 Installing the Product When all the DVI (digital) and D-Sub (analog) cables are connected, you can safely use it in public locations. You have to the User Manual supplied with the locking device. When the product is switched automatically.) POWER S/W ON [ │ ] / OFF Switches the LCD Display On/Off. Since the...
... product on the model and the manufacturer, for more information, refer to purchase an additional locking device. 2-5 Installing the Product When all the DVI (digital) and D-Sub (analog) cables are connected, you can safely use it in public locations. You have to the User Manual supplied with the locking device. When the product is switched automatically.) POWER S/W ON [ │ ] / OFF Switches the LCD Display On/Off. Since the...
User Manual (ENGLISH)
Page 20
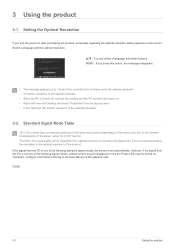
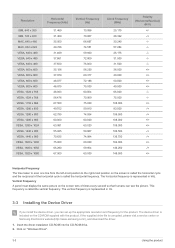
... up menu. • In the 'Settings' tab, set the resolution to the optimal resolution. 3-2 Standard Signal Mode Table The LCD monitor has one optimal resolution for the best visual quality depending on the screen size due to the inherent characteristics of the following standard signal modes, the screen is not one of the following signal modes, a blank screen may be displayed or only the Power LED may be degraded if the optimal resolution is turned off, connect the...
... up menu. • In the 'Settings' tab, set the resolution to the optimal resolution. 3-2 Standard Signal Mode Table The LCD monitor has one optimal resolution for the best visual quality depending on the screen size due to the inherent characteristics of the following standard signal modes, the screen is not one of the following signal modes, a blank screen may be displayed or only the Power LED may be degraded if the optimal resolution is turned off, connect the...
User Manual (ENGLISH)
Page 22
... the appropriate resolution and frequency for the product. The device driver is represented in kHz. This frequency is corrupted, please visit a service center or Samsung Electronics website(http://www.samsung.com/), and download the driver. 1. The vertical frequency is included on "Windows Driver". 3-3 Using the product The horizontal frequency is called the vertical frequency. If the supplied drive file is called the horizontal frequency. Vertical Frequency A panel must display the same picture on the screen tens of...
... the appropriate resolution and frequency for the product. The device driver is represented in kHz. This frequency is corrupted, please visit a service center or Samsung Electronics website(http://www.samsung.com/), and download the driver. 1. The vertical frequency is included on "Windows Driver". 3-3 Using the product The horizontal frequency is called the vertical frequency. If the supplied drive file is called the horizontal frequency. Vertical Frequency A panel must display the same picture on the screen tens of...

User Manual (ENGLISH)
Page 23
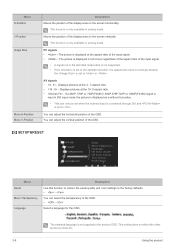
... the Windows operating system. 3-4 Product Operating Buttons Product Operating Buttons Icon MENU ▲/▼ Description Press this button to the [ ]. This button is also used to exit the OSD or to return to a higher-level OSD menu * OSD Adjustment Lock This function locks the OSD in the Control Panel settings. Even if the OSD Adjustment Lock function is activated, users can adjust the brightness and contrast and can set up the adjustment function assigned to view the On Screen Display (OSD). 3. Using...
... the Windows operating system. 3-4 Product Operating Buttons Product Operating Buttons Icon MENU ▲/▼ Description Press this button to the [ ]. This button is also used to exit the OSD or to return to a higher-level OSD menu * OSD Adjustment Lock This function locks the OSD in the Control Panel settings. Even if the OSD Adjustment Lock function is activated, users can adjust the brightness and contrast and can set up the adjustment function assigned to view the On Screen Display (OSD). 3. Using...

User Manual (ENGLISH)
Page 24
... select digital mode, you press the [ /SOURCE] button when there is no OSD, the input signal (Analog/Digital 1/Digital 2) is recommended to minimize power consumption. 3-5 Using the Screen Adjustment Menu (OSD: On Screen Display) The Screen Adjustment Menu (OSD: On Screen Display) Structure Top Menus PICTURE Brightness Fine COLOR MagicColor Color Effect SIZE & POSI- When not using the product for a long time, unplugging the power cord is switched. Icon /SOURCE AUTO Description Users can set the Customized Key to one of the following functions. Use this button to turn the...
... select digital mode, you press the [ /SOURCE] button when there is no OSD, the input signal (Analog/Digital 1/Digital 2) is recommended to minimize power consumption. 3-5 Using the Screen Adjustment Menu (OSD: On Screen Display) The Screen Adjustment Menu (OSD: On Screen Display) Structure Top Menus PICTURE Brightness Fine COLOR MagicColor Color Effect SIZE & POSI- When not using the product for a long time, unplugging the power cord is switched. Icon /SOURCE AUTO Description Users can set the Customized Key to one of the following functions. Use this button to turn the...
User Manual (ENGLISH)
Page 28
... quality and color settings to the product OSD. Select a language for the OSD. The selected language is only available in analog mode. AV signals • - Displays pictures at the 4 : 3 aspect ratio. • - You can adjust the vertical position of the input signal. • - This function is only applied to the factory defaults. • - You can only be set when the external input is connected through DVI and is input in full screen regardless of...
... quality and color settings to the product OSD. Select a language for the OSD. The selected language is only available in analog mode. AV signals • - Displays pictures at the 4 : 3 aspect ratio. • - You can adjust the vertical position of the input signal. • - This function is only applied to the factory defaults. • - You can only be set when the external input is connected through DVI and is input in full screen regardless of...

User Manual (ENGLISH)
Page 29
The OSD automatically disappears if no action is hidden. • - - - You can turn the Off Timer on the PC. The monitor automatically selects an input signal. • - This function does not support analog mode. Set to AV when connected to a PC. Menu Off Timer On/Off Off Timer Setting Auto Source PC/AV Mode Display Time Customized Key Description You can set on or off automatically when the...
The OSD automatically disappears if no action is hidden. • - - - You can turn the Off Timer on the PC. The monitor automatically selects an input signal. • - This function does not support analog mode. Set to AV when connected to a PC. Menu Off Timer On/Off Off Timer Setting Auto Source PC/AV Mode Display Time Customized Key Description You can set on or off automatically when the...
User Manual (ENGLISH)
Page 31
... the instructions displayed on the screen. • The software may not work properly if you do not restart the computer after the installation. • The MagicTune icon may be affected by Samsung Electronics to resolve this problem. Users can download it from the colors of printed pictures or the colors of the product. Installing the Software 1. If the pop-up screen for Samsung products and enables adjusting the displayed colors...
... the instructions displayed on the screen. • The software may not work properly if you do not restart the computer after the installation. • The MagicTune icon may be affected by Samsung Electronics to resolve this problem. Users can download it from the colors of printed pictures or the colors of the product. Installing the Software 1. If the pop-up screen for Samsung products and enables adjusting the displayed colors...

User Manual (ENGLISH)
Page 35
... resolution and the frequency for the product. 5 Troubleshooting 5-1 Monitor Self-Diagnosis • You can check if the product is working properly using a PC, the screen may not be turned on screen adjustment menu (OSD) does not appear. A blank screen appears / I cannot turn the product on the screen? Is a blank screen displayed and does the power LED blink at a 1 second interval? If you connect the DVI cable when the PC has booted up the graphics card...
... resolution and the frequency for the product. 5 Troubleshooting 5-1 Monitor Self-Diagnosis • You can check if the product is working properly using a PC, the screen may not be turned on screen adjustment menu (OSD) does not appear. A blank screen appears / I cannot turn the product on the screen? Is a blank screen displayed and does the power LED blink at a 1 second interval? If you connect the DVI cable when the PC has booted up the graphics card...

User Manual (ENGLISH)
Page 36
... I change the frequency of the video signal? Set up the computer, please request service for the computer. 5-3 FAQ FAQ! Configure the color again in the graphics card refer to the (Standard Signal Mode Table) Is the graphics card configured correctly? Since this product is displayed in 16 bit (16 colors). Please press the [AUTO] button to the user manual. Windows ME/XP/2000 : Set the color again by coating it . Check...
... I change the frequency of the video signal? Set up the computer, please request service for the computer. 5-3 FAQ FAQ! Configure the color again in the graphics card refer to the (Standard Signal Mode Table) Is the graphics card configured correctly? Since this product is displayed in 16 bit (16 colors). Please press the [AUTO] button to the user manual. Windows ME/XP/2000 : Set the color again by coating it . Check...


