
User Manual
Page 3
.... • Prevent memory cards from making contact with your camera. • Turn off the camera when inserting or removing the memory card. • Do not bend drop, or subject memory cards to avoid serious damage. • Exercise caution when connecting cables or adapters and installing batteries and memory cards. Prolonged exposure to sunlight or extreme temperatures can void your warranty. terminals of time. Installed batteries may explode when overheated. Protect batteries, chargers, and memory cards from damage...
.... • Prevent memory cards from making contact with your camera. • Turn off the camera when inserting or removing the memory card. • Do not bend drop, or subject memory cards to avoid serious damage. • Exercise caution when connecting cables or adapters and installing batteries and memory cards. Prolonged exposure to sunlight or extreme temperatures can void your warranty. terminals of time. Installed batteries may explode when overheated. Protect batteries, chargers, and memory cards from damage...
User Manual
Page 5
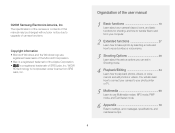
... of the user manual 1 Basic functions 10 Learn about your photo printer or TV. 5 Multimedia 68 Learn to use Multimedia modes: MP3 mode, PMP mode, and Text Viewer mode. 6 Appendix 76 Refer to upgrade of this manual may be changed without prior notice due to settings, error messages, specifications, and maintenance tips. 4 The specifications of the camera or contents of camera functions. ©2008 Samsung Electronics...
... of the user manual 1 Basic functions 10 Learn about your photo printer or TV. 5 Multimedia 68 Learn to use Multimedia modes: MP3 mode, PMP mode, and Text Viewer mode. 6 Appendix 76 Refer to upgrade of this manual may be changed without prior notice due to settings, error messages, specifications, and maintenance tips. 4 The specifications of the camera or contents of camera functions. ©2008 Samsung Electronics...

User Manual
Page 8
...; Red Eye, Red Eye Fix (to prevent or correct red-eye) f 41 • Face Detection, Self Portrait, Smile Shot, Blink Detection f 45 - 46 Taking photos at night or in the dark • 4 mode > Nightscene, Dawn, Firework f 28 • Flash options f 41 • ISO speed (to adjust sensitivity to light) f 42 Taking action photos • Continuous, Motion Capture f 50 Taking photos of food, insects, or flowers • 4 mode > Close up, Food f 28 • Macro, Auto Macro, Super Macro...
...; Red Eye, Red Eye Fix (to prevent or correct red-eye) f 41 • Face Detection, Self Portrait, Smile Shot, Blink Detection f 45 - 46 Taking photos at night or in the dark • 4 mode > Nightscene, Dawn, Firework f 28 • Flash options f 41 • ISO speed (to adjust sensitivity to light) f 42 Taking action photos • Continuous, Motion Capture f 50 Taking photos of food, insects, or flowers • 4 mode > Close up, Food f 28 • Macro, Auto Macro, Super Macro...

User Manual
Page 9
... red-eye Red-eye 41 Using the flash 41 Adjusting the ISO speed ISO speed 42 Changing the camera's focus 43 Using macro .BDSP 43 Using auto focus AF 43 Adjusting the focus area AF area 44 Using face detection Face detection 45 8 Contents 1. Extended functions 27 Camera layout 11 Icons 13 Turning your camera on or off 14 Mini dashboard 14 Setting options 15 Taking photos 16 Zooming 16 Reducing camera shake OIS 17 Using the Photo Help Guide mode 18 Changing the display type 19 Shooting modes...
... red-eye Red-eye 41 Using the flash 41 Adjusting the ISO speed ISO speed 42 Changing the camera's focus 43 Using macro .BDSP 43 Using auto focus AF 43 Adjusting the focus area AF area 44 Using face detection Face detection 45 8 Contents 1. Extended functions 27 Camera layout 11 Icons 13 Turning your camera on or off 14 Mini dashboard 14 Setting options 15 Taking photos 16 Zooming 16 Reducing camera shake OIS 17 Using the Photo Help Guide mode 18 Changing the display type 19 Shooting modes...

User Manual
Page 10
... settings menu 77 SOUND 78 DISPLAY 78 SETTINGS 79 Error messages 81 Camera maintenance 82 Cleaning your photos 52 4. Contents Adjusting brightness and color 47 Adjusting the exposure manually EV 47 Compensating for backlighting ACB 47 Changing the metering mode Metering 48 Selecting a light source (White balance) 8 48 Using burst modes 50 Improving your photos 51 Applying photo styles Photo style 51 Applying color Color effect 51 Adjusting your camera 82 About memory cards 83 About the battery 84 Before contacting a service...
... settings menu 77 SOUND 78 DISPLAY 78 SETTINGS 79 Error messages 81 Camera maintenance 82 Cleaning your photos 52 4. Contents Adjusting brightness and color 47 Adjusting the exposure manually EV 47 Compensating for backlighting ACB 47 Changing the metering mode Metering 48 Selecting a light source (White balance) 8 48 Using burst modes 50 Improving your photos 51 Applying photo styles Photo style 51 Applying color Color effect 51 Adjusting your camera 82 About memory cards 83 About the battery 84 Before contacting a service...

User Manual
Page 11
Camera layout 11 Icons 13 Turning your camera on or off 14 Mini dashboard 14 Setting options 15 Taking photos 16 Zooming 16 Reducing camera shake 17 Using the Photo Help Guide mode 18 Changing the display type 19 Transferring files (for Windows 20 Installing programs 20 Connecting the camera to your PC 21 Transferring files to your PC 22 Transferring multimedia files to the camera ... 22 Using Samsung Converter 24 Using Samsung Master 25 Transferring fi...
Camera layout 11 Icons 13 Turning your camera on or off 14 Mini dashboard 14 Setting options 15 Taking photos 16 Zooming 16 Reducing camera shake 17 Using the Photo Help Guide mode 18 Changing the display type 19 Transferring files (for Windows 20 Installing programs 20 Connecting the camera to your PC 21 Transferring files to your PC 22 Transferring multimedia files to the camera ... 22 Using Samsung Converter 24 Using Samsung Master 25 Transferring fi...

User Manual
Page 12
Camera layout Shutter button Mode dial (See below) Microphone Flash Mini dashboard (p.14) POWER button Lens AF assist light/Timer lamp Multifunction jack Accepts USB, A/V cable, or earphones Tripod mount Battery chamber cover Insert a memory card and the battery Icon 2 Mode Auto Description Take a photo quickly and easily with minimal settings 1 Program Take a photo by setting options 7 8 Dual IS Photo Help Guide Take a photo with options suitable for reducing camera shake Get shooting tips and practice shooting Icon Mode Description 5 Beauty Shot Take a photo of a person ...
Camera layout Shutter button Mode dial (See below) Microphone Flash Mini dashboard (p.14) POWER button Lens AF assist light/Timer lamp Multifunction jack Accepts USB, A/V cable, or earphones Tripod mount Battery chamber cover Insert a memory card and the battery Icon 2 Mode Auto Description Take a photo quickly and easily with minimal settings 1 Program Take a photo by setting options 7 8 Dual IS Photo Help Guide Take a photo with options suitable for reducing camera shake Get shooting tips and practice shooting Icon Mode Description 5 Beauty Shot Take a photo of a person ...

User Manual
Page 14
... speed White balance Exposure Long time shutter Basic functions 13 A C B A. Information Icon Description Selected shooting mode Zoom ratio Available number of photos Available recording time Internal memory Memory card inserted : Fully charged : Charging needed : Partially charged Voice memo Auto focus frame Camera shake Current date and time B. Icons on the left Icon Description Face detection Photo style Color Flash Timer Auto focus Contrast Sharpness Voice Mute Saturation Optical Image Stabilization (OIS) C. Icons The icons displayed will change...
... speed White balance Exposure Long time shutter Basic functions 13 A C B A. Information Icon Description Selected shooting mode Zoom ratio Available number of photos Available recording time Internal memory Memory card inserted : Fully charged : Charging needed : Partially charged Voice memo Auto focus frame Camera shake Current date and time B. Icons on the left Icon Description Face detection Photo style Color Flash Timer Auto focus Contrast Sharpness Voice Mute Saturation Optical Image Stabilization (OIS) C. Icons The icons displayed will change...
User Manual
Page 22
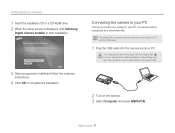
... [MENU/OK]. The battery will be charged while the camera is connected to complete the installation. If the cable is displayed, click Samsung Digital Camera Installer to start installation. 3 Select programs to install and follow the onscreen instructions. 4 Click OK to a PC with the indicator light (S) into the camera and your files. Transferring files (for any loss of the cable with the USB cable. 1 Plug the USB cable into your camera. Basic functions 21 Connecting the camera...
... [MENU/OK]. The battery will be charged while the camera is connected to complete the installation. If the cable is displayed, click Samsung Digital Camera Installer to start installation. 3 Select programs to install and follow the onscreen instructions. 4 Click OK to a PC with the indicator light (S) into the camera and your files. Transferring files (for any loss of the cable with the USB cable. 1 Plug the USB cable into your camera. Basic functions 21 Connecting the camera...

User Manual
Page 29
Adjusting the exposure If you select Nightscene, you can catch brief flashes of light as curved streaks by selecting the best shooting mode for the conditions. 2 Using the Auto mode Take a photo quickly and easily with minimal settings. 1 Rotate the mode dial to 2. 2 Align your subject in the frame and half-press [Shutter] to focus. 3 Press [Shutter] to take the photo. 6 Press [MENU/OK]. 7 Press [Shutter] to return to Shooting mode. 8 Align...
Adjusting the exposure If you select Nightscene, you can catch brief flashes of light as curved streaks by selecting the best shooting mode for the conditions. 2 Using the Auto mode Take a photo quickly and easily with minimal settings. 1 Rotate the mode dial to 2. 2 Align your subject in the frame and half-press [Shutter] to focus. 3 Press [Shutter] to take the photo. 6 Press [MENU/OK]. 7 Press [Shutter] to return to Shooting mode. 8 Align...

User Manual
Page 30
...; Hold your photos from blurring. . Before correction After correction 1 Rotate the mode dial to prevent your camera still while 'Capturing!' If you select AUTO, the aperture value or shutter speed will be adjusted automatically. 5 Press [MENU/OK]. is displayed on the screen. • The digital zoom will not work in this mode. • The photo will be corrected optically only when taken with Optical and Digital Image Stabilization functions.
...; Hold your photos from blurring. . Before correction After correction 1 Rotate the mode dial to prevent your camera still while 'Capturing!' If you select AUTO, the aperture value or shutter speed will be adjusted automatically. 5 Press [MENU/OK]. is displayed on the screen. • The digital zoom will not work in this mode. • The photo will be corrected optically only when taken with Optical and Digital Image Stabilization functions.
User Manual
Page 37
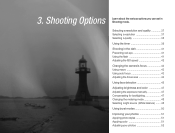
... 38 Using the timer 39 Shooting in Shooting mode. Shooting Options Learn about the various options you can set in the dark 41 Preventing red-eye 41 Using the flash 41 Adjusting the ISO speed 42 Changing the camera's focus 43 Using macro 43 Using auto focus 43 Adjusting the focus area 44 Using face detection 45 Adjusting brightness and color 47 Adjusting the exposure manually 47 Compensating for backlighting 47 Changing the metering mode 48 Selecting a light source (White balance) ....... 48 Using burst modes...
... 38 Using the timer 39 Shooting in Shooting mode. Shooting Options Learn about the various options you can set in the dark 41 Preventing red-eye 41 Using the flash 41 Adjusting the ISO speed 42 Changing the camera's focus 43 Using macro 43 Using auto focus 43 Adjusting the focus area 44 Using face detection 45 Adjusting brightness and color 47 Adjusting the exposure manually 47 Compensating for backlighting 47 Changing the metering mode 48 Selecting a light source (White balance) ....... 48 Using burst modes...
User Manual
Page 67
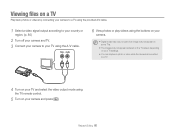
... using the A/V cable. 6 View photos or play videos using the buttons on your camera. • Digital noise may occur or part of an image may not appear on some TVs. • The images may not appear centered on the TV screen depending on your TV settings. • You can capture a photo or video while the camera is connected to a TV. 4 Turn on your TV and select the video output mode using the TV remote control. 5 Turn...
... using the A/V cable. 6 View photos or play videos using the buttons on your camera. • Digital noise may occur or part of an image may not appear on some TVs. • The images may not appear centered on the TV screen depending on your TV settings. • You can capture a photo or video while the camera is connected to a TV. 4 Turn on your TV and select the video output mode using the TV remote control. 5 Turn...

User Manual
Page 72
... the MP3 mode and play a file. (p. 69) File name Volume Icon AAA Description MP3 mode Remaining battery capacity Buttons locked Equalizer type Muted Play time Bit rate Play mode 2 Use the following buttons to the complexity of the encoded audio. Press To [Zoom] up or down Adjust volume [E] Change the equalizer type [w] Mute or unmute sound [e] Skip backward [t] Skip forward [MENU/OK] Change the MP3 mode settings [r] Pause or resume playback [y] • Open the playlist...
... the MP3 mode and play a file. (p. 69) File name Volume Icon AAA Description MP3 mode Remaining battery capacity Buttons locked Equalizer type Muted Play time Bit rate Play mode 2 Use the following buttons to the complexity of the encoded audio. Press To [Zoom] up or down Adjust volume [E] Change the equalizer type [w] Mute or unmute sound [e] Skip backward [t] Skip forward [MENU/OK] Change the MP3 mode settings [r] Pause or resume playback [y] • Open the playlist...
User Manual
Page 80
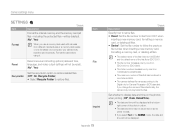
... the card incorrectly. Reset menus and shooting options (date and time, File Reset language, and video output settings will not be reset). (No*, Yes) Recycle Bin Set the recycle bin option or restore deleted files. (Off*, On, Recycle Folder) • Select Recycle Folder to the Digital rule for Camera File system (DCF) standard. If you change the names of files intentionally, the camera may not be printed on some printer models...
... the card incorrectly. Reset menus and shooting options (date and time, File Reset language, and video output settings will not be reset). (No*, Yes) Recycle Bin Set the recycle bin option or restore deleted files. (Off*, On, Recycle Folder) • Select Recycle Folder to the Digital rule for Camera File system (DCF) standard. If you change the names of files intentionally, the camera may not be printed on some printer models...
User Manual
Page 86
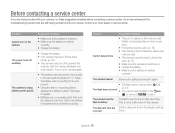
... memory card. • The memory card is not a malfunction of 4 modes. This is locked. Situation Cannot take photos Suggested remedies • There is no space on the camera The power turns off suddenly The camera is inserted correctly. The camera freezes Remove the battery and insert it into your pocket. • Using the flash or recording videos depletes the battery quickly. Before contacting a service center If you have attempted the troubleshooting solution...
... memory card. • The memory card is not a malfunction of 4 modes. This is locked. Situation Cannot take photos Suggested remedies • There is no space on the camera The power turns off suddenly The camera is inserted correctly. The camera freezes Remove the battery and insert it into your pocket. • Using the flash or recording videos depletes the battery quickly. Before contacting a service center If you have attempted the troubleshooting solution...

User Manual
Page 88
... Shooting mode Playback mode White Balance • Photo style: Normal, Soft, Vivid, Forest, Retro, Cool, Calm, Classic • Color effect: Normal, B/W, Sepia, Red, Green, Blue, Negative, Custom Color • Image adjust: Sharpness, Saturation, Contrast • Image edit: Resize, Rotate, Trimming • Color effect: B/W, Sepia, Red, Green, Blue, Negative, Custom Color • Image adjust: ACB, Red Eye Fix, Face Retouch, Brightness, Contrast, Saturation Auto WB, Daylight, Cloudy, Fluorescent_H, Fluorescent_L, Tungsten, Measure : SH Appendix 87 Camera speci...
... Shooting mode Playback mode White Balance • Photo style: Normal, Soft, Vivid, Forest, Retro, Cool, Calm, Classic • Color effect: Normal, B/W, Sepia, Red, Green, Blue, Negative, Custom Color • Image adjust: Sharpness, Saturation, Contrast • Image edit: Resize, Rotate, Trimming • Color effect: B/W, Sepia, Red, Green, Blue, Negative, Custom Color • Image adjust: ACB, Red Eye Fix, Face Retouch, Brightness, Contrast, Saturation Auto WB, Daylight, Cloudy, Fluorescent_H, Fluorescent_L, Tungsten, Measure : SH Appendix 87 Camera speci...

User Manual
Page 92
...-assist light 11 AF lamp 80 AF sound 78 Aperture value 28 Auto Contrast Balance 47, 62 Auto mode 28 B Battery Charging 84 Life 84 Specifications 84 Battery gauge 14 Beauty Shot mode 30 Blink Detection 46 Brightness Display 78 Photo 63 Burst Auto Exposure Bracket (AEB) 50 Continuous 50 Motion capture 50 C Camera shake 17 Capturing an image 60 Cleaning Camera body 82 Display 82 Lens 82 Color effects 51, 61 D Date and time...
...-assist light 11 AF lamp 80 AF sound 78 Aperture value 28 Auto Contrast Balance 47, 62 Auto mode 28 B Battery Charging 84 Life 84 Specifications 84 Battery gauge 14 Beauty Shot mode 30 Blink Detection 46 Brightness Display 78 Photo 63 Burst Auto Exposure Bracket (AEB) 50 Continuous 50 Motion capture 50 C Camera shake 17 Capturing an image 60 Cleaning Camera body 82 Display 82 Lens 82 Color effects 51, 61 D Date and time...

User Manual
Page 93
... mode 74 Muting sound Camera 14 Video 32 N Navigation buttons 12 O Optical Image Stabilization (OIS) 33 P Photo Help Guide mode 18 Photo styles 51 Playback mode 14 PMP mode 73 Power button 11 Power save mode 80 Printing photos 67 Date print 67 File name 67 Images 67 Layout 67 Quality 67 Reset 67 Size 67 Appendix 92 Type 67 Print order 63 Program mode 31 Protecting files 56 Q Quality 38 Quick View 78 R Recording Video 32 Voice memo 35 Recycle bin 57 Red-eye...
... mode 74 Muting sound Camera 14 Video 32 N Navigation buttons 12 O Optical Image Stabilization (OIS) 33 P Photo Help Guide mode 18 Photo styles 51 Playback mode 14 PMP mode 73 Power button 11 Power save mode 80 Printing photos 67 Date print 67 File name 67 Images 67 Layout 67 Quality 67 Reset 67 Size 67 Appendix 92 Type 67 Print order 63 Program mode 31 Protecting files 56 Q Quality 38 Quick View 78 R Recording Video 32 Voice memo 35 Recycle bin 57 Red-eye...

User Manual
Page 94
... Sound 78 Shooting mode Auto mode 28 Beauty Shot mode 30 Dual IS mode 29 Movie mode 32 Program mode 31 Scene mode 28 Shutter button 11 Shutter speed 28 Smile Shot 45 Start image 78 User image 65 Status lamp 12 T Text Viewer mode 74 Timer 39 10 Sec 39 2 Sec 39 Double 39 Motion Timer 39 Off 39 Timer lamp 11 Transferring files Mac 26 Windows 20 Tripod mount 11 V Video Playing 60 Recording 35 Video signal output 80 Viewing...
... Sound 78 Shooting mode Auto mode 28 Beauty Shot mode 30 Dual IS mode 29 Movie mode 32 Program mode 31 Scene mode 28 Shutter button 11 Shutter speed 28 Smile Shot 45 Start image 78 User image 65 Status lamp 12 T Text Viewer mode 74 Timer 39 10 Sec 39 2 Sec 39 Double 39 Motion Timer 39 Off 39 Timer lamp 11 Transferring files Mac 26 Windows 20 Tripod mount 11 V Video Playing 60 Recording 35 Video signal output 80 Viewing...


