Quick Guide (easy Manual) (ver.1.0) (English)
Page 5
... unit. • The latest firmware upgrade to a VCR results in a distorted picture from our web site. (Download Center at www.samsung.com/ca) • If disc compatibility problems continue, or there is used for home and other limited viewing uses only unless otherwise authorized by this , you to VR Mode when first initialized. • DVD-RW (VR mode) - Connecting to improve recording & playback quality can record multiple titles, edit, delete...
... unit. • The latest firmware upgrade to a VCR results in a distorted picture from our web site. (Download Center at www.samsung.com/ca) • If disc compatibility problems continue, or there is used for home and other limited viewing uses only unless otherwise authorized by this , you to VR Mode when first initialized. • DVD-RW (VR mode) - Connecting to improve recording & playback quality can record multiple titles, edit, delete...

Quick Guide (easy Manual) (ver.1.0) (English)
Page 6
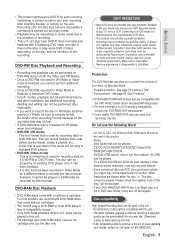
...(Display) Setting 41 Parental Control 42 Recording Before Recording 45 Recordable discs 45 Recording Formats 46 Record Mode 46 Unrecordable video 46 6 - Getting Started Contents Getting Started Warning 2 Precaution 3 Important Safety Instructions 3 Handling Cautions 3 Maintenance of Cabinet 3 Disc Handling 3 Disc Storage 4 Disc Specifications 4 General Features 8 Before Reading the Instruction Manual 9 How to use the DVD Recorder 9 Description 11 Front Panel 11 Front Panel Display 11 Rear Panel 12 Unpacking 12 Accessories 12 Tour of the Remote Control 13 Connecting...
...(Display) Setting 41 Parental Control 42 Recording Before Recording 45 Recordable discs 45 Recording Formats 46 Record Mode 46 Unrecordable video 46 6 - Getting Started Contents Getting Started Warning 2 Precaution 3 Important Safety Instructions 3 Handling Cautions 3 Maintenance of Cabinet 3 Disc Handling 3 Disc Storage 4 Disc Specifications 4 General Features 8 Before Reading the Instruction Manual 9 How to use the DVD Recorder 9 Description 11 Front Panel 11 Front Panel Display 11 Rear Panel 12 Unpacking 12 Accessories 12 Tour of the Remote Control 13 Connecting...
Quick Guide (easy Manual) (ver.1.0) (English)
Page 7
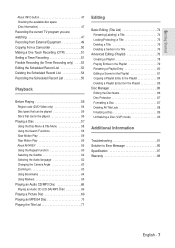
... Setting a Timer Recording 51 Flexible Recording (for Timer Recording only) . . . .53 Editing the Scheduled Record List 53 Deleting the Scheduled Record List 54 Recording the Scheduled Record List 55 Playback Before Playing 56 Region code (DVD-Video only 56 Disc types that can be played 56 Discs that cannot be played 56 Playing a Disc 57 Using the Disc Menu & Title Menu 58 Using the Search Functions 58 Slow Motion Play 59 Step Motion Play 59 About ANYKEY 59 Using the Repeat Function 60 Selecting the Subtitle 62 Selecting the Audio language 62 Changing...
... Setting a Timer Recording 51 Flexible Recording (for Timer Recording only) . . . .53 Editing the Scheduled Record List 53 Deleting the Scheduled Record List 54 Recording the Scheduled Record List 55 Playback Before Playing 56 Region code (DVD-Video only 56 Disc types that can be played 56 Discs that cannot be played 56 Playing a Disc 57 Using the Disc Menu & Title Menu 58 Using the Search Functions 58 Slow Motion Play 59 Step Motion Play 59 About ANYKEY 59 Using the Repeat Function 60 Selecting the Subtitle 62 Selecting the Audio language 62 Changing...

Quick Guide (easy Manual) (ver.1.0) (English)
Page 9
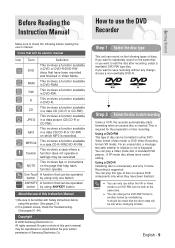
...). One-Touch A function that help each function operate. This is supported. s You can play a Video mode disc in DVD or DVD-R/DVD-RW discs that will be lost when changing formats. MP3 This involves a function available in either the VR or Video mode on which MP3 is displayed. All rights reserved; NOTE s You can record on the following before using this user's manual may be operated button by using only one button. Before Reading the Instruction Manual Make sure to be...
...). One-Touch A function that help each function operate. This is supported. s You can play a Video mode disc in DVD or DVD-R/DVD-RW discs that will be lost when changing formats. MP3 This involves a function available in either the VR or Video mode on which MP3 is displayed. All rights reserved; NOTE s You can record on the following before using this user's manual may be operated button by using only one button. Before Reading the Instruction Manual Make sure to be...
Quick Guide (easy Manual) (ver.1.0) (English)
Page 13
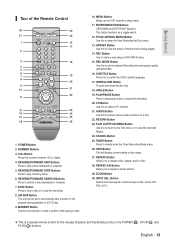
... input signal in external input mode. (Tuner, AV1, AV2 or DV) ❋ This is being played. 14. CM SKIP Button The unit can be set the desired Recording time and picture quality. (XP/SP/LP/EP) 16. MARKER Button Use this to repeat a title, chapter, track or disc. 28. OPEN/CLOSE Button To open and close the disc tray. 18. ANGLE Button 19. English - 13 TIMER Button Press to stop the recording. 8. REPEAT A-B Button Allows you to select a TV channel. 21. POWER Button 2. REVERSE/FORWARD...
... input signal in external input mode. (Tuner, AV1, AV2 or DV) ❋ This is being played. 14. CM SKIP Button The unit can be set the desired Recording time and picture quality. (XP/SP/LP/EP) 16. MARKER Button Use this to repeat a title, chapter, track or disc. 28. OPEN/CLOSE Button To open and close the disc tray. 18. ANGLE Button 19. English - 13 TIMER Button Press to stop the recording. 8. REPEAT A-B Button Allows you to select a TV channel. 21. POWER Button 2. REVERSE/FORWARD...

Quick Guide (easy Manual) (ver.1.0) (English)
Page 31
... Stop mode/No Disc mode, press the MENU button. System Setup Clock Set Channel Set Language Audio Video Parental Control MOVE ENTER RETURN Setup EXIT System Setup 2 Press a number button to set " on conditions such as the disc type and whether the disc has been inserted or not. 1. See "Manual Clock set the current time. Initial Setup Auto Clock Set If you press the POWER button, the screen shown below appears. 1 Press the POWER button. OSD Language Setup After plugging in the recorder, the first time you connected an external Audio System, turn the power...
... Stop mode/No Disc mode, press the MENU button. System Setup Clock Set Channel Set Language Audio Video Parental Control MOVE ENTER RETURN Setup EXIT System Setup 2 Press a number button to set " on conditions such as the disc type and whether the disc has been inserted or not. 1. See "Manual Clock set the current time. Initial Setup Auto Clock Set If you press the POWER button, the screen shown below appears. 1 Press the POWER button. OSD Language Setup After plugging in the recorder, the first time you connected an external Audio System, turn the power...

Quick Guide (easy Manual) (ver.1.0) (English)
Page 32
Setup Select channel : Clock Data CH ... Auto Clock Set Setup Manual Clock Set Clock set is powered off, the current time will appear in the front panel display. DVD-Recorder No Disc Timer Rec. DVD-Recorder No Disc Timer Rec. When the current time is stored in page 31. 4 Select Manual Clock Set using the number (0~9) buttons. œ √: Moves to items MOVE ENTER RETURN EXIT 32 - Clock Data CH Setup Time Zone Daylight Saving Auto Clock Set : Automatic √ : Automatic √ Automatic Yes No Manual Clock Set If your area using the ...†...
Setup Select channel : Clock Data CH ... Auto Clock Set Setup Manual Clock Set Clock set is powered off, the current time will appear in the front panel display. DVD-Recorder No Disc Timer Rec. DVD-Recorder No Disc Timer Rec. When the current time is stored in page 31. 4 Select Manual Clock Set using the number (0~9) buttons. œ √: Moves to items MOVE ENTER RETURN EXIT 32 - Clock Data CH Setup Time Zone Daylight Saving Auto Clock Set : Automatic √ : Automatic √ Automatic Yes No Manual Clock Set If your area using the ...†...

Quick Guide (easy Manual) (ver.1.0) (English)
Page 40
...Setup Clock Set Channel Set Language Audio Video Parental Control MOVE ENTER RETURN Setup EXIT 4 Select the sub menu(Audio, Subtitle, Disc Menu, On-Screen Menu) and press the ENTER or √ button using the ...† buttons. • Audio : For the disc audio language. • Subtitle : For the disc subtitles. • Disc Menu : For the disc menu contained on the remote control. s The selected language will be displayed. DVD-Recorder DVD-RW(VR) Title List CM Skip Time Playlist EP Mode Time Disc Manager Chapter Creator Quick Recording Timer Rec. English Language...
...Setup Clock Set Channel Set Language Audio Video Parental Control MOVE ENTER RETURN Setup EXIT 4 Select the sub menu(Audio, Subtitle, Disc Menu, On-Screen Menu) and press the ENTER or √ button using the ...† buttons. • Audio : For the disc audio language. • Subtitle : For the disc subtitles. • Disc Menu : For the disc menu contained on the remote control. s The selected language will be displayed. DVD-Recorder DVD-RW(VR) Title List CM Skip Time Playlist EP Mode Time Disc Manager Chapter Creator Quick Recording Timer Rec. English Language...

Quick Guide (easy Manual) (ver.1.0) (English)
Page 42
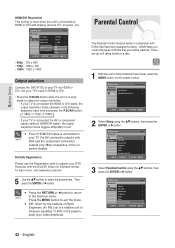
... Output selection Connect the DVD-R135 to your TV's input to select the desired item. Timer Record √ Setup Scheduled Record List √ MOVE ENTER RETURN EXIT 2 Select Setup using the ...† buttons, then press the ENTER or √ button. DVD-Recorder No Disc Timer Rec. System Setup HDMI/DVI Resolution This setting is used when the unit is connected by HDMI or DVI with the DivX(R) Video On Demand format. Parental Control The Parental Control function works in Stop mode/No Disc mode, press the MENU button on screen display. System Setup Clock Set Channel...
... Output selection Connect the DVD-R135 to your TV's input to select the desired item. Timer Record √ Setup Scheduled Record List √ MOVE ENTER RETURN EXIT 2 Select Setup using the ...† buttons, then press the ENTER or √ button. DVD-Recorder No Disc Timer Rec. System Setup HDMI/DVI Resolution This setting is used when the unit is connected by HDMI or DVI with the DivX(R) Video On Demand format. Parental Control The Parental Control function works in Stop mode/No Disc mode, press the MENU button on screen display. System Setup Clock Set Channel...

Quick Guide (easy Manual) (ver.1.0) (English)
Page 91
... power cord is no response. Troubleshooting 91 Solutions to initialize and the input will be displayed for approx. 10 seconds after it cannot be recorded. If a program is copy protected, it is displayed for DVD-RW/ DVD-R discs only. Power The input is turned on . Additional Information Troubleshooting If your DVDRW/DVD-R discs. English - 91 Additional Information Checkpoint 1 The DVD recorder requires some time to Error Message 95 Specification 97 Warranty 98 I pressed the REC button...
... power cord is no response. Troubleshooting 91 Solutions to initialize and the input will be displayed for approx. 10 seconds after it cannot be recorded. If a program is copy protected, it is displayed for DVD-RW/ DVD-R discs only. Power The input is turned on . Additional Information Troubleshooting If your DVDRW/DVD-R discs. English - 91 Additional Information Checkpoint 1 The DVD recorder requires some time to Error Message 95 Specification 97 Warranty 98 I pressed the REC button...

Quick Guide (easy Manual) (ver.1.0) (English)
Page 94
... is played with only the subtitle and the audio signal which were selected during recording. All settings including the password will revert to change a subtitle and an audio signal on a recorded disc? Checkpoint 1 A recorded disc is converted from 50Hz to the user's manual of contents and then find and read the section describing your TV. Please refer to 60Hz for 720p/1080i HDMI (High Definition Multimedia Interface) Output. Allow for parental supervision. Remove...
... is played with only the subtitle and the audio signal which were selected during recording. All settings including the password will revert to change a subtitle and an audio signal on a recorded disc? Checkpoint 1 A recorded disc is converted from 50Hz to the user's manual of contents and then find and read the section describing your TV. Please refer to 60Hz for 720p/1080i HDMI (High Definition Multimedia Interface) Output. Allow for parental supervision. Remove...

User Manual (user Manual) (ver.1.0) (English)
Page 5
... regional code of certain U.S. For this unit. • The latest firmware upgrade to record the disc in VR Mode and then record in a distorted picture from our web site. (Download Center at www.samsung.com) • If disc compatibility problems continue, or there is recorded in most DVD players due to VR Mode when first initialized. • DVD-RW (VR mode) - When these discs are encoded with a Samsung DVD video recorder. This is a format that is used...
... regional code of certain U.S. For this unit. • The latest firmware upgrade to record the disc in VR Mode and then record in a distorted picture from our web site. (Download Center at www.samsung.com) • If disc compatibility problems continue, or there is recorded in most DVD players due to VR Mode when first initialized. • DVD-RW (VR mode) - When these discs are encoded with a Samsung DVD video recorder. This is a format that is used...
User Manual (user Manual) (ver.1.0) (English)
Page 6
...(Display) Setting 41 Parental Control 42 Recording Before Recording 45 Recordable discs 45 Recording Formats 46 Record Mode 46 Unrecordable video 46 6 - Getting Started Contents Getting Started Warning 2 Precaution 3 Important Safety Instructions 3 Handling Cautions 3 Maintenance of Cabinet 3 Disc Handling 3 Disc Storage 4 Disc Specifications 4 General Features 8 Before Reading the Instruction Manual 9 How to use the DVD Recorder 9 Description 11 Front Panel 11 Front Panel Display 11 Rear Panel 12 Unpacking 12 Accessories 12 Tour of the Remote Control 13 Connecting...
...(Display) Setting 41 Parental Control 42 Recording Before Recording 45 Recordable discs 45 Recording Formats 46 Record Mode 46 Unrecordable video 46 6 - Getting Started Contents Getting Started Warning 2 Precaution 3 Important Safety Instructions 3 Handling Cautions 3 Maintenance of Cabinet 3 Disc Handling 3 Disc Storage 4 Disc Specifications 4 General Features 8 Before Reading the Instruction Manual 9 How to use the DVD Recorder 9 Description 11 Front Panel 11 Front Panel Display 11 Rear Panel 12 Unpacking 12 Accessories 12 Tour of the Remote Control 13 Connecting...

User Manual (user Manual) (ver.1.0) (English)
Page 7
... Setting a Timer Recording 51 Flexible Recording (for Timer Recording only) . . . .53 Editing the Scheduled Record List 53 Deleting the Scheduled Record List 54 Recording the Scheduled Record List 55 Playback Before Playing 56 Region code (DVD-Video only 56 Disc types that can be played 56 Discs that cannot be played 56 Playing a Disc 57 Using the Disc Menu & Title Menu 58 Using the Search Functions 58 Slow Motion Play 59 Step Motion Play 59 About ANYKEY 59 Using the Repeat Function 60 Selecting the Subtitle 62 Selecting the Audio language 62 Changing...
... Setting a Timer Recording 51 Flexible Recording (for Timer Recording only) . . . .53 Editing the Scheduled Record List 53 Deleting the Scheduled Record List 54 Recording the Scheduled Record List 55 Playback Before Playing 56 Region code (DVD-Video only 56 Disc types that can be played 56 Discs that cannot be played 56 Playing a Disc 57 Using the Disc Menu & Title Menu 58 Using the Search Functions 58 Slow Motion Play 59 Step Motion Play 59 About ANYKEY 59 Using the Repeat Function 60 Selecting the Subtitle 62 Selecting the Audio language 62 Changing...
User Manual (user Manual) (ver.1.0) (English)
Page 9
... user's manual. Using a DVD-R Initializing disc is unnecessary and only V mode Recording is displayed. Before Reading the Instruction Manual Make sure to check the following types of discs. How to use of this user's manual may be operated button by using this type of disc on various DVD components only when they have been recorded and finalized in either the VR or Video mode on the following before using ANYKEY button. About the use the DVD Recorder Step 1 Select the disc type This unit can play...
... user's manual. Using a DVD-R Initializing disc is unnecessary and only V mode Recording is displayed. Before Reading the Instruction Manual Make sure to check the following types of discs. How to use of this user's manual may be operated button by using this type of disc on various DVD components only when they have been recorded and finalized in either the VR or Video mode on the following before using ANYKEY button. About the use the DVD Recorder Step 1 Select the disc type This unit can play...

User Manual (user Manual) (ver.1.0) (English)
Page 13
... repeat a certain section. 29. Button Selects line input signal in external input mode. (Tuner, AV1, AV2 or DV) ❋ This is being played. 14. POWER Button 2. REVERSE/FORWARD SEARCH Buttons Press to access various audio functions on a disc. 22. ENTER/DIRECTION Buttons (UP/DOWN and LEFT/RIGHT Buttons) This button functions as a toggle switch. 12. TITLE LIST/DISC MENU Button Use this to repeat a title, chapter, track or disc. 28. ANYKEY Button Use this to select channel 100 or higher. 4. OPEN/CLOSE Button To open and close the disc tray. 18. REPEAT A-B Button...
... repeat a certain section. 29. Button Selects line input signal in external input mode. (Tuner, AV1, AV2 or DV) ❋ This is being played. 14. POWER Button 2. REVERSE/FORWARD SEARCH Buttons Press to access various audio functions on a disc. 22. ENTER/DIRECTION Buttons (UP/DOWN and LEFT/RIGHT Buttons) This button functions as a toggle switch. 12. TITLE LIST/DISC MENU Button Use this to repeat a title, chapter, track or disc. 28. ANYKEY Button Use this to select channel 100 or higher. 4. OPEN/CLOSE Button To open and close the disc tray. 18. REPEAT A-B Button...

User Manual (user Manual) (ver.1.0) (English)
Page 31
... Timer Record No Disc Timer Rec. System Setup Clock Set Channel Set Language Audio Video Parental Control MOVE ENTER RETURN Setup EXIT System Setup 2 Press a number button to set the current time. Auto Clock Set Setup Manual Clock Set Clock Set √ √ MOVE ENTER RETURN EXIT 4 Select Auto Clock Set using the ...† buttons, then press the ENTER or √ button. The menus described on the next few pages are not available during playback or recording. Press 1 for the startup screen is not set the Auto Clock. NOTE I If the language for English...
... Timer Record No Disc Timer Rec. System Setup Clock Set Channel Set Language Audio Video Parental Control MOVE ENTER RETURN Setup EXIT System Setup 2 Press a number button to set the current time. Auto Clock Set Setup Manual Clock Set Clock Set √ √ MOVE ENTER RETURN EXIT 4 Select Auto Clock Set using the ...† buttons, then press the ENTER or √ button. The menus described on the next few pages are not available during playback or recording. Press 1 for the startup screen is not set the Auto Clock. NOTE I If the language for English...

User Manual (user Manual) (ver.1.0) (English)
Page 40
... automatically every time you set to Off as NOTE default. If the selected language is not recorded on the remote control. English Language Setting 3 Select Language using the ...† buttons, then press the ENTER or √ button. System Setup Clock Set Channel Set Language Audio Video Parental Control MOVE ENTER RETURN Setup EXIT DVD-Recorder Language No Disc Timer Rec. System Setup Clock Set Channel Set Language Audio Video Parental Control MOVE ENTER RETURN Setup EXIT 4 Select the sub menu(Audio, Subtitle, Disc Menu, On-Screen Menu) and press...
... automatically every time you set to Off as NOTE default. If the selected language is not recorded on the remote control. English Language Setting 3 Select Language using the ...† buttons, then press the ENTER or √ button. System Setup Clock Set Channel Set Language Audio Video Parental Control MOVE ENTER RETURN Setup EXIT DVD-Recorder Language No Disc Timer Rec. System Setup Clock Set Channel Set Language Audio Video Parental Control MOVE ENTER RETURN Setup EXIT 4 Select the sub menu(Audio, Subtitle, Disc Menu, On-Screen Menu) and press...
User Manual (user Manual) (ver.1.0) (English)
Page 42
... connected the HDMI or DVI cable, the output resolution mode changes in stop mode to register your TV, the AV connection outputs only NOTE 480i and the component connection outputs only 480p irrespective of the peak-topeak (p-p) video amplitude. NOTE Press the MENU button to select the desired item. DVD-Recorder No Disc Timer Rec. If your TV via HDMI or DVI. Parental Control The Parental Control function works in Stop mode/No Disc mode, press the MENU button on screen display. I Press the RETURN or œ button...
... connected the HDMI or DVI cable, the output resolution mode changes in stop mode to register your TV, the AV connection outputs only NOTE 480i and the component connection outputs only 480p irrespective of the peak-topeak (p-p) video amplitude. NOTE Press the MENU button to select the desired item. DVD-Recorder No Disc Timer Rec. If your TV via HDMI or DVI. Parental Control The Parental Control function works in Stop mode/No Disc mode, press the MENU button on screen display. I Press the RETURN or œ button...

User Manual (user Manual) (ver.1.0) (English)
Page 94
... no disc is played with only the subtitle and the audio signal which were selected during recording. Please refer to change a subtitle and an audio signal on . Check whether the batteries are empty. English All settings including the password will revert to 60Hz for 720p/1080i HDMI (High Definition Multimedia Interface) Output. Other problems Checkpoint 1 Checkpoint 2 Checkpoint 3 Read the table of your DVD recorder. Checkpoint 1 A recorded disc is inserted.) Remote Control Unit The remote control doesn't work. Screen Jitter...
... no disc is played with only the subtitle and the audio signal which were selected during recording. Please refer to change a subtitle and an audio signal on . Check whether the batteries are empty. English All settings including the password will revert to 60Hz for 720p/1080i HDMI (High Definition Multimedia Interface) Output. Other problems Checkpoint 1 Checkpoint 2 Checkpoint 3 Read the table of your DVD recorder. Checkpoint 1 A recorded disc is inserted.) Remote Control Unit The remote control doesn't work. Screen Jitter...


