Quick Guide (easy Manual) (ver.1.0) (English)
Page 2
...that is designed and manufactured to respond to other equipment. English This symbol indicates important instructions accompanying the product. DO NOT OPEN COVERS AND DO NOT REPAIR YOURSELF. REFER SERVICING TO QUALIFIED PERSONNEL. Do not install this equipment in fire or electric shock... hazard, do not expose this DVD Recorder, the DVD Recorder cannot play the disc. CAUTION : DVD RECORDERS USE AN INVISIBLE LASER BEAM WHICH CAN CAUSE HAZARDOUS RADIATION EXPOSURE IF DIRECTED. This product satisfies...
...that is designed and manufactured to respond to other equipment. English This symbol indicates important instructions accompanying the product. DO NOT OPEN COVERS AND DO NOT REPAIR YOURSELF. REFER SERVICING TO QUALIFIED PERSONNEL. Do not install this equipment in fire or electric shock... hazard, do not expose this DVD Recorder, the DVD Recorder cannot play the disc. CAUTION : DVD RECORDERS USE AN INVISIBLE LASER BEAM WHICH CAN CAUSE HAZARDOUS RADIATION EXPOSURE IF DIRECTED. This product satisfies...

Quick Guide (easy Manual) (ver.1.0) (English)
Page 3
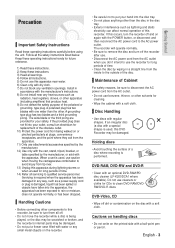
...the disc with the manufacturer's instructions. 8) Do not install near water. 6) Clean only with dry cloth. 7) Do not block any ventilation openings, Install in any heat sources such as a power-supply cord or plug is damaged, liquid has been spilled or objects have fallen into ...disc and turn them all the safety instructions listed below. Keep these operating instructions carefully before using the unit. DVD-RAM, DVD-RW and DVD-R • Clean with an optional DVD-RAM/PD disc cleaner (LF-K200DCA1 where available). The recorder will operate normally. • Be sure to rain...
...the disc with the manufacturer's instructions. 8) Do not install near water. 6) Clean only with dry cloth. 7) Do not block any ventilation openings, Install in any heat sources such as a power-supply cord or plug is damaged, liquid has been spilled or objects have fallen into ...disc and turn them all the safety instructions listed below. Keep these operating instructions carefully before using the unit. DVD-RAM, DVD-RW and DVD-R • Clean with an optional DVD-RAM/PD disc cleaner (LF-K200DCA1 where available). The recorder will operate normally. • Be sure to rain...

Quick Guide (easy Manual) (ver.1.0) (English)
Page 11
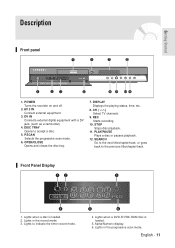
...) 4. Front Panel Display 1. Lights to the previous title/chapter/track. REC Starts recording. 10. STOP Stops disc playback. 11. Lights when a DVD-R/-RW/-RAM disc is loaded. 2. English - 11 OPEN/CLOSE Opens and closes the disc tray. 7. Lights in the progressive scan mode. Alpha/Numeric display. 6. DISPLAY Displays the playing status, time, etc...
...) 4. Front Panel Display 1. Lights to the previous title/chapter/track. REC Starts recording. 10. STOP Stops disc playback. 11. Lights when a DVD-R/-RW/-RAM disc is loaded. 2. English - 11 OPEN/CLOSE Opens and closes the disc tray. 7. Lights in the progressive scan mode. Alpha/Numeric display. 6. DISPLAY Displays the playing status, time, etc...
Quick Guide (easy Manual) (ver.1.0) (English)
Page 13
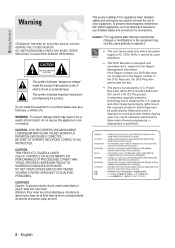
REVERSE/FORWARD SKIP Buttons Press to make a recording on DVD-RW/-R discs. 15. CM SKIP Button The unit can be set the desired Recording time and picture... ANGLE Button 19. PLAY/PAUSE Button Press to select a TV channel. 21. MENU Button Brings up the DVD recorder's setup menu. 11. OPEN/CLOSE Button To open and close the disc tray. 18. ANYKEY Button Use this to play frame by frame. 6. CH Button Use... AUDIO Button Use this to search a disc backwards or forwards. 7. REPEAT Button Allows you to switch the DVD's subtitle language. 17. Getting Started Tour of...
REVERSE/FORWARD SKIP Buttons Press to make a recording on DVD-RW/-R discs. 15. CM SKIP Button The unit can be set the desired Recording time and picture... ANGLE Button 19. PLAY/PAUSE Button Press to select a TV channel. 21. MENU Button Brings up the DVD recorder's setup menu. 11. OPEN/CLOSE Button To open and close the disc tray. 18. ANYKEY Button Use this to play frame by frame. 6. CH Button Use... AUDIO Button Use this to search a disc backwards or forwards. 7. REPEAT Button Allows you to switch the DVD's subtitle language. 17. Getting Started Tour of...

Quick Guide (easy Manual) (ver.1.0) (English)
Page 29
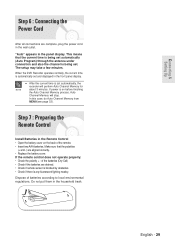
In this case, do Auto Channel Memory from MENU(see page 33). English - 29 Connecting & Setting Up When the DVD Recorder operates normally, the current time is on the back of the remote. • Insert two AAA batteries. Dispose of the batteries (Dry-Cell) •... if remote sensor is blocked by obstacles. • Check if there is any fluorescent lighting nearby. Do not put them in the Remote Control • Open the battery cover on before finishing the Auto Channel Memory process, Auto Channel Memory will perform Auto Channel Memory for about 3 minutes. Step 6 : Connecting...
In this case, do Auto Channel Memory from MENU(see page 33). English - 29 Connecting & Setting Up When the DVD Recorder operates normally, the current time is on the back of the remote. • Insert two AAA batteries. Dispose of the batteries (Dry-Cell) •... if remote sensor is blocked by obstacles. • Check if there is any fluorescent lighting nearby. Do not put them in the Remote Control • Open the battery cover on before finishing the Auto Channel Memory process, Auto Channel Memory will perform Auto Channel Memory for about 3 minutes. Step 6 : Connecting...

Quick Guide (easy Manual) (ver.1.0) (English)
Page 47
... recording. Adjust the recording mode. Depending on the disc tray. 2 Press the OPEN/CLOSE button to close the disc tray. Items in the BCA(Burst Cutting Area). Yes No English - 47 DVD-RW If an unused DVD-RW disc is inserted, you to view the current status and progress of the... your selection using the œ √ buttons, then press ENTER.(See page 46) Uninitialized Disc Do you can be decryptable. Each blank recordable DVD has a unique 64-bit media ID etched in the display differ depending on the disc type or the recording format. ! About the INFO button Recording...
... recording. Adjust the recording mode. Depending on the disc tray. 2 Press the OPEN/CLOSE button to close the disc tray. Items in the BCA(Burst Cutting Area). Yes No English - 47 DVD-RW If an unused DVD-RW disc is inserted, you to view the current status and progress of the... your selection using the œ √ buttons, then press ENTER.(See page 46) Uninitialized Disc Do you can be decryptable. Each blank recordable DVD has a unique 64-bit media ID etched in the display differ depending on the disc type or the recording format. ! About the INFO button Recording...
Quick Guide (easy Manual) (ver.1.0) (English)
Page 49
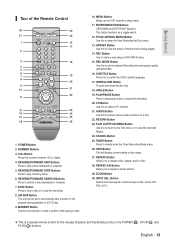
...on the disc tray. 2 Press the OPEN/CLOSE button to select the recording speed(quality). © SP © LP © EP © XP Record Mode XP (01:11) Recording English - 49 is no free space left for recording. s Do not use DVD-R authoring discs with this disc?" button ... the INPUT SEL. s Recording will stop automatically if there is displayed. Most new discs are sold unformatted. If you made. If an unused DVD-RW disc is selected. Please wait for the recording. will stop or finish recording in the following sequence: © Channel Number © AV1...
...on the disc tray. 2 Press the OPEN/CLOSE button to select the recording speed(quality). © SP © LP © EP © XP Record Mode XP (01:11) Recording English - 49 is no free space left for recording. s Do not use DVD-R authoring discs with this disc?" button ... the INPUT SEL. s Recording will stop automatically if there is displayed. Most new discs are sold unformatted. If you made. If an unused DVD-RW disc is selected. Please wait for the recording. will stop or finish recording in the following sequence: © Channel Number © AV1...
Quick Guide (easy Manual) (ver.1.0) (English)
Page 50
... the information of the screen using the œ √ buttons, then press the ENTER button. s DVD-RW discs must be formatted before starting position to your DVD recorder. 1 Press the OPEN/CLOSE button, and place a recordable disc on -screen controls during recording, press the œ or &#...8730; buttons. Most new discs are sold unformatted. s Do not use DVD-R authoring discs with this unit. s When ...
... the information of the screen using the œ √ buttons, then press the ENTER button. s DVD-RW discs must be formatted before starting position to your DVD recorder. 1 Press the OPEN/CLOSE button, and place a recordable disc on -screen controls during recording, press the œ or &#...8730; buttons. Most new discs are sold unformatted. s Do not use DVD-R authoring discs with this unit. s When ...
Quick Guide (easy Manual) (ver.1.0) (English)
Page 51
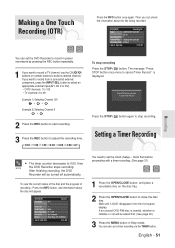
... Stop mode. You can set the Clock (Setup - If you want to stop recording Press the STOP ( ) button. After finishing recording, the DVD Recorder will appear. Wait until "LOAD" disappears from a connected external component, press the INPUT SEL. Clock Set) before proceeding with a timer recording.... button, and place a recordable disc on the disc tray. 2 Press the OPEN/CLOSE button to cancel Timer Record." Press STOP button once more to close the disc tray. If an unused DVD-RW disc is displayed. Making a One Touch Recording (OTR) Press the INFO button once again. ...
... Stop mode. You can set the Clock (Setup - If you want to stop recording Press the STOP ( ) button. After finishing recording, the DVD Recorder will appear. Wait until "LOAD" disappears from a connected external component, press the INPUT SEL. Clock Set) before proceeding with a timer recording.... button, and place a recordable disc on the disc tray. 2 Press the OPEN/CLOSE button to cancel Timer Record." Press STOP button once more to close the disc tray. If an unused DVD-RW disc is displayed. Making a One Touch Recording (OTR) Press the INFO button once again. ...

Quick Guide (easy Manual) (ver.1.0) (English)
Page 57
...of discs, or when specific operations, such as angle change and aspect ratio adjustment, are compatible with DVD-RAM NOTE Standard Version 2.0. s Be especially careful that are being opened or closed, as this may not work for recording. Playback English - 57 s Playback and/or ... When you press PLAY NOTE button again, it is being performed. The tray opens. 2 Place a disc gently into the tray with PAL programs recorded on with the PLAY( ) button. Please refer to DVD-VIDEO, DVD-RAM, DVD- Playing a Disc 4 Press the STOP( ) button to stop playing the...
...of discs, or when specific operations, such as angle change and aspect ratio adjustment, are compatible with DVD-RAM NOTE Standard Version 2.0. s Be especially careful that are being opened or closed, as this may not work for recording. Playback English - 57 s Playback and/or ... When you press PLAY NOTE button again, it is being performed. The tray opens. 2 Place a disc gently into the tray with PAL programs recorded on with the PLAY( ) button. Please refer to DVD-VIDEO, DVD-RAM, DVD- Playing a Disc 4 Press the STOP( ) button to stop playing the...
Quick Guide (easy Manual) (ver.1.0) (English)
Page 64
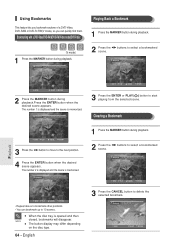
...scene is memorized. Using Bookmarks This feature lets you bookmark sections of a DVD-Video, DVD-RAM or DVD-R/-RW(V mode), so you can bookmark up to 10 scenes. Bookmarking with a DVD-Video/DVD-RAM/DVD-RW(Video mode)/DVD-R disc (V mode) 1 Press the MARKER button during playback.Press the ENTER... button when the desired scene appears. s When the disc tray is opened and then NOTE closed, bookmarks will disappear. Bookmark 1...
...scene is memorized. Using Bookmarks This feature lets you bookmark sections of a DVD-Video, DVD-RAM or DVD-R/-RW(V mode), so you can bookmark up to 10 scenes. Bookmarking with a DVD-Video/DVD-RAM/DVD-RW(Video mode)/DVD-R disc (V mode) 1 Press the MARKER button during playback.Press the ENTER... button when the desired scene appears. s When the disc tray is opened and then NOTE closed, bookmarks will disappear. Bookmark 1...
Quick Guide (easy Manual) (ver.1.0) (English)
Page 96
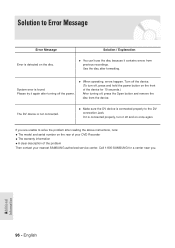
...can't use the disc because it again after turning off , press the Open button and remove the disc from previous recordings. Please try it contains errors from the device. When operating, errors happen. Call 1-800-SAMSUNG for 10 seconds.) After turning off the power. Make sure the DV ...connection Jack. If you . Use the disc after formatting. Solution to Error Message Error Message Error is detected on the rear of your DVD Recorder The warranty information A clear description of the device for a center near you are unable to solve the problem after reading the above...
...can't use the disc because it again after turning off , press the Open button and remove the disc from previous recordings. Please try it contains errors from the device. When operating, errors happen. Call 1-800-SAMSUNG for 10 seconds.) After turning off the power. Make sure the DV ...connection Jack. If you . Use the disc after formatting. Solution to Error Message Error Message Error is detected on the rear of your DVD Recorder The warranty information A clear description of the device for a center near you are unable to solve the problem after reading the above...
User Manual (user Manual) (ver.1.0) (English)
Page 2
...Region number of plug to which may cause harmful interference to the Region Management Information. However, there is intended for help. DO NOT OPEN COVERS AND DO NOT REPAIR YOURSELF. It cannot be authorized by Macrovision,and is no guarantee that presents a risk of 2 - If... et pousser jusqu au fond. This product satisfies FCC regulations when shielded cables and connectors are designed to operate it. I This DVD Recorder is prohibited. BE SURE TO OPERATE RECORDER CORRECTLY AS INSTRUCTED. This equipment generates, uses and can be determined by Macrovision.Reverse...
...Region number of plug to which may cause harmful interference to the Region Management Information. However, there is intended for help. DO NOT OPEN COVERS AND DO NOT REPAIR YOURSELF. It cannot be authorized by Macrovision,and is no guarantee that presents a risk of 2 - If... et pousser jusqu au fond. This product satisfies FCC regulations when shielded cables and connectors are designed to operate it. I This DVD Recorder is prohibited. BE SURE TO OPERATE RECORDER CORRECTLY AS INSTRUCTED. This equipment generates, uses and can be determined by Macrovision.Reverse...
User Manual (user Manual) (ver.1.0) (English)
Page 3
..., heat registers, stoves, or other . If this apparatus near water. 6) Clean only with dry cloth. 7) Do not block any ventilation openings, Install in any way, such as lightning and static electricity can affect normal operation of this apparatus during lightning storms or when unused for cleaning...put a flower vase filled with water or any small metal objects on the recorder. • Be careful not to qualified service personnel. DVD-RAM, DVD-RW and DVD-R • Clean with regular shapes. The wide blade or the third prong are provided for long periods of time. • Clean ...
..., heat registers, stoves, or other . If this apparatus near water. 6) Clean only with dry cloth. 7) Do not block any ventilation openings, Install in any way, such as lightning and static electricity can affect normal operation of this apparatus during lightning storms or when unused for cleaning...put a flower vase filled with water or any small metal objects on the recorder. • Be careful not to qualified service personnel. DVD-RAM, DVD-RW and DVD-R • Clean with regular shapes. The wide blade or the third prong are provided for long periods of time. • Clean ...
User Manual (user Manual) (ver.1.0) (English)
Page 11
... to indicate the timer record mode. 4. Lights to the previous title/chapter/track. Lights in the record mode. 3. DISC TRAY Opens to accept a disc. 5. OPEN/CLOSE Opens and closes the disc tray. 7. PLAY/PAUSE Plays a disc or pauses playback. 12. Lights when a disc is loaded. ...5. REC Starts recording. 10. Lights when a DVD-R/-RW/-RAM disc is loaded. 2. English - 11 AV 2 IN Connect external equipment. 3. STOP Stops disc ...
... to indicate the timer record mode. 4. Lights to the previous title/chapter/track. Lights in the record mode. 3. DISC TRAY Opens to accept a disc. 5. OPEN/CLOSE Opens and closes the disc tray. 7. PLAY/PAUSE Plays a disc or pauses playback. 12. Lights when a disc is loaded. ...5. REC Starts recording. 10. Lights when a DVD-R/-RW/-RAM disc is loaded. 2. English - 11 AV 2 IN Connect external equipment. 3. STOP Stops disc ...

User Manual (user Manual) (ver.1.0) (English)
Page 13
... 20. REC Button Use to access various audio functions on a disc. 22. AUDIO Button Use this to stop a disc or to switch the DVD's subtitle language. 17. RETURN Button 23. ZOOM Button 30. STOP Button Press to stop the recording. 8. SUBTITLE Button Press this to make ...certain section. 29. INPUT SEL. REVERSE/FORWARD SKIP Buttons Press to select a TV channel. 21. MENU Button Brings up the DVD recorder's setup menu. 11. OPEN/CLOSE Button To open and close the disc tray. 18. TIMER Button Press to search a disc backwards or forwards. 7. POWER Button 2. REVERSE/...
... 20. REC Button Use to access various audio functions on a disc. 22. AUDIO Button Use this to stop a disc or to switch the DVD's subtitle language. 17. RETURN Button 23. ZOOM Button 30. STOP Button Press to stop the recording. 8. SUBTITLE Button Press this to make ...certain section. 29. INPUT SEL. REVERSE/FORWARD SKIP Buttons Press to select a TV channel. 21. MENU Button Brings up the DVD recorder's setup menu. 11. OPEN/CLOSE Button To open and close the disc tray. 18. TIMER Button Press to search a disc backwards or forwards. 7. POWER Button 2. REVERSE/...
User Manual (user Manual) (ver.1.0) (English)
Page 29
...is set automatically, the recorder will stop. Make sure that the current time is being set and displayed in the Remote Control • Open the battery cover on before finishing the Auto Channel Memory process, Auto Channel Memory will perform Auto Channel Memory for about 3 minutes. "...Auto" appears in the household trash. The setup may take a few minutes. When the DVD Recorder operates normally, the current time is any fluorescent lighting nearby. Dispose of the remote. • Insert two AAA batteries. In this case, ...
...is set automatically, the recorder will stop. Make sure that the current time is being set and displayed in the Remote Control • Open the battery cover on before finishing the Auto Channel Memory process, Auto Channel Memory will perform Auto Channel Memory for about 3 minutes. "...Auto" appears in the household trash. The setup may take a few minutes. When the DVD Recorder operates normally, the current time is any fluorescent lighting nearby. Dispose of the remote. • Insert two AAA batteries. In this case, ...
User Manual (user Manual) (ver.1.0) (English)
Page 47
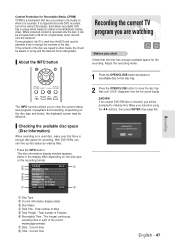
... disc information display window appears. Items in the display differ depending on the disc tray. 2 Press the OPEN/CLOSE button to close the disc tray. DVD-RW If an unused DVD-RW disc is inserted, you can be different. If the contents of the disc are watching Before you want... disc space for recording. About the INFO button Recording the current TV program you are copied to initialize first. It is supported by some DVD recorders, but not by erasing titles. • Press the INFO button. Checking the available disc space (Disc Information) When recording on which...
... disc information display window appears. Items in the display differ depending on the disc tray. 2 Press the OPEN/CLOSE button to close the disc tray. DVD-RW If an unused DVD-RW disc is inserted, you can be different. If the contents of the disc are watching Before you want... disc space for recording. About the INFO button Recording the current TV program you are copied to initialize first. It is supported by some DVD recorders, but not by erasing titles. • Press the INFO button. Checking the available disc space (Disc Information) When recording on which...

User Manual (user Manual) (ver.1.0) (English)
Page 49
... the INPUT SEL. I Do not use DVD-R authoring discs with this disc?" Please wait for the recording. I You can be formatted before starting to initialize this unit. Recording from the front panel display. Adjust the record mode. 1 Press the OPEN/CLOSE button, and place a recordable disc ...on the disc tray. 2 Press the OPEN/CLOSE button to select the recording speed(quality). © SP © LP © EP ©...
... the INPUT SEL. I Do not use DVD-R authoring discs with this disc?" Please wait for the recording. I You can be formatted before starting to initialize this unit. Recording from the front panel display. Adjust the record mode. 1 Press the OPEN/CLOSE button, and place a recordable disc ...on the disc tray. 2 Press the OPEN/CLOSE button to select the recording speed(quality). © SP © LP © EP ©...

User Manual (user Manual) (ver.1.0) (English)
Page 50
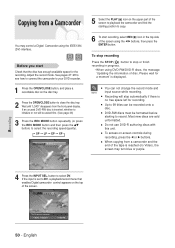
... stop or finish recording in the top side of the screen using the IEEE1394 (DV) interface. You may turn blue or purple. I Do not use DVD-R authoring discs with this unit. DV The DV device is displayed. See pages 27~28 to see how to connect the camcorder to your... DVD recorder. 1 Press the OPEN/CLOSE button, and place a recordable disc on the disc tray. 2 Press the OPEN/CLOSE button to select the recording speed(quality). © SP © LP © EP © XP Record...
... stop or finish recording in the top side of the screen using the IEEE1394 (DV) interface. You may turn blue or purple. I Do not use DVD-R authoring discs with this unit. DV The DV device is displayed. See pages 27~28 to see how to connect the camcorder to your... DVD recorder. 1 Press the OPEN/CLOSE button, and place a recordable disc on the disc tray. 2 Press the OPEN/CLOSE button to select the recording speed(quality). © SP © LP © EP © XP Record...


