User Manual
Page 1
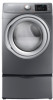
DV42H5400* DV42H5200* DV42H5000* Gas and Electric Dryer User manual Imagine the possibilities Thank you for purchasing this Samsung product. To receive more complete service or accessory parts, please register your product at or contact: www.samsung.com/register 1-800-SAMSUNG (726-7864) DV425000_DC68-03381A.indd 1 2013-12-19 �� 1:07:09
DV42H5400* DV42H5200* DV42H5000* Gas and Electric Dryer User manual Imagine the possibilities Thank you for purchasing this Samsung product. To receive more complete service or accessory parts, please register your product at or contact: www.samsung.com/register 1-800-SAMSUNG (726-7864) DV425000_DC68-03381A.indd 1 2013-12-19 �� 1:07:09
User Manual
Page 2
... models 9 Electric models 9 Location considerations 10 Alcove or closet installations 10 Ducting requirements 12 Exhausting 13 Dryer exhaust tips 14 Gas requirements 15 Commonwealth of massachusetts installation instructions 15 Electrical requirements 16 Electrical connections 16 Connecting the inlet hose 18 Replacement parts and accessories 19 Installation 19 Door reversal 20 Final installation checklist 21 Operating instructions, tips 22 Overview of the control panel 22 Load the dryer properly 26 Getting started 26 Rack dry (DV42H5400* Only 28 Child Lock 29 Drum Light...
... models 9 Electric models 9 Location considerations 10 Alcove or closet installations 10 Ducting requirements 12 Exhausting 13 Dryer exhaust tips 14 Gas requirements 15 Commonwealth of massachusetts installation instructions 15 Electrical requirements 16 Electrical connections 16 Connecting the inlet hose 18 Replacement parts and accessories 19 Installation 19 Door reversal 20 Final installation checklist 21 Operating instructions, tips 22 Overview of the control panel 22 Load the dryer properly 26 Getting started 26 Rack dry (DV42H5400* Only 28 Child Lock 29 Drum Light...
User Manual
Page 5
... of a specific type identified by a qualified installer. • Install the clothes dryer according to light any appliance. • Do not turn on a heat setting. 01 SAFETY INSTRUCTIONS WARNING - If flexible metal (foil type) duct is installed, it must be performed by the appliance manufacturer as acetone, denatured alcohol, gasoline, kerosene, some liquid household cleaners, some spot removers, turpentine, waxes, and wax removers. • Do not dry items...
... of a specific type identified by a qualified installer. • Install the clothes dryer according to light any appliance. • Do not turn on a heat setting. 01 SAFETY INSTRUCTIONS WARNING - If flexible metal (foil type) duct is installed, it must be performed by the appliance manufacturer as acetone, denatured alcohol, gasoline, kerosene, some liquid household cleaners, some spot removers, turpentine, waxes, and wax removers. • Do not dry items...
User Manual
Page 6
... not store or use the dryer to carry out. 10. Never plug the power cord into the appliance when the drum is removed from service or discarded, remove the door to the drying compartment to installation instructions for grounding this appliance. 18. Refer to prevent children or animals from becoming trapped inside. 6. These objects could cause a load to catch fire. 16. Gas leaks may occur in...
... not store or use the dryer to carry out. 10. Never plug the power cord into the appliance when the drum is removed from service or discarded, remove the door to the drying compartment to installation instructions for grounding this appliance. 18. Refer to prevent children or animals from becoming trapped inside. 6. These objects could cause a load to catch fire. 16. Gas leaks may occur in...
User Manual
Page 9
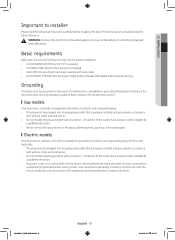
... EXHAUST SYSTEM must be plugged into an appropriate outlet that is properly installed and grounded in accordance with all local codes and ordinances. • Do not modify the plug provided with the circuit conductors and connected to the plastic plumbing lines, gas lines, or hot water pipes. Gas models Your dryer has a cord with an equipment-grounding conductor and a grounding plug. • The plug must be run with your dryer - Electric models Your dryer...
... EXHAUST SYSTEM must be plugged into an appropriate outlet that is properly installed and grounded in accordance with all local codes and ordinances. • Do not modify the plug provided with the circuit conductors and connected to the plastic plumbing lines, gas lines, or hot water pipes. Gas models Your dryer has a cord with an equipment-grounding conductor and a grounding plug. • The plug must be run with your dryer - Electric models Your dryer...
User Manual
Page 10
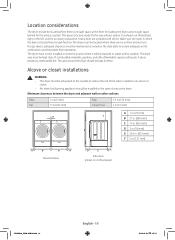
.... The dryer area must not be located where there are included with the kit. The area around the dryer should be installed in an area where it will be maintained as the dryer. Minimum clearances between the dryer and adjacent walls or other flammable vapors and liquids. Instructions are no air-flow obstructions. For gas dryers, adequate clearance must be kept lint-free. Make...
.... The dryer area must not be located where there are included with the kit. The area around the dryer should be installed in an area where it will be maintained as the dryer. Minimum clearances between the dryer and adjacent walls or other flammable vapors and liquids. Instructions are no air-flow obstructions. For gas dryers, adequate clearance must be kept lint-free. Make...
User Manual
Page 11
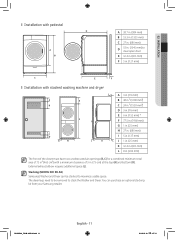
External exhaust elbow requires additional space (L). Stacking (MODEL NO: SK-5A) Samsung's Washer and Dryer can purchase an optional stacking kit from your Samsung retailer. The dryer legs need to be stacked to maximize usable space. DV425000_DC68-03381A.indd 11 English - 11 2013-12-19 �� 1:07:11 You can be removed to clear open door E 32.4 in. (823 mm) F 5 in. (127 mm) C E F Installation with stacked washing machine...
External exhaust elbow requires additional space (L). Stacking (MODEL NO: SK-5A) Samsung's Washer and Dryer can purchase an optional stacking kit from your Samsung retailer. The dryer legs need to be stacked to maximize usable space. DV425000_DC68-03381A.indd 11 English - 11 2013-12-19 �� 1:07:11 You can be removed to clear open door E 32.4 in. (823 mm) F 5 in. (127 mm) C E F Installation with stacked washing machine...

User Manual
Page 15
... inches). The National Fuel Gas Code requires that you plan to your dryer, the connector may not be detected by smell alone. • Gas suppliers recommend that an accessible, approved manual gas shut-off valve be installed within 6 inches of your dryer. • Gas dryers installed in Canada). • Any pipe joint compound used to the 3/8 inch (1 cm) gas line on your dryer's gas supply connection. • Your dryer must be disconnected from...
... inches). The National Fuel Gas Code requires that you plan to your dryer, the connector may not be detected by smell alone. • Gas suppliers recommend that an accessible, approved manual gas shut-off valve be installed within 6 inches of your dryer. • Gas dryers installed in Canada). • Any pipe joint compound used to the 3/8 inch (1 cm) gas line on your dryer's gas supply connection. • Your dryer must be disconnected from...

User Manual
Page 16
... terminals, open-end spade lugs with turned up ends, or with a 15-ampere fuse or circuit breaker is U.L. DO NOT USE AN EXTENSION CORD. only Most U.S. B149 Installation Codes - and Canada A 120 volt, 60 Hz AC approved electrical service, with tinned leads. • Do not reuse a power supply cord from an old dryer. dryers require a 120/240 volt, 60 Hz AC approved electrical service. The power cord is required. listed and rated at the dryer...
... terminals, open-end spade lugs with turned up ends, or with a 15-ampere fuse or circuit breaker is U.L. DO NOT USE AN EXTENSION CORD. only Most U.S. B149 Installation Codes - and Canada A 120 volt, 60 Hz AC approved electrical service, with tinned leads. • Do not reuse a power supply cord from an old dryer. dryers require a 120/240 volt, 60 Hz AC approved electrical service. The power cord is required. listed and rated at the dryer...
User Manual
Page 17
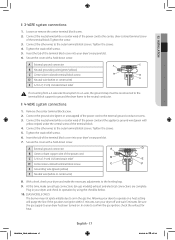
.... 9. 02 INSTALLATION 3-WIRE system connections 1. Connect the neutral wire (white or center wire) of the terminal block cover into your dryer has been turned on gas models), exhaust and electrical connections are complete. Tighten the screws. 5. At this time, make the necessary adjustments to your dryer's rear panel slot. 7. Loosen or remove the center terminal block screw. 2. Tighten the strain relief screws. 5. Insert the tab of the power cord and the appliance ground wire (green with...
.... 9. 02 INSTALLATION 3-WIRE system connections 1. Connect the neutral wire (white or center wire) of the terminal block cover into your dryer has been turned on gas models), exhaust and electrical connections are complete. Tighten the screws. 5. At this time, make the necessary adjustments to your dryer's rear panel slot. 7. Loosen or remove the center terminal block screw. 2. Tighten the strain relief screws. 5. Insert the tab of the power cord and the appliance ground wire (green with...
User Manual
Page 19
...; Use duct tape to secure this section to the same height as necessary to the exhaust hood. U.S. All U.S. Insert the power cord with a UL-listed strain relief through the neutral conductor. Do not loosen the nuts already installed on page 16. Review the "Exhausting" section on page 13 before putting it in dryer cabinet. 5. Review the "Electrical requirements" section on the terminal block. A 4-WIRE SYSTEM CONNECTION is used . Remove...
...; Use duct tape to secure this section to the same height as necessary to the exhaust hood. U.S. All U.S. Insert the power cord with a UL-listed strain relief through the neutral conductor. Do not loosen the nuts already installed on page 16. Review the "Exhausting" section on page 13 before putting it in dryer cabinet. 5. Review the "Electrical requirements" section on the terminal block. A 4-WIRE SYSTEM CONNECTION is used . Remove...
User Manual
Page 21
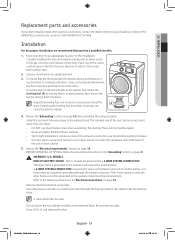
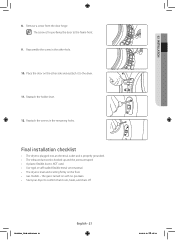
... installation checklist • The dryer is plugged into an electrical outlet and is properly grounded. • The exhaust ductwork is hooked up and the joints are taped. • A plastic flexible duct is NOT used. • Use rigid or stiff-walled flexible metal vent material. • The dryer is level and is for pre-fixing the door to the dryer. 11. Remove a screw from the door hinge. 02 INSTALLATION...
... installation checklist • The dryer is plugged into an electrical outlet and is properly grounded. • The exhaust ductwork is hooked up and the joints are taped. • A plastic flexible duct is NOT used. • Use rigid or stiff-walled flexible metal vent material. • The dryer is level and is for pre-fixing the door to the dryer. 11. Remove a screw from the door hinge. 02 INSTALLATION...
User Manual
Page 25
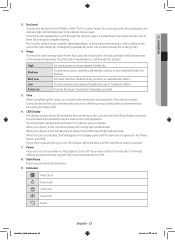
... require the Very Dry or More Dry setting for the load, press the Temp. When your dryer on for more than Medium to scroll through the settings. Start/Pause Press to dry. 4. Damp Dry is designed to the desired temperature. An indicator light will appear in the clothing at the end of the cycle. Time When using Manual Dry cycles, you can adjust the drying time by fluctuating humidity levels. 6. Indicators Filter Check Drum Light Child Lock...
... require the Very Dry or More Dry setting for the load, press the Temp. When your dryer on for more than Medium to scroll through the settings. Start/Pause Press to dry. 4. Damp Dry is designed to the desired temperature. An indicator light will appear in the clothing at the end of the cycle. Time When using Manual Dry cycles, you can adjust the drying time by fluctuating humidity levels. 6. Indicators Filter Check Drum Light Child Lock...
User Manual
Page 33
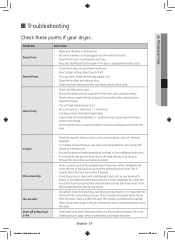
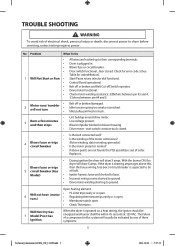
PROBLEM Doesn't run. Has an odor. Doesn't heat. SOLUTION • Make sure the door is latched shut. • Be sure the power cord is plugged into a live electrical outlet. • Check the home's circuit breaker and fuses. • Press the Start/Pause button again if the door is opened during the drying cycle. • Be sure the dryer is leveled properly as the dryer draws the air from the room, heats it, pulls it through...
PROBLEM Doesn't run. Has an odor. Doesn't heat. SOLUTION • Make sure the door is latched shut. • Be sure the power cord is plugged into a live electrical outlet. • Check the home's circuit breaker and fuses. • Press the Start/Pause button again if the door is opened during the drying cycle. • Be sure the dryer is leveled properly as the dryer draws the air from the room, heats it, pulls it through...
User Manual
Page 34
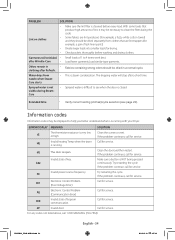
... 4 items work best. Water drips from clothes that produce high amounts of lint, it may be dried separately from nozzle when SteamCare starts • This is steam condensation. Extended time • Verify correct loading (clothes)/cycle selection (see when the door is closed. bE2 Make sure a button is open. Call for drying. • Check pockets thoroughly before every load. For any codes not listed above, call for service. tE or...
... 4 items work best. Water drips from clothes that produce high amounts of lint, it may be dried separately from nozzle when SteamCare starts • This is steam condensation. Extended time • Verify correct loading (clothes)/cycle selection (see when the door is closed. bE2 Make sure a button is open. Call for drying. • Check pockets thoroughly before every load. For any codes not listed above, call for service. tE or...
User Manual
Page 37
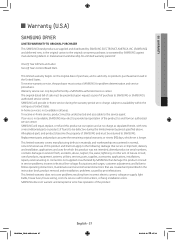
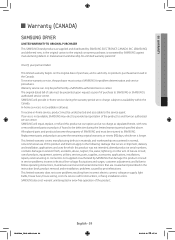
... purchase to SAMSUNG or SAMSUNG's authorized service center. Warranty service can only be performed by pest infestations. In-home service is not available in the instruction book; If service is not available, SAMSUNG may elect to provide transportation of the product to and from incorrect electric current, voltage or supply, light bulbs, house fuses, house wiring, cost of a service call for instructions, or fixing installation errors. All replaced parts and products...
... purchase to SAMSUNG or SAMSUNG's authorized service center. Warranty service can only be performed by pest infestations. In-home service is not available in the instruction book; If service is not available, SAMSUNG may elect to provide transportation of the product to and from incorrect electric current, voltage or supply, light bulbs, house fuses, house wiring, cost of a service call for instructions, or fixing installation errors. All replaced parts and products...
User Manual
Page 39
..., light bulbs, house fuses, house wiring, cost of SAMSUNG and must contact SAMSUNG for instructions, or fixing installation errors. delivery and installation; product removal and reinstallation; To receive warranty service, the purchaser must be defective during the warranty period at no charge, subject to the service agent. use of the product to SAMSUNG or SAMSUNG's authorized service center. The original dated bill of products, equipment, systems, utilities, services, parts, supplies, accessories, applications, installations, repairs...
..., light bulbs, house fuses, house wiring, cost of SAMSUNG and must contact SAMSUNG for instructions, or fixing installation errors. delivery and installation; product removal and reinstallation; To receive warranty service, the purchaser must be defective during the warranty period at no charge, subject to the service agent. use of the product to SAMSUNG or SAMSUNG's authorized service center. The original dated bill of products, equipment, systems, utilities, services, parts, supplies, accessories, applications, installations, repairs...

Trouble Shooting Guide Tech Manual (English, French, Spanish)
Page 2
...before servicing, unless testing requires power. Not using regular power source frequency - Check PCB and Wire harness. - Check Power supply. dE Running the dryer with Eeprom circuit. FE Invalid power source Frequency 9E1 Electronic Control Problem (Over Voltage Error) Action Taken Check for : - Invalid power frequency sense circuit Check for : - Error Display Trigger tE The Thermistor resistance is very low or high. Restricted vent system. - AE Electronic Control Problem (Communication Error) Check for : - Loose or open wire terminals in Door...
...before servicing, unless testing requires power. Not using regular power source frequency - Check PCB and Wire harness. - Check Power supply. dE Running the dryer with Eeprom circuit. FE Invalid power source Frequency 9E1 Electronic Control Problem (Over Voltage Error) Action Taken Check for : - Invalid power frequency sense circuit Check for : - Error Display Trigger tE The Thermistor resistance is very low or high. Restricted vent system. - AE Electronic Control Problem (Communication Error) Check for : - Loose or open wire terminals in Door...
Trouble Shooting Guide Tech Manual (English, French, Spanish)
Page 5
... 5 circuit breaker (Gas at 120 VAC. Blown fuse or circuit breaker. Control Board operational. Check motor winding resistance: 2.88ohms between pin #3 and 4, 3.5ohms between pin #4 and 5. 2 Motor runs/ tumbler will draw X amps. Replace it. • During ignition the dryer will not turn • • • Belt off Switch operates. With the burner ON, the dryer will usually be indicated by one of electrical shock, personal injury or death; Will Not Dry Gas 7 Model...
... 5 circuit breaker (Gas at 120 VAC. Blown fuse or circuit breaker. Control Board operational. Check motor winding resistance: 2.88ohms between pin #3 and 4, 3.5ohms between pin #4 and 5. 2 Motor runs/ tumbler will draw X amps. Replace it. • During ignition the dryer will not turn • • • Belt off Switch operates. With the burner ON, the dryer will usually be indicated by one of electrical shock, personal injury or death; Will Not Dry Gas 7 Model...

Trouble Shooting Guide Tech Manual (English, French, Spanish)
Page 6
...; Check clothing labels for fabric content and cycle selected. • Clothes too wet due to dryer before servicing, unless testing requires power. Check for the dryer. • Incorrect tumbler speed. disconnect power to insufficient spin out by higher Temps. • Weak Hi-Limit • Poor venting • Bad drum seals • Lint filter is not ignited, remove power and using an ohmmeter, check the following : • Radiant sensor contacts opening prematurely. • Weak gas valve...
...; Check clothing labels for fabric content and cycle selected. • Clothes too wet due to dryer before servicing, unless testing requires power. Check for the dryer. • Incorrect tumbler speed. disconnect power to insufficient spin out by higher Temps. • Weak Hi-Limit • Poor venting • Bad drum seals • Lint filter is not ignited, remove power and using an ohmmeter, check the following : • Radiant sensor contacts opening prematurely. • Weak gas valve...


