User Manual (ENGLISH)
Page 1
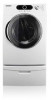
DV337 DV328 Gas and Electric Dryer user manual imagine the possibilities Thank you for purchasing a Samsung product. To receive a more complete service, please register your product at www.samsung.com/global/register DV337AEW-02453A-04_EN.indd 1 2007-07-23 ¿ÀÈÄ 1:47:14
DV337 DV328 Gas and Electric Dryer user manual imagine the possibilities Thank you for purchasing a Samsung product. To receive a more complete service, please register your product at www.samsung.com/global/register DV337AEW-02453A-04_EN.indd 1 2007-07-23 ¿ÀÈÄ 1:47:14

User Manual (ENGLISH)
Page 2
... automatically drying your clothes. 4. Stacking (MODEL NO: SK-3A1/XAA, SK-4A/XAA) Samsung's Washer and Dryer can be changed with you in storage drawer that can dry extra-large loads. The Dryer legs need washing, but could use a little help after last night's party. Extra Large ...Capacity Ultra drying capabilitlites are designed with just four screws. 7. Time Saving Our cycles are at your Samsung retailer. 2_ Features of laundry. Easy Reversible Door Our dryers will fit just about anywhere and without a door conflict. The direction of our easy reversible door can be ...
... automatically drying your clothes. 4. Stacking (MODEL NO: SK-3A1/XAA, SK-4A/XAA) Samsung's Washer and Dryer can be changed with you in storage drawer that can dry extra-large loads. The Dryer legs need washing, but could use a little help after last night's party. Extra Large ...Capacity Ultra drying capabilitlites are designed with just four screws. 7. Time Saving Our cycles are at your Samsung retailer. 2_ Features of laundry. Easy Reversible Door Our dryers will fit just about anywhere and without a door conflict. The direction of our easy reversible door can be ...
User Manual (ENGLISH)
Page 3
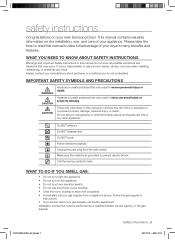
... GAS: • Do not try to prevent property damage, personal injury, or death. This manual contains valuable information on your new Samsung Dryer. Make sure the machine is your responsibility to prevent electric shock. Follow the gas supplier's instructions. • If you do not ... reach your gas supplier, call your gas supplier from the wall socket. Follow directions explicity. Please take full advantage of your dryer's many benefits and features. Follow the information in severe personal injury or death. safety instructions Congratulations on the installation, use, ...
... GAS: • Do not try to prevent property damage, personal injury, or death. This manual contains valuable information on your new Samsung Dryer. Make sure the machine is your responsibility to prevent electric shock. Follow the gas supplier's instructions. • If you do not ... reach your gas supplier, call your gas supplier from the wall socket. Follow directions explicity. Please take full advantage of your dryer's many benefits and features. Follow the information in severe personal injury or death. safety instructions Congratulations on the installation, use, ...
User Manual (ENGLISH)
Page 4
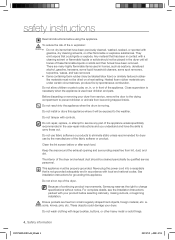
... instructions and you understand and have the skills to change specifications without notice. See installation instructions for dryer use fabric softeners or products to play on top of these flammable liquids or solids and their fumes... must be dried on a heat setting. Do not use by spontaneous combustion. The interior of the dryer and exhaust duct should not be cleaned periodically by qualified service personnel. These objects could ignite or explode... drum is used in front of continuing product improvements, Samsung reserves the right to carry those out.
... instructions and you understand and have the skills to change specifications without notice. See installation instructions for dryer use fabric softeners or products to play on top of these flammable liquids or solids and their fumes... must be dried on a heat setting. Do not use by spontaneous combustion. The interior of the dryer and exhaust duct should not be cleaned periodically by qualified service personnel. These objects could ignite or explode... drum is used in front of continuing product improvements, Samsung reserves the right to carry those out.
User Manual (ENGLISH)
Page 5
...allowing an oxidation reaction in the oil to occur. Washing these items when they are exposed to heat. Do not place items in your dryer that contain vegetable oil or cooking oil can be detected by smell alone. Heat sources such as your system, resulting in a dangerous situation...items from escaping and can ignite spontaneously. Even after being washed, these items may contain significant amounts of items may prevent heat from the dryer hot or interrupt the drying cycle until the items have been spotted or soaked with the manufacturer's instructions. DV337AEW-02453A-04_EN.indd 5 ...
...allowing an oxidation reaction in the oil to occur. Washing these items when they are exposed to heat. Do not place items in your dryer that contain vegetable oil or cooking oil can be detected by smell alone. Heat sources such as your system, resulting in a dangerous situation...items from escaping and can ignite spontaneously. Even after being washed, these items may contain significant amounts of items may prevent heat from the dryer hot or interrupt the drying cycle until the items have been spotted or soaked with the manufacturer's instructions. DV337AEW-02453A-04_EN.indd 5 ...
User Manual (ENGLISH)
Page 6
... 11 Gas requirements 12 Electrical requirements 12 Grounding 13 Electrical connections 13 Replacement parts and accessories 14 Installation 15 Final installation checklist 16 Dryer Exhaust Tips 17 Door Reversal 18 Overview of the control panel 20 Child lock 20 My cycle 21 Rack Dry 22 Clean the ...lint filter 22 Load the dryer properly 22 Getting started 23 Control Panel 23 Tumbler 23 Stainless Steel Tumbler 23 Dryer Exterior 23 Dryer Exhaust System TROUBLESHOOTING 25 25 Check these points if your dryer... 26 Information codes 6_ Contents APPENDIX 27 27 Fabric care...
... 11 Gas requirements 12 Electrical requirements 12 Grounding 13 Electrical connections 13 Replacement parts and accessories 14 Installation 15 Final installation checklist 16 Dryer Exhaust Tips 17 Door Reversal 18 Overview of the control panel 20 Child lock 20 My cycle 21 Rack Dry 22 Clean the ...lint filter 22 Load the dryer properly 22 Getting started 23 Control Panel 23 Tumbler 23 Stainless Steel Tumbler 23 Dryer Exterior 23 Dryer Exhaust System TROUBLESHOOTING 25 25 Check these points if your dryer... 26 Information codes 6_ Contents APPENDIX 27 27 Fabric care...
User Manual (ENGLISH)
Page 7
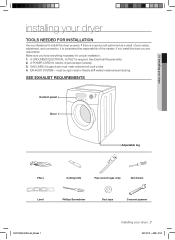
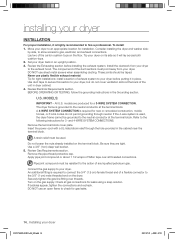
... 4. If there is a service call performed as a result of the installer. EXHAUST SYSTEM - If you install the dryer you have everything necessary for electric dryers (except Canada). 3. A GROUNDED ELECTRICAL OUTLET is considered the responsibility of poor setup, adjustment, and connection, it is required.... See Electrical Requirements. 2. 01 Installing your dryer installing your dryer _7 2007-07-23 ¿ÀÈÄ 1:47:18 A POWER CORD for proper installation. 1. GAS LINES (if a gas dryer) must be rigid metal or flexible stiff-walled metal exhaust ...
... 4. If there is a service call performed as a result of the installer. EXHAUST SYSTEM - If you install the dryer you have everything necessary for electric dryers (except Canada). 3. A GROUNDED ELECTRICAL OUTLET is considered the responsibility of poor setup, adjustment, and connection, it is required.... See Electrical Requirements. 2. 01 Installing your dryer installing your dryer _7 2007-07-23 ¿ÀÈÄ 1:47:18 A POWER CORD for proper installation. 1. GAS LINES (if a gas dryer) must be rigid metal or flexible stiff-walled metal exhaust ...
User Manual (ENGLISH)
Page 8
... exhaust system at least one time per month, and clean at least once a year. THIS COULD CREATE A FIRE HAZARD FROM LINT EXPELLED BY THE DRYER. • Plastic flexible duct can result if the flexible metal duct is bent too sharply. • Never install any type of flexible duct in ..., sag, be insulated and slope slightly down . • Never install a screen over the exhaust outlet. • To avoid lint buildup, do not exhaust the dryer directly into a window well. Note: If clothes are not getting dry, then check ducting for short-run through an unheated area, the duct should end...
... exhaust system at least one time per month, and clean at least once a year. THIS COULD CREATE A FIRE HAZARD FROM LINT EXPELLED BY THE DRYER. • Plastic flexible duct can result if the flexible metal duct is bent too sharply. • Never install any type of flexible duct in ..., sag, be insulated and slope slightly down . • Never install a screen over the exhaust outlet. • To avoid lint buildup, do not exhaust the dryer directly into a window well. Note: If clothes are not getting dry, then check ducting for short-run through an unheated area, the duct should end...
User Manual (ENGLISH)
Page 9
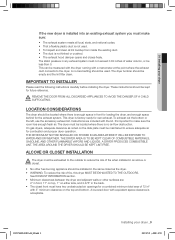
...local, state, and national codes. • That a flexible plastic duct is not used . A no air-flow obstruction. On gas dryers, adequate clearance as the dryer. • WARNING: To reduce the risk of fire when installed in an alcove or WARNING closet. • No other surfaces are ... kinked or crushed. • The exhaust hood damper opens and closes freely. See EXHAUST INFORMATION section. • Minimum clearances between the dryer and adjacent walls or other fuel-burning appliance should be located where there is no -heat setting should be less than 0. It's important...
...local, state, and national codes. • That a flexible plastic duct is not used . A no air-flow obstruction. On gas dryers, adequate clearance as the dryer. • WARNING: To reduce the risk of fire when installed in an alcove or WARNING closet. • No other surfaces are ... kinked or crushed. • The exhaust hood damper opens and closes freely. See EXHAUST INFORMATION section. • Minimum clearances between the dryer and adjacent walls or other fuel-burning appliance should be located where there is no -heat setting should be less than 0. It's important...
User Manual (ENGLISH)
Page 10
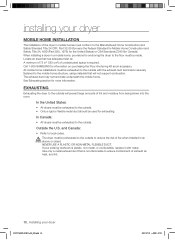
... mobile home installations must be exhausted to the outside to the outside with metal. See Exhausting section for Canada). EXHAUSTING Exhausting the dryer to reduce the risk of fire when installed in an WARNING alcove or closet. NEVER USE A PLASTIC OR NON-METAL FLEXIBLE DUCT. ... to the outside . • Only a rigid or flexible metal duct should be made. Call 1-800-SAMSUNG for anchoring the dryer to the floor must be used for exhausting. In Canada: • All dryers must be exhausted to local codes. A minimum of 72 in a mobile home, provisions for information on ...
... mobile home installations must be exhausted to the outside to the outside with metal. See Exhausting section for Canada). EXHAUSTING Exhausting the dryer to reduce the risk of fire when installed in an WARNING alcove or closet. NEVER USE A PLASTIC OR NON-METAL FLEXIBLE DUCT. ... to the outside . • Only a rigid or flexible metal duct should be made. Call 1-800-SAMSUNG for anchoring the dryer to the floor must be used for exhausting. In Canada: • All dryers must be exhausted to local codes. A minimum of 72 in a mobile home, provisions for information on ...
User Manual (ENGLISH)
Page 11
...manufacturer's instructions. Additionally, a 1/8" (0.3 cm) N.P.T. (National Pipe Thread) plugged tapping, accessible for test gauge connection, must have a maximum length of your dryer. DO NOT reuse old flexible metal gas lines. GAS IGNITION - There is recommended and must be reduced to connect to the 3/8" (1 cm) gas line on... and proper performance by the American Gas Association (CGA in the gas supply line to ignite the burner. Your dryer uses an automatic ignition system to your dryer _11 2007-07-23 ¿ÀÈÄ 1:47:21 If a flexible gas connector is used must be...
...manufacturer's instructions. Additionally, a 1/8" (0.3 cm) N.P.T. (National Pipe Thread) plugged tapping, accessible for test gauge connection, must have a maximum length of your dryer. DO NOT reuse old flexible metal gas lines. GAS IGNITION - There is recommended and must be reduced to connect to the 3/8" (1 cm) gas line on... and proper performance by the American Gas Association (CGA in the gas supply line to ignite the burner. Your dryer uses an automatic ignition system to your dryer _11 2007-07-23 ¿ÀÈÄ 1:47:21 If a flexible gas connector is used must be...
User Manual (ENGLISH)
Page 12
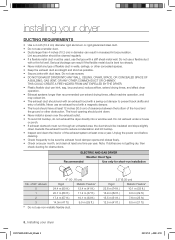
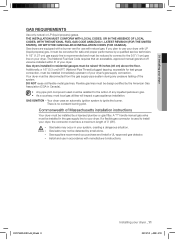
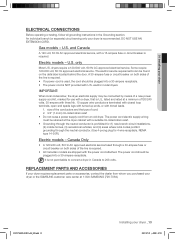
... to provide adequate electrical services for the U.S.) or the Canadian Electrical Code CSA C22.1 - B149 Installation Codes - Gas models Your dryer has a cord with an equipment-grounding conductor and a grounding plug, sold separately. The plug must be done in accordance with local... national Fuel Code ANSI/Z2231 - All gas installations must be grounded. Check with the circuit conductors and connected to whether your dryer ELECTRICAL REQUIREMENTS Wiring diagram is located on plate below the control panel. • WARNING • • Improper connection of ...
... to provide adequate electrical services for the U.S.) or the Canadian Electrical Code CSA C22.1 - B149 Installation Codes - Gas models Your dryer has a cord with an equipment-grounding conductor and a grounding plug, sold separately. The plug must be done in accordance with local... national Fuel Code ANSI/Z2231 - All gas installations must be grounded. Check with the circuit conductors and connected to whether your dryer ELECTRICAL REQUIREMENTS Wiring diagram is located on plate below the control panel. • WARNING • • Improper connection of ...
User Manual (ENGLISH)
Page 13
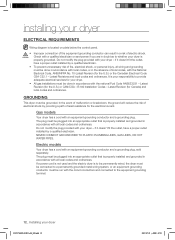
... cord. 2. 3/4" (1.9 cm) UL-listed strain relief • Do not reuse a power supply cord from whom you purchased your dryer or the SAMSUNG customer care center at the dryer cabinet with the power cord attached. size of the conductors and the type of a new power supply cord kit, marked for 4 ...Electric models - DO NOT USE AN EXTENSION CORD. electric model dryers. A 30-ampere fuse or circuit breaker on both sides of the line is required. • If a power cord is used, the cord should be retained at 1-800-SAMSUNG (726-7864). The power cord should be found on both ...
... cord. 2. 3/4" (1.9 cm) UL-listed strain relief • Do not reuse a power supply cord from whom you purchased your dryer or the SAMSUNG customer care center at the dryer cabinet with the power cord attached. size of the conductors and the type of a new power supply cord kit, marked for 4 ...Electric models - DO NOT USE AN EXTENSION CORD. electric model dryers. A 30-ampere fuse or circuit breaker on both sides of the line is required. • If a power cord is used, the cord should be retained at 1-800-SAMSUNG (726-7864). The power cord should be found on both ...
User Manual (ENGLISH)
Page 14
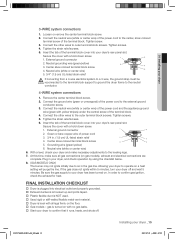
...grounded to an appropriate location for installation. Use a 3/8" (1cm) deep well socket. 5. Pipe joint compound must point away from your dryer to your dryer, but do not permit grounding through the hole provided in the cabinet near the terminal block. An additional fitting is required to connect ... two of any liquefied petroleum gas. DO NOT use plastic flexible exhaust material. A 4-WIRE SYSTEM CONNECTION is grounded to your dryer. Insert the power cord with a UL-listed strain relief through neutral. Remove the pipe thread protective cap. Install the ductwork from your...
...grounded to an appropriate location for installation. Use a 3/8" (1cm) deep well socket. 5. Pipe joint compound must point away from your dryer to your dryer, but do not permit grounding through the hole provided in the cabinet near the terminal block. An additional fitting is required to connect ... two of any liquefied petroleum gas. DO NOT use plastic flexible exhaust material. A 4-WIRE SYSTEM CONNECTION is grounded to your dryer. Insert the power cord with a UL-listed strain relief through neutral. Remove the pipe thread protective cap. Install the ductwork from your...
User Manual (ENGLISH)
Page 15
... Insert the tab of the terminal block. 4. Secure the cover with yellow stripes) under the central screw of the terminal block cover into your dryer and make sure all legs firmly on the floor. Gas models - External ground connector 2. Remove the center terminal block screw. 2. Green or.... 3. Connect the other wires to operate on a heat setting will purge the line. If the gas does not ignite within 5 minutes, turn your dryer to outer terminal block screws. Tighten the strain relief screws. 5. Connect the ground wire (green or unwrapped) of power cord 3. 3/4 in the gas...
... Insert the tab of the terminal block. 4. Secure the cover with yellow stripes) under the central screw of the terminal block cover into your dryer and make sure all legs firmly on the floor. Gas models - External ground connector 2. Remove the center terminal block screw. 2. Green or.... 3. Connect the other wires to operate on a heat setting will purge the line. If the gas does not ignite within 5 minutes, turn your dryer to outer terminal block screws. Tighten the strain relief screws. 5. Connect the ground wire (green or unwrapped) of power cord 3. 3/4 in the gas...

User Manual (ENGLISH)
Page 16
... as straight as possible. 4. Don't let a poor exhaust system slow drying by: 1. installing your dryer exhaust the air easily. 2. Clean all joints, including at the dryer. Be sure vent flap opens and closes freely. Inspect and clean the exhaust system annually. Using unnecessarily long... screws. 3. Using a plastic, thin foil, or non-metal flexible duct. 3. Let your dryer DRYER EXHAUST TIPS Plastic or non-metal flexible duct presents a potential fire hazard. Restricting your dryer DV337AEW-02453A-04_EN.indd 16 2007-07-23 ¿ÀÈÄ 1:47:24 Use 4"...
... as straight as possible. 4. Don't let a poor exhaust system slow drying by: 1. installing your dryer exhaust the air easily. 2. Clean all joints, including at the dryer. Be sure vent flap opens and closes freely. Inspect and clean the exhaust system annually. Using unnecessarily long... screws. 3. Using a plastic, thin foil, or non-metal flexible duct. 3. Let your dryer DRYER EXHAUST TIPS Plastic or non-metal flexible duct presents a potential fire hazard. Restricting your dryer DV337AEW-02453A-04_EN.indd 16 2007-07-23 ¿ÀÈÄ 1:47:24 Use 4"...

User Manual (ENGLISH)
Page 17
... screws from the door hinge. 8. Place the door on the opposite side of the door hinge. 6. WARNING DV337AEW-02453A-04_EN.indd 17 Installing your dryer DOOR REVERSAL 1. Unplug the power cord. 2. Remove a screw on the Frame Front 10. Reassemble the holder lever. 12. Remove two door hinge screws. ... holes. Reassemble the screws in STEP 4 may not exist. Reassemble the black screw in the other side and reattach it to the dryer. 11. 01 Installing your dryer _17 2007-07-23 ¿ÀÈÄ 1:47:28 Reassemble the screw (Step 4) on the Frame Front 5. Remove two ...
... screws from the door hinge. 8. Place the door on the opposite side of the door hinge. 6. WARNING DV337AEW-02453A-04_EN.indd 17 Installing your dryer DOOR REVERSAL 1. Unplug the power cord. 2. Remove a screw on the Frame Front 10. Reassemble the holder lever. 12. Remove two door hinge screws. ... holes. Reassemble the screws in STEP 4 may not exist. Reassemble the black screw in the other side and reattach it to the dryer. 11. 01 Installing your dryer _17 2007-07-23 ¿ÀÈÄ 1:47:28 Reassemble the screw (Step 4) on the Frame Front 5. Remove two ...
User Manual (ENGLISH)
Page 18
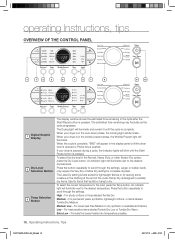
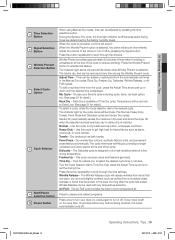
... labeled Tumble Dry Low or Tumble Dry Warm. The Drying light will appear in the cycle after the Start/Pause button is pressed. When your dryer is in the Normal, Heavy Duty, or other Sensor Dry cycles, press the Dry Level button. An indicator light will illuminate next to the ... Button Temp Selection 3 Button The display window shows the estimated time remaining in the display panel until the cycle is complete. Medium Low - If your dryer is in the clothing at the end of the cycle. Larger or bulkier loads may fluctuate as the cycle progresses. Press the button repeatedly to...
... labeled Tumble Dry Low or Tumble Dry Warm. The Drying light will appear in the cycle after the Start/Pause button is pressed. When your dryer is in the Normal, Heavy Duty, or other Sensor Dry cycles, press the Dry Level button. An indicator light will illuminate next to the ... Button Temp Selection 3 Button The display window shows the estimated time remaining in the display panel until the cycle is complete. Medium Low - If your dryer is in the clothing at the end of the cycle. Larger or bulkier loads may fluctuate as the cycle progresses. Press the button repeatedly to...
User Manual (ENGLISH)
Page 19
... garments. DV337AEW-02453A-04_EN.indd 19 Operating Instructions, Tips _19 2007-07-23 ¿ÀÈÄ 1:47:32 Adjust Time - Choose your dryer on for detail.) Rack Dry - Temperature will be set the drying time. Delicates - Press to pause and restart programs. Press once to turn...load is selected. Sensor Dry automatically senses the moisture in unheated air at the end of intermittent tumbling in the load and shuts the dryer off . Press the button repeatedly to scroll through the choices. Press the arrow repeatedly to scroll through the time settings. The indicator light...
... garments. DV337AEW-02453A-04_EN.indd 19 Operating Instructions, Tips _19 2007-07-23 ¿ÀÈÄ 1:47:32 Adjust Time - Choose your dryer on for detail.) Rack Dry - Temperature will be set the drying time. Delicates - Press to pause and restart programs. Press once to turn...load is selected. Sensor Dry automatically senses the moisture in unheated air at the end of intermittent tumbling in the load and shuts the dryer off . Press the button repeatedly to scroll through the choices. Press the arrow repeatedly to scroll through the time settings. The indicator light...

User Manual (ENGLISH)
Page 20
... not respond, check the Child Lock indicator. The cycle and options you select will be set . To release that are automatically set while your dryer is running. 2. MY CYCLE Lets you want to set each option. It can start My Cycle by repeating same process above . The Child Lock... indicator will be controlled until you choose My Cycle. Setting/Releasing If you activate your dryer. By pushing the My Cycle button, you activate the settings used setting will be displayed the next time you can be lit. 1. If...
... not respond, check the Child Lock indicator. The cycle and options you select will be set . To release that are automatically set while your dryer is running. 2. MY CYCLE Lets you want to set each option. It can start My Cycle by repeating same process above . The Child Lock... indicator will be controlled until you choose My Cycle. Setting/Releasing If you activate your dryer. By pushing the My Cycle button, you activate the settings used setting will be displayed the next time you can be lit. 1. If...

