

User Manual
Page 2
...CD-ROM. (p.66) Take a picture Take a picture. (p.14) Insert the USB cable Insert the supplied USB cable into the PC's USB port and the camera's USB connection terminal. (p.68) Getting to know your camera Thank you will need to your PC. Samsung camera takes no responsibility for loss or damage of images on the memory... card due to your PC, the images could be sure to use the supplied USB cable to connect the camera to the use a card reader to...
...CD-ROM. (p.66) Take a picture Take a picture. (p.14) Insert the USB cable Insert the supplied USB cable into the PC's USB port and the camera's USB connection terminal. (p.68) Getting to know your camera Thank you will need to your PC. Samsung camera takes no responsibility for loss or damage of images on the memory... card due to your PC, the images could be sure to use the supplied USB cable to connect the camera to the use a card reader to...

User Manual
Page 5
... Samsung dealer or Samsung service centre. < Included items > Camera case User manual, Product warranty Camera strap Software CD (see p.65) DPOF compatible printer (see p.46) SD memory card / MMC (see p.9) Rechargeable battery (SNB-2512) AA Alkaline Batteries ŝ4Ş AC cord Charger(SBC-N1) Computer (see p.68) PictBridge compatible printer (see p.49) USB cable...
... Samsung dealer or Samsung service centre. < Included items > Camera case User manual, Product warranty Camera strap Software CD (see p.65) DPOF compatible printer (see p.46) SD memory card / MMC (see p.9) Rechargeable battery (SNB-2512) AA Alkaline Batteries ŝ4Ş AC cord Charger(SBC-N1) Computer (see p.68) PictBridge compatible printer (see p.49) USB cable...

User Manual
Page 9
... CHILDREN MOVIE PLAY Icon SCENE MODE LANDSCAPE CLOSE UP SUNSET DAWN BACKLIGHT FIREWORKS BEACH & SNOW Icon Connecting to a printer The lamp is off ) When the USB cable is printing The lamp blinks The lamp turns on (The camera focus on the subject) When the AF activates The lamp blinks (The camera doesn...
... CHILDREN MOVIE PLAY Icon SCENE MODE LANDSCAPE CLOSE UP SUNSET DAWN BACKLIGHT FIREWORKS BEACH & SNOW Icon Connecting to a printer The lamp is off ) When the USB cable is printing The lamp blinks The lamp turns on (The camera focus on the subject) When the AF activates The lamp blinks (The camera doesn...
User Manual
Page 43
... - ŝ42Ş ƈ This menu is available while the camera is connected to a PictBridge supporting printer (direct connection to the camera, sold separately) with a USB cable. Setting up the play back function using the LCD monitor Menu tab Main menu ROTATE DPOF COPY TO CARD OSD INFORMATION Sub menu Right 90...
... - ŝ42Ş ƈ This menu is available while the camera is connected to a PictBridge supporting printer (direct connection to the camera, sold separately) with a USB cable. Setting up the play back function using the LCD monitor Menu tab Main menu ROTATE DPOF COPY TO CARD OSD INFORMATION Sub menu Right 90...
User Manual
Page 50
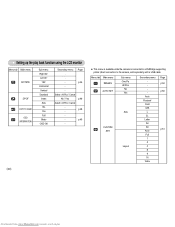
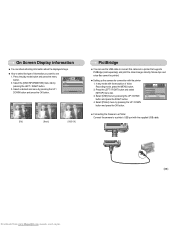
... by pressing the UP / DOWN button and press the OK button. SETUP Format Date&Time Imprint Sound USB Computer Printer Back: Set:OK ƈ Connecting the Camera to a Printer Connect the camera to a printer's USB port with the printer 1. Press the LEFT / RIGHT button and select [SETUP] menu tab. 3. Select... the LEFT / RIGHT button. 3. Movie clips and voice files cannot be printed. ƃ Setting up the camera for connection with the supplied USB cable. ŝ49Ş Downloaded from www.Manualslib.com manuals search engine On Screen Display information ƈ You can use the...
... by pressing the UP / DOWN button and press the OK button. SETUP Format Date&Time Imprint Sound USB Computer Printer Back: Set:OK ƈ Connecting the Camera to a Printer Connect the camera to a printer's USB port with the printer 1. Press the LEFT / RIGHT button and select [SETUP] menu tab. 3. Select... the LEFT / RIGHT button. 3. Movie clips and voice files cannot be printed. ƃ Setting up the camera for connection with the supplied USB cable. ŝ49Ş Downloaded from www.Manualslib.com manuals search engine On Screen Display information ƈ You can use the...

User Manual
Page 51
... button. [No] : [CUSTOM SET] values are kept. [Yes] : All values in Step 4, when you can set the number of prints. In this case, disconnect the USB cable, and then follow the procedure from www.Manualslib.com manuals search engine Select [One Pic] or [All Pics]. PictBridge : Print Setting ƈ AUTO SET 1. Or...
... button. [No] : [CUSTOM SET] values are kept. [Yes] : All values in Step 4, when you can set the number of prints. In this case, disconnect the USB cable, and then follow the procedure from www.Manualslib.com manuals search engine Select [One Pic] or [All Pics]. PictBridge : Print Setting ƈ AUTO SET 1. Or...

User Manual
Page 57
..., when buttons are pressed, so that you want to connect the camera to your printer. SETUP Date&Time Imprint Sound USB Off AF Lamp On Back: Set:OK [ Connecting an External Device (USB) ] ƈ You can adjust the LCD brightness. ƃ [LCD] sub menu : Dark, Normal, Bright ŝ56Ş Imprint ... Printer Back: Set:OK [ LCD brightness ] ƈ You can select an external device to which you want to connect the camera using the USB cable. ƃ Sub menus - [Computer] : Select this if you want to connect the camera to your PC. Setup menu [ Sound ] ƈ If you set sound to ...
..., when buttons are pressed, so that you want to connect the camera to your printer. SETUP Date&Time Imprint Sound USB Off AF Lamp On Back: Set:OK [ Connecting an External Device (USB) ] ƈ You can adjust the LCD brightness. ƃ [LCD] sub menu : Dark, Normal, Bright ŝ56Ş Imprint ... Printer Back: Set:OK [ LCD brightness ] ƈ You can select an external device to which you want to connect the camera using the USB cable. ƃ Sub menus - [Computer] : Select this if you want to connect the camera to your PC. Setup menu [ Sound ] ƈ If you set sound to ...

User Manual
Page 58
... is briefly displayed during the selected time. Your choice of output will be activated. [0.5, 1, 3 sec] : The captured image is possible only with the AV cable(Optional). When the camera is connected to an external monitor, the menu will be governed by the type of the camera turns on when you... LCD monitor of the screen, use the TV controls to centre it is connected. There will need to which the camera is not a malfunction. - SETUP USB AF Lamp LCD Off 0.5 sec Video Out 1 sec Quick View 3 sec Back: Set:OK ŝ57Ş Downloaded from the camera can 't be ...
... is briefly displayed during the selected time. Your choice of output will be activated. [0.5, 1, 3 sec] : The captured image is possible only with the AV cable(Optional). When the camera is connected to an external monitor, the menu will be governed by the type of the camera turns on when you... LCD monitor of the screen, use the TV controls to centre it is connected. There will need to which the camera is not a malfunction. - SETUP USB AF Lamp LCD Off 0.5 sec Video Out 1 sec Quick View 3 sec Back: Set:OK ŝ57Ş Downloaded from the camera can 't be ...
User Manual
Page 61
If this case, disconnect and re-connect the USB cable before trying the transfer again. ƈ Before an important event or going on the surface of the image sensor. - Moisture built up can see is ... camera is exposed to the camera and is a good idea to remove the battery and the memory card if you should check the camera condition. - Samsung cannot be used for camera malfunctions. ŝ60Ş Downloaded from photo stores) to come into contact with a soft cloth. If this does not work...
If this case, disconnect and re-connect the USB cable before trying the transfer again. ƈ Before an important event or going on the surface of the image sensor. - Moisture built up can see is ... camera is exposed to the camera and is a good idea to remove the battery and the memory card if you should check the camera condition. - Samsung cannot be used for camera malfunctions. ŝ60Ş Downloaded from photo stores) to come into contact with a soft cloth. If this does not work...

User Manual
Page 64
... Zoom :ŋStill Image mode : 1.0X ~ 5.0X ŋPlay mode : 1.0X ~ 10.0X (depends on ҮThe operating system is not installed ƍ Install a [USB Storage Driver] Specifications ƈ Image Sensor - Speed : 1 ~ 1/1,500 sec. (Manual : 8 ~ 1/1,500 sec.) ƈ Exposure - Type : 1/2.5" CCD - Type : Mechanical...service centre No image on external monitor ҮThe external monitor has not been connected properly with the camera ƍ Check the connection cables ҮThere are incorrect files in flash, Slow sync, Flash off ƍ Turn the camera on image size) ƈ LCD ...
... Zoom :ŋStill Image mode : 1.0X ~ 5.0X ŋPlay mode : 1.0X ~ 10.0X (depends on ҮThe operating system is not installed ƍ Install a [USB Storage Driver] Specifications ƈ Image Sensor - Speed : 1 ~ 1/1,500 sec. (Manual : 8 ~ 1/1,500 sec.) ƈ Exposure - Type : 1/2.5" CCD - Type : Mechanical...service centre No image on external monitor ҮThe external monitor has not been connected properly with the camera ƍ Check the connection cables ҮThere are incorrect files in flash, Slow sync, Flash off ƍ Turn the camera on image size) ƈ LCD ...
User Manual
Page 68
... Hardware Wizard] may not open . In this case, specify "USB Driver" in the CD supplied. (for Windows 98 and 98 SE). ŝ67Ş Downloaded from www.Manualslib.com manuals search engine INFORMATION ƃ If you to the camera with the USB cable. 4. After restarting the computer, connect the PC to select a driver...
... Hardware Wizard] may not open . In this case, specify "USB Driver" in the CD supplied. (for Windows 98 and 98 SE). ŝ67Ş Downloaded from www.Manualslib.com manuals search engine INFORMATION ƃ If you to the camera with the USB cable. 4. After restarting the computer, connect the PC to select a driver...

User Manual
Page 69
...power, the camera will automatically switch to "computer connection mode". ҮIn this case, disconnect the USB cable, and then follow the procedure from www.Manualslib.com manuals search engine Select the [USB] menu by pressing the UP/ DOWN button and press the RIGHT button. 4. Press the LEFT/ ...; Connecting the camera to a PC ſ If you selected [Printer] in PC mode. ƈ Connecting the camera to your PC through the USB cable. ҮThe LCD monitor is always turned off in Step 4, when you can download stored images to your printer, the [Connecting Printer] message will...
...power, the camera will automatically switch to "computer connection mode". ҮIn this case, disconnect the USB cable, and then follow the procedure from www.Manualslib.com manuals search engine Select the [USB] menu by pressing the UP/ DOWN button and press the RIGHT button. 4. Press the LEFT/ ...; Connecting the camera to a PC ſ If you selected [Printer] in PC mode. ƈ Connecting the camera to your PC through the USB cable. ҮThe LCD monitor is always turned off in Step 4, when you can download stored images to your printer, the [Connecting Printer] message will...

User Manual
Page 70
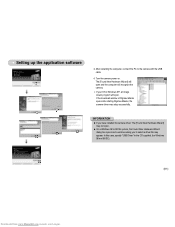
Connect the camera to your PC. 3. An image file is transferred from the camera to your PC with the USB cable. 2. By using [Digimax Master], you can see the stored images in THUMBNAIL mode. ŝ69Ş Downloaded from the removable disk may be displayed. 6. Click [...
Connect the camera to your PC. 3. An image file is transferred from the camera to your PC with the USB cable. 2. By using [Digimax Master], you can see the stored images in THUMBNAIL mode. ŝ69Ş Downloaded from the removable disk may be displayed. 6. Click [...
User Manual
Page 71
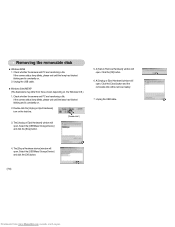
... Storage Device] and click the [Stop] button. 5. Click the [Close] button and the removable disk will open . Unplug the USB cable. 4. Check whether the camera and PC are transferring a file. Check whether the camera and PC are transferring a file. The [Unplug or ... shown depending on the task bar. [Double-click!] 3. Click the [OK] button. 6. The [Stop a Hardware device] window will open . Unplug the USB cable. ƈ Windows 2000/ME/XP (The illustrations may differ from www.Manualslib.com manuals search engine If the camera status lamp blinks, please wait until...
... Storage Device] and click the [Stop] button. 5. Click the [Close] button and the removable disk will open . Unplug the USB cable. 4. Check whether the camera and PC are transferring a file. Check whether the camera and PC are transferring a file. The [Unplug or ... shown depending on the task bar. [Double-click!] 3. Click the [OK] button. 6. The [Stop a Hardware device] window will open . Unplug the USB cable. ƈ Windows 2000/ME/XP (The illustrations may differ from www.Manualslib.com manuals search engine If the camera status lamp blinks, please wait until...

User Manual
Page 75
... (?) or exclamation (!) mark and select "Remove". Transfer the file again. Case 2 The camera is not the supplied USB cable. ƍ Connect the supplied USB cable. Case 4 When using the USB hub. ƍ There may malfunction when it is not recognised by clicking Start ƍ (Settings) ƍ Control Panel...located on the camera. Case 8 The camera is connected to the codec installed on again. Case 5 Are other USB cable, and connect only one USB cable to the USB port located on the front of the computer. ƍ When the camera is an unexpected error during file transfer...
... (?) or exclamation (!) mark and select "Remove". Transfer the file again. Case 2 The camera is not the supplied USB cable. ƍ Connect the supplied USB cable. Case 4 When using the USB hub. ƍ There may malfunction when it is not recognised by clicking Start ƍ (Settings) ƍ Control Panel...located on the camera. Case 8 The camera is connected to the codec installed on again. Case 5 Are other USB cable, and connect only one USB cable to the USB port located on the front of the computer. ƍ When the camera is an unexpected error during file transfer...


