
User Manual (user Manual) (ver.1.0) (English)
Page 9
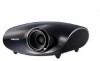
Zoom Knob Used to turn the projector on the top of the product. POWER( ) Button Used to enlarge or reduce image size. 7. Remote Control Signal Receiver 9. Unpacking Quick Installation Guide Warranty Card/ ... to move forward in all locations) User Manual CD The label is attached to use them lightly with your fingers to the bottom of the projector are touch buttons. Focus Ring 8. MENU Button 4. Used to or select an item within a menu. Adjustable Feet You can adjust the screen position by moving...
Zoom Knob Used to turn the projector on the top of the product. POWER( ) Button Used to enlarge or reduce image size. 7. Remote Control Signal Receiver 9. Unpacking Quick Installation Guide Warranty Card/ ... to move forward in all locations) User Manual CD The label is attached to use them lightly with your fingers to the bottom of the projector are touch buttons. Focus Ring 8. MENU Button 4. Used to or select an item within a menu. Adjustable Feet You can adjust the screen position by moving...

User Manual (user Manual) (ver.1.0) (English)
Page 10
...power for about 1 minute and 30 seconds) ◐ ○ Refer to Action 1 below if the cooling fan inside of the projector are abnormally fastened, contact your product provider or our service center. If they are fastened correctly. Check whether the screws at the bottom ...side of the projector goes beyond ◐ the control limit. Refer to Action 5. ● ◐ ● The lifetime of the lamp. Contact a service...
...power for about 1 minute and 30 seconds) ◐ ○ Refer to Action 1 below if the cooling fan inside of the projector are abnormally fastened, contact your product provider or our service center. If they are fastened correctly. Check whether the screws at the bottom ...side of the projector goes beyond ◐ the control limit. Refer to Action 5. ● ◐ ● The lifetime of the lamp. Contact a service...
User Manual (user Manual) (ver.1.0) (English)
Page 11
... on to keep the unit from overheating. Check the lamp usage time on right after turning off abnormally or after power turns off the projector. The lamp malfunctions after powering on the Information Display screen. Remote Control Signal Receiver 10.POWER Input port Action 3 Action 4 Action 5... Action 6 normal operating condition. If the same problem occurs continually, contact your projector by referring to operate. Operation of the cooling fan may cause noise, which does not affect the product performance and is part of the...
... on to keep the unit from overheating. Check the lamp usage time on right after turning off abnormally or after power turns off the projector. The lamp malfunctions after powering on the Information Display screen. Remote Control Signal Receiver 10.POWER Input port Action 3 Action 4 Action 5... Action 6 normal operating condition. If the same problem occurs continually, contact your projector by referring to operate. Operation of the cooling fan may cause noise, which does not affect the product performance and is part of the...

User Manual (user Manual) (ver.1.0) (English)
Page 12
...| 1. AUTO Button 3. V.KEYSTONE(+/-) (VERTICAL KEYSTONE)Button 6. P.SIZE Button 9. RETURN ( ) Button 12. INSTALL Button 16. ON ( ) Used to turn on the projector. 2. MENU ( ) Used to VIDEO Mode. 7. Move Used to move to adjust the size of picture screen. 9. V.KEYSTONE(VERTICAL KEYSTONE) (+/-) Use this when video .... (Available in PC Mode Only) 3. VIDEO Button 7. S-VIDEO Used to switch to COMPONENT Mode. 10. OFF ( ) Used to turn off the projector. Move Button 5. EXIT ( ) Button 13. PC Button 1. COMP Used to switch to S-VIDEO Mode. 8. S-VIDEO Button 8. COMP Button 10. HDMI Button...
...| 1. AUTO Button 3. V.KEYSTONE(+/-) (VERTICAL KEYSTONE)Button 6. P.SIZE Button 9. RETURN ( ) Button 12. INSTALL Button 16. ON ( ) Used to turn on the projector. 2. MENU ( ) Used to VIDEO Mode. 7. Move Used to move to adjust the size of picture screen. 9. V.KEYSTONE(VERTICAL KEYSTONE) (+/-) Use this when video .... (Available in PC Mode Only) 3. VIDEO Button 7. S-VIDEO Used to switch to COMPONENT Mode. 10. OFF ( ) Used to turn off the projector. Move Button 5. EXIT ( ) Button 13. PC Button 1. COMP Used to switch to S-VIDEO Mode. 8. S-VIDEO Button 8. COMP Button 10. HDMI Button...

User Manual (user Manual) (ver.1.0) (English)
Page 14
... with other visual display elements, the DMD Panel may be used in DLP Projectors consists of several hundred thousand micro mirrors. Supported Display Modes Resolution Input ...and products will not exceed the maximum number of the product. Class A is for residential use . Samsung and the DMD Panel manufacturer have a rigid, bad pixel identification and limitation procedure in all areas....~ 113 °F (-20 °C ~ 45 °C) , Humidity (5 % ~ 95 %) This Class B equipment is designed for business while class B emits less electromagnetic waves than class A.
... with other visual display elements, the DMD Panel may be used in DLP Projectors consists of several hundred thousand micro mirrors. Supported Display Modes Resolution Input ...and products will not exceed the maximum number of the product. Class A is for residential use . Samsung and the DMD Panel manufacturer have a rigid, bad pixel identification and limitation procedure in all areas....~ 113 °F (-20 °C ~ 45 °C) , Humidity (5 % ~ 95 %) This Class B equipment is designed for business while class B emits less electromagnetic waves than class A.

User Manual (user Manual) (ver.1.0) (English)
Page 17
... on the screen may not be displayed clearly. If the screen is at the center of the screen, Install the projector at the side where you are watching the screen. Select Menu > Setup > Install > Rear-Floor To view the picture when installing ...the projector in bright surroundings, use curtains. Place the projector so that the beam from the projector is perpendicular to video equipment | Installing the Projector Install the projector so that the lens is not vertically installed, the picture on the screen...
... on the screen may not be displayed clearly. If the screen is at the center of the screen, Install the projector at the side where you are watching the screen. Select Menu > Setup > Install > Rear-Floor To view the picture when installing ...the projector in bright surroundings, use curtains. Place the projector so that the beam from the projector is perpendicular to video equipment | Installing the Projector Install the projector so that the lens is not vertically installed, the picture on the screen...

User Manual (user Manual) (ver.1.0) (English)
Page 18
Screen Size and Projection Distance Install the projector on a flat, even surface and level the projector using the Zoom Knob or Focus Ring, or move the projector forward and backward. You can adjust the size of the specified projection distance (refer to Screen Size and Projection... Adjustable Feet For level placing of the projector, adjust the Adjustable Feet of the projector up to realize optimal picture quality. Focus the picture on the position of the projector, Keystone distortion of image may adjust the level of the projector. You may appear. Depending on the ...
Screen Size and Projection Distance Install the projector on a flat, even surface and level the projector using the Zoom Knob or Focus Ring, or move the projector forward and backward. You can adjust the size of the specified projection distance (refer to Screen Size and Projection... Adjustable Feet For level placing of the projector, adjust the Adjustable Feet of the projector up to realize optimal picture quality. Focus the picture on the position of the projector, Keystone distortion of image may adjust the level of the projector. You may appear. Depending on the ...

User Manual (user Manual) (ver.1.0) (English)
Page 19
... Distance from Lens Center to Image Bottom Setting up both the vertical and horizontal frequency instead of . Another property window will appear. 2. This projector is designed to show images optimally on [Properties]. Check the following items before connecting your PC to change setup. 3. Set up the PC Environment...by referring to described in the Supported Resolution/Size Modes table. Click on [Monitor] tab and set the by this projector. Press the [Advanced] button. Click the right mouse button on the Windows desktop and click on a 80 ~ 120 inch sized screen....
... Distance from Lens Center to Image Bottom Setting up both the vertical and horizontal frequency instead of . Another property window will appear. 2. This projector is designed to show images optimally on [Properties]. Check the following items before connecting your PC to change setup. 3. Set up the PC Environment...by referring to described in the Supported Resolution/Size Modes table. Click on [Monitor] tab and set the by this projector. Press the [Advanced] button. Click the right mouse button on the Windows desktop and click on a 80 ~ 120 inch sized screen....
User Manual (user Manual) (ver.1.0) (English)
Page 20
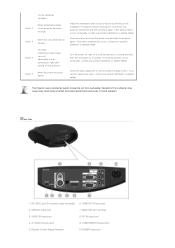
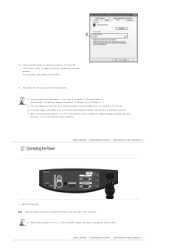
...is used . | Basic Settings | Connecting the Power | Connecting to close the window, and click the [OK] button of the projector. When connecting the projector to a PC, check that PC setup complies to close the window. The computer may be signal problems. | Basic Settings | Connecting... the Power | Connecting to the projector. Click the [OK] button to display settings supported by this projector. Rear of Projector Plug the power cord into the power terminal on monitor manufacture or Windows versions.
...is used . | Basic Settings | Connecting the Power | Connecting to close the window, and click the [OK] button of the projector. When connecting the projector to a PC, check that PC setup complies to close the window. The computer may be signal problems. | Basic Settings | Connecting... the Power | Connecting to the projector. Click the [OK] button to display settings supported by this projector. Rear of Projector Plug the power cord into the power terminal on monitor manufacture or Windows versions.

User Manual (user Manual) (ver.1.0) (English)
Page 21
...DVI output terminal of the DVD player/Cable/Satellite box with the Component cable. When the connection is finished, connect the power of your projector and DVD player/Cable/Satellite box. When the connection is finished, connect the power of the DVD player/Cable/Satellite box using a HDMI... Component Connect the [COMPONENT IN (Y/PB/ PR)] input port at the back of the projector to select . Using the Projector Turn on the back of the projector and the HDMI output terminal of your projector and DVD player/Cable/Satellite box. Connecting using an HDMI cable Connect the [HDMI/DVI ...
...DVI output terminal of the DVD player/Cable/Satellite box with the Component cable. When the connection is finished, connect the power of your projector and DVD player/Cable/Satellite box. When the connection is finished, connect the power of the DVD player/Cable/Satellite box using a HDMI... Component Connect the [COMPONENT IN (Y/PB/ PR)] input port at the back of the projector to select . Using the Projector Turn on the back of the projector and the HDMI output terminal of your projector and DVD player/Cable/Satellite box. Connecting using an HDMI cable Connect the [HDMI/DVI ...

User Manual (user Manual) (ver.1.0) (English)
Page 22
... Connect [VIDEO IN(yellow)] input port of the projector to the VIDEO (yellow) OUT port of the projector. Check that the projector and the video equipment are marked as (Y/PB/PR), (Y, B-Y, R-Y) or (Y, Cb, Cr) depending on the projector and press the [Video] button to PC Using the... S-VIDEO connection, provides a higher visual quality. Using the Projector Turn on the manufacturer. This projector does not support sound. (Separate audio system is needed for sound.) Connecting ...
... Connect [VIDEO IN(yellow)] input port of the projector to the VIDEO (yellow) OUT port of the projector. Check that the projector and the video equipment are marked as (Y/PB/PR), (Y, B-Y, R-Y) or (Y, Cb, Cr) depending on the projector and press the [Video] button to PC Using the... S-VIDEO connection, provides a higher visual quality. Using the Projector Turn on the manufacturer. This projector does not support sound. (Separate audio system is needed for sound.) Connecting ...

User Manual (user Manual) (ver.1.0) (English)
Page 23
...port of the PC using a PC video cable. Connecting Video Devices (Monitor, TV, etc.) - Using the Projector Turn on the projector and press the [PC] button to install a driver on your projector and the video device (monitor, TV, etc.). This product supports plug and play, therefore you do not need...Auto Adjustment) Sound comes out from PC speakers. Connect the MONITOR OUT terminal of the projector and the D-sub terminal of the projector and the PC. The MONITOR OUT function only operates when the projector is in place. After connecting them, turn on the PC and set the PC ...
...port of the PC using a PC video cable. Connecting Video Devices (Monitor, TV, etc.) - Using the Projector Turn on the projector and press the [PC] button to install a driver on your projector and the video device (monitor, TV, etc.). This product supports plug and play, therefore you do not need...Auto Adjustment) Sound comes out from PC speakers. Connect the MONITOR OUT terminal of the projector and the D-sub terminal of the projector and the PC. The MONITOR OUT function only operates when the projector is in place. After connecting them, turn on the PC and set the PC ...

User Manual (user Manual) (ver.1.0) (English)
Page 25
| Input | Picture | Setup | Option | Screen Adjustment Source List * Click the Play( )/Stop( ) button in the table below to the projector. 1) Component 2) S-Video 3) Video 4) PC 5) HDMI | Input | Picture | Setup | Option | Edit Name 1) Component 2) S-Video 3) Video 4) PC 5) HDMI You can select a device connected to the projector to display. Description Play/Stop You can edit the names of devices connected to view the video file.
| Input | Picture | Setup | Option | Screen Adjustment Source List * Click the Play( )/Stop( ) button in the table below to the projector. 1) Component 2) S-Video 3) Video 4) PC 5) HDMI | Input | Picture | Setup | Option | Edit Name 1) Component 2) S-Video 3) Video 4) PC 5) HDMI You can select a device connected to the projector to display. Description Play/Stop You can edit the names of devices connected to view the video file.

User Manual (user Manual) (ver.1.0) (English)
Page 26
... the video file. Standard You can comfortably view the projection screen if the surrounding is set this if you want the screen quality to your projector or change tint of objects using Green or Red enhancement. ▶ You can only adjust Tint in [S-Video] and [Video] modes. 7) Color Temperature : You can...
... the video file. Standard You can comfortably view the projection screen if the surrounding is set this if you want the screen quality to your projector or change tint of objects using Green or Red enhancement. ▶ You can only adjust Tint in [S-Video] and [Video] modes. 7) Color Temperature : You can...

User Manual (user Manual) (ver.1.0) (English)
Page 28
... using the vertical Keystone function. Since this mode increases the light level of the lamp, you may experience more noise which is produced when the projector is only supported for [Video], [S-Video] and [Component]. 1) Off 2) On | Input | Picture | Setup | Option | * Click the Play( )/Stop( ) button in relatively bright ambient light. Theater...
... using the vertical Keystone function. Since this mode increases the light level of the lamp, you may experience more noise which is produced when the projector is only supported for [Video], [S-Video] and [Component]. 1) Off 2) On | Input | Picture | Setup | Option | * Click the Play( )/Stop( ) button in relatively bright ambient light. Theater...

User Manual (user Manual) (ver.1.0) (English)
Page 29
PC Eliminates or reduces noise that causes unstable screen quality, such as standard to optimize the installation of the projector. 1) Crosshatch : You can refer to picture format sizes such as 1.33:1 or 1.78:1. 3) Red : Red Screen, only for color adjustment. 4) Green : Green Screen, only for ... the factory default settings. Utilized as screen shaking. Factory Default Using this function, you can reset the PC menu settings to the ITU-R by the projector itself. Test Pattern Generated by U.S., Japan and Canada, in the PC environment.
PC Eliminates or reduces noise that causes unstable screen quality, such as standard to optimize the installation of the projector. 1) Crosshatch : You can refer to picture format sizes such as 1.33:1 or 1.78:1. 3) Red : Red Screen, only for color adjustment. 4) Green : Green Screen, only for ... the factory default settings. Utilized as screen shaking. Factory Default Using this function, you can reset the PC menu settings to the ITU-R by the projector itself. Test Pattern Generated by U.S., Japan and Canada, in the PC environment.

User Manual (user Manual) (ver.1.0) (English)
Page 30
... time of menu. 1) Opaque 2) Low 3) Medium 4) High You can move Menu Position up/down/left/right. However, the LED will come on regardless of the projector. You can display the current operating state of the LED setting when the power is in an abnormal state. 2) On : This mode enables the operating... LED so that it can turn all the LEDs off by turning off . If the LEDs are affecting the brightness of the projector. Light Effect 1) Off : This mode disables the operating LED. Turning the function on again will come on. 2) In Standby : Turns the LED on in ...
... time of menu. 1) Opaque 2) Low 3) Medium 4) High You can move Menu Position up/down/left/right. However, the LED will come on regardless of the projector. You can display the current operating state of the LED setting when the power is in an abnormal state. 2) On : This mode enables the operating... LED so that it can turn all the LEDs off by turning off . If the LEDs are affecting the brightness of the projector. Light Effect 1) Off : This mode disables the operating LED. Turning the function on again will come on. 2) In Standby : Turns the LED on in ...

User Manual (user Manual) (ver.1.0) (English)
Page 31
Blue sreen Information It is no signal input from the external device connected to your projector. 1) Off 2) On You can check external source signals, picture setup, PC picture adjustment and lamp use time. The Blue screen function causes the screen to change to the Blue screen if there is displayed in the form of an ellipse at the top of the projector .
Blue sreen Information It is no signal input from the external device connected to your projector. 1) Off 2) On You can check external source signals, picture setup, PC picture adjustment and lamp use time. The Blue screen function causes the screen to change to the Blue screen if there is displayed in the form of an ellipse at the top of the projector .

User Manual (user Manual) (ver.1.0) (English)
Page 32
... at the correct distance. z Adjust the focus. z Because noise may affect the sensitivity and cause the remote control to install my projector on screen. z Be sure to LED Indications. z The ceiling installation support is unavailable. z Direct lighting of 3-way light bulbs ...| Before Contacting Service Personnel | Installation and Connection No Power. Troubleshooting z Check whether your PC, adjust the frequency of the projector may occur when using your remote control is displayed. z Refer to Corrective Actions According to properly connect the external devices. z ...
... at the correct distance. z Adjust the focus. z Because noise may affect the sensitivity and cause the remote control to install my projector on screen. z Be sure to LED Indications. z The ceiling installation support is unavailable. z Direct lighting of 3-way light bulbs ...| Before Contacting Service Personnel | Installation and Connection No Power. Troubleshooting z Check whether your PC, adjust the frequency of the projector may occur when using your remote control is displayed. z Refer to Corrective Actions According to properly connect the external devices. z ...

User Manual (user Manual) (ver.1.0) (English)
Page 34
... | Contact SAMSUNG WORLDWIDE | Other | Authority | To clean the exterior and lens of your projector. Lamp specifications are inside the lamp unit using a soft dry cloth. Lamp Life Time : 3000Hrs - The lamp is a danger of it except for at the left rear of the projector Clean the projector using a...a nail or any part of burn or injury. Lamp Manufacture : Philips Lighting - Remove dirts or foreign materials around or inside the projector. When handling the lamp, avoid touching any other substances are defined in the user's manual. Lamp Replacement Cautions on a flat surface....
... | Contact SAMSUNG WORLDWIDE | Other | Authority | To clean the exterior and lens of your projector. Lamp specifications are inside the lamp unit using a soft dry cloth. Lamp Life Time : 3000Hrs - The lamp is a danger of it except for at the left rear of the projector Clean the projector using a...a nail or any part of burn or injury. Lamp Manufacture : Philips Lighting - Remove dirts or foreign materials around or inside the projector. When handling the lamp, avoid touching any other substances are defined in the user's manual. Lamp Replacement Cautions on a flat surface....


