User Manual (user Manual) (ver.2.00) (English)
Page 5
...for moving & storing your machine TROUBLESHOOTING 1 1 Redistributing toner 1 Tips for avoiding paper jams 2 Clearing original document jams (CLX-3185FN/CLX-3185FW only) 2 Clearing paper jams 3 In the tray 3 In the fuser unit area 4 In the paper exit ...Samsung Scan and Fax Manager Problem 15 Common Windows problems 16 Common Linux problems 17 Common Macintosh problems SUPPLIES AND ACCESSORIES 1 1 How to purchase 1 Available supplies 1 Available maintenance parts 2 Checking replaceable's lifespan 2 Replacing the toner cartridge 3 Replacing the imaging unit 4 Replacing the waste toner container...
...for moving & storing your machine TROUBLESHOOTING 1 1 Redistributing toner 1 Tips for avoiding paper jams 2 Clearing original document jams (CLX-3185FN/CLX-3185FW only) 2 Clearing paper jams 3 In the tray 3 In the fuser unit area 4 In the paper exit ...Samsung Scan and Fax Manager Problem 15 Common Windows problems 16 Common Linux problems 17 Common Macintosh problems SUPPLIES AND ACCESSORIES 1 1 How to purchase 1 Available supplies 1 Available maintenance parts 2 Checking replaceable's lifespan 2 Replacing the toner cartridge 3 Replacing the imaging unit 4 Replacing the waste toner container...

User Manual (user Manual) (ver.2.00) (English)
Page 12
... power consumption is not in the European Union and other types of waste and recycle them responsibly to Local, State or Federal Laws.(U.S.A. only) Power Saver This printer contains advanced energy conservation technology that the product and its electronic accessories should ...contact either the retailer where they can take these items from uncontrolled waste disposal, please separate these items for environmentally safe ...
... power consumption is not in the European Union and other types of waste and recycle them responsibly to Local, State or Federal Laws.(U.S.A. only) Power Saver This printer contains advanced energy conservation technology that the product and its electronic accessories should ...contact either the retailer where they can take these items from uncontrolled waste disposal, please separate these items for environmentally safe ...
User Manual (user Manual) (ver.2.00) (English)
Page 13
...'s authority to provide reasonable protection against harmful interference in a residential installation. However, there is no guarantee that the battery contains mercury, cadmium or lead above the reference levels in EC Directive 2006/66. Change or modifications not expressly approved by one... the interference-causing equipment standard entitled "Digital Apparatus", ICES-003 of , these substances can be disposed with other types of waste and recycle them through your local, free battery return system. Canadian Radio Interference Regulations This digital apparatus does not exceed the...
...'s authority to provide reasonable protection against harmful interference in a residential installation. However, there is no guarantee that the battery contains mercury, cadmium or lead above the reference levels in EC Directive 2006/66. Change or modifications not expressly approved by one... the interference-causing equipment standard entitled "Digital Apparatus", ICES-003 of , these substances can be disposed with other types of waste and recycle them through your local, free battery return system. Canadian Radio Interference Regulations This digital apparatus does not exceed the...
User Manual (user Manual) (ver.2.00) (English)
Page 26
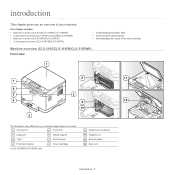
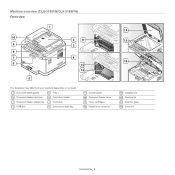
...illustration may differ from your machine. This chapter includes: • Machine overview (CLX-3185/CLX-3185N/CLX-3185WK) • Control panel overview (CLX-3185/CLX-3185N/CLX-3185WK) • Machine overview (CLX-3185FN/CLX-3185FW) • Control panel overview (CLX-3185FN/CLX-3185FW) • Understanding the Status LED • Introducing the useful buttons &#... 6 Output support 3 Tray 1 7 Control panel 4 Front door handle 8 Toner cartridges a. CLX-3185N/CLX-3185WK only 9 Waste toner container 10 Imaging unit 11 Scanner glass 12 Scan unit Introduction_ 1 introduction 1.
...illustration may differ from your machine. This chapter includes: • Machine overview (CLX-3185/CLX-3185N/CLX-3185WK) • Control panel overview (CLX-3185/CLX-3185N/CLX-3185WK) • Machine overview (CLX-3185FN/CLX-3185FW) • Control panel overview (CLX-3185FN/CLX-3185FW) • Understanding the Status LED • Introducing the useful buttons &#... 6 Output support 3 Tray 1 7 Control panel 4 Front door handle 8 Toner cartridges a. CLX-3185N/CLX-3185WK only 9 Waste toner container 10 Imaging unit 11 Scanner glass 12 Scan unit Introduction_ 1 introduction 1.
User Manual (user Manual) (ver.2.00) (English)
Page 29
Machine overview (CLX-3185FN/CLX-3185FW) Front view 1 10 9 8 7 6 5 2 11 3 4 12 13 This illustration may differ from your machine depending on its model. 1 Document width guides 5 Tray 1 2 Document feeder input tray 6 Front door handle 3 Document feeder output tray 7 Front door 4 USB port 8 Document output tray 9 Control panel 10 Document feeder cover 11 Toner cartridges 12 Waste toner container 14 15 16 13 Imaging unit 14 Scanner lid 15 Scanner glass 16 Scan unit Introduction_ 4
Machine overview (CLX-3185FN/CLX-3185FW) Front view 1 10 9 8 7 6 5 2 11 3 4 12 13 This illustration may differ from your machine depending on its model. 1 Document width guides 5 Tray 1 2 Document feeder input tray 6 Front door handle 3 Document feeder output tray 7 Front door 4 USB port 8 Document output tray 9 Control panel 10 Document feeder cover 11 Toner cartridges 12 Waste toner container 14 15 16 13 Imaging unit 14 Scanner lid 15 Scanner glass 16 Scan unit Introduction_ 4
User Manual (user Manual) (ver.2.00) (English)
Page 113
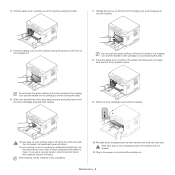
... dust and spilled toner from the toner cartridges area and their cavities. 9. After cleaning, let the machine to avoid touching this area. 6. Pull the waste toner container out of the drum located in the imaging unit. Holding the groove on the front of the imaging unit, push imaging unit into the machine... the machine. •If toner gets on the cartridge to dry completely. 10. Do not touch the green surface of the imaging unit. Insert the waste toner container into the air then might be harmful if inhaled.
... dust and spilled toner from the toner cartridges area and their cavities. 9. After cleaning, let the machine to avoid touching this area. 6. Pull the waste toner container out of the drum located in the imaging unit. Holding the groove on the front of the imaging unit, push imaging unit into the machine... the machine. •If toner gets on the cartridge to dry completely. 10. Do not touch the green surface of the imaging unit. Insert the waste toner container into the air then might be harmful if inhaled.
User Manual (user Manual) (ver.2.00) (English)
Page 121
... Contact the service representatives. Make sure that the receiving machine is not a Samsung-genuine toner cartridge. The toner cartridge is operational. Paper has jammed in the ADF. Install the waste toner container. Paper has jammed inside machine Prepare IMG unit ▼ Prepare new Transfer belt...(See "In the tray" on page 2). The estimated life of the fax job. Clear the jam (See "Clearing original document jams (CLX-3185FN/CLX-3185 FW only)" on page 3). If the problem persists, call a service representative. Prepare a imaging unit for DHCP is failed. Install the ...
... Contact the service representatives. Make sure that the receiving machine is not a Samsung-genuine toner cartridge. The toner cartridge is operational. Paper has jammed in the ADF. Install the waste toner container. Paper has jammed inside machine Prepare IMG unit ▼ Prepare new Transfer belt...(See "In the tray" on page 2). The estimated life of the fax job. Clear the jam (See "Clearing original document jams (CLX-3185FN/CLX-3185 FW only)" on page 3). If the problem persists, call a service representative. Prepare a imaging unit for DHCP is failed. Install the ...
User Manual (user Manual) (ver.2.00) (English)
Page 133
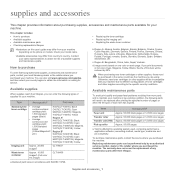
...Available maintenance parts • Checking replaceable's lifespan • Replacing the toner cartridge • Replacing the imaging unit • Replacing the waste toner container •Illustrations on its options or models. c. When purchasing new toner cartridges or other supplies, these must be performed only by operating ... of each page. Yield is affected by an authorized service provider, dealer or the retailer where you can also visit www.samsung.com/supplies, and then select your country/region to maintain your machine in full color (Cyan, Magenta, Yellow, Black), the...
...Available maintenance parts • Checking replaceable's lifespan • Replacing the toner cartridge • Replacing the imaging unit • Replacing the waste toner container •Illustrations on its options or models. c. When purchasing new toner cartridges or other supplies, these must be performed only by operating ... of each page. Yield is affected by an authorized service provider, dealer or the retailer where you can also visit www.samsung.com/supplies, and then select your country/region to maintain your machine in full color (Cyan, Magenta, Yellow, Black), the...
User Manual (user Manual) (ver.2.00) (English)
Page 135
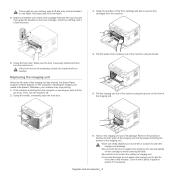
... computer or warming up, wait until it clicks into fabric. 8. If the machine is not completely closed, the machine will not operate. Pull the waste toner container out of the machine using the groove on both sides of the imaging unit and the paper protecting the surface of the toner cartridge matches...
... computer or warming up, wait until it clicks into fabric. 8. If the machine is not completely closed, the machine will not operate. Pull the waste toner container out of the machine using the groove on both sides of the imaging unit and the paper protecting the surface of the toner cartridge matches...
User Manual (user Manual) (ver.2.00) (English)
Page 136
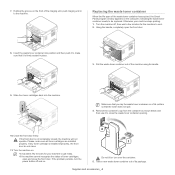
... toner cartridges are installed properly. If the front door is firmly seated in to cool. 2. Insert the waste toner container into the machine. Remove the container's cap from the container as shown below and then use it to get ready. •If the machine cannot recognize the status ... persists, turn the power button off , then wait a few minutes for the machine to the machine. Replacing the waste toner container When the life span of the waste toner container has expired, the Smart Panel program window appears on the front of toner cartridges, open the front door. 8. Slide...
... toner cartridges are installed properly. If the front door is firmly seated in to cool. 2. Insert the waste toner container into the machine. Remove the container's cap from the container as shown below and then use it to get ready. •If the machine cannot recognize the status ... persists, turn the power button off , then wait a few minutes for the machine to the machine. Replacing the waste toner container When the life span of the waste toner container has expired, the Smart Panel program window appears on the front of toner cartridges, open the front door. 8. Slide...

