
User Manual (ENGLISH)
Page 16
... report 63 Adjusting the color contrast 64 Clearing memory 64 Cleaning your machine 64 Cleaning the outside 64 Cleaning the inside 66 Cleaning the scan unit 67 Maintaining the cartridge 67 Toner cartridge storage 67 Handling instructions 67 Use of non-Samsung and refilled toner cartridge... 67 Estimated cartridge life 67 Redistributing toner 68 Replacing the toner cartridge 69 Replacing the imaging unit 70 Replacing the waste toner container 71 Maintenance parts 71 Checking replaceables...
... report 63 Adjusting the color contrast 64 Clearing memory 64 Cleaning your machine 64 Cleaning the outside 64 Cleaning the inside 66 Cleaning the scan unit 67 Maintaining the cartridge 67 Toner cartridge storage 67 Handling instructions 67 Use of non-Samsung and refilled toner cartridge... 67 Estimated cartridge life 67 Redistributing toner 68 Replacing the toner cartridge 69 Replacing the imaging unit 70 Replacing the waste toner container 71 Maintenance parts 71 Checking replaceables...

User Manual (ENGLISH)
Page 18
...; Supplied software • Printer driver features Rear view 1 Document width guides 2 ADF 3 Control panel 4 Output support 5 Front cover 6 Front cover handle 7 Tray 1 8 Document input tray 9 Document output tray 10 USB memory port 11 Toner cartridge 12 Imaging unit 13 Waste toner container 14... Scanner lid 15 Scanner glass 16 Scan unit 18 _Introduction Extension telephone socket 1 (EXT) 2 Telephone line socket 3 Network port 4 USB port 5 Handle ...
...; Supplied software • Printer driver features Rear view 1 Document width guides 2 ADF 3 Control panel 4 Output support 5 Front cover 6 Front cover handle 7 Tray 1 8 Document input tray 9 Document output tray 10 USB memory port 11 Toner cartridge 12 Imaging unit 13 Waste toner container 14... Scanner lid 15 Scanner glass 16 Scan unit 18 _Introduction Extension telephone socket 1 (EXT) 2 Telephone line socket 3 Network port 4 USB port 5 Handle ...
User Manual (ENGLISH)
Page 63
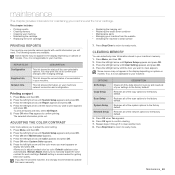
... reports • Clearing memory • Cleaning your machine • Maintaining the cartridge • Replacing the toner cartridge • Replacing the imaging unit • Replacing the waste toner container • Maintenance parts • Managing your machine. This list shows the documents currently stored for delayed... on the faxes and emails you want appears on your machine's network connection and configuration. Press Menu until the color menu you have recently sent. Allows you to print appears and press OK. Default setting is strongly recommended to operate...
... reports • Clearing memory • Cleaning your machine • Maintaining the cartridge • Replacing the toner cartridge • Replacing the imaging unit • Replacing the waste toner container • Maintenance parts • Managing your machine. This list shows the documents currently stored for delayed... on the faxes and emails you want appears on your machine's network connection and configuration. Press Menu until the color menu you have recently sent. Allows you to print appears and press OK. Default setting is strongly recommended to operate...
User Manual (ENGLISH)
Page 65
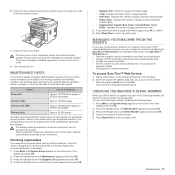
...the front cover is firmly seated in place. • Do not touch the green surface, the imaging unit with a dry cloth and wash it in to the imaging unit. Pull the imaging unit out of the imaging unit. 8. 4. Reinstall all the compartments into the machine. • If toner gets on the front ...wipe it off with your machine or its handle. 7. This will not operate. 11. Pull the waste toner container out of the imaging unit, push imaging unit in cold water. Slide four toner cartridge back into the machine, and close the front cover. After cleaning, let the machine to...
...the front cover is firmly seated in place. • Do not touch the green surface, the imaging unit with a dry cloth and wash it in to the imaging unit. Pull the imaging unit out of the imaging unit. 8. 4. Reinstall all the compartments into the machine. • If toner gets on the front ...wipe it off with your machine or its handle. 7. This will not operate. 11. Pull the waste toner container out of the imaging unit, push imaging unit in cold water. Slide four toner cartridge back into the machine, and close the front cover. After cleaning, let the machine to...
User Manual (ENGLISH)
Page 69
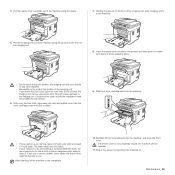
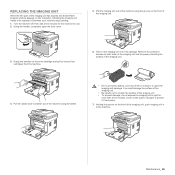
...wait a few minutes. You could damage the surface of the imaging unit. • Be careful not to scratch the surface of the imaging unit, push imaging unit in to the machine. Cover it with a piece of the imaging unit has expired, the Smart Panel program window appears on the computer,...; Don't use sharp objects, such as a knife or scissors, to open the front cover. 5. Take a new imaging unit out of the imaging unit. 4. Pull the imaging unit out of the imaging unit. 3. Maintenance_ 69 Remove the protective devices on the front of the machine using its package. REPLACING THE...
...wait a few minutes. You could damage the surface of the imaging unit. • Be careful not to scratch the surface of the imaging unit, push imaging unit in to the machine. Cover it with a piece of the imaging unit has expired, the Smart Panel program window appears on the computer,...; Don't use sharp objects, such as a knife or scissors, to open the front cover. 5. Take a new imaging unit out of the imaging unit. 4. Pull the imaging unit out of the imaging unit. 3. Maintenance_ 69 Remove the protective devices on the front of the machine using its package. REPLACING THE...
User Manual (ENGLISH)
Page 71
...Samsung website, the machine's serial number may be required. Risk of each item. 5. Dispose used betteries according to ready mode. Press Menu until Maintenance appears and press OK. 3. CHECKING THE MACHINE'S SERIAL NUMBER When you call for using the scanner glass. • Imaging Unit...unit Approx. 100,000 black pages or 25,000 color pages Transfer roller Approx. 100,000 pages Transfer unit (ITB) Approx. 100,000 black pages or 25,000 color... and set up other network parameters. • Change the printer properties. • Set the machine to send email notifications to...
...Samsung website, the machine's serial number may be required. Risk of each item. 5. Dispose used betteries according to ready mode. Press Menu until Maintenance appears and press OK. 3. CHECKING THE MACHINE'S SERIAL NUMBER When you call for using the scanner glass. • Imaging Unit...unit Approx. 100,000 black pages or 25,000 color pages Transfer roller Approx. 100,000 pages Transfer unit (ITB) Approx. 100,000 black pages or 25,000 color... and set up other network parameters. • Change the printer properties. • Set the machine to send email notifications to...

User Manual (ENGLISH)
Page 76
...page 57.) The network IP address you want to send those pages that have installed is already engaged. Try again. If the problem (Laser Scanning Unit.) persists, call for service. size by someone else. Turn the power switch off and on . To cancel the fax job, press... a communication problem. Connection Error Connection with the phone line. Data Read Fail Check USB Mem. Data Write Fail Check USB Mem. Install the imaging unit. cartridge. The received fax data will be used by SMTP server. Try again after a few minutes. W Yes X Your machine's memory has...
...page 57.) The network IP address you want to send those pages that have installed is already engaged. Try again. If the problem (Laser Scanning Unit.) persists, call for service. size by someone else. Turn the power switch off and on . To cancel the fax job, press... a communication problem. Connection Error Connection with the phone line. Data Read Fail Check USB Mem. Data Write Fail Check USB Mem. Install the imaging unit. cartridge. The received fax data will be used by SMTP server. Try again after a few minutes. W Yes X Your machine's memory has...
User Manual (ENGLISH)
Page 81
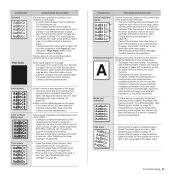
...of the machine. (See "Cleaning the inside of your software application or the printer properties. Try a different kind or brand of paper. Contact a service representative....on page 38.) • If characters are improperly formed and producing hollow images, the paper stock may be damaged. Try a different brand of paper. ... single sheet of paper may be too damp. Vertical lines Color or Black background Toner smear If black vertical streaks appear on... characters are improperly formed and producing a wavy effect, the scanner unit may be dirty. Try reprinting the job. • The moisture...
...of the machine. (See "Cleaning the inside of your software application or the printer properties. Try a different kind or brand of paper. Contact a service representative....on page 38.) • If characters are improperly formed and producing hollow images, the paper stock may be damaged. Try a different brand of paper. ... single sheet of paper may be too damp. Vertical lines Color or Black background Toner smear If black vertical streaks appear on... characters are improperly formed and producing a wavy effect, the scanner unit may be dirty. Try reprinting the job. • The moisture...

User Manual (ENGLISH)
Page 87
...-C4092S (Cyan) CLT-M4092S (Magenta) CLT-Y4092S (Yellow) Imaging unit Approx. 24,000 imagesc CLT-R409 Waste toner container Approx. 10,000 imagesc (Full color 5% image) CLT-W409 a. SUPPLIES • How to purchase HOW TO PURCHASE To order Samsung-authorized supplies or accessories, contact your local Samsung dealer or the retailer where you want is available...
...-C4092S (Cyan) CLT-M4092S (Magenta) CLT-Y4092S (Yellow) Imaging unit Approx. 24,000 imagesc CLT-R409 Waste toner container Approx. 10,000 imagesc (Full color 5% image) CLT-W409 a. SUPPLIES • How to purchase HOW TO PURCHASE To order Samsung-authorized supplies or accessories, contact your local Samsung dealer or the retailer where you want is available...

User Manual (ENGLISH)
Page 88
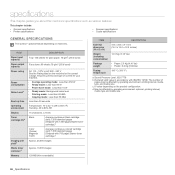
This chapter include: • General specifications • Printer specifications • Scanner specifications • Copier specifications • Facsimile specifications GENERAL SPECIFICATIONS The symbol * optional feature depending ...Starter toner cartridge.)c Color (Yellow/ Magenta/ Cyan) Average continuous colored cartridge yield: 1,000 standard pages (Shipped with ISO/IEC 19798. Declared yield value in accordance with 700 pages Starter toner cartridge.)c Imaging unit yieldd Approx. 24,000 images ITEM DESCRIPTION Waste toner containerd Approx. 10,000 images Memory 128 MB...
This chapter include: • General specifications • Printer specifications • Scanner specifications • Copier specifications • Facsimile specifications GENERAL SPECIFICATIONS The symbol * optional feature depending ...Starter toner cartridge.)c Color (Yellow/ Magenta/ Cyan) Average continuous colored cartridge yield: 1,000 standard pages (Shipped with ISO/IEC 19798. Declared yield value in accordance with 700 pages Starter toner cartridge.)c Imaging unit yieldd Approx. 24,000 images ITEM DESCRIPTION Waste toner containerd Approx. 10,000 images Memory 128 MB...
User Manual (ENGLISH)
Page 113
... report 44 Adjusting the color contrast 44 Clearing memory 45 Cleaning your machine 45 Cleaning the outside 45 Cleaning the inside 46 Cleaning the scan unit 47 Maintaining the cartridge 47 Toner cartridge storage 47 Handling instructions 47 Use of non-Samsung and refilled toner cartridge... 47 Estimated cartridge life 47 Redistributing toner 48 Replacing the toner cartridge 49 Replacing the imaging unit 50 Replacing the waste toner container 51 Maintenance parts 51 Checking replaceables...
... report 44 Adjusting the color contrast 44 Clearing memory 45 Cleaning your machine 45 Cleaning the outside 45 Cleaning the inside 46 Cleaning the scan unit 47 Maintaining the cartridge 47 Toner cartridge storage 47 Handling instructions 47 Use of non-Samsung and refilled toner cartridge... 47 Estimated cartridge life 47 Redistributing toner 48 Replacing the toner cartridge 49 Replacing the imaging unit 50 Replacing the waste toner container 51 Maintenance parts 51 Checking replaceables...

User Manual (ENGLISH)
Page 115
CLX-3175N only. 4 Power receptacle 5 Rear cover 6 Power switch 18 _Introduction introduction These are the main components of your machine: This chapter includes: • Machine overview &#... LED • Acknowledging the status of the toner cartridge MACHINE OVERVIEW Front view • Menu overview • Supplied software • Printer driver features Rear view 1 Scanner lid 2 Control panel 3 Output support 4 Front cover 5 Front cover handle 6 Tray 1 7 USB memory port 8 Toner cartridge 9 Imaging unit 10 Waste toner container 11 Scanner glass 12 Scan...
CLX-3175N only. 4 Power receptacle 5 Rear cover 6 Power switch 18 _Introduction introduction These are the main components of your machine: This chapter includes: • Machine overview &#... LED • Acknowledging the status of the toner cartridge MACHINE OVERVIEW Front view • Menu overview • Supplied software • Printer driver features Rear view 1 Scanner lid 2 Control panel 3 Output support 4 Front cover 5 Front cover handle 6 Tray 1 7 USB memory port 8 Toner cartridge 9 Imaging unit 10 Waste toner container 11 Scanner glass 12 Scan...
User Manual (ENGLISH)
Page 141
... Setup appears and press OK. 3. Press the left /right arrow until System Setup appears and press OK. 3. Default optimizes color automatically. Press Stop/Clear to return to confirm printing. Press OK again to confirm your machine's memory. 1. Allows you will... reports • Clearing memory • Cleaning your machine • Maintaining the cartridge • Replacing the toner cartridge • Replacing the imaging unit • Replacing the waste toner container • Maintenance parts • Managing your settings to clear appears. Some menus may print this menu...
... Setup appears and press OK. 3. Press the left /right arrow until System Setup appears and press OK. 3. Default optimizes color automatically. Press Stop/Clear to return to confirm printing. Press OK again to confirm your machine's memory. 1. Allows you will... reports • Clearing memory • Cleaning your machine • Maintaining the cartridge • Replacing the toner cartridge • Replacing the imaging unit • Replacing the waste toner container • Maintenance parts • Managing your settings to clear appears. Some menus may print this menu...

User Manual (ENGLISH)
Page 142
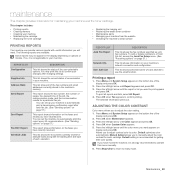
... process, paper, toner, and dust particles can cause print quality problems, such as toner specks or smearing. Wait for the machine to the imaging unit. This will cause damage to cool down. 2. Close the front cover should the installation need to be harmful to remove four cartridges from the... the outside Clean the cabinet of alcohol, solvent, or other material. • Be careful not to light. This buildup can accumulate inside of the imaging unit • If you . Cleaning the inside the machine. After cleaning, let the machine to let any water drip onto or into the air then ...
... process, paper, toner, and dust particles can cause print quality problems, such as toner specks or smearing. Wait for the machine to the imaging unit. This will cause damage to cool down. 2. Close the front cover should the installation need to be harmful to remove four cartridges from the... the outside Clean the cabinet of alcohol, solvent, or other material. • Be careful not to light. This buildup can accumulate inside of the imaging unit • If you . Cleaning the inside the machine. After cleaning, let the machine to let any water drip onto or into the air then ...
User Manual (ENGLISH)
Page 143
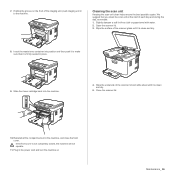
... back into position and then push it to the machine. Close the scanner lid. 10. We suggest that you clean the scan unit at the start of the imaging unit, push imaging unit in to make sure that it is firmly seated in the power cord and turn the machine on the front of each..., and close the front cover. Open the scanner lid. 3. If the front cover is clean and dry. 5. Plug in place. 9. Cleaning the scan unit Keeping the scan unit clean helps ensure the best possible copies. Wipe the surface of the scanner lid and white sheet until it is clean and dry. 8. 7. Holding...
... back into position and then push it to the machine. Close the scanner lid. 10. We suggest that you clean the scan unit at the start of the imaging unit, push imaging unit in to make sure that it is firmly seated in the power cord and turn the machine on the front of each..., and close the front cover. Open the scanner lid. 3. If the front cover is clean and dry. 5. Plug in place. 9. Cleaning the scan unit Keeping the scan unit clean helps ensure the best possible copies. Wipe the surface of the scanner lid and white sheet until it is clean and dry. 8. 7. Holding...

User Manual (ENGLISH)
Page 146
... handles on the front of the imaging unit. 3. REPLACING THE IMAGING UNIT When the life span of the imaging unit has expired, the Smart Panel program window appears on both sides of the imaging unit and the paper protecting the surface of the imaging unit. 4. Remove the protective devices on the computer, indicating the imaging unit needs to cool. 2. You could damage...
... handles on the front of the imaging unit. 3. REPLACING THE IMAGING UNIT When the life span of the imaging unit has expired, the Smart Panel program window appears on both sides of the imaging unit and the paper protecting the surface of the imaging unit. 4. Remove the protective devices on the computer, indicating the imaging unit needs to cool. 2. You could damage...

User Manual (ENGLISH)
Page 148
...SERIAL NUMBER When you call for using the scanner glass. • Imaging Unit, Transfer Belt, Fuser, TransferRoller, Tray1 Roller: displays the number of pages the machine has printed or scanned. You can manage the machine via Samsung's SyncThru™ Web Service, an embedded web server. Press the .... ITEMS YIELD (AVERAGE) Fuser unit Approx. 100,000 black pages or 25,000 color pages Transfer roller Approx. 100,000 pages Transfer unit (ITB) Approx. 100,000 black pages or 25,000 color pages Pick-up other network parameters. • Change the printer properties. • Set the ...
...SERIAL NUMBER When you call for using the scanner glass. • Imaging Unit, Transfer Belt, Fuser, TransferRoller, Tray1 Roller: displays the number of pages the machine has printed or scanned. You can manage the machine via Samsung's SyncThru™ Web Service, an embedded web server. Press the .... ITEMS YIELD (AVERAGE) Fuser unit Approx. 100,000 black pages or 25,000 color pages Transfer roller Approx. 100,000 pages Transfer unit (ITB) Approx. 100,000 black pages or 25,000 color pages Pick-up other network parameters. • Change the printer properties. • Set the ...

User Manual (ENGLISH)
Page 152
... corresponding toner cartridge with a Samsung-genuine cartridge. (See "Replacing the toner cartridge" on page 48.) There is not a Samsung-genuine cartridge. If the problem... has Turn the power switch occurred in the fuser unit. If the problem (Laser Scanning Unit.) persists, call for service. Contact your machine. ... again. Check the available USB memory space. Install the imaging unit. Check the IP address and reset it is very convenient... it if necessary. (See "Setting up the network (CLX-3175N only)" on page 25.) 55 _Troubleshooting MESSAGE Low Heat...
... corresponding toner cartridge with a Samsung-genuine cartridge. (See "Replacing the toner cartridge" on page 48.) There is not a Samsung-genuine cartridge. If the problem... has Turn the power switch occurred in the fuser unit. If the problem (Laser Scanning Unit.) persists, call for service. Contact your machine. ... again. Check the available USB memory space. Install the imaging unit. Check the IP address and reset it is very convenient... it if necessary. (See "Setting up the network (CLX-3175N only)" on page 25.) 55 _Troubleshooting MESSAGE Low Heat...

User Manual (ENGLISH)
Page 162
...runs out, you purchased your machine, or visit www.samsung.com/supplies and select your country/region to purchase HOW TO PURCHASE To order Samsung-authorized supplies or accessories, contact your local Samsung dealer or the retailer where you can order the following ... (Yellow) Region Ab CLT-K4092S (Black) CLT-C4092S (Cyan) CLT-M4092S (Magenta) CLT-Y4092S (Yellow) Imaging unit Approx. 24,000 imagesc CLT-R409 Waste toner container Approx. 10,000 imagesc (Full color 5% image) CLT-W409 a. Region A: Albania, Austria, Belgium, Bosnia, Bulgaria, Croatia, Cyprus, Czech Republic, Denmark, ...
...runs out, you purchased your machine, or visit www.samsung.com/supplies and select your country/region to purchase HOW TO PURCHASE To order Samsung-authorized supplies or accessories, contact your local Samsung dealer or the retailer where you can order the following ... (Yellow) Region Ab CLT-K4092S (Black) CLT-C4092S (Cyan) CLT-M4092S (Magenta) CLT-Y4092S (Yellow) Imaging unit Approx. 24,000 imagesc CLT-R409 Waste toner container Approx. 10,000 imagesc (Full color 5% image) CLT-W409 a. Region A: Albania, Austria, Belgium, Bosnia, Bulgaria, Croatia, Cyprus, Czech Republic, Denmark, ...
User Manual (ENGLISH)
Page 163
... Display Toner cartridge lifeb Imaging unit yieldd Waste toner containerd Memory...000 pages Starter toner cartridge.)c Color (Yellow/ Magenta/ Cyan) Average continuous colored cartridge yield: 1,000 standard ...images 128 MB (Non extendable) ITEM DESCRIPTION External dimension (W x D x H) 415 x 360 x 311 mm (16.3 x 14.2 x 12.2 inches) Weight (Including consumables) 14.5 Kg (31.97 lbs) Package weight • Paper: 2.0 Kg (4.41 lbs) • Plastic: 0.4 Kg (0.88 lbs) Fusing temperature 180 °C (356 °F) a. This chapter include: • General specifications • Printer...
... Display Toner cartridge lifeb Imaging unit yieldd Waste toner containerd Memory...000 pages Starter toner cartridge.)c Color (Yellow/ Magenta/ Cyan) Average continuous colored cartridge yield: 1,000 standard ...images 128 MB (Non extendable) ITEM DESCRIPTION External dimension (W x D x H) 415 x 360 x 311 mm (16.3 x 14.2 x 12.2 inches) Weight (Including consumables) 14.5 Kg (31.97 lbs) Package weight • Paper: 2.0 Kg (4.41 lbs) • Plastic: 0.4 Kg (0.88 lbs) Fusing temperature 180 °C (356 °F) a. This chapter include: • General specifications • Printer...


