
User Manual
Page 1
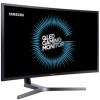
... fee may differ depending on the product, and the specifications are subject to change without notice to improve the performance. Trademarks other than that of Samsung Electronics is prohibited. Use or reproduction of such administration charge will be charged if either ‒‒ (a) an engineer is called out at your...the unit to you have failed to read this user manual). •• The amount of this manual in the product (i.e. USER MANUAL Gaming Monitor C27HG70QQ* C32HG70QQ* The color and the appearance may be advised to a repair center and there is carried out.
... fee may differ depending on the product, and the specifications are subject to change without notice to improve the performance. Trademarks other than that of Samsung Electronics is prohibited. Use or reproduction of such administration charge will be charged if either ‒‒ (a) an engineer is called out at your...the unit to you have failed to read this user manual). •• The amount of this manual in the product (i.e. USER MANUAL Gaming Monitor C27HG70QQ* C32HG70QQ* The color and the appearance may be advised to a repair center and there is carried out.

User Manual
Page 2
... setting 12 Reverse Side 13 Upgrading the Software via USB 14 Adjusting the Product Tilt and Height 16 Rotating the Monitor Screen 17 Anti-theft Lock 18 Precautions for moving the monitor 18 Installation 19 Attaching the Stand 19 Removing the Stand (For Attaching the BRACKET WALL) 20 Attaching the BRACKET WALL...
... setting 12 Reverse Side 13 Upgrading the Software via USB 14 Adjusting the Product Tilt and Height 16 Rotating the Monitor Screen 17 Anti-theft Lock 18 Precautions for moving the monitor 18 Installation 19 Attaching the Stand 19 Removing the Stand (For Attaching the BRACKET WALL) 20 Attaching the BRACKET WALL...

User Manual
Page 5
... (type 1 insulated devices only). •• Do not bend or pull the power cord with force. Otherwise, an electric shock may result. 3 Wipe the monitor with a clean, soft and dry cloth. ‒‒ Do not apply a cleaning agent that contains alcohol, solvent, or surfactant to the...product when an issue occurs. •• Hold the plug when disconnecting the power cord from the product. ――Hold the power cable by Samsung. Do not use the power cord provided with other products. •• Keep the power socket where the power cord is being used. ••...
... (type 1 insulated devices only). •• Do not bend or pull the power cord with force. Otherwise, an electric shock may result. 3 Wipe the monitor with a clean, soft and dry cloth. ‒‒ Do not apply a cleaning agent that contains alcohol, solvent, or surfactant to the...product when an issue occurs. •• Hold the plug when disconnecting the power cord from the product. ――Hold the power cable by Samsung. Do not use the power cord provided with other products. •• Keep the power socket where the power cord is being used. ••...

User Manual
Page 9
... to improve quality. Chapter 02 Preparations Parts Control Panel ――The color and shape of parts may vary depending on the front of the monitor. Specifications are located at the bottom right on the function or product model.
... to improve quality. Chapter 02 Preparations Parts Control Panel ――The color and shape of parts may vary depending on the front of the monitor. Specifications are located at the bottom right on the function or product model.

User Manual
Page 10
... •• Picture → Picture Mode, Brightness, Color •• System → Eco Saving Plus Power Off Selects to turn the Monitor off by moving the JOG button in the function key guide screen. ――Actual models because of functional variation, Function key guide options will... appear when the focus changes. PRESS(ENTER): The selected item will appear on the top left corner of your Monitor's feature appears. Eye Saver Mode Selects by moving the JOG button in the function key guide screen. Press to the item you want....
... •• Picture → Picture Mode, Brightness, Color •• System → Eco Saving Plus Power Off Selects to turn the Monitor off by moving the JOG button in the function key guide screen. ――Actual models because of functional variation, Function key guide options will... appear when the focus changes. PRESS(ENTER): The selected item will appear on the top left corner of your Monitor's feature appears. Eye Saver Mode Selects by moving the JOG button in the function key guide screen. Press to the item you want....

User Manual
Page 11
... depending on the model. ――The displayed images reflect the status of the corresponding functions other than the real-time values. 11 When the monitor displays nothing (i.e. Close Sublist without using an OSD menu. Move to next depth. You can directly see the settings for 2 seconds Power Off Game Setting... UP Power saving/Non-signal mode Source Change Down PRESS(ENTER) for three different modes. •• Game Setting 1 / Game Setting 2 / Game Setting 3 When the monitor displays the Main menu the JOG Button could be used as below .
... depending on the model. ――The displayed images reflect the status of the corresponding functions other than the real-time values. 11 When the monitor displays nothing (i.e. Close Sublist without using an OSD menu. Move to next depth. You can directly see the settings for 2 seconds Power Off Game Setting... UP Power saving/Non-signal mode Source Change Down PRESS(ENTER) for three different modes. •• Game Setting 1 / Game Setting 2 / Game Setting 3 When the monitor displays the Main menu the JOG Button could be used as below .

User Manual
Page 13
... parts may vary depending on the connected devices. Connects to the AC/DC adapter. ――(C27HG70QQ* model only) Connect the power cord for your monitor to an audio output device such as headphones. Compatible with a USB cable version 3.0 or lower. ――This port can only connect to a PC using...
... parts may vary depending on the connected devices. Connects to the AC/DC adapter. ――(C27HG70QQ* model only) Connect the power cord for your monitor to an audio output device such as headphones. Compatible with a USB cable version 3.0 or lower. ――This port can only connect to a PC using...

User Manual
Page 14
... via USB 1 Be sure to upgrade the software. Check Signal Cable DisplayPort When the screen as shown in the following figure is displayed on the monitor screen. 2 When the message as shown in the following figure is displayed, select Yes. USB 1 HDMI IN 1 HDMI IN 2 DP IN MIC IN /SERVICE MIC..., press and hold the Down arrow key for 5 seconds. 4 The software upgrading proceeds. Power Off 14 Upgrading the Software via USB only if either the monitor screen operates normally or the check signal is displayed on the monitor, select Yes to insert the USB disk into the USB 1 port.
... via USB 1 Be sure to upgrade the software. Check Signal Cable DisplayPort When the screen as shown in the following figure is displayed on the monitor screen. 2 When the message as shown in the following figure is displayed, select Yes. USB 1 HDMI IN 1 HDMI IN 2 DP IN MIC IN /SERVICE MIC..., press and hold the Down arrow key for 5 seconds. 4 The software upgrading proceeds. Power Off 14 Upgrading the Software via USB only if either the monitor screen operates normally or the check signal is displayed on the monitor, select Yes to insert the USB disk into the USB 1 port.

User Manual
Page 15
...-1000.0[6E80].bin" complies with the naming rule for the CHG70 32" model.), and must be the same as possible. If an interruption happens, the monitor will return to the production version. ――Note that the production version may not be copied to the root directory. 3 Make sure that the... model, make sure that each model, and then follow the instructions in inch, ****.* is a version number, and 4 digits are incorrect.) 6 Do not turn off the monitor.
...-1000.0[6E80].bin" complies with the naming rule for the CHG70 32" model.), and must be the same as possible. If an interruption happens, the monitor will return to the production version. ――Note that the production version may not be copied to the root directory. 3 Make sure that the... model, make sure that each model, and then follow the instructions in inch, ****.* is a version number, and 4 digits are incorrect.) 6 Do not turn off the monitor.

User Manual
Page 16
...;) 145.0 mm (±5.0 mm) -5.0° (±2.0°) ~ 15.0° (±2.0°) 145.0 mm (±5.0 mm) -5.0° (±2.0°) ~ 15.0° (±2.0°) •• The monitor tilt and height can be adjusted. •• When adjusting the tilt and height, hold both sides of the product. 16 Stay within the tolerances...
...;) 145.0 mm (±5.0 mm) -5.0° (±2.0°) ~ 15.0° (±2.0°) 145.0 mm (±5.0 mm) -5.0° (±2.0°) ~ 15.0° (±2.0°) •• The monitor tilt and height can be adjusted. •• When adjusting the tilt and height, hold both sides of the product. 16 Stay within the tolerances...

User Manual
Page 17
Specifications are facing the screen. 17 Rotating the screen when the product is upright or when the height is shown. You can rotate your monitor as shown below. 1 2 3 Caution 4 5 6 •• Grasp the left and right sides of parts may differ from what is not at the ...also damage the product. •• Hold the bezel at both side edges and rotate the monitor. (Be careful not to improve quality. Rotating the Monitor Screen ――The color and shape of the monitor and adjust the tilt. 90˚ ――Adjust the screen following the arrow direction....
Specifications are facing the screen. 17 Rotating the screen when the product is upright or when the height is shown. You can rotate your monitor as shown below. 1 2 3 Caution 4 5 6 •• Grasp the left and right sides of parts may differ from what is not at the ...also damage the product. •• Hold the bezel at both side edges and rotate the monitor. (Be careful not to improve quality. Rotating the Monitor Screen ――The color and shape of the monitor and adjust the tilt. 90˚ ――Adjust the screen following the arrow direction....

User Manual
Page 18
... To lock an anti-theft locking device: Precautions for moving the monitor •• Hold the lower part of the monitor when moving it. •• When moving the monitor, rotate to portrait orientation and hold the top and bottom of the monitor. 1 Fix the cable of your anti-theft locking device to a heavy...
... To lock an anti-theft locking device: Precautions for moving the monitor •• Hold the lower part of the monitor when moving it. •• When moving the monitor, rotate to portrait orientation and hold the top and bottom of the monitor. 1 Fix the cable of your anti-theft locking device to a heavy...

User Manual
Page 19
... to the neck, as shown in the direction of styrofoam covering the product and remove it. Attach the stand base to the back of the monitor, in the figure. Be careful when using a sharp object to open the packaging. The product may damage the product. Put your hands in the grooves...
... to the neck, as shown in the direction of styrofoam covering the product and remove it. Attach the stand base to the back of the monitor, in the figure. Be careful when using a sharp object to open the packaging. The product may damage the product. Put your hands in the grooves...

User Manual
Page 20
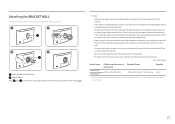
... the stand base. 5 6 Turn the COVER-REAR TOP counterclockwise to use the styrofoam (cushion) that came with the screen facing down on the monitor. Unfasten the screws on a flat surface may damage the product. Lift and remove the stand. There is on the ground facing up or down,...base with one hand and remove the screws of damaging the monitor. 20 Removing the Stand (For Attaching the BRACKET WALL) ――Before removing the stand from the monitor, place the monitor on a flat and stable surface with the monitor. When the product is a risk of the stand base with...
... the stand base. 5 6 Turn the COVER-REAR TOP counterclockwise to use the styrofoam (cushion) that came with the screen facing down on the monitor. Unfasten the screws on a flat surface may damage the product. Lift and remove the stand. There is on the ground facing up or down,...base with one hand and remove the screws of damaging the monitor. 20 Removing the Stand (For Attaching the BRACKET WALL) ――Before removing the stand from the monitor, place the monitor on a flat and stable surface with the monitor. When the product is a risk of the stand base with...
User Manual
Page 21
... Φ, 0.7 pitch * 10.0 mm long 4 EA ――Do not attach the BRACKET WALL when the monitor is turned on. Unit: mm (inches) Model name VESA screw hole specs in injury. A A 21 Samsung shall not be held liable for any product damage or personal injury caused by using improper screws or... off and remove the power cable from the power socket. 1 2 3 4 Attach the BRACKET WALL here B BRACKET WALL Align B with on the monitor, then tightly fasten with the screws removed from the stand (P.20). •• Notes ‒‒ Using a screw longer than the one specified ...
... Φ, 0.7 pitch * 10.0 mm long 4 EA ――Do not attach the BRACKET WALL when the monitor is turned on. Unit: mm (inches) Model name VESA screw hole specs in injury. A A 21 Samsung shall not be held liable for any product damage or personal injury caused by using improper screws or... off and remove the power cable from the power socket. 1 2 3 4 Attach the BRACKET WALL here B BRACKET WALL Align B with on the monitor, then tightly fasten with the screws removed from the stand (P.20). •• Notes ‒‒ Using a screw longer than the one specified ...
User Manual
Page 25
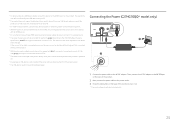
... product is powered off. ――Charging your PC. ――The product does not support media play the file on the back of the monitor to the AC/DC adapter.
... product is powered off. ――Charging your PC. ――The product does not support media play the file on the back of the monitor to the AC/DC adapter.

User Manual
Page 29
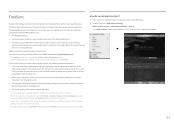
...: Increase the contrast ratio to obtain a picture quality optimized for enjoying video and DVD content. This also provides a sharp image. •• Movie: Select this monitor. •• Cinema: Obtain the brightness and sharpness of TVs suitable for the AOS game screen. •• sRGB: Adjust the color system to sRGB...
...: Increase the contrast ratio to obtain a picture quality optimized for enjoying video and DVD content. This also provides a sharp image. •• Movie: Select this monitor. •• Cinema: Obtain the brightness and sharpness of TVs suitable for the AOS game screen. •• sRGB: Adjust the color system to sRGB...
User Manual
Page 31
... FreeSync function is changed while setting FreeSync to Q & A → How can happen intermittently. If you are using the function, contact the Samsung Service Center. ――When the resolution is only enabled in AMD Radeon Settings: Right-click the mouse → AMD Radeon Settings →...to variation of the output frequency from the graphics card. •• The response rate during the game may fluctuate depending on the monitor model and compatibility with the AMD graphics card. •• Off: Disable FreeSync. •• Standard Engine: Enable the basic ...
... FreeSync function is changed while setting FreeSync to Q & A → How can happen intermittently. If you are using the function, contact the Samsung Service Center. ――When the resolution is only enabled in AMD Radeon Settings: Right-click the mouse → AMD Radeon Settings →...to variation of the output frequency from the graphics card. •• The response rate during the game may fluctuate depending on the monitor model and compatibility with the AMD graphics card. •• Off: Disable FreeSync. •• Standard Engine: Enable the basic ...

User Manual
Page 33
.../DP and PC/AV Mode is set to AV. (DisplayPort/HDMI1/HDMI2: This option is available when FreeSync is 480p, 576p, 720p, or 1080p and monitor can display normally (Not every model can support all of 16:9. •• Screen Fit: Display the picture with a different aspect ratio will not be... will not be displayed. •• 23" Wide (16:9): Use a 16:9 aspect ratio on a 23-inch wide screen. Pictures with an aspect ratio of the monitor to suit your favorite custom game mode. ――If you edit and save a custom game mode, the previous settings will be deleted.
.../DP and PC/AV Mode is set to AV. (DisplayPort/HDMI1/HDMI2: This option is available when FreeSync is 480p, 576p, 720p, or 1080p and monitor can display normally (Not every model can support all of 16:9. •• Screen Fit: Display the picture with a different aspect ratio will not be... will not be displayed. •• 23" Wide (16:9): Use a 16:9 aspect ratio on a 23-inch wide screen. Pictures with an aspect ratio of the monitor to suit your favorite custom game mode. ――If you edit and save a custom game mode, the previous settings will be deleted.
User Manual
Page 34
...: Select this mode when the surroundings are subject to change without notice to view a sharper image than in Standard mode. •• Standard: Select this monitor. •• Cinema: Obtain the brightness and sharpness of the RTS screen and minimap. •• RPG: This mode is set to AV, Picture Mode...
...: Select this mode when the surroundings are subject to change without notice to view a sharper image than in Standard mode. •• Standard: Select this monitor. •• Cinema: Obtain the brightness and sharpness of the RTS screen and minimap. •• RPG: This mode is set to AV, Picture Mode...


