

User Manual (user Manual) (ver.1.0) (English, French)
Page 7
Best Quality (Recommended) 25 Case 2 : Connecting to the Network 26 Cable Network 27 Wireless Network Setup 28 Before Starting (Initial Settings) 29 Setting the Menu 30 Display 30 TV Aspect 30 BD Wise (Samsung Players only) 30 Resolution 32 HDMI Format 32 Movie Frame (24Fs) 32 Progressive Mode 32 ...34 Downmixing Mode 34 DTS Neo:6 34 System 34 Initial Settings 34 Internet@TV Screen Size 34 Anynet+(HDMI-CEC) 35 BD Data Management 35 Clock 35 DivX(R) Registration 36 DivX(R) Deactivation 36 Network Setup 36 Network Settings 39 Network Status 39...
Best Quality (Recommended) 25 Case 2 : Connecting to the Network 26 Cable Network 27 Wireless Network Setup 28 Before Starting (Initial Settings) 29 Setting the Menu 30 Display 30 TV Aspect 30 BD Wise (Samsung Players only) 30 Resolution 32 HDMI Format 32 Movie Frame (24Fs) 32 Progressive Mode 32 ...34 Downmixing Mode 34 DTS Neo:6 34 System 34 Initial Settings 34 Internet@TV Screen Size 34 Anynet+(HDMI-CEC) 35 BD Data Management 35 Clock 35 DivX(R) Registration 36 DivX(R) Deactivation 36 Network Setup 36 Network Settings 39 Network Status 39...

User Manual (user Manual) (ver.1.0) (English, French)
Page 16
Lights when the wireless network is inserted or played back. Displays the play time and the current status. Getting Started Front Panel Display a b 1 IN DISC INDICATOR 2 CURRENT TIME AND STATUS INDICATOR 3 WIFI INDICATOR c Lights when a disc is connected. 16 English
Lights when the wireless network is inserted or played back. Displays the play time and the current status. Getting Started Front Panel Display a b 1 IN DISC INDICATOR 2 CURRENT TIME AND STATUS INDICATOR 3 WIFI INDICATOR c Lights when a disc is connected. 16 English

User Manual (user Manual) (ver.1.0) (English, French)
Page 17
... a video cable. Connects to a Receiver. Connects to equipment having component video input. 03 Getting Started Rear Panel ab c d gf e 1 WIRELESS LAN ADAPTER Connect the optional Wireless LAN Adapter (WIS09ABGN) here to use the Wireless network. 2 LAN Can be used for the best quality sound. Connects the input of external equipment using a network connection... to the HDMI input terminal on your TV for the best quality picture or to your Receiver for network based services (See pages 51~56), BD-LIVE and software upgrades using audio cables. English 17
... a video cable. Connects to a Receiver. Connects to equipment having component video input. 03 Getting Started Rear Panel ab c d gf e 1 WIRELESS LAN ADAPTER Connect the optional Wireless LAN Adapter (WIS09ABGN) here to use the Wireless network. 2 LAN Can be used for the best quality sound. Connects the input of external equipment using a network connection... to the HDMI input terminal on your TV for the best quality picture or to your Receiver for network based services (See pages 51~56), BD-LIVE and software upgrades using audio cables. English 17

User Manual (user Manual) (ver.1.0) (English, French)
Page 27
... key for AllShare function (See pages 55~56) Wireless LAN Adapter (not included) ✎ NOTE ▪ Use only the optional Samsung wireless LAN adapter with this adapter with a Wireless IP sharer. 1. English 27 04 Connections Wireless Network You can connect to network with any other ...radio devices, etc). ▪ Set the wireless IP sharer to Infrastructure mode. Set the...
... key for AllShare function (See pages 55~56) Wireless LAN Adapter (not included) ✎ NOTE ▪ Use only the optional Samsung wireless LAN adapter with this adapter with a Wireless IP sharer. 1. English 27 04 Connections Wireless Network You can connect to network with any other ...radio devices, etc). ▪ Set the wireless IP sharer to Infrastructure mode. Set the...

User Manual (user Manual) (ver.1.0) (English, French)
Page 28
... will start and Initial Settings will be set to network. Press the ◄► buttons to select desired language, then press the ENTER button. 3. Wired Wireless PBC (WPS) a Previous d Skip < Move " Select No Disc a Change Device d View Devices " Enter ✎ NOTE ▪ When the player is ... (For more than 5 seconds with no disc inserted. ▪ Use the HDMI cable to connect the player to an Anynet+(HDMI-CEC)-compliant Samsung TV. Press the ▲▼ buttons to select the desired TV Aspect ratio, then press the ENTER button. (See page 30) Initial Settings...
... will start and Initial Settings will be set to network. Press the ◄► buttons to select desired language, then press the ENTER button. 3. Wired Wireless PBC (WPS) a Previous d Skip < Move " Select No Disc a Change Device d View Devices " Enter ✎ NOTE ▪ When the player is ... (For more than 5 seconds with no disc inserted. ▪ Use the HDMI cable to connect the player to an Anynet+(HDMI-CEC)-compliant Samsung TV. Press the ▲▼ buttons to select the desired TV Aspect ratio, then press the ENTER button. (See page 30) Initial Settings...

User Manual (user Manual) (ver.1.0) (English, French)
Page 36
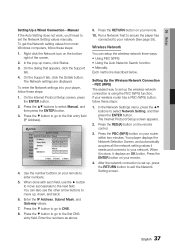
...In the Network Settings menu, press the ▲▼ buttons to select Network Type, and then press the ENTER button. 5. Directions for wireless networks are below. After the Network Function has acquired the network values, press the RETURN button. Press the ▲▼ buttons to select...Function acquires and fills in the majority of cases. Auto 1. If you must use the manual set up procedure. Go to select Wired or Wireless, and then press the ENTER button. 6. Press the ▲▼ buttons to the next section. Directions for IP Address, Subnet Mask, ...
...In the Network Settings menu, press the ▲▼ buttons to select Network Type, and then press the ENTER button. 5. Directions for wireless networks are below. After the Network Function has acquired the network values, press the RETURN button. Press the ▲▼ buttons to select...Function acquires and fills in the majority of cases. Auto 1. If you must use the manual set up procedure. Go to select Wired or Wireless, and then press the ENTER button. 6. Press the ▲▼ buttons to the next section. Directions for IP Address, Subnet Mask, ...
User Manual (user Manual) (ver.1.0) (English, French)
Page 37
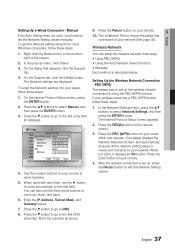
...; button to the first entry field (IP Address). On the Internet Protocol Setup screen, press the ENTER button. 2. Setting Up the Wireless Network Connection - When it needs and connects to your remote to exit the Network Setting screen. After the network connection is using the...to set up , press the Return button to enter numbers. 5. On the dialog that appears, click the Support tab. 4. You can setup the wireless network three ways: • Using PBC (WPS) • Using the Auto Network Search function. • Manually. Settings Network Settings Display Audio ...
...; button to the first entry field (IP Address). On the Internet Protocol Setup screen, press the ENTER button. 2. Setting Up the Wireless Network Connection - When it needs and connects to your remote to exit the Network Setting screen. After the network connection is using the...to set up , press the Return button to enter numbers. 5. On the dialog that appears, click the Support tab. 4. You can setup the wireless network three ways: • Using PBC (WPS) • Using the Auto Network Search function. • Manually. Settings Network Settings Display Audio ...

User Manual (user Manual) (ver.1.0) (English, French)
Page 38
... " Select ' Return 5. Each time you press the ENTER button, you change the kind of a specified length you would select Security (for available wireless networks. In the Network Settings menu, press the ▲▼ buttons to select PIN or Security. The Internet Protocol Setup screen appears. 2. Press...Security Key). 8. In the list of the available networks. If the PIN/Security pop-up your remote. 10. Setup Setting Up the Wireless Network Connection - When done, it displays a list of networks, press the ▲▼ buttons to select the Internet Protocol Setup, and...
... " Select ' Return 5. Each time you press the ENTER button, you change the kind of a specified length you would select Security (for available wireless networks. In the Network Settings menu, press the ▲▼ buttons to select PIN or Security. The Internet Protocol Setup screen appears. 2. Press...Security Key). 8. In the list of the available networks. If the PIN/Security pop-up your remote. 10. Setup Setting Up the Wireless Network Connection - When done, it displays a list of networks, press the ▲▼ buttons to select the Internet Protocol Setup, and...
User Manual (user Manual) (ver.1.0) (English, French)
Page 39
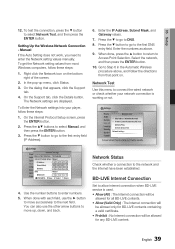
... connection will be allowed for any BD-LIVE content. To get the Network setting values from that appears, click the Support tab. 4. Network Test Use this menu to connect the wired network or check whether your Internet Protocol setup to Step 6 in the Automatic Wireless procedure above . 9. To test ...the ENTER button. Press the ▼ to go to move successively to the first DNS entry field. Use the number buttons to DNS. 8. BD-LIVE Internet Connection Set to enter the Network settng values manually. Select the network, and then press the ENTER button. 10. Manual If the Auto...
... connection will be allowed for any BD-LIVE content. To get the Network setting values from that appears, click the Support tab. 4. Network Test Use this menu to connect the wired network or check whether your Internet Protocol setup to Step 6 in the Automatic Wireless procedure above . 9. To test ...the ENTER button. Press the ▼ to go to move successively to the first DNS entry field. Use the number buttons to DNS. 8. BD-LIVE Internet Connection Set to enter the Network settng values manually. Select the network, and then press the ENTER button. 10. Manual If the Auto...

User Manual (user Manual) (ver.1.0) (English, French)
Page 41
... Dim the display window. • Bright : Brighten the display window. You can reduce power consumption by cable or wirelessly, the player will automatically connect to Samsung's website each time it on manually.) 3. Settings Display Software Upgrade Audio SDoisftcwMareenuUpgrade : System Current VersAioundio : XXX-XXXXX... Update will automatically turn off automatically when there is turned on the player manually during the update process. ▪ Samsung Electronics shall take no operation for your use. 05 Setup Energy Saving You can check the current software version, upgrade...
... Dim the display window. • Bright : Brighten the display window. You can reduce power consumption by cable or wirelessly, the player will automatically connect to Samsung's website each time it on manually.) 3. Settings Display Software Upgrade Audio SDoisftcwMareenuUpgrade : System Current VersAioundio : XXX-XXXXX... Update will automatically turn off automatically when there is turned on the player manually during the update process. ▪ Samsung Electronics shall take no operation for your use. 05 Setup Energy Saving You can check the current software version, upgrade...

User Manual (user Manual) (ver.1.0) (English, French)
Page 58
... if the network is stable. • Check if the network cable is properly connected and if the network is not overloaded. • Wireless connection between the server and the player is unstable. Don't use this unless absolutely necessary. • When the factory default settings are restored... you have a firewall enabled. PC Share Manager function I can results in the BD data will revert to the contents and find the section of the player. • Check if your nearest Samsung authorized service center. Abnormal HDMI output screen. Check the connection. AllShare function Video is...
... if the network is stable. • Check if the network cable is properly connected and if the network is not overloaded. • Wireless connection between the server and the player is unstable. Don't use this unless absolutely necessary. • When the factory default settings are restored... you have a firewall enabled. PC Share Manager function I can results in the BD data will revert to the contents and find the section of the player. • Check if your nearest Samsung authorized service center. Abnormal HDMI output screen. Check the connection. AllShare function Video is...

User Manual (user Manual) (ver.1.0) (English, French)
Page 60
Appendix A Accessories Ad-hoc Anynet+ (HDMI-CEC) Audio Language AllShare 14 27 34 46 55~56 B BD Wise BD Data Management BD-LIVE BONUSVIEW Background Music 30 35 39, 55 47 49 C Component 22 Cable Network 26 Camera Angle 46 D Digital Output 32~33 Dynamic Range Control ... Sensor 15 Romote Control 18 Resolution 30 Repeat 45, 48 S Supported File Format Software Upgrade Search and Skip Slow and Step Subtitle Language Slide Show SAMSUNG PC Share Manager 12 41, 55 44 44 46 49 55~56 T TV Aspect Title Menu TOOLS Menu 30 43 45~47 U USB Storage Device...
Appendix A Accessories Ad-hoc Anynet+ (HDMI-CEC) Audio Language AllShare 14 27 34 46 55~56 B BD Wise BD Data Management BD-LIVE BONUSVIEW Background Music 30 35 39, 55 47 49 C Component 22 Cable Network 26 Camera Angle 46 D Digital Output 32~33 Dynamic Range Control ... Sensor 15 Romote Control 18 Resolution 30 Repeat 45, 48 S Supported File Format Software Upgrade Search and Skip Slow and Step Subtitle Language Slide Show SAMSUNG PC Share Manager 12 41, 55 44 44 46 49 55~56 T TV Aspect Title Menu TOOLS Menu 30 43 45~47 U USB Storage Device...

User Manual (user Manual) (ver.2.0) (English)
Page 7
...Channel Amplifier) - Better Quality 25 Case 3 : Connecting to the Network 26 Cable Network 27 Wireless Network Setup 28 Before Starting (Initial Settings) 29 Setting the Menu 30 Display 30 TV Aspect 30 BD Wise (Samsung Players only) 30 Resolution 32 HDMI Format 32 Movie Frame (24Fs) 32 Progressive Mode 32 ... 34 Downmixing Mode 34 DTS Neo:6 34 System 34 Initial Settings 34 Internet@TV Screen Size 34 Anynet+(HDMI-CEC) 35 BD Data Management 35 Clock 35 DivX(R) Registration 36 DivX(R) Deactivation 36 Network 36 Network Settings 39 Network Status 40...
...Channel Amplifier) - Better Quality 25 Case 3 : Connecting to the Network 26 Cable Network 27 Wireless Network Setup 28 Before Starting (Initial Settings) 29 Setting the Menu 30 Display 30 TV Aspect 30 BD Wise (Samsung Players only) 30 Resolution 32 HDMI Format 32 Movie Frame (24Fs) 32 Progressive Mode 32 ... 34 Downmixing Mode 34 DTS Neo:6 34 System 34 Initial Settings 34 Internet@TV Screen Size 34 Anynet+(HDMI-CEC) 35 BD Data Management 35 Clock 35 DivX(R) Registration 36 DivX(R) Deactivation 36 Network 36 Network Settings 39 Network Status 40...

User Manual (user Manual) (ver.2.0) (English)
Page 16
Getting Started Front Panel Display a b 1 IN DISC INDICATOR 2 CURRENT TIME AND STATUS INDICATOR 3 WIFI INDICATOR c Lights when a disc is connected. 16 English Lights when the wireless network is inserted or played back. Displays the play time and the current status.
Getting Started Front Panel Display a b 1 IN DISC INDICATOR 2 CURRENT TIME AND STATUS INDICATOR 3 WIFI INDICATOR c Lights when a disc is connected. 16 English Lights when the wireless network is inserted or played back. Displays the play time and the current status.

User Manual (user Manual) (ver.2.0) (English)
Page 17
... external equipment using a video cable. 03 Getting Started Rear Panel ab c d gf e 1 WIRELESS LAN ADAPTER Connect the optional Wireless LAN Adapter (WIS09ABGN) here to use the Wireless network. 2 LAN Can be used for network based services (See pages 52~57), BD-LIVE and software upgrades using a network connection. 3 HDMI OUT 4 COMPONENT OUT 5 VIDEO OUT...
... external equipment using a video cable. 03 Getting Started Rear Panel ab c d gf e 1 WIRELESS LAN ADAPTER Connect the optional Wireless LAN Adapter (WIS09ABGN) here to use the Wireless network. 2 LAN Can be used for network based services (See pages 52~57), BD-LIVE and software upgrades using a network connection. 3 HDMI OUT 4 COMPONENT OUT 5 VIDEO OUT...

User Manual (user Manual) (ver.2.0) (English)
Page 27
..., depending on the use this adapter with this player for AllShare function (See pages 56~57) Wireless LAN Adapter (not included) ✎ NOTE ▪ Use only the Samsung wireless LAN adapter with any other third-party players. A wireless AP/IP router is supported. 1) Authentication Mode : WEP, WPAPSK, WPA2PSK 2) Encryption Type : WEP, AES ▪ For...
..., depending on the use this adapter with this player for AllShare function (See pages 56~57) Wireless LAN Adapter (not included) ✎ NOTE ▪ Use only the Samsung wireless LAN adapter with any other third-party players. A wireless AP/IP router is supported. 1) Authentication Mode : WEP, WPAPSK, WPA2PSK 2) Encryption Type : WEP, AES ▪ For...

User Manual (user Manual) (ver.2.0) (English)
Page 28
...language, then press the ENTER button. 3. However, the Anynet+(HDMI-CEC) feature should be set to On in order to use various Internet services. Wired Wireless PBC (WPS) a Previous d Skip < Move " Select No Disc a Change Device d View Devices " Enter ✎ NOTE ▪ When the player...press the ENTER button. (See page 30) Initial Settings I On-Screen Language Select a language for connecting to an Anynet+(HDMI-CEC)-compliant Samsung TV. Wired : Set the network connection using the Ethernet cable. Do not confuse because this is not malfunction. ▪ The home menu ...
...language, then press the ENTER button. 3. However, the Anynet+(HDMI-CEC) feature should be set to On in order to use various Internet services. Wired Wireless PBC (WPS) a Previous d Skip < Move " Select No Disc a Change Device d View Devices " Enter ✎ NOTE ▪ When the player...press the ENTER button. (See page 30) Initial Settings I On-Screen Language Select a language for connecting to an Anynet+(HDMI-CEC)-compliant Samsung TV. Wired : Set the network connection using the Ethernet cable. Do not confuse because this is not malfunction. ▪ The home menu ...

User Manual (user Manual) (ver.2.0) (English)
Page 36
... Return 2. If the Network Function does not acquire the network values or you selected Manual, go to the next section. Directions for wireless networks are below. Network To begin setting up the network connection for wired networks. 36 English After the Network Function has acquired the network...a new registration code. If it is dynamic, we recommend using the Auto setting. Press the ▲▼ buttons to select Wired or Wireless, and then press the ENTER button. 6. Press the ▲▼ buttons to select Network, and then press the ENTER button. 3. In...
... Return 2. If the Network Function does not acquire the network values or you selected Manual, go to the next section. Directions for wireless networks are below. Network To begin setting up the network connection for wired networks. 36 English After the Network Function has acquired the network...a new registration code. If it is dynamic, we recommend using the Auto setting. Press the ▲▼ buttons to select Wired or Wireless, and then press the ENTER button. 6. Press the ▲▼ buttons to select Network, and then press the ENTER button. 3. In...
User Manual (user Manual) (ver.2.0) (English)
Page 37
... to exit the Network Setting screen. To enter the Network settings into your network (See page 39). Press the Return button on your wireless router has a PBC (WPS) button, follow these steps: 1. In the Network Settings menu, press the ▲▼ buttons to select...▼ button to go to enter numbers. 5. Press the RED(A) button on the bottom right of the screen. 2. Setting Up the Wireless Network Connection - Your player displays the Network Selection Screen, and automatically acquires all the network setting values it displays an OK button. Each method...
... to exit the Network Setting screen. To enter the Network settings into your network (See page 39). Press the Return button on your wireless router has a PBC (WPS) button, follow these steps: 1. In the Network Settings menu, press the ▲▼ buttons to select...▼ button to go to enter numbers. 5. Press the RED(A) button on the bottom right of the screen. 2. Setting Up the Wireless Network Connection - Your player displays the Network Selection Screen, and automatically acquires all the network setting values it displays an OK button. Each method...

User Manual (user Manual) (ver.2.0) (English)
Page 38
...; buttons to enter the Pass Phrase during the setup process. Setting Up the Network Connection To set up the wireless connection using Auto Network Search, follow these steps: 1. Pressing the button repeatedly changes the letter. • To delete the...the Security screen, enter your network's Pass Phrase. ✎ NOTE ▪ You should be able to find the Pass Phrase on your wireless network, you set up security for your remote. 38 English Settings Display Audio System Network Language Security General Support NeStwecourkritSyeKtteinygs Security K ey (0) lid...
...; buttons to enter the Pass Phrase during the setup process. Setting Up the Network Connection To set up the wireless connection using Auto Network Search, follow these steps: 1. Pressing the button repeatedly changes the letter. • To delete the...the Security screen, enter your network's Pass Phrase. ✎ NOTE ▪ You should be able to find the Pass Phrase on your wireless network, you set up security for your remote. 38 English Settings Display Audio System Network Language Security General Support NeStwecourkritSyeKtteinygs Security K ey (0) lid...


