Samsung B2430HD Hdmi
Related Manual Pages

Similar Questions

No Digital Or Hdmi Signal
I can only receive an analog signal on my monitor. When I do get a HDMI signal all I get is my wallp...
I can only receive an analog signal on my monitor. When I do get a HDMI signal all I get is my wallp...
(Posted by dellavalle 9 years ago)

Hdmi/ Analog
how do i switch ffrom hdmi to analog mode-- it is stuck in hdmi mode and need to be in analog mode t...
how do i switch ffrom hdmi to analog mode-- it is stuck in hdmi mode and need to be in analog mode t...
(Posted by maolen99 11 years ago)
How Do Get Get Sound Via Hdmi From My Notebook To Samsung T27a950
How do get get sound via hdmi from my notebook to Samsung T27A950 (NVIDA 560 3D gaphic card)?
How do get get sound via hdmi from my notebook to Samsung T27A950 (NVIDA 560 3D gaphic card)?
(Posted by retoxdafreah 11 years ago)

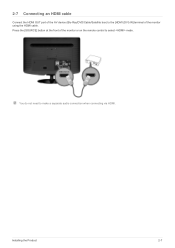
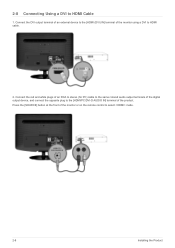
Which Gives Best Tv Pic, Hdmi To Hdmi Or Dvi To Hdmi?
Cable lines connects directly to back of monitor. Which is the best way to connnect to monitor to re...
Cable lines connects directly to back of monitor. Which is the best way to connnect to monitor to re...
(Posted by pegbeutler 12 years ago)
Related Terms
The following terms were also used when searching for Samsung B2430HD Hdmi:- samsung b2430hd
- b2430hd samsung
- b2430hd tv
- b2430hd review
- samsung b2430hd review
- b2430hd monitor
- samsung 24 b2430hd
- samsung b2430hd tv
- b2430hd 24 widescreen lcd monitor
- b2430hd driver
- b2430hd manual
- b2430hd pip
- b2430hd refresh rate
- b2430hd spec
- b2430hd vesa
- b2430hd
- b2430hd 24
- b2430hd 24 lcd monitor
- b2430hd 24 review
- b2430hd 24 widescreen lcd
- b2430hd 27
- b2430hd audio
- b2430hd blue light
- b2430hd calibration
- b2430hd demo mode
- b2430hd dimensions
- b2430hd display settings
- b2430hd driver windows 7
- b2430hd drivers
- b2430hd firmware
- b2430hd firmware download
- b2430hd firmware update
- b2430hd firmware upgrade
- b2430hd gaming
- b2430hd hd
- b2430hd hdmi
- b2430hd instructions
- b2430hd interface
- b2430hd monitor specs
- b2430hd newegg
- b2430hd no color
- b2430hd parts
- b2430hd pdf
- b2430hd picture setting
- b2430hd price
- b2430hd price in india
- b2430hd price india
- b2430hd prices
- b2430hd problems
- b2430hd remove stand
- b2430hd reset
- b2430hd resolution
- b2430hd review cnet
- b2430hd reviews
- b2430hd samsung driver
- b2430hd samsung drivers
- b2430hd samsung manual
- b2430hd samsung price
- b2430hd samsung review
- b2430hd service manual
- b2430hd settings
- b2430hd software
- b2430hd software upgrade
- b2430hd specifications
- b2430hd specs
- b2430hd stand
- b2430hd support
- b2430hd troubleshooting
- b2430hd tv samsung
- b2430hd update
- b2430hd usb
- b2430hd user manual
- b2430hd wall mount
- buy b2430hd
- buy samsung b2430hd
- price b2430hd
- samsung b2430hd 24
- samsung b2430hd 24 lcd monitor
- samsung b2430hd 24 review
- samsung b2430hd 24 widescreen lcd
- samsung b2430hd 24 widescreen lcd monitor
- samsung b2430hd 27
- samsung b2430hd calibration
- samsung b2430hd demo mode
- samsung b2430hd dimensions
- samsung b2430hd driver
- samsung b2430hd driver windows 7
- samsung b2430hd drivers
- samsung b2430hd firmware
- samsung b2430hd firmware download
- samsung b2430hd firmware update
- samsung b2430hd firmware upgrade
- samsung b2430hd gaming
- samsung b2430hd hdmi
- samsung b2430hd instructions
- samsung b2430hd manual
- samsung b2430hd monitor
- samsung b2430hd monitor specs
- samsung b2430hd newegg
- samsung b2430hd no color
- samsung b2430hd parts
- samsung b2430hd pdf
- samsung b2430hd picture setting
- samsung b2430hd pip
- samsung b2430hd price
- samsung b2430hd price in india
- samsung b2430hd prices
- samsung b2430hd problems
- samsung b2430hd refresh rate
- samsung b2430hd remove stand
- samsung b2430hd reset
- samsung b2430hd resolution
- samsung b2430hd review cnet
- samsung b2430hd reviews
- samsung b2430hd service manual
- samsung b2430hd settings
- samsung b2430hd software upgrade
- samsung b2430hd specifications
- samsung b2430hd specs
- samsung b2430hd stand
- samsung b2430hd support
- samsung b2430hd troubleshooting
- samsung b2430hd update
- samsung b2430hd usb
- samsung b2430hd user manual
- samsung b2430hd vesa
- samsung b2430hd wall mount
- samsung syncmaster b2430hd manual
- syncmaster b2430hd