User Manual (ENGLISH)
Page 3
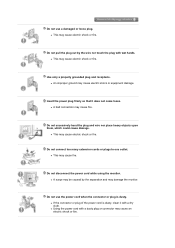
... excessively bend the plug and wire nor place heavy objects upon them, which could cause damage. Do not disconnect the power cord while using the monitor. Do not connect too many extension cords or plugs to one outlet. z This may cause an electric shock or fire. Use only a properly grounded plug...
... excessively bend the plug and wire nor place heavy objects upon them, which could cause damage. Do not disconnect the power cord while using the monitor. Do not connect too many extension cords or plugs to one outlet. z This may cause an electric shock or fire. Use only a properly grounded plug...
User Manual (ENGLISH)
Page 4
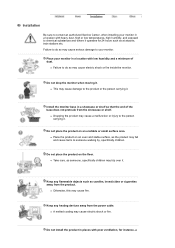
... with heavy dust, high or low temperatures, high humidity, and exposed to chemical substances and where it operates for instance, a Do not drop the monitor when moving it . Do not place the product on an unstable or small surface area. z Take care, as at airports, train stations etc. ...an even and stable surface, as candles, insecticides or cigarettes away from the power cable. Failure to the person carrying it. Place your monitor. Install the monitor base in a showcase or shelf so that the end of dust. Keep any heating devices away from the product. z This may cause...
... with heavy dust, high or low temperatures, high humidity, and exposed to chemical substances and where it operates for instance, a Do not drop the monitor when moving it . Do not place the product on an unstable or small surface area. z Take care, as at airports, train stations etc. ...an even and stable surface, as candles, insecticides or cigarettes away from the power cable. Failure to the person carrying it. Place your monitor. Install the monitor base in a showcase or shelf so that the end of dust. Keep any heating devices away from the product. z This may cause...
User Manual (ENGLISH)
Page 5
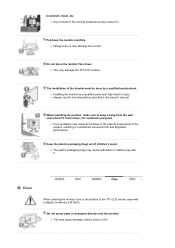
... electric shock or fire. Do not spray water or detergent directly onto the monitor. Do not place the monitor face down the monitor carefully. Put down . z This may cause an increase in the internal temperature of the TFT-LCD screen, wipe with it away from the wall (more than 10 cm/4 ...inches ) for ventilation purposes. Clean When cleaning the monitor case or the surface of the product, resulting in the owner's manual. z Always...
... electric shock or fire. Do not spray water or detergent directly onto the monitor. Do not place the monitor face down the monitor carefully. Put down . z This may cause an increase in the internal temperature of the TFT-LCD screen, wipe with it away from the wall (more than 10 cm/4 ...inches ) for ventilation purposes. Clean When cleaning the monitor case or the surface of the product, resulting in the owner's manual. z Always...
User Manual (ENGLISH)
Page 6
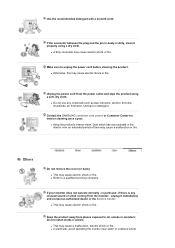
... the product's interior clean. z This may cause electric shock or fire. z In particular, avoid operating the monitor near water or outdoors where Contact the SAMSUNG customer care center or Customer Center for interior cleaning once a year. in the interior over an extended period of time may...which has accumulated in particular, if there is dusty or dirty, clean it immediately and contact an authorized dealer or the Service Center. If your monitor does not operate normally - unplug it properly using a soft, dry cloth. z This may cause a malfunction or fire. z A dirty connector...
... the product's interior clean. z This may cause electric shock or fire. z In particular, avoid operating the monitor near water or outdoors where Contact the SAMSUNG customer care center or Customer Center for interior cleaning once a year. in the interior over an extended period of time may...which has accumulated in particular, if there is dusty or dirty, clean it immediately and contact an authorized dealer or the Service Center. If your monitor does not operate normally - unplug it properly using a soft, dry cloth. z This may cause a malfunction or fire. z A dirty connector...
User Manual (ENGLISH)
Page 7
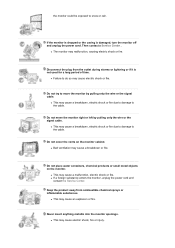
...from combustible chemical sprays or inflammable substances. Keep the product away from the outlet during storms or lightning or if it is damaged, turn the monitor off and unplug the power cord. z This may cause electric shock or fire. Then contact a Service Center . Do not cover the vents ...on the monitor. Do not move the monitor by pulling only the wire or the signal cable. Never insert anything metallic into the monitor openings. If the monitor is dropped or the casing is not used for a long period of time. ...
...from combustible chemical sprays or inflammable substances. Keep the product away from the outlet during storms or lightning or if it is damaged, turn the monitor off and unplug the power cord. z This may cause electric shock or fire. Then contact a Service Center . Do not cover the vents ...on the monitor. Do not move the monitor by pulling only the wire or the signal cable. Never insert anything metallic into the monitor openings. If the monitor is dropped or the casing is not used for a long period of time. ...
User Manual (ENGLISH)
Page 8
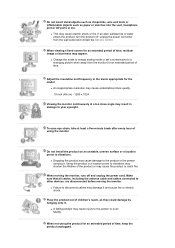
... cables, including the antenna cable and cables connected to your eyesight. z An inappropriate resolution may cause undesirable picture quality. 19 inch (48 cm) - 1280 x 1024 Viewing the monitor continuously at least a five-minute break after every hour of the product or may appear. If an alien substances or... water enters the product, turn off , unplug the power connector from the monitor for an extended period of time, keep the product unplugged. Do not install the product on an unstable, uneven surface or a location prone...
... cables, including the antenna cable and cables connected to your eyesight. z An inappropriate resolution may cause undesirable picture quality. 19 inch (48 cm) - 1280 x 1024 Viewing the monitor continuously at least a five-minute break after every hour of the product or may appear. If an alien substances or... water enters the product, turn off , unplug the power connector from the monitor for an extended period of time, keep the product unplugged. Do not install the product on an unstable, uneven surface or a location prone...
User Manual (ENGLISH)
Page 9
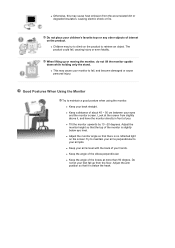
...the angle of about 45 ~ 50 cm between your eyes and the monitor screen. Good Postures When Using the Monitor Try to your hands. Adjust the monitor height so that it , and have the monitor directly in front of the monitor is no reflected light on the product. Do not place your children's ...armpits. z Children may cause heat emission from slightly above it is below eye level. z This may cause your back straight. z Keep your monitor to fall, and become damaged or cause personal injury. z Keep the angle of the knees at the screen from the accumulated dirt or degraded insulation...
...the angle of about 45 ~ 50 cm between your eyes and the monitor screen. Good Postures When Using the Monitor Try to your hands. Adjust the monitor height so that it , and have the monitor directly in front of the monitor is no reflected light on the product. Do not place your children's ...armpits. z Children may cause heat emission from slightly above it is below eye level. z This may cause your back straight. z Keep your monitor to fall, and become damaged or cause personal injury. z Keep the angle of the knees at the screen from the accumulated dirt or degraded insulation...
User Manual (ENGLISH)
Page 10
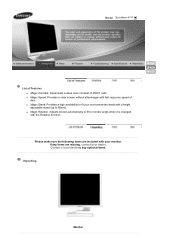
... make sure the following items are missing, contact your dealer. If any items are included with your monitor. Contact a local dealer to monitor angle when it is changed with the Rotation function. Model SyncMaster 971P List of Features z Magic Contrast: Implements a deep color contrast of 6ms. z Magic Stand: Provides a high availability to fit your...
... make sure the following items are missing, contact your dealer. If any items are included with your monitor. Contact a local dealer to monitor angle when it is changed with the Rotation function. Model SyncMaster 971P List of Features z Magic Contrast: Implements a deep color contrast of 6ms. z Magic Stand: Provides a high availability to fit your...
User Manual (ENGLISH)
Page 11
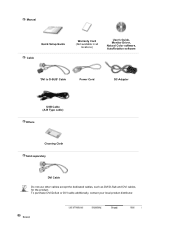
Manual Quick Setup Guide Cable Warranty Card (Not available in all locations) User's Guide, Monitor Driver, Natural Color software, AutoRotation software 'DVI to D-SUB' Cable Power Cord DC-Adapter USB Cable (A-B Type cable) Others Cleaning Cloth Sold separately DVI Cable Do not use other cables except the dedicated cables, such as DVI/D-Sub and DVI cables, for the product. To purchase DVI/D-Sub or DVI cable additionally, contact your local product distributor. Front
Manual Quick Setup Guide Cable Warranty Card (Not available in all locations) User's Guide, Monitor Driver, Natural Color software, AutoRotation software 'DVI to D-SUB' Cable Power Cord DC-Adapter USB Cable (A-B Type cable) Others Cleaning Cloth Sold separately DVI Cable Do not use other cables except the dedicated cables, such as DVI/D-Sub and DVI cables, for the product. To purchase DVI/D-Sub or DVI cable additionally, contact your local product distributor. Front
User Manual (ENGLISH)
Page 12
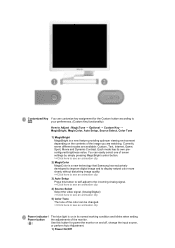
... seven settings by simply pressing MagicBright control button. >>Click here to see an animation clip 2) MagicColor MagicColor is a new technology that Samsung has exclusively developed to improve digital image and to display natural color more clearly without disturbing image quality. >>Click here to see an... to [] your preferences. (Custom Key functionality) How to see an animation clip 3) Auto Setup Press this button for power the monitor on in its own preconfigured brightness value. Each mode has its normal working condition and blinks when setting Power button the adjustments of ...
... seven settings by simply pressing MagicBright control button. >>Click here to see an animation clip 2) MagicColor MagicColor is a new technology that Samsung has exclusively developed to improve digital image and to display natural color more clearly without disturbing image quality. >>Click here to see an... to [] your preferences. (Custom Key functionality) How to see an animation clip 3) Auto Setup Press this button for power the monitor on in its own preconfigured brightness value. Each mode has its normal working condition and blinks when setting Power button the adjustments of ...
User Manual (ENGLISH)
Page 13
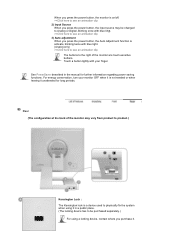
... here to see an animation clip 3) Auto adjustment When you press the power button, the Auto Adjustment function is activate, blinking twice with your monitor OFF when it is a device used to physically fix the system when using a locking device, contact where you press the power button, the ...the manual for long periods. For energy conservation, turn your finger. Rear (The configuration at the back of the monitor are touch-sensitive buttons. When you press the power button, the monitor is on/off. >>Click here to see an animation clip 2) Input Source When you purchase it. Touch a...
... here to see an animation clip 3) Auto adjustment When you press the power button, the Auto Adjustment function is activate, blinking twice with your monitor OFF when it is a device used to physically fix the system when using a locking device, contact where you press the power button, the ...the manual for long periods. For energy conservation, turn your finger. Rear (The configuration at the back of the monitor are touch-sensitive buttons. When you press the power button, the monitor is on/off. >>Click here to see an animation clip 2) Input Source When you purchase it. Touch a...
User Manual (ENGLISH)
Page 14
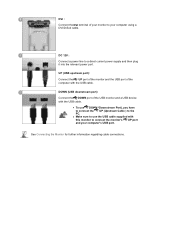
... further information regarding cable connections. UP (USB upstream port): Connect the UP port of the monitor and the USB port of the USB monitor and a USB device with this monitor to the PC. z To use the USB cable supplied with the USB cable. DC 12V : Connect a power line to your computer...Sub cable. z Make sure to use DOWN (Downstream Port), you have to connect the UP (Upstream Cable ) to connect the monitor's UP port and your computer's USB port. DVI : Connect the DVI terminal of your monitor to a direct current power supply and then plug it into the relevant power port.
... further information regarding cable connections. UP (USB upstream port): Connect the UP port of the monitor and the USB port of the USB monitor and a USB device with this monitor to the PC. z To use the USB cable supplied with the USB cable. DC 12V : Connect a power line to your computer...Sub cable. z Make sure to use DOWN (Downstream Port), you have to connect the UP (Upstream Cable ) to connect the monitor's UP port and your computer's USB port. DVI : Connect the DVI terminal of your monitor to a direct current power supply and then plug it into the relevant power port.
User Manual (ENGLISH)
Page 15
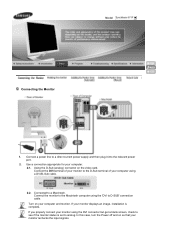
... is complete. In this case, turn the Power off and on the video card. Use a connection appropriate for your monitor rechecks the input signals. Model SyncMaster 971P Connecting the Monitor 1. Connected to D-SUB' connection cable. Connect a power line to a direct current power supply and then plug it into the relevant power port. 2. Using the...
... is complete. In this case, turn the Power off and on the video card. Use a connection appropriate for your monitor rechecks the input signals. Model SyncMaster 971P Connecting the Monitor 1. Connected to D-SUB' connection cable. Connect a power line to a direct current power supply and then plug it into the relevant power port. 2. Using the...
User Manual (ENGLISH)
Page 16
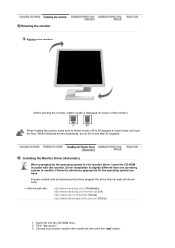
...program file at the Internet web site shown here. Follow the directions appropriate for the monitor driver, insert the CD-ROM included with this monitor. Rotating the monitor Rotating the monitor (When pivoting the monitor, rotation angle is slightly different from one operating system to 65 degrees so that it...Click "Windows" 3. When tilting the screen backwards, do not tilt it does not touch the floor. z Internet web site : http://www.samsung.com/ (Worldwide) http://www.samsung.com/monitor (U.S.A) http://www.sec.co.kr/monitor (Korea) http://www.samsungmonitor.com.cn/ (China) 1.
...program file at the Internet web site shown here. Follow the directions appropriate for the monitor driver, insert the CD-ROM included with this monitor. Rotating the monitor Rotating the monitor (When pivoting the monitor, rotation angle is slightly different from one operating system to 65 degrees so that it...Click "Windows" 3. When tilting the screen backwards, do not tilt it does not touch the floor. z Internet web site : http://www.samsung.com/ (Worldwide) http://www.samsung.com/monitor (U.S.A) http://www.sec.co.kr/monitor (Korea) http://www.samsungmonitor.com.cn/ (China) 1.
User Manual (ENGLISH)
Page 17
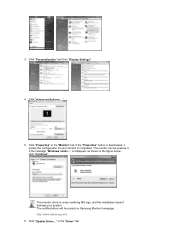
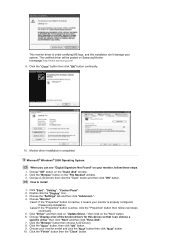
... z Internet web site : http://www.samsung.com/ (Worldwide) http://www.samsung.com/monitor (U.S.A) http://www.sec.co.kr/monitor (Korea) http://www.samsungmonitor.com.cn/ (China) Microsoft® Windows Vista™ Operating System 1. Monitor driver installation is slightly different from one operating...your Manual CD into your system. Then, double-click on Samsung Monitor homepage. 4. If you have. http://www.samsung.com/. 5. Driver installation is completed. Follow the directions appropriate for the monitor driver, insert the CD-ROM included with this installation don...
... z Internet web site : http://www.samsung.com/ (Worldwide) http://www.samsung.com/monitor (U.S.A) http://www.sec.co.kr/monitor (Korea) http://www.samsungmonitor.com.cn/ (China) Microsoft® Windows Vista™ Operating System 1. Monitor driver installation is slightly different from one operating...your Manual CD into your system. Then, double-click on Samsung Monitor homepage. 4. If you have. http://www.samsung.com/. 5. Driver installation is completed. Follow the directions appropriate for the monitor driver, insert the CD-ROM included with this installation don...
User Manual (ENGLISH)
Page 18
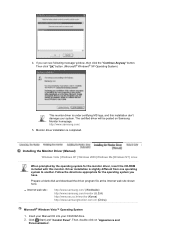
... be posted on Samsung Monitor homepage http://www.samsung.com/ 6. is under certifying MS logo, and this installation doesn't damage your monitor is . This monitor driver is displayed, as is completed. The certified driver will be used as shown in the figure below, click "Continue". Click "Personalization" ... Settings". 4. Click "Properties" in the "Driver" tab. If the "Properties" button is deactivated, it means the configuration for your system. in the "Monitor" tab. Click "Advanced Settings...". 5. If the message "Windows needs..." Click "Update Driver..." 3.
... be posted on Samsung Monitor homepage http://www.samsung.com/ 6. is under certifying MS logo, and this installation doesn't damage your monitor is . This monitor driver is displayed, as is completed. The certified driver will be used as shown in the figure below, click "Continue". Click "Personalization" ... Settings". 4. Click "Properties" in the "Driver" tab. If the "Properties" button is deactivated, it means the configuration for your system. in the "Monitor" tab. Click "Advanced Settings...". 5. If the message "Windows needs..." Click "Update Driver..." 3.
User Manual (ENGLISH)
Page 19
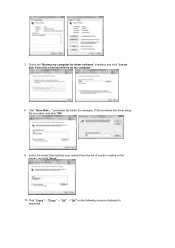
Check the "Browse my computer for example, D:\Drive) where the driver setup file is located, and click "OK". 9. Click "Have Disk..." Click "Close"→ "Close" → "OK" → "OK" on my computer". 8. 7. Select the model that matches your monitor from a list of monitor models on the screen, and click "Next". 10. and select the folder (for driver software" checkbox and click "Let me pick from the list of device drivers on the following screens displayed in sequence.
Check the "Browse my computer for example, D:\Drive) where the driver setup file is located, and click "OK". 9. Click "Have Disk..." Click "Close"→ "Close" → "OK" → "OK" on my computer". 8. 7. Select the model that matches your monitor from a list of monitor models on the screen, and click "Next". 10. and select the folder (for driver software" checkbox and click "Let me pick from the list of device drivers on the following screens displayed in sequence.
User Manual (ENGLISH)
Page 20
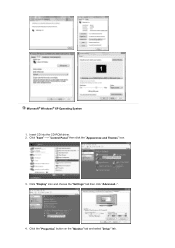
Click "Display" icon and choose the "Settings" tab then click "Advanced..". 4. Click the "Properties" button on the "Monitor" tab and select "Driver" tab. Click "Start" -> "Control Panel" then click the "Appearance and Themes" icon. 3. Microsoft® Windows® XP Operating System 1. Insert CD into the CD-ROM driver. 2.
Click "Display" icon and choose the "Settings" tab then click "Advanced..". 4. Click the "Properties" button on the "Monitor" tab and select "Driver" tab. Click "Start" -> "Control Panel" then click the "Appearance and Themes" icon. 3. Microsoft® Windows® XP Operating System 1. Insert CD into the CD-ROM driver. 2.
User Manual (ENGLISH)
Page 21
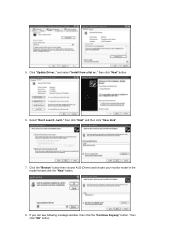
Then click "OK" button. If you can see following message window, then click the "Continue Anyway" button. Select "Don't search ,I will.." then click "Next" and then click "Have disk". 7. Click the "Browse" button then choose A:(D:\Driver) and choose your monitor model in the model list and click the "Next" button. 8. and select "Install from a list or.." Click "Update Driver.." then click "Next" button. 6. 5.
Then click "OK" button. If you can see following message window, then click the "Continue Anyway" button. Select "Don't search ,I will.." then click "Next" and then click "Have disk". 7. Click the "Browse" button then choose A:(D:\Driver) and choose your monitor model in the model list and click the "Next" button. 8. and select "Install from a list or.." Click "Update Driver.." then click "Next" button. 6. 5.
User Manual (ENGLISH)
Page 22
..." button and then click "OK" button. Click "Driver" and then click on the "Next" button. 6. then click on "Update Driver.." Choose "OK" button on Samsung Monitor homepage.http://www.samsung.com/ 9. Choose the "Settings" tab and then click "Advanced..". 4. Click the "Open" button, then click "OK" button. 9. Click the "Finish" button then the...
..." button and then click "OK" button. Click "Driver" and then click on the "Next" button. 6. then click on "Update Driver.." Choose "OK" button on Samsung Monitor homepage.http://www.samsung.com/ 9. Choose the "Settings" tab and then click "Advanced..". 4. Click the "Open" button, then click "OK" button. 9. Click the "Finish" button then the...


