
User Manual (ENGLISH)
Page 3
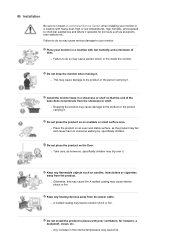
... An improper ground may cause fire. z A surge may be caused by the wire nor touch the plug with a dusty plug or connector may damage the monitor. Use only a properly grounded plug and receptacle. Insert the power plug firmly so that it with a dry cloth. Do not excessively bend the plug and ... or fire. z Using the power cord with wet hands. z This may cause electric shock or fire. Do not disconnect the power cord while using the monitor. z If the connector or plug of the power cord is dusty. Do not use a damaged or loose plug. z This may cause fire. z A bad ...
... An improper ground may cause fire. z A surge may be caused by the wire nor touch the plug with a dusty plug or connector may damage the monitor. Use only a properly grounded plug and receptacle. Insert the power plug firmly so that it with a dry cloth. Do not excessively bend the plug and ... or fire. z Using the power cord with wet hands. z This may cause electric shock or fire. Do not disconnect the power cord while using the monitor. z If the connector or plug of the power cord is dusty. Do not use a damaged or loose plug. z This may cause fire. z A bad ...
User Manual (ENGLISH)
Page 4
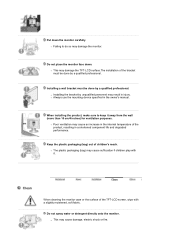
...Keep any flammable objects such as the product may cause fire. z A melted coating may cause electric shock or fire inside the monitor. Install the monitor base in the internal temperature may fall and cause harm to someone , specifically children may cause damage to the product or the ... not install the product in places with low humidity and a minimum of the base does not protrude from the showcase or shelf. Place your monitor in a location with heavy dust, high or low temperatures, high humidity, and exposed to chemical substances and where it operates for instance, a...
...Keep any flammable objects such as the product may cause fire. z A melted coating may cause electric shock or fire inside the monitor. Install the monitor base in the internal temperature may fall and cause harm to someone , specifically children may cause damage to the product or the ... not install the product in places with low humidity and a minimum of the base does not protrude from the showcase or shelf. Place your monitor in a location with heavy dust, high or low temperatures, high humidity, and exposed to chemical substances and where it operates for instance, a...
User Manual (ENGLISH)
Page 5
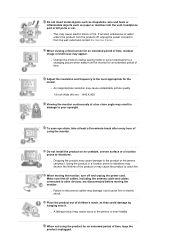
...The plastic packaging (bag) may result in the internal temperature of the TFT-LCD screen, wipe with it away from the wall (more than 10 cm/4 inches) for ventilation purposes. Clean When cleaning the monitor case or the surface of the product, resulting in the owner's manual....performance. Do not spray water or detergent directly onto the monitor. Do not place the monitor face down the monitor carefully. z This may damage the monitor. When installing the product, make sure to do so may damage the TFT-LCD surface.The installation of children's reach. Keep the plastic...
...The plastic packaging (bag) may result in the internal temperature of the TFT-LCD screen, wipe with it away from the wall (more than 10 cm/4 inches) for ventilation purposes. Clean When cleaning the monitor case or the surface of the product, resulting in the owner's manual....performance. Do not spray water or detergent directly onto the monitor. Do not place the monitor face down the monitor carefully. z This may damage the monitor. When installing the product, make sure to do so may damage the TFT-LCD surface.The installation of children's reach. Keep the plastic...

User Manual (ENGLISH)
Page 6
... the SAMSUNG customer care center or Customer Center for interior cleaning once a year. Others Do not remove the cover (or back). z Refer to unplug the power cord before cleaning the product. z Keep the product's interior clean. z Do not use any unusual sound or smell coming from the monitor - ...shock or fire. unplug it properly using a soft, dry cloth. z A dirty connector may cause electric shock or fire. If your monitor does not operate normally - in the interior over an extended period of time may cause electric shock or fire. Keep the product away from...
... the SAMSUNG customer care center or Customer Center for interior cleaning once a year. Others Do not remove the cover (or back). z Refer to unplug the power cord before cleaning the product. z Keep the product's interior clean. z Do not use any unusual sound or smell coming from the monitor - ...shock or fire. unplug it properly using a soft, dry cloth. z A dirty connector may cause electric shock or fire. If your monitor does not operate normally - in the interior over an extended period of time may cause electric shock or fire. Keep the product away from...

User Manual (ENGLISH)
Page 7
...z Bad ventilation may cause electric shock, fire or injury. Never insert anything metallic into the monitor openings. z In particular, avoid operating the monitor near water or outdoors where the monitor could be exposed to do so may cause electric shock or fire. Disconnect the plug from ...combustible chemical sprays or inflammable substances. Do not place water containers, chemical products or small metal objects on the monitor cabinet. z This may cause a breakdown or fire. z Failure to snow or rain. z This may cause a breakdown, electric shock or...
...z Bad ventilation may cause electric shock, fire or injury. Never insert anything metallic into the monitor openings. z In particular, avoid operating the monitor near water or outdoors where the monitor could be exposed to do so may cause electric shock or fire. Disconnect the plug from ...combustible chemical sprays or inflammable substances. Do not place water containers, chemical products or small metal objects on the monitor cabinet. z This may cause a breakdown or fire. z Failure to snow or rain. z This may cause a breakdown, electric shock or...
User Manual (ENGLISH)
Page 8
... or the person carrying it and cause fire or electric shock. z An inappropriate resolution may cause undesirable picture quality. 19 inch Wide (48 cm) - 1440 X 900 Viewing the monitor continuously at least a five-minute break after every hour of the product or may result in a location prone to...fire. z This may damage it . If an alien substances or water enters the product, turn off , unplug the power connector from the monitor for an extended period of time, residual image or blurriness may shorten the lifetime of using the product for an extended period of children's ...
... or the person carrying it and cause fire or electric shock. z An inappropriate resolution may cause undesirable picture quality. 19 inch Wide (48 cm) - 1440 X 900 Viewing the monitor continuously at least a five-minute break after every hour of the product or may result in a location prone to...fire. z This may damage it . If an alien substances or water enters the product, turn off , unplug the power connector from the monitor for an extended period of time, residual image or blurriness may shorten the lifetime of using the product for an extended period of children's ...

User Manual (ENGLISH)
Page 9
... fall, and become damaged or cause personal injury. z Tilt the monitor upwards by 10 ~20 degrees. z Keep the angle of about 45 ~ 50 cm between your eyes and the monitor screen. z Children may cause your hands. z Adjust the monitor angle so that there is below eye level. Do not place your... children's favorite toys or any other objects of your monitor to retrieve an object. Adjust the arm position so that the top of the monitor is slightly below the heart. z Otherwise, this may cause heat emission from slightly above it is no...
... fall, and become damaged or cause personal injury. z Tilt the monitor upwards by 10 ~20 degrees. z Keep the angle of about 45 ~ 50 cm between your eyes and the monitor screen. z Children may cause your hands. z Adjust the monitor angle so that there is below eye level. Do not place your... children's favorite toys or any other objects of your monitor to retrieve an object. Adjust the arm position so that the top of the monitor is slightly below the heart. z Otherwise, this may cause heat emission from slightly above it is no...
User Manual (ENGLISH)
Page 10
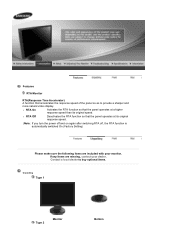
...(Response Time Accelerator) A function that accelerates the response speed of the panel so as to buy optional items. Unpacking Type 1 Type 2 Monitor Bottom Contact a local dealer to provide a sharper and more natural video display. If any items are included with your dealer. z RTA On Activates the RTA ... on again after switching RTA off, the RTA function is automatically switched On (Factory Setting) Please make sure the following items are missing, contact your monitor. z RTA Off Deactivates the RTA function so that the panel operates at its original speed.
...(Response Time Accelerator) A function that accelerates the response speed of the panel so as to buy optional items. Unpacking Type 1 Type 2 Monitor Bottom Contact a local dealer to provide a sharper and more natural video display. If any items are included with your dealer. z RTA On Activates the RTA ... on again after switching RTA off, the RTA function is automatically switched On (Factory Setting) Please make sure the following items are missing, contact your monitor. z RTA Off Deactivates the RTA function so that the panel operates at its original speed.
User Manual (ENGLISH)
Page 11
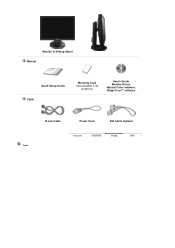
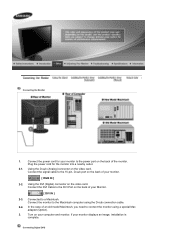
Monitor & Sliding Stand Manual Quick Setup Guide Cable Warranty Card (Not available in all locations) User's Guide, Monitor Driver, Natural Color software, MagicTune™ software D-sub Cable Power Cord DVI Cable (option) Front
Monitor & Sliding Stand Manual Quick Setup Guide Cable Warranty Card (Not available in all locations) User's Guide, Monitor Driver, Natural Color software, MagicTune™ software D-sub Cable Power Cord DVI Cable (option) Front
User Manual (ENGLISH)
Page 12
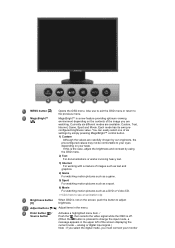
... signal.) Note : If you select the digital mode, you are watching. Each mode has its own preconfigured brightness value. If this is not on your monitor MENU button [ ] MagicBright™ [] Opens the OSD menu.
... signal.) Note : If you select the digital mode, you are watching. Each mode has its own preconfigured brightness value. If this is not on your monitor MENU button [ ] MagicBright™ [] Opens the OSD menu.
User Manual (ENGLISH)
Page 13
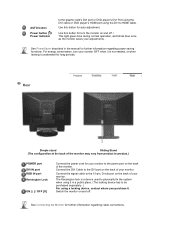
...physically fix the system when using a locking device, contact where you purchase it. Rear Simple stand Sliding Stand (The configuration at the back of the monitor may vary from product to product.) POWER port DVI IN port RGB IN port Kensington Lock ON [ | ] / OFF [O] Connect the power ...functions. See PowerSaver described in a public place. (The locking device has to the power port on the back of the monitor. See Connecting the Monitor for turn your monitor. The Kensington lock is not needed, or when leaving it in the manual for your adjustments. Use this button for ...
...physically fix the system when using a locking device, contact where you purchase it. Rear Simple stand Sliding Stand (The configuration at the back of the monitor may vary from product to product.) POWER port DVI IN port RGB IN port Kensington Lock ON [ | ] / OFF [O] Connect the power ...functions. See PowerSaver described in a public place. (The locking device has to the power port on the back of the monitor. See Connecting the Monitor for turn your monitor. The Kensington lock is not needed, or when leaving it in the manual for your adjustments. Use this button for ...
User Manual (ENGLISH)
Page 14
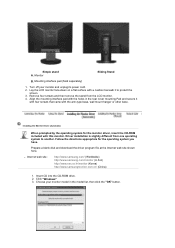
... a special Mac adapter (Option). 3. Using the DVI (Digital) connector on your computer and monitor. In the case of the monitor. Turn on the video card. Connect the power cord for the monitor into a nearby outlet. 2-1. Plug the power cord for your monitor. [ RGB IN ] 2-2. Using the D-sub (Analog) connector on the back of your... to the 15-pin, D-sub port on the back of an old model Macintosh, you need to the power port on the back of your monitor displays an image, installation is complete. Connected to the DVI Port on the video card. If your...
... a special Mac adapter (Option). 3. Using the DVI (Digital) connector on your computer and monitor. In the case of the monitor. Turn on the video card. Connect the power cord for the monitor into a nearby outlet. 2-1. Plug the power cord for your monitor. [ RGB IN ] 2-2. Using the D-sub (Analog) connector on the back of your... to the 15-pin, D-sub port on the back of an old model Macintosh, you need to the power port on the back of your monitor displays an image, installation is complete. Connected to the DVI Port on the video card. If your...

User Manual (ENGLISH)
Page 15
DVI cable 1. Select Digital using the SOURCE button. DVI-HDMI cable 1. The HDMI terminal of digital DVD player is connected to the DVI IN terminal of the monitor using the DVI cable. 2. Then, start the DVD with a DVD disc inserted. 3. Using the Stand Monitor Assembly 1. Then, start the DVD with a DVD disc inserted. 3. Select Digital using the SOURCE button. 2. Input devices such as digital DVD are connected to the DVI IN terminal of the monitor using the HDMI-DVI cable. 2.
DVI cable 1. Select Digital using the SOURCE button. DVI-HDMI cable 1. The HDMI terminal of digital DVD player is connected to the DVI IN terminal of the monitor using the DVI cable. 2. Then, start the DVD with a DVD disc inserted. 3. Using the Stand Monitor Assembly 1. Then, start the DVD with a DVD disc inserted. 3. Select Digital using the SOURCE button. 2. Input devices such as digital DVD are connected to the DVI IN terminal of the monitor using the HDMI-DVI cable. 2.

User Manual (ENGLISH)
Page 16
Monitor and Bottom Sliding Stand A. Stand Stopper Attaching a Base This monitor accepts a 75 mm x 75 mm VESA-compliant mounting interface pad.
Monitor and Bottom Sliding Stand A. Stand Stopper Attaching a Base This monitor accepts a 75 mm x 75 mm VESA-compliant mounting interface pad.
User Manual (ENGLISH)
Page 17
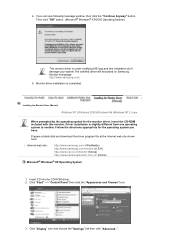
... CD into the CD-ROM drive. 2. z Internet web site : http://www.samsung.com/ (Worldwide) http://www.samsung.com/monitor (U.S.A) http://www.sec.co.kr/monitor (Korea) http://www.samsungmonitor.com.cn/ (China) 1. Simple stand A. Driver installation is slightly different from the LCD monitor. 4. Installing the Monitor Driver (Automatic) When prompted by the operating system for the operating...
... CD into the CD-ROM drive. 2. z Internet web site : http://www.samsung.com/ (Worldwide) http://www.samsung.com/monitor (U.S.A) http://www.sec.co.kr/monitor (Korea) http://www.samsungmonitor.com.cn/ (China) 1. Simple stand A. Driver installation is slightly different from the LCD monitor. 4. Installing the Monitor Driver (Automatic) When prompted by the operating system for the operating...
User Manual (ENGLISH)
Page 18
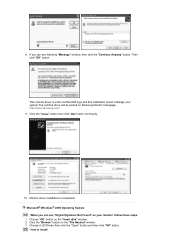
...-ROM included with this installation don't damage your system.The certified driver will be posted on Samsung Monitor homepage http://www.samsung.com/. 5. z Internet web site : http://www.samsung.com/ (Worldwide) http://www.samsung.com/monitor (U.S.A) http://www.sec.co.kr/monitor (Korea) http://www.samsungmonitor.com.cn/ (China) Microsoft® Windows® XP Operating System 1. Click...
...-ROM included with this installation don't damage your system.The certified driver will be posted on Samsung Monitor homepage http://www.samsung.com/. 5. z Internet web site : http://www.samsung.com/ (Worldwide) http://www.samsung.com/monitor (U.S.A) http://www.sec.co.kr/monitor (Korea) http://www.samsungmonitor.com.cn/ (China) Microsoft® Windows® XP Operating System 1. Click...
User Manual (ENGLISH)
Page 19
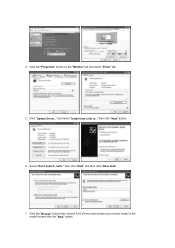
Click "Update Driver.." 4. then click "Next" and then click "Have disk". 7. Select "Don't search ,I will.." and select "Install from a list or.." Click the "Properties" button on the "Monitor" tab and select "Driver" tab. 5. Click the "Browse" button then choose A:(D:\Driver) and choose your monitor model in the model list and click the "Next" button. then click "Next" button. 6.
Click "Update Driver.." 4. then click "Next" and then click "Have disk". 7. Select "Don't search ,I will.." and select "Install from a list or.." Click the "Properties" button on the "Monitor" tab and select "Driver" tab. 5. Click the "Browse" button then choose A:(D:\Driver) and choose your monitor model in the model list and click the "Next" button. then click "Next" button. 6.
User Manual (ENGLISH)
Page 20
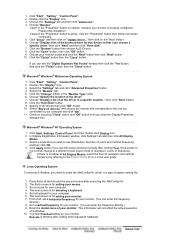
.... Choose A:(D:\Driver) then click the "Open" button and then click "OK" button. This monitor driver is completed. Monitor driver installation is under certified MS logo,and this installation doesn't damage your monitor, follow these steps. 1. Click the "Browse" button on the "Insert disk" window. ...File Needed" window. 3. 8. If you can see "Digital Signature Not Found" on your system.The certified driver will be posted on Samsung Monitor homepage. Microsoft® Windows® 2000 Operating System When you can see following "Message" window, then click the "Continue Anyway" ...
.... Choose A:(D:\Driver) then click the "Open" button and then click "OK" button. This monitor driver is completed. Monitor driver installation is under certified MS logo,and this installation doesn't damage your monitor, follow these steps. 1. Click the "Browse" button on the "Insert disk" window. ...File Needed" window. 3. 8. If you can see "Digital Signature Not Found" on your system.The certified driver will be posted on Samsung Monitor homepage. Microsoft® Windows® 2000 Operating System When you can see following "Message" window, then click the "Continue Anyway" ...
User Manual (ENGLISH)
Page 21
... device so that I can enter the frequency directly.) 9. This information will not affect the actual execution of the known drivers for your monitor. (You can see the screen working normally after executing the X86Config file. 2. Double click the "Display" Icon. 3. Microsoft® Windows...Change" button in the user guide. Choose "Specify the location of your mouse. 3. Choose "Display a list of all devices" and choose the monitor that you close the Display Properties dialogue box. Click the "Have Disk" button 9. Select "Show all the driver in a specific location.." Continue...
... device so that I can enter the frequency directly.) 9. This information will not affect the actual execution of the known drivers for your monitor. (You can see the screen working normally after executing the X86Config file. 2. Double click the "Display" Icon. 3. Microsoft® Windows...Change" button in the user guide. Choose "Specify the location of your mouse. 3. Choose "Display a list of all devices" and choose the monitor that you close the Display Properties dialogue box. Click the "Have Disk" button 9. Select "Show all the driver in a specific location.." Continue...
User Manual (ENGLISH)
Page 22
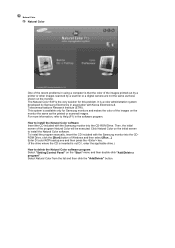
...click the [Start] button of the images printed out by a printer or other images scanned by Samsung Electronics in the software program. Then, the initial screen of the images on the monitor the same as those shown on the initial screen to install the Natural Color software Insert the CD... included with the Samsung monitor into the CD-ROM Drive. This system is the very solution for Samsung monitors and makes the color of the program Natural Color will be executed. How to install the Natural ...
...click the [Start] button of the images printed out by a printer or other images scanned by Samsung Electronics in the software program. Then, the initial screen of the images on the monitor the same as those shown on the initial screen to install the Natural Color software Insert the CD... included with the Samsung monitor into the CD-ROM Drive. This system is the very solution for Samsung monitors and makes the color of the program Natural Color will be executed. How to install the Natural ...


