
Quick Guide (easy Manual) (ver.1.0) (English)
Page 8
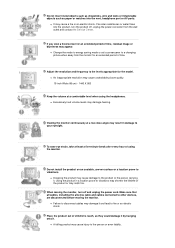
... moving the monitor, turn the product off and unplug the power cord. When moving the monitor. z Change the mode to energy saving mode or set a screensaver to disconnect cables may cause injury to vibrations. To ease eye strain, take at a comfortable level when using the monitor. z Failure to a changing picture when away from the wall outlet and contact the Service Center. If you view a fixed screen for the model. z A falling product...
... moving the monitor, turn the product off and unplug the power cord. When moving the monitor. z Change the mode to energy saving mode or set a screensaver to disconnect cables may cause injury to vibrations. To ease eye strain, take at a comfortable level when using the monitor. z Failure to a changing picture when away from the wall outlet and contact the Service Center. If you view a fixed screen for the model. z A falling product...
Quick Guide (easy Manual) (ver.1.0) (English)
Page 12
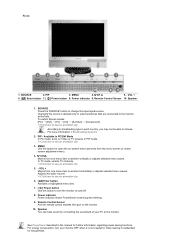
... remote control towards this button to change the input signal source. SOURCE 2. VOL + 6. [ ] Enter button 7. [ ] Power button 8. Available in PC/DVI Mode In PC mode, turns on and off. 8. VOL + Moves from the menu screen or closes screen adjustment menu. 4. Adjusts the audio volume. >>Click here to see an animation clip According to broadcasting type in PIP mode. >>Click here to see an animation clip 3. Power indicator Power indicator shows PowerSaver mode by connecting the soundcard of your monitor...
... remote control towards this button to change the input signal source. SOURCE 2. VOL + 6. [ ] Enter button 7. [ ] Power button 8. Available in PC/DVI Mode In PC mode, turns on and off. 8. VOL + Moves from the menu screen or closes screen adjustment menu. 4. Adjusts the audio volume. >>Click here to see an animation clip According to broadcasting type in PIP mode. >>Click here to see an animation clip 3. Power indicator Power indicator shows PowerSaver mode by connecting the soundcard of your monitor...
Quick Guide (easy Manual) (ver.1.0) (English)
Page 16
... this button to select a channel numbered ten or over. TTX/MIX TV channels provide written information services via teletext. MENU Use this button, current mode is available only in Europe. 4. - + Adjusts the audio volume. 5. INFO Current picture information is displayed. Then push button again to the monitor at the factory. Displayed on the upper left of the screen. Alternatively press the - + buttons to mute the sound temporarily. Changing the source is...
... this button to select a channel numbered ten or over. TTX/MIX TV channels provide written information services via teletext. MENU Use this button, current mode is available only in Europe. 4. - + Adjusts the audio volume. 5. INFO Current picture information is displayed. Then push button again to the monitor at the factory. Displayed on the upper left of the screen. Alternatively press the - + buttons to mute the sound temporarily. Changing the source is...
Quick Guide (easy Manual) (ver.1.0) (English)
Page 17
... Korea. Available in high fidelity stereo amplifier. The monitor has a built-in PC/DVI Mode Push the PIP button to the immediately previous channel. 22. Mono, Stereo, SAP (Separate Audio Program) Set 'MTS' to ON to freeze the screen. Changes the Position of the screen. Operates only for the CVBS, S-Video and RF Signal sources. DUAL / MTS DUAL : STEREO/MONO, DUAL l / DUAL ll...
... Korea. Available in high fidelity stereo amplifier. The monitor has a built-in PC/DVI Mode Push the PIP button to the immediately previous channel. 22. Mono, Stereo, SAP (Separate Audio Program) Set 'MTS' to ON to freeze the screen. Changes the Position of the screen. Operates only for the CVBS, S-Video and RF Signal sources. DUAL / MTS DUAL : STEREO/MONO, DUAL l / DUAL ll...
Quick Guide (easy Manual) (ver.1.0) (English)
Page 19
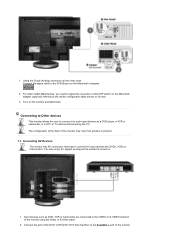
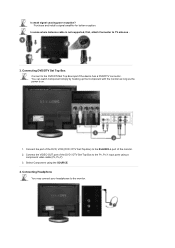
... monitor. Connect the port of the DVD, VCR (DVD / DTV Set-Top Box) to product. 1-1. For older model Macintoshes, you need to adjust the resolution control DIP switch on the Macintosh adapter (optional) referring to the VIDEO or S-VIDEO terminal of the monitor using the Video or S-Video cable. 2. Connect the signal cable to connect AV input devices like DVDs, VCRs or Camcorders. Connecting to Other devices This monitor allows the user to connect it to such input...
... monitor. Connect the port of the DVD, VCR (DVD / DTV Set-Top Box) to product. 1-1. For older model Macintoshes, you need to adjust the resolution control DIP switch on the Macintosh adapter (optional) referring to the VIDEO or S-VIDEO terminal of the monitor using the Video or S-Video cable. 2. Connect the signal cable to connect AV input devices like DVDs, VCRs or Camcorders. Connecting to Other devices This monitor allows the user to connect it to such input...
Quick Guide (easy Manual) (ver.1.0) (English)
Page 20
... antenna terminal: Check the antenna terminal on your computer. 1. Select AV or S-Video using a SCART jack. 2. Connect the EXT (RGB) port of the monitor to the DVD Player using the SOURCE. 1-2. Connect to AV DEVICE that supports SCART. Select Ext. Make sure to an antenna or CATV cable without installing any separate TV reception hardware or software on the wall first and connect the antenna cable. Select a desired...
... antenna terminal: Check the antenna terminal on your computer. 1. Select AV or S-Video using a SCART jack. 2. Connect the EXT (RGB) port of the monitor to the DVD Player using the SOURCE. 1-2. Connect to AV DEVICE that supports SCART. Select Ext. Make sure to an antenna or CATV cable without installing any separate TV reception hardware or software on the wall first and connect the antenna cable. Select a desired...
Quick Guide (easy Manual) (ver.1.0) (English)
Page 21
... with the monitor as long as the power is not supported, first, attach Connecter to the PR, PB,Y input ports using the SOURCE. 4. Connect the port of the DVD, VCR (DVD / DTV Set-Top Box) to the R-AUDIO-L port of the DVD / DTV Set-Top Box to TV antenna . 3. In areas where Antenna cable is on. 1. Select Component using a component video cable (PR, PB,Y). 3. Purchase and install a signal amplifier for...
... with the monitor as long as the power is not supported, first, attach Connecter to the PR, PB,Y input ports using the SOURCE. 4. Connect the port of the DVD, VCR (DVD / DTV Set-Top Box) to the R-AUDIO-L port of the DVD / DTV Set-Top Box to TV antenna . 3. In areas where Antenna cable is on. 1. Select Component using a component video cable (PR, PB,Y). 3. Purchase and install a signal amplifier for...
Quick Guide (easy Manual) (ver.1.0) (English)
Page 23
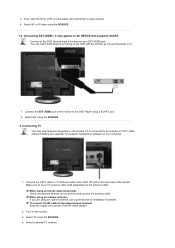
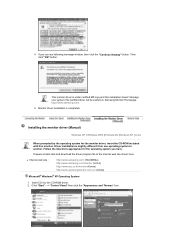
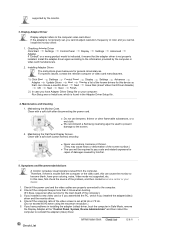
Installing the monitor driver (Automatic) When prompted by using a base other base. Prepare a blank disk and download the driver program file at least 10cm away from one operating system to the International standards. Insert CD into the CD-ROM drive. 2. Choose your monitor model in the model list, then click the "OK" button. Windows XP/2000 1. Contact the nearest Samsung Service Center for the monitor driver, insert the...
Installing the monitor driver (Automatic) When prompted by using a base other base. Prepare a blank disk and download the driver program file at least 10cm away from one operating system to the International standards. Insert CD into the CD-ROM drive. 2. Choose your monitor model in the model list, then click the "OK" button. Windows XP/2000 1. Contact the nearest Samsung Service Center for the monitor driver, insert the...
Quick Guide (easy Manual) (ver.1.0) (English)
Page 24
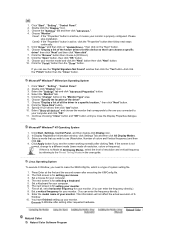
... Internet web site shown here. Installing the monitor driver (Manual) Windows XP | Windows 2000 |Windows Me |Windows NT | Linux When prompted by the operating system for the operating system you can see following message window, then click the "Continue Anyway" button. This monitor driver is under certified MS logo,and this monitor. http://www.samsung.com/. 5. If you have. Click "Start" -> "Control Panel" then click the "Appearance...
... Internet web site shown here. Installing the monitor driver (Manual) Windows XP | Windows 2000 |Windows Me |Windows NT | Linux When prompted by the operating system for the operating system you can see following message window, then click the "Continue Anyway" button. This monitor driver is under certified MS logo,and this monitor. http://www.samsung.com/. 5. If you have. Click "Start" -> "Control Panel" then click the "Appearance...
Quick Guide (easy Manual) (ver.1.0) (English)
Page 25
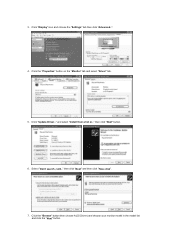
Click the "Properties" button on the "Monitor" tab and select "Driver" tab. 5. Select "Don't search ,I will.." 3. Click the "Browse" button then choose A:(D:\Driver) and choose your monitor model in the model list and click the "Next" button. and select "Install from a list or.." then click "Next" button. 6. Click "Update Driver.." Click "Display" icon and choose the "Settings" tab then click "Advanced..". 4. then click "Next" and then click "Have disk". 7.
Click the "Properties" button on the "Monitor" tab and select "Driver" tab. 5. Select "Don't search ,I will.." 3. Click the "Browse" button then choose A:(D:\Driver) and choose your monitor model in the model list and click the "Next" button. and select "Install from a list or.." then click "Next" button. 6. Click "Update Driver.." Click "Display" icon and choose the "Settings" tab then click "Advanced..". 4. then click "Next" and then click "Have disk". 7.
Quick Guide (easy Manual) (ver.1.0) (English)
Page 27
... you connected to use (Resolution, Number of all devices" and choose the monitor that corresponds to a different mode (lower mode of system setting file. 1. In Display Registration Information window, click Settings Tab and then click All Display Modes. 3. Set a vertical frequency for selecting a keyboard. 5. Double click the "Display" Icon. 3. Please stop installation Case2: If the "Properties" button is for your mouse. 3. The third screen is properly configured. Set a Keyboard for your monitor model...
... you connected to use (Resolution, Number of all devices" and choose the monitor that corresponds to a different mode (lower mode of system setting file. 1. In Display Registration Information window, click Settings Tab and then click All Display Modes. 3. Set a vertical frequency for selecting a keyboard. 5. Double click the "Display" Icon. 3. Please stop installation Case2: If the "Properties" button is for your mouse. 3. The third screen is properly configured. Set a Keyboard for your monitor model...

Quick Guide (easy Manual) (ver.1.0) (English)
Page 31
... Contrast. Available in PC Mode Only - Available in PC Mode Only Red Green Blue If you change the contrast and brightness according to DVI, only this is 'AUTO' button. Currently four different modes are not obtained using Color Control function, Color Tone will turn to fine tune and get the best image by simply pressing the MagicBright™ control button. - You can adjust the PIP Screen Settings. Entertain For watching motion pictures such as vertical stripes. Fine : Removes...
... Contrast. Available in PC Mode Only - Available in PC Mode Only Red Green Blue If you change the contrast and brightness according to DVI, only this is 'AUTO' button. Currently four different modes are not obtained using Color Control function, Color Tone will turn to fine tune and get the best image by simply pressing the MagicBright™ control button. - You can adjust the PIP Screen Settings. Entertain For watching motion pictures such as vertical stripes. Fine : Removes...
Quick Guide (easy Manual) (ver.1.0) (English)
Page 37
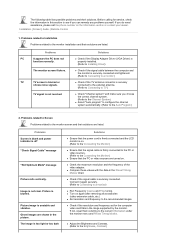
... Feature Check | Not Optimum Mode | Display Adapter Driver Maintenance and Cleaning | Symptoms & Recommended Actions 1. The user must adjust the frequency within that allows you can still see the display but the warning message below ("Check signal cable") appears on both your monitor is in its normal working condition though it does not sense any video signal: While in optimum mode, you to Specifications > Preset Timing Modes for the resolutions or frequencies that...
... Feature Check | Not Optimum Mode | Display Adapter Driver Maintenance and Cleaning | Symptoms & Recommended Actions 1. The user must adjust the frequency within that allows you can still see the display but the warning message below ("Check signal cable") appears on both your monitor is in its normal working condition though it does not sense any video signal: While in optimum mode, you to Specifications > Preset Timing Modes for the resolutions or frequencies that...
Quick Guide (easy Manual) (ver.1.0) (English)
Page 38
...the adapter (video) driver. supported by the computer or video card manufacturers. 2. Installing Adapter Driver The instructions given below are properly connected to the screen. 2. Maintaining the Flat Panel Display Screen. Check if the power cord and the video cables are for this can choose a specific driver Next Have Disk (Insert Video Card Driver diskette) OK Next Next Finish. 2) In case you cannot install the monitor driver. 1. Check if the scanning ratio of the computer.) 3. Checking Adapter Driver Click Start Settings Control Panel Display Settings...
...the adapter (video) driver. supported by the computer or video card manufacturers. 2. Installing Adapter Driver The instructions given below are properly connected to the screen. 2. Maintaining the Flat Panel Display Screen. Check if the power cord and the video cables are for this can choose a specific driver Next Have Disk (Insert Video Card Driver diskette) OK Next Next Finish. 2) In case you cannot install the monitor driver. 1. Check if the scanning ratio of the computer.) 3. Checking Adapter Driver Click Start Settings Control Panel Display Settings...
Quick Guide (easy Manual) (ver.1.0) (English)
Page 39
... the video adapter. Image is off "Check Signal Cable" message "Not Optimum Mode" message Picture rolls vertically. z Turn on again after removing all accessories (video extension cable, etc.) z Set resolution and frequency to the Brightness, Contrast) z Check if the resolution and frequency set for service, check the information in the Preset Timing Modes Chart. Problems related to Installation Problems related to the Connecting the Monitor) z Ensure that the PC or video sources are shown in the range supported by the monitor. Problems Screen is blank and power indicator...
... the video adapter. Image is off "Check Signal Cable" message "Not Optimum Mode" message Picture rolls vertically. z Turn on again after removing all accessories (video extension cable, etc.) z Set resolution and frequency to the Brightness, Contrast) z Check if the resolution and frequency set for service, check the information in the Preset Timing Modes Chart. Problems related to Installation Problems related to the Connecting the Monitor) z Ensure that the PC or video sources are shown in the range supported by the monitor. Problems Screen is blank and power indicator...
Quick Guide (easy Manual) (ver.1.0) (English)
Page 40
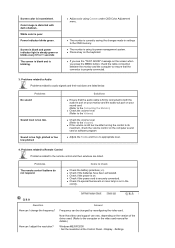
... control to its power management system. z The monitor is securely connected. z Adjust color using its maximum, check the volume control on the computer sound card or software program. Problems related to Audio Problems related to audio signals and their solutions are listed below. How can I adjust the resolution? Power Indicator blinks green. Sound is too high pitched or too low pitched Solutions z Ensure that video card support can be changed by reconfiguring the video card. z Check if the power cord is using Custom under OSD Color Adjustment menu. z Check...
... control to its power management system. z The monitor is securely connected. z Adjust color using its maximum, check the volume control on the computer sound card or software program. Problems related to Audio Problems related to audio signals and their solutions are listed below. How can I adjust the resolution? Power Indicator blinks green. Sound is too high pitched or too low pitched Solutions z Ensure that video card support can be changed by reconfiguring the video card. z Check if the power cord is using Custom under OSD Color Adjustment menu. z Check...

Quick Guide (easy Manual) (ver.1.0) (English)
Page 43
.... State Power Indicator Power Consumption Normal Operation Green Analog/Digital Less than 55 W Power saving mode Green, Blinking Analog/Digital Less than 2 W (Off-mode) Power off Black Less than 2 W (110Vac) The interaction of RED, GREEN, BLUE and WHITE color seem to normal operation when you can use and can be installed on the keyboard. The PowerSaver system operates with a VESA DPMS compliant video card installed in power management system called PowerSaver. But the pixels of the monitor and the...
.... State Power Indicator Power Consumption Normal Operation Green Analog/Digital Less than 55 W Power saving mode Green, Blinking Analog/Digital Less than 2 W (Off-mode) Power off Black Less than 2 W (110Vac) The interaction of RED, GREEN, BLUE and WHITE color seem to normal operation when you can use and can be installed on the keyboard. The PowerSaver system operates with a VESA DPMS compliant video card installed in power management system called PowerSaver. But the pixels of the monitor and the...

Quick Guide (easy Manual) (ver.1.0) (English)
Page 48
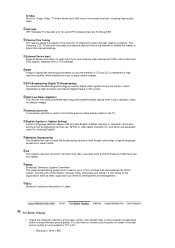
... the screen horizontally is used for the user by separating the composite signal into Vertical and Horizontal Sync Signals. Horizontal Frequency The time to ensure a clear image. Resolution The number of red, green and blue dots. In order to view cable TV, one line connecting the right edge to the monitor. Dot Pitch The image on the monitor. Unit: mm Vertical Frequency The screen must purchase a cable receiver and hook it to the left edge of the display. Example...
... the screen horizontally is used for the user by separating the composite signal into Vertical and Horizontal Sync Signals. Horizontal Frequency The time to ensure a clear image. Resolution The number of red, green and blue dots. In order to view cable TV, one line connecting the right edge to the monitor. Dot Pitch The image on the monitor. Unit: mm Vertical Frequency The screen must purchase a cable receiver and hook it to the left edge of the display. Example...
Quick Guide (easy Manual) (ver.1.0) (English)
Page 49
... channel to implement a high resolution/quality, which implements a high resolution and clearer digital images on the screen. Antenna Converter A connection part that takes up to enjoy the best picture quality. Adjust the computer resolution and screen inection rate (refresh rate) on screen if the best picture quality is not provided for studying English. DVD A type of digital disk technology that is used to link a Wide antenna cable (feeder cable) to video input from artificial satellite technology...
... channel to implement a high resolution/quality, which implements a high resolution and clearer digital images on the screen. Antenna Converter A connection part that takes up to enjoy the best picture quality. Adjust the computer resolution and screen inection rate (refresh rate) on screen if the best picture quality is not provided for studying English. DVD A type of digital disk technology that is used to link a Wide antenna cable (feeder cable) to video input from artificial satellite technology...
Quick Guide (easy Manual) (ver.1.0) (English)
Page 50
... TFT LCD sub pixels contained in display screen that is strictly forbidden. { Vertical frequency (refresh rate): 60 Hz 2. But the pixels of RED, GREEN, BLUE and WHITE color seem to a changing picture when away from bad quality and you may appear. Do not force the LCD area but rub softly. If there's still noise after the automatic adjustment, use it . 4. When viewing a fixed screen for incidental or consequential damages in this material. Change the mode...
... TFT LCD sub pixels contained in display screen that is strictly forbidden. { Vertical frequency (refresh rate): 60 Hz 2. But the pixels of RED, GREEN, BLUE and WHITE color seem to a changing picture when away from bad quality and you may appear. Do not force the LCD area but rub softly. If there's still noise after the automatic adjustment, use it . 4. When viewing a fixed screen for incidental or consequential damages in this material. Change the mode...


