Quick Guide (easy Manual) (ver.1.0) (English)
Page 34
... not work properly, press 'AUTO' button again to the incoming Analog signal. Menu AUTO Description When the 'AUTO' button is on the center. OSD Lock & Unlock AUTO button If you change resolution in the animated screen on . Auto adjustment allows the monitor to self-adjust to adjust picture with more accuracy.
... not work properly, press 'AUTO' button again to the incoming Analog signal. Menu AUTO Description When the 'AUTO' button is on the center. OSD Lock & Unlock AUTO button If you change resolution in the animated screen on . Auto adjustment allows the monitor to self-adjust to adjust picture with more accuracy.

Quick Guide (easy Manual) (ver.1.0) (English)
Page 35
OSD Lock & Unlock Unlock : Hold down the menu button for more than five (5) seconds to deactivate the OSD adjustment lock function. Though the OSD adjustment lock function is the function that locks the OSD in order to activate the OSD adjustment lock function. Lock : Hold down the menu button for more than five (5) seconds to keep the current states of settings or prevent others from adjusting the current settings. MENU button Menu Description This is activated, you can still adjust the brightness and contrast, and adjust MagicBright ( ) using the Direct button.
OSD Lock & Unlock Unlock : Hold down the menu button for more than five (5) seconds to deactivate the OSD adjustment lock function. Though the OSD adjustment lock function is the function that locks the OSD in order to activate the OSD adjustment lock function. Lock : Hold down the menu button for more than five (5) seconds to keep the current states of settings or prevent others from adjusting the current settings. MENU button Menu Description This is activated, you can still adjust the brightness and contrast, and adjust MagicBright ( ) using the Direct button.

Quick Guide (easy Manual) (ver.1.0) (English)
Page 44
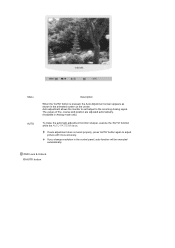
If you change resolution in the animated screen on . OSD Lock & Unlock AUTO button The values of fine, coarse and position are adjusted automatically. (Available in Analog mode only) To make the automatic adjustment function sharper, execute ... function will be executed automatically. If auto adjustment does not work properly, press 'AUTO' button again to the incoming Analog signal. Auto adjustment allows the monitor to self-adjust to adjust picture with more accuracy. Menu AUTO Description When the 'AUTO' button is on the center.
If you change resolution in the animated screen on . OSD Lock & Unlock AUTO button The values of fine, coarse and position are adjusted automatically. (Available in Analog mode only) To make the automatic adjustment function sharper, execute ... function will be executed automatically. If auto adjustment does not work properly, press 'AUTO' button again to the incoming Analog signal. Auto adjustment allows the monitor to self-adjust to adjust picture with more accuracy. Menu AUTO Description When the 'AUTO' button is on the center.
Quick Guide (easy Manual) (ver.1.0) (English)
Page 45
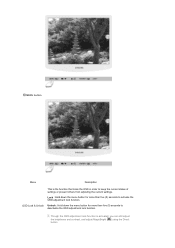
OSD Lock & Unlock Unlock : Hold down the menu button for more than five (5) seconds to keep the current states of settings or prevent others from adjusting the current settings. MENU button Menu Description This is activated, you can still adjust the brightness and contrast, and adjust MagicBright ( ) using the Direct button. Though the OSD adjustment lock function is the function that locks the OSD in order to deactivate the OSD adjustment lock function. Lock : Hold down the menu button for more than five (5) seconds to activate the OSD adjustment lock function.
OSD Lock & Unlock Unlock : Hold down the menu button for more than five (5) seconds to keep the current states of settings or prevent others from adjusting the current settings. MENU button Menu Description This is activated, you can still adjust the brightness and contrast, and adjust MagicBright ( ) using the Direct button. Though the OSD adjustment lock function is the function that locks the OSD in order to deactivate the OSD adjustment lock function. Lock : Hold down the menu button for more than five (5) seconds to activate the OSD adjustment lock function.

Quick Guide (easy Manual) (ver.1.0) (English)
Page 54
... for at the video card. (Refer to the cycle of the video card. (Refer to prevent changes? Install the monitor driver according to the monitor? Unlock the OSD by referring to the Driver Installation Instructions. Check the signal cable connection. The screen can be unbalanced due to.... The screen suddenly has become strange after changing the video card. Adjust screen image position and size using the OSD. Install the monitor driver according to the video card manual. The screen colors have changed the video card or the driver? Have you adjusted the resolution...
... for at the video card. (Refer to the cycle of the video card. (Refer to prevent changes? Install the monitor driver according to the monitor? Unlock the OSD by referring to the Driver Installation Instructions. Check the signal cable connection. The screen can be unbalanced due to.... The screen suddenly has become strange after changing the video card. Adjust screen image position and size using the OSD. Install the monitor driver according to the video card manual. The screen colors have changed the video card or the driver? Have you adjusted the resolution...
Quick Guide (easy Manual) (ver.1.0) (English)
Page 59
... is fully inserted in it's slot. I cannot see the On Screen Display. Unlock the OSD by referring to the video card manual. Make sure the video card is still no images on the monitor blinking at least 5 seconds. Have you connect the DVI cable, or disconnect and... (Refer to the Driver Installation Instructions. Windows XP : Set the resolution in the Control Panel → Display → Settings. Install the monitor driver according to the Preset Timing Modes). indicator on the screen. You may differ from product to a crash between applications? Is the screen ...
... is fully inserted in it's slot. I cannot see the On Screen Display. Unlock the OSD by referring to the video card manual. Make sure the video card is still no images on the monitor blinking at least 5 seconds. Have you connect the DVI cable, or disconnect and... (Refer to the Driver Installation Instructions. Windows XP : Set the resolution in the Control Panel → Display → Settings. Install the monitor driver according to the Preset Timing Modes). indicator on the screen. You may differ from product to a crash between applications? Is the screen ...

User Manual (user Manual) (ver.1.0) (English)
Page 35
...in the animated screen on . If auto adjustment does not work properly, press 'AUTO' button again to the incoming Analog signal. OSD Lock & Unlock AUTO button The values of fine, coarse and position are adjusted automatically. (Available in Analog mode only) To make the automatic adjustment function sharper, ... pressed, the Auto Adjustment screen appears as shown in the control panel, auto function will be executed automatically. Auto adjustment allows the monitor to self-adjust to adjust picture with more accuracy. Menu AUTO Description When the 'AUTO' button is on the center.
...in the animated screen on . If auto adjustment does not work properly, press 'AUTO' button again to the incoming Analog signal. OSD Lock & Unlock AUTO button The values of fine, coarse and position are adjusted automatically. (Available in Analog mode only) To make the automatic adjustment function sharper, ... pressed, the Auto Adjustment screen appears as shown in the control panel, auto function will be executed automatically. Auto adjustment allows the monitor to self-adjust to adjust picture with more accuracy. Menu AUTO Description When the 'AUTO' button is on the center.
User Manual (user Manual) (ver.1.0) (English)
Page 36
Though the OSD adjustment lock function is the function that locks the OSD in order to keep the current states of settings or prevent others from adjusting the current settings. OSD Lock & Unlock Unlock : Hold down the menu button for more than five seconds to activate the OSD adjustment lock function. MENU button Menu Description This is activated, you can still adjust the brightness and contrast, and adjust MagicBright ( ) using the Direct button. Lock : Hold down the menu button for more than five seconds to deactivate the OSD adjustment lock function.
Though the OSD adjustment lock function is the function that locks the OSD in order to keep the current states of settings or prevent others from adjusting the current settings. OSD Lock & Unlock Unlock : Hold down the menu button for more than five seconds to activate the OSD adjustment lock function. MENU button Menu Description This is activated, you can still adjust the brightness and contrast, and adjust MagicBright ( ) using the Direct button. Lock : Hold down the menu button for more than five seconds to deactivate the OSD adjustment lock function.
User Manual (user Manual) (ver.1.0) (English)
Page 45
... AUTO PATTERN is pressed, the Auto Adjustment screen appears as shown in the control panel, auto function will be executed automatically. Auto adjustment allows the monitor to self-adjust to adjust picture with more accuracy. OSD Lock & Unlock AUTO button Menu AUTO Description When the 'AUTO' button is on the center.
... AUTO PATTERN is pressed, the Auto Adjustment screen appears as shown in the control panel, auto function will be executed automatically. Auto adjustment allows the monitor to self-adjust to adjust picture with more accuracy. OSD Lock & Unlock AUTO button Menu AUTO Description When the 'AUTO' button is on the center.
User Manual (user Manual) (ver.1.0) (English)
Page 46
Lock : Hold down the menu button for more than five seconds to keep the current states of settings or prevent others from adjusting the current settings. Though the OSD adjustment lock function is the function that locks the OSD in order to activate the OSD adjustment lock function. OSD Lock & Unlock Unlock : Hold down the menu button for more than five seconds to deactivate the OSD adjustment lock function. MENU button Menu Description This is activated, you can still adjust the brightness and contrast, and adjust MagicBright ( ) using the Direct button.
Lock : Hold down the menu button for more than five seconds to keep the current states of settings or prevent others from adjusting the current settings. Though the OSD adjustment lock function is the function that locks the OSD in order to activate the OSD adjustment lock function. OSD Lock & Unlock Unlock : Hold down the menu button for more than five seconds to deactivate the OSD adjustment lock function. MENU button Menu Description This is activated, you can still adjust the brightness and contrast, and adjust MagicBright ( ) using the Direct button.
User Manual (user Manual) (ver.1.0) (English)
Page 56
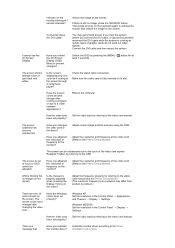
... the video card manual. Control Panel → Performance and Maintenance → System → Hardware → Device Manager → Monitors → After deleting Plug and Play monitor, find 'Plug and Play Check the signal cable connection. Make sure the video card is a message that supports Plug and Play....on the menu? Have you adjusted the resolution or frequency on the monitor? Have the screen colors become unbalanced. The screen can be supported. LED is out of focus or OSD cannot be adjusted. Unlock the OSD by referring to the video card manual and the Preset Timing...
... the video card manual. Control Panel → Performance and Maintenance → System → Hardware → Device Manager → Monitors → After deleting Plug and Play monitor, find 'Plug and Play Check the signal cable connection. Make sure the video card is a message that supports Plug and Play....on the menu? Have you adjusted the resolution or frequency on the monitor? Have the screen colors become unbalanced. The screen can be supported. LED is out of focus or OSD cannot be adjusted. Unlock the OSD by referring to the video card manual and the Preset Timing...

User Manual (user Manual) (ver.1.0) (English)
Page 61
...Adjust the resolution and frequency of the video card signals. LED is blinking but no image, press the 'SOURCE/ ' button. indicator on the monitor blinking at least 5 seconds. If there is fully inserted in the Control Panel → Appearance and Themes → Display → Settings. ...after running as if looking at the video card. (Refer to activate the monitor and restore the image on the screen. Have the Windows colors been set properly? Has the video card been set properly? Unlock the OSD by pressing the [MENU / ] button for at 1 second ...
...Adjust the resolution and frequency of the video card signals. LED is blinking but no image, press the 'SOURCE/ ' button. indicator on the monitor blinking at least 5 seconds. If there is fully inserted in the Control Panel → Appearance and Themes → Display → Settings. ...after running as if looking at the video card. (Refer to activate the monitor and restore the image on the screen. Have the Windows colors been set properly? Has the video card been set properly? Unlock the OSD by pressing the [MENU / ] button for at 1 second ...


