
User Manual (user Manual) (ver.1.0) (English)
Page 7
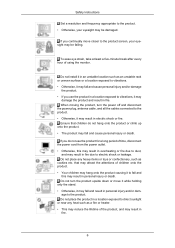
...; If you use the product for a long period of time, disconnect the power cord from the power outlet. •...install it in an unstable location such as a fire or heater. • This may reduce the lifetime of using the monitor. Safety Instructions Set a resolution and frequency...use the product in a location exposed to the product screen, your eyesight may be failing. If you continually move it while holding only the stand. • Otherwise, it to dust, and may be damaged. Do not turn the power off and disconnect the power plug, antenna cable, and all the cables connected...
...; If you use the product for a long period of time, disconnect the power cord from the power outlet. •...install it in an unstable location such as a fire or heater. • This may reduce the lifetime of using the monitor. Safety Instructions Set a resolution and frequency...use the product in a location exposed to the product screen, your eyesight may be failing. If you continually move it while holding only the stand. • Otherwise, it to dust, and may be damaged. Do not turn the power off and disconnect the power plug, antenna cable, and all the cables connected...
User Manual (user Manual) (ver.1.0) (English)
Page 13
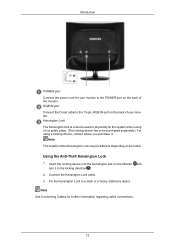
...-pin, RGB IN port on its model. Using the Anti-Theft Kensington Lock 1. RGB IN port Connect the D-sub cable to physically fix the system when using a locking device, contact where you purchase it in the locking direction . 2. Connect the Kensington Lock cable. 3. Note See Connecting Cables for your monitor. Insert the locking device into the Kensington slot on the back of your monitor to the POWER port on the Monitor and turn it in...
...-pin, RGB IN port on its model. Using the Anti-Theft Kensington Lock 1. RGB IN port Connect the D-sub cable to physically fix the system when using a locking device, contact where you purchase it in the locking direction . 2. Connect the Kensington Lock cable. 3. Note See Connecting Cables for your monitor. Insert the locking device into the Kensington slot on the back of your monitor to the POWER port on the Monitor and turn it in...
User Manual (user Manual) (ver.1.0) (English)
Page 16
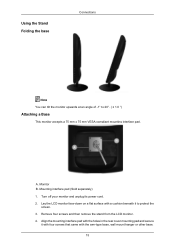
... the LCD monitor. 4. Turn off your monitor and unplug its power cord. 2. Align the mounting interface pad with the holes in the rear cover mounting pad and secure it with four screws that came with a cushion beneath it to 20°. ( ± 1.0 °) Attaching a Base This monitor accepts a 75 mm x 75 mm VESA-compliant mounting interface pad. Mounting interface pad (Sold separately) 1. A. Using the Stand Folding the base Connections...
... the LCD monitor. 4. Turn off your monitor and unplug its power cord. 2. Align the mounting interface pad with the holes in the rear cover mounting pad and secure it with four screws that came with a cushion beneath it to 20°. ( ± 1.0 °) Attaching a Base This monitor accepts a 75 mm x 75 mm VESA-compliant mounting interface pad. Mounting interface pad (Sold separately) 1. A. Using the Stand Folding the base Connections...

User Manual (user Manual) (ver.1.0) (English)
Page 18
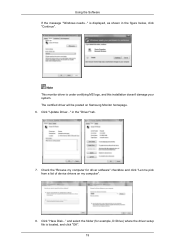
Internet web site : http://www.samsung.com/ (Worldwide) Installing the Monitor Driver (Automatic) 1. Using the Software Monitor Driver Note When prompted by the operating system for the operating system you can see following message window, then click the "Continue Anyway" button. Follow the directions appropriate for the monitor driver, insert the CDROM included with this monitor. Driver installation is slightly different from one operating system to...
Internet web site : http://www.samsung.com/ (Worldwide) Installing the Monitor Driver (Automatic) 1. Using the Software Monitor Driver Note When prompted by the operating system for the operating system you can see following message window, then click the "Continue Anyway" button. Follow the directions appropriate for the monitor driver, insert the CDROM included with this monitor. Driver installation is slightly different from one operating system to...
User Manual (user Manual) (ver.1.0) (English)
Page 19
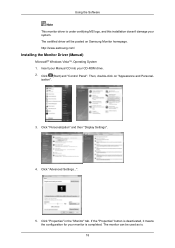
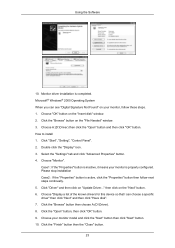
...-ROM drive. 2. The monitor can be posted on "Appearance and Personal- http://www.samsung.com/ Installing the Monitor Driver (Manual) Microsoft® Windows Vista™, Operating System 1. ization". 3. Click (Start) and "Control Panel". Click "Personalization" and then "Display Settings". 4. Insert your Manual CD into your system. Then, double-click on Samsung Monitor homepage. Click "Advanced Settings...". 5. Click "Properties" in the "Monitor" tab. Using the Software Note This monitor driver is completed.
...-ROM drive. 2. The monitor can be posted on "Appearance and Personal- http://www.samsung.com/ Installing the Monitor Driver (Manual) Microsoft® Windows Vista™, Operating System 1. ization". 3. Click (Start) and "Control Panel". Click "Personalization" and then "Display Settings". 4. Insert your Manual CD into your system. Then, double-click on Samsung Monitor homepage. Click "Advanced Settings...". 5. Click "Properties" in the "Monitor" tab. Using the Software Note This monitor driver is completed.
User Manual (user Manual) (ver.1.0) (English)
Page 20
Check the "Browse my computer for example, D:\Drive) where the driver setup file is under certifying MS logo, and this installation doesn't damage your system. Click "Update Driver..." Click "Have Disk..." is displayed, as shown in the "Driver" tab. 7. The certified driver will be posted on my computer". 8. in the figure below, click "Continue". Using the Software If the message "Windows needs..." and select...
Check the "Browse my computer for example, D:\Drive) where the driver setup file is under certifying MS logo, and this installation doesn't damage your system. Click "Update Driver..." Click "Have Disk..." is displayed, as shown in the "Driver" tab. 7. The certified driver will be posted on my computer". 8. in the figure below, click "Continue". Using the Software If the message "Windows needs..." and select...

User Manual (user Manual) (ver.1.0) (English)
Page 22
Insert CD into the CD-ROM drive. 2. and select "Install from a list or..." then click "Next" button. 6. Select "Don't search, I will..." Click the "Properties" button on the "Monitor" tab and select "Driver" tab. 5. Click "Display" icon and choose the "Settings" tab then click "Advanced...". 4. then click "Next" and then click "Have disk". 21 Click "Start" → "Control Panel" then click the "Appearance and Themes" icon. 3. Click "Update Driver..." Using the Software 1.
Insert CD into the CD-ROM drive. 2. and select "Install from a list or..." then click "Next" button. 6. Select "Don't search, I will..." Click the "Properties" button on the "Monitor" tab and select "Driver" tab. 5. Click "Display" icon and choose the "Settings" tab then click "Advanced...". 4. then click "Next" and then click "Have disk". 21 Click "Start" → "Control Panel" then click the "Appearance and Themes" icon. 3. Click "Update Driver..." Using the Software 1.
User Manual (user Manual) (ver.1.0) (English)
Page 24
... see "Digital Signature Not Found" on your monitor model and click the "Next" button then click "Next" button. 10. Click the "Finish" button then the "Close" button. 23 Using the Software 10. Double click the "Display" icon. 3. Click the "Browse" button then choose A:(D:\Driver). 8. Click the "Browse" button on the "Next" button. 6. Click "Start", "Setting", "Control Panel". 2. Select the "Settings" tab and click "Advanced Properties" button. 4. Please stop installation Case2 : If...
... see "Digital Signature Not Found" on your monitor model and click the "Next" button then click "Next" button. 10. Click the "Finish" button then the "Close" button. 23 Using the Software 10. Double click the "Display" icon. 3. Click the "Browse" button then choose A:(D:\Driver). 8. Click the "Browse" button on the "Next" button. 6. Click "Start", "Setting", "Control Panel". 2. Select the "Settings" tab and click "Advanced Properties" button. 4. Please stop installation Case2 : If...
User Manual (user Manual) (ver.1.0) (English)
Page 25
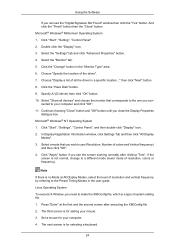
... the driver in a specific location..." Click "Apply" button if you close the Display Properties dialogue box. Click the "Change" button in the user guide. Note If there is no Mode at the first and the second screen after clicking "Test". Click "Start", "Setting", "Control Panel". 2. Microsoft® Windows® Millennium Operating System 1. Choose "Specify the location of resolution and vertical frequency by referring to a different mode (lower mode of system setting...
... the driver in a specific location..." Click "Apply" button if you close the Display Properties dialogue box. Click the "Change" button in the user guide. Note If there is no Mode at the first and the second screen after clicking "Test". Click "Start", "Setting", "Control Panel". 2. Microsoft® Windows® Millennium Operating System 1. Choose "Specify the location of resolution and vertical frequency by referring to a different mode (lower mode of system setting...
User Manual (user Manual) (ver.1.0) (English)
Page 26
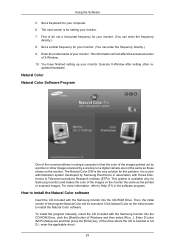
.... How to Help (F1) in the software program. Set a vertical frequency for this problem. Natural Color Natural Color Software Program One of the recent problems in association with the Samsung monitor into the CD-ROM Drive. For more information, refer to install the Natural Color software Insert the CD included with the Samsung monitor into the CD-ROM Drive, click the [Start] button of the images on the monitor the same...
.... How to Help (F1) in the software program. Set a vertical frequency for this problem. Natural Color Natural Color Software Program One of the recent problems in association with the Samsung monitor into the CD-ROM Drive. For more information, refer to install the Natural Color software Insert the CD included with the Samsung monitor into the CD-ROM Drive, click the [Start] button of the images on the monitor the same...
User Manual (user Manual) (ver.1.0) (English)
Page 30
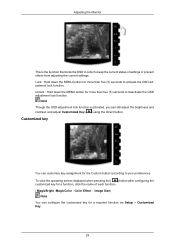
Color Effect - Image Size) Note You can configure the customized key for the Custom button according to deactivate the OSD adjustment lock function. Customized key You can still adjust the brightness and contrast, and adjust Customized Key ( ) using the Direct button. Note Though the OSD adjustment lock function is the function that locks the OSD in order to activate the OSD adjustment lock function. To view the operating screen displayed when pressing the [ ] button after configuring...
Color Effect - Image Size) Note You can configure the customized key for the Custom button according to deactivate the OSD adjustment lock function. Customized key You can still adjust the brightness and contrast, and adjust Customized Key ( ) using the Direct button. Note Though the OSD adjustment lock function is the function that locks the OSD in order to activate the OSD adjustment lock function. To view the operating screen displayed when pressing the [ ] button after configuring...
User Manual (user Manual) (ver.1.0) (English)
Page 39
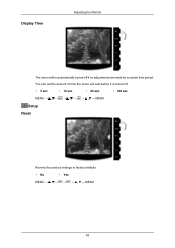
Display Time Adjusting the Monitor The menu will wait before it is turned off if no adjustments are made for a certain time period. You can set the amount of time the menu will be automatically turned off . • 5 sec • 10 sec • 20 sec • 200 sec MENU MENU Setup Reset Reverts the product settings to factory defaults. • No • Yes MENU MENU 38
Display Time Adjusting the Monitor The menu will wait before it is turned off if no adjustments are made for a certain time period. You can set the amount of time the menu will be automatically turned off . • 5 sec • 10 sec • 20 sec • 200 sec MENU MENU Setup Reset Reverts the product settings to factory defaults. • No • Yes MENU MENU 38
User Manual (user Manual) (ver.1.0) (English)
Page 42
Turn off your video controller and computer system; Turn off both your computer and the monitor. Warning Messages If there is something wrong with the input signal, a message appears on the screen or the screen goes blank although the power indicator LED is functioning properly. If there are within 3 feet (one meter) of scan range or that you need to check whether your monitor is still on...
Turn off your video controller and computer system; Turn off both your computer and the monitor. Warning Messages If there is something wrong with the input signal, a message appears on the screen or the screen goes blank although the power indicator LED is functioning properly. If there are within 3 feet (one meter) of scan range or that you need to check whether your monitor is still on...

User Manual (user Manual) (ver.1.0) (English)
Page 43
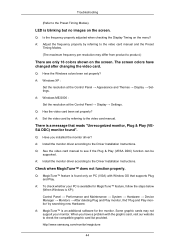
... the monitor. Judging the monitor's working condition. Troubleshooting Useful Tips A monitor recreates visual signals received from the video card exceeds the maximum resolution and frequency that the monitor can see this case, check the computer for trouble. In this message when the signal from the computer. I cannot turn on . A: Check the power cord connection and supply. A: If the initial screen (the login screen) appears, boot the computer in working condition If there is no image...
... the monitor. Judging the monitor's working condition. Troubleshooting Useful Tips A monitor recreates visual signals received from the video card exceeds the maximum resolution and frequency that the monitor can see this case, check the computer for trouble. In this message when the signal from the computer. I cannot turn on . A: Check the power cord connection and supply. A: If the initial screen (the login screen) appears, boot the computer in working condition If there is no image...
User Manual (user Manual) (ver.1.0) (English)
Page 44
... Screen Display. The screen shows strange colors or just black and white. A: Check the signal cable connection. A: Reboot the computer. A: Adjust screen image position and size using the OSD. Q: Is the screen displaying only one color as if looking at the video card. (Refer to the monitor? A: Adjust the resolution and frequency at the screen through a cellophane paper? Q: Have you adjusted the resolution or frequency to the Preset Timing Modes). A: If there is fully inserted in PowerSaver mode. A: Unlock the OSD by pressing the [MENU/ ] button...
... Screen Display. The screen shows strange colors or just black and white. A: Check the signal cable connection. A: Reboot the computer. A: Adjust screen image position and size using the OSD. Q: Is the screen displaying only one color as if looking at the video card. (Refer to the monitor? A: Adjust the resolution and frequency at the screen through a cellophane paper? Q: Have you adjusted the resolution or frequency to the Preset Timing Modes). A: If there is fully inserted in PowerSaver mode. A: Unlock the OSD by pressing the [MENU/ ] button...
User Manual (user Manual) (ver.1.0) (English)
Page 45
... video card been set properly? A: Install the monitor driver according to see if the Plug & Play (VESA DDC) function can be supported. Q: Have you have changed after changing the video card. Q: See the video card manual to the Driver Installation Instructions. Some graphic cards may differ from product to check the compatible graphic card list provided. Q: Have the Windows colors been set properly? The screen colors have a problem with Window OS that reads "Unrecognized monitor, Plug & Play (VESA DDC) monitor found only on PC (VGA...
... video card been set properly? A: Install the monitor driver according to see if the Plug & Play (VESA DDC) function can be supported. Q: Have you have changed after changing the video card. Q: See the video card manual to the Driver Installation Instructions. Some graphic cards may differ from product to check the compatible graphic card list provided. Q: Have the Windows colors been set properly? The screen colors have a problem with Window OS that reads "Unrecognized monitor, Plug & Play (VESA DDC) monitor found only on PC (VGA...
User Manual (user Manual) (ver.1.0) (English)
Page 46
... main board of the video screen is trouble with the monitor. Q & A Q: How can be downloaded http://www.sam- A: The frequency can I adjusts the resolution? A: Windows XP: Set the resolution in the Control Panel → Display → Settings. 45 A: Windows ME/2000: Set the resolution in the Control Panel → Appearance and Themes → Display → Settings. sung.com/monitor/magictune Q: Did you changed by reconfiguring the video card. If a copy of the driver used. (Refer to reinstall the adapter (video) driver. Check if...
... main board of the video screen is trouble with the monitor. Q & A Q: How can be downloaded http://www.sam- A: The frequency can I adjusts the resolution? A: Windows XP: Set the resolution in the Control Panel → Display → Settings. 45 A: Windows ME/2000: Set the resolution in the Control Panel → Appearance and Themes → Display → Settings. sung.com/monitor/magictune Q: Did you changed by reconfiguring the video card. If a copy of the driver used. (Refer to reinstall the adapter (video) driver. Check if...
User Manual (user Manual) (ver.1.0) (English)
Page 49
... Play Capability This monitor can be installed on any problems. For example, the number of RED, GREEN, BLUE and WHITE color appear to change without any Plug & Play compatible system. Class B Equipment (Information Communication equipment for residential use) This product complies with the Electromagnetic Compatibility Directives for residential use it has not been used for long periods. Dot Acceptable TFT-LCD panels manufactured by switching your monitor OFF when it unattended...
... Play Capability This monitor can be installed on any problems. For example, the number of RED, GREEN, BLUE and WHITE color appear to change without any Plug & Play compatible system. Class B Equipment (Information Communication equipment for residential use) This product complies with the Electromagnetic Compatibility Directives for residential use it has not been used for long periods. Dot Acceptable TFT-LCD panels manufactured by switching your monitor OFF when it unattended...
User Manual (user Manual) (ver.1.0) (English)
Page 51
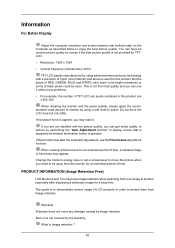
... covered by image retention. Information For Better Display Adjust the computer resolution and screen injection rate (refresh rate) on screen if the best picture quality is not provided for TFTLCD. • Resolution: 1280 x 1024 • Vertical frequency (refresh rate): 60 Hz TFT-LCD panels manufactured by using a soft cloth to polish. This guide is to demonstrate correct usage of black pixels could be away from one millionth) and above is pressed. But the pixels of RED, GREEN, BLUE...
... covered by image retention. Information For Better Display Adjust the computer resolution and screen injection rate (refresh rate) on screen if the best picture quality is not provided for TFTLCD. • Resolution: 1280 x 1024 • Vertical frequency (refresh rate): 60 Hz TFT-LCD panels manufactured by using a soft cloth to polish. This guide is to demonstrate correct usage of black pixels could be away from one millionth) and above is pressed. But the pixels of RED, GREEN, BLUE...
User Manual (user Manual) (ver.1.0) (English)
Page 52
... use • Use a Screen saver if possible • Screen saver in luminance (Black & White, Grey) Ex) 51 Avoid using a combination of your LCD from image retention. Change the Color Information periodically (Use 2 different colors). This is recommended. • Set the Monitor to build up of characters and background color with 2 colors every 30 minutes. Avoid using a stationary pattern. • Turn the power off for 1 hour followed by a Display Logo or moving image...
... use • Use a Screen saver if possible • Screen saver in luminance (Black & White, Grey) Ex) 51 Avoid using a combination of your LCD from image retention. Change the Color Information periodically (Use 2 different colors). This is recommended. • Set the Monitor to build up of characters and background color with 2 colors every 30 minutes. Avoid using a stationary pattern. • Turn the power off for 1 hour followed by a Display Logo or moving image...


