User Manual
Page 4
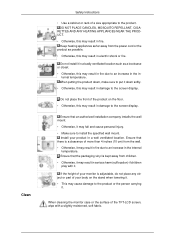
... not place the front of the product on the stand when lowering it may result in fire. Ensure that an authorized installation company installs the wall mount. • Otherwise, it . • This may result in electric shock or fire. Clean Safety Instructions • Use a cabinet or rack of the TFT-LCD screen...
... not place the front of the product on the stand when lowering it may result in fire. Ensure that an authorized installation company installs the wall mount. • Otherwise, it . • This may result in electric shock or fire. Clean Safety Instructions • Use a cabinet or rack of the TFT-LCD screen...
User Manual
Page 11
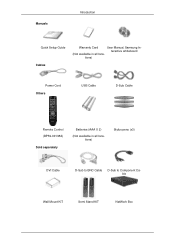
teractive whiteboard tions) Power Cord Others USB Cable D-Sub Cable Remote Control (BP59-00138A) Sold separately Batteries (AAA X 2) (Not available in all locations) Stylus pens (x3) DVI Cable D-Sub to BNC Cable D-Sub to Component Cable Wall Mount KIT Semi Stand KIT NetWork Box Manuals Introduction Quick Setup Guide Cables Warranty Card User Manual, Samsung In- (Not available in all loca-
teractive whiteboard tions) Power Cord Others USB Cable D-Sub Cable Remote Control (BP59-00138A) Sold separately Batteries (AAA X 2) (Not available in all locations) Stylus pens (x3) DVI Cable D-Sub to BNC Cable D-Sub to Component Cable Wall Mount KIT Semi Stand KIT NetWork Box Manuals Introduction Quick Setup Guide Cables Warranty Card User Manual, Samsung In- (Not available in all loca-

User Manual
Page 21
... and tighten the 11 screws A. Fix each of the 4screws on the wall bracket to drill holes deeper than 35 mm. Hinge (Left) D - Use the correct one. Captive Screw B - Wall Bracket C - Before drilling into the wall, check if the length between the two locking holes 3. A - Use... the 5.0 mm bit to adjust the length. If the length is correct. Check the installation diagram and mark the drill points on the wall. Introduction When done, mount the wall bracket on the wall. There are...
... and tighten the 11 screws A. Fix each of the 4screws on the wall bracket to drill holes deeper than 35 mm. Hinge (Left) D - Use the correct one. Captive Screw B - Wall Bracket C - Before drilling into the wall, check if the length between the two locking holes 3. A - Use... the 5.0 mm bit to adjust the length. If the length is correct. Check the installation diagram and mark the drill points on the wall. Introduction When done, mount the wall bracket on the wall. There are...

User Manual
Page 22
... on the model. (The assemblies of the plastic hanger and the screw are the same) 1. Introduction To mount the product on the wall bracket The shape of the product may not stay in the holes. • Make sure the wall bracket is securely fixed to the rear holes of the product. Notice •...; Mount the product on the wall bracket and make sure it is properly fixed to the left and right plastic hangers. • Be careful...
... on the model. (The assemblies of the plastic hanger and the screw are the same) 1. Introduction To mount the product on the wall bracket The shape of the product may not stay in the holes. • Make sure the wall bracket is securely fixed to the rear holes of the product. Notice •...; Mount the product on the wall bracket and make sure it is properly fixed to the left and right plastic hangers. • Be careful...


