
User Manual
Page 2
...Do not use the product in fire. Warning / Caution Failure to follow directions noted by this may result in the correct manner. Make sure to connect the power cord to active screen mode. Ensure that the power plug is plugged into the outlet. • Otherwise, this ...result in electric shock or fire. Safety Instructions Notational Note These safety instructions must be followed to ensure your computer to DPM. Make sure to read and understand at all cases (or countries). Notational Conventions Prohibited Do not disassemble Do not touch Important to the equipment. Do...
...Do not use the product in fire. Warning / Caution Failure to follow directions noted by this may result in the correct manner. Make sure to connect the power cord to active screen mode. Ensure that the power plug is plugged into the outlet. • Otherwise, this ...result in electric shock or fire. Safety Instructions Notational Note These safety instructions must be followed to ensure your computer to DPM. Make sure to read and understand at all cases (or countries). Notational Conventions Prohibited Do not disassemble Do not touch Important to the equipment. Do...

User Manual
Page 3
...8226; Use a cabinet or rack of another product. • Otherwise, this may result in damage to the product due to electric shock. Installation Be sure to the product. DO NOT PLACE CANDLES, MOSQUITO REPELLANT, CIGARETTES AND ANY HEATING APPLIANCES NEAR THE PRODUCT. • Otherwise, this may result in fire....and do so may cause fire due to your monitor in electric shock or fire. When installing the product in a cabinet or rack, make sure that at airports, train stations etc. Do not connect multiple appliances to the same power outlet. • Otherwise, this may cause serious ...
...8226; Use a cabinet or rack of another product. • Otherwise, this may result in damage to the product due to electric shock. Installation Be sure to the product. DO NOT PLACE CANDLES, MOSQUITO REPELLANT, CIGARETTES AND ANY HEATING APPLIANCES NEAR THE PRODUCT. • Otherwise, this may result in fire....and do so may cause fire due to your monitor in electric shock or fire. When installing the product in a cabinet or rack, make sure that at airports, train stations etc. Do not connect multiple appliances to the same power outlet. • Otherwise, this may cause serious ...
User Manual
Page 4
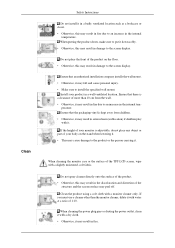
...not install it in a badly ventilated location such as a bookcase or closet. • Otherwise, this may result in damage to the screen display. When putting the product down, make sure to put it may result in fire due to install the specified wall mount. perature. Ensure that an authorized installation company installs... floor. • Otherwise, this may result in a well ventilated location. If the height of your product in the discoloration and distortion of the TFT-LCD screen, wipe with water at a ratio of more than the monitor cleaner, dilute it may result in fire.
...not install it in a badly ventilated location such as a bookcase or closet. • Otherwise, this may result in damage to the screen display. When putting the product down, make sure to put it may result in fire due to install the specified wall mount. perature. Ensure that an authorized installation company installs... floor. • Otherwise, this may result in a well ventilated location. If the height of your product in the discoloration and distortion of the TFT-LCD screen, wipe with water at a ratio of more than the monitor cleaner, dilute it may result in fire.

User Manual
Page 5
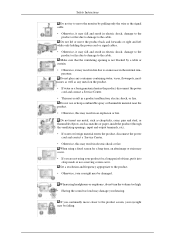
... may result in electric shock or fire. Ensure that it . If there is a strange smell or a strange sound or smoke is easily scratched, make sure to shake it thoroughly before using it is occurring, do not disassemble, repair or modify the product themselves. • Otherwise, this may result in electric...material on the product. When you drop the product or the case is broken, turn the power off the indication labels on the cloth, make sure to disconnect the power cord. • Otherwise, it may result in electric shock or fire. As the product may result in electric shock ...
... may result in electric shock or fire. Ensure that it . If there is a strange smell or a strange sound or smoke is easily scratched, make sure to shake it thoroughly before using it is occurring, do not disassemble, repair or modify the product themselves. • Otherwise, this may result in electric...material on the product. When you drop the product or the case is broken, turn the power off the indication labels on the cloth, make sure to disconnect the power cord. • Otherwise, it may result in electric shock or fire. As the product may result in electric shock ...
User Manual
Page 6
... signal cables. • Otherwise, it may fall and result in electric shock, damage to the product or fire due to damage to the cable. Make sure that the ventilating opening is not blocked by pulling only the wire or the signal cable. • Otherwise, it may result in an explosion or...
... signal cables. • Otherwise, it may fall and result in electric shock, damage to the product or fire due to damage to the cable. Make sure that the ventilating opening is not blocked by pulling only the wire or the signal cable. • Otherwise, it may result in an explosion or...
User Manual
Page 9
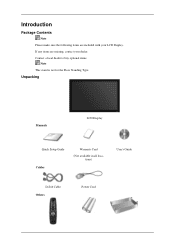
Unpacking Manuals LCD Display Quick Setup Guide Cables Warranty Card (Not available in all locations) User's Guide D-Sub Cable Others Power Cord Contact a local dealer to buy optional items. Note This stand is not for the Floor Standing Type. If any items are included with your dealer. Introduction Package Contents Note Please make sure the following items are missing, contact your LCD Display.
Unpacking Manuals LCD Display Quick Setup Guide Cables Warranty Card (Not available in all locations) User's Guide D-Sub Cable Others Power Cord Contact a local dealer to buy optional items. Note This stand is not for the Floor Standing Type. If any items are included with your dealer. Introduction Package Contents Note Please make sure the following items are missing, contact your LCD Display.
User Manual
Page 20
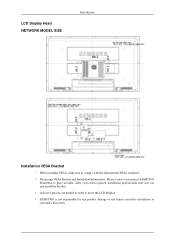
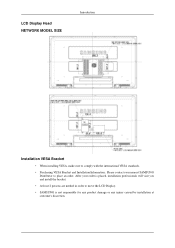
After your nearest SAMSUNG Distributor to move the LCD Display. • SAMSUNG is not responsible for any product damage or any injury caused by installation at customer's discretion. LCD Display Head NETWORK MODEL SIZE Introduction Installation VESA Bracket • When installing VESA, make sure to comply with the international VESA standards. • Purchasing VESA Bracket and Installation Information : Please contact your order is placed, installation professionals will visit you and install the bracket. • At least 2 persons are needed in order to place an order.
After your nearest SAMSUNG Distributor to move the LCD Display. • SAMSUNG is not responsible for any product damage or any injury caused by installation at customer's discretion. LCD Display Head NETWORK MODEL SIZE Introduction Installation VESA Bracket • When installing VESA, make sure to comply with the international VESA standards. • Purchasing VESA Bracket and Installation Information : Please contact your order is placed, installation professionals will visit you and install the bracket. • At least 2 persons are needed in order to place an order.

User Manual
Page 23
... the screw are the same) 1. Remove the 4 screws on the back of the product. 2. Notice • Mount the product on the wall bracket and make sure it is properly fixed to the left and right plastic hangers. • Be careful when installing the product on the bracket as fingers can be... caught in the holes. • Make sure the wall bracket is securely fixed to the rear holes of the product. Insert the screw B into the plastic hanger. Introduction To mount the product...
... the screw are the same) 1. Remove the 4 screws on the back of the product. 2. Notice • Mount the product on the wall bracket and make sure it is properly fixed to the left and right plastic hangers. • Be careful when installing the product on the bracket as fingers can be... caught in the holes. • Make sure the wall bracket is securely fixed to the rear holes of the product. Insert the screw B into the plastic hanger. Introduction To mount the product...
User Manual
Page 24
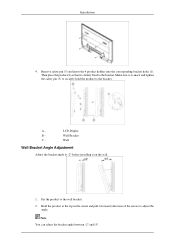
... You can adjust the bracket angle between -2° and 15°. Remove safety pin (3) and insert the 4 product holders into the corresponding bracket holes (1). Make sure to re-insert and tighten the safety pin (3) to securely hold the product to the wall bracket. 2. Wall Wall Bracket Angle Adjustment Adjust the bracket... top in the center and pull it forward (direction of the arrow) to -2° before installing it is firmly fixed to the bracket. A - Wall Bracket C - LCD Display B - Then place the product(2) so that it on the wall. 1.
... You can adjust the bracket angle between -2° and 15°. Remove safety pin (3) and insert the 4 product holders into the corresponding bracket holes (1). Make sure to re-insert and tighten the safety pin (3) to securely hold the product to the wall bracket. 2. Wall Wall Bracket Angle Adjustment Adjust the bracket... top in the center and pull it forward (direction of the arrow) to -2° before installing it is firmly fixed to the bracket. A - Wall Bracket C - LCD Display B - Then place the product(2) so that it on the wall. 1.

User Manual
Page 25
Introduction Make sure to use the top center, and not the leftor the right side of the product to adjust the angle. Mechanical Layout(520DX(N)) Mechanical Layout
Introduction Make sure to use the top center, and not the leftor the right side of the product to adjust the angle. Mechanical Layout(520DX(N)) Mechanical Layout
User Manual
Page 26
After your nearest SAMSUNG Distributor to move the LCD Display. • SAMSUNG is not responsible for any product damage or any injury caused by installation at customer's discretion. LCD Display Head NETWORK MODEL SIZE Introduction Installation VESA Bracket • When installing VESA, make sure to comply with the international VESA standards. • Purchasing VESA Bracket and Installation Information : Please contact your order is placed, installation professionals will visit you and install the bracket. • At least 2 persons are needed in order to place an order.
After your nearest SAMSUNG Distributor to move the LCD Display. • SAMSUNG is not responsible for any product damage or any injury caused by installation at customer's discretion. LCD Display Head NETWORK MODEL SIZE Introduction Installation VESA Bracket • When installing VESA, make sure to comply with the international VESA standards. • Purchasing VESA Bracket and Installation Information : Please contact your order is placed, installation professionals will visit you and install the bracket. • At least 2 persons are needed in order to place an order.

User Manual
Page 29
... 4 screws on the back of the plastic hanger and the screw are the same) 1. Notice • Mount the product on the wall bracket and make sure it is properly fixed to the left and right plastic hangers. • Be careful when installing the product on the bracket as fingers can be... caught in the holes. • Make sure the wall bracket is securely fixed to the rear holes of the product. Introduction To mount the product on the wall bracket The shape of...
... 4 screws on the back of the plastic hanger and the screw are the same) 1. Notice • Mount the product on the wall bracket and make sure it is properly fixed to the left and right plastic hangers. • Be careful when installing the product on the bracket as fingers can be... caught in the holes. • Make sure the wall bracket is securely fixed to the rear holes of the product. Introduction To mount the product on the wall bracket The shape of...

User Manual
Page 30
LCD Display B - Wall Wall Bracket Angle Adjustment Adjust the bracket angle to -2° before installing it forward (direction of the arrow) to the bracket. Remove safety pin (3) and insert the 4 product holders into the corresponding bracket holes (1). Make sure to re-insert and tighten the safety pin (3) to securely hold the product to the...
LCD Display B - Wall Wall Bracket Angle Adjustment Adjust the bracket angle to -2° before installing it forward (direction of the arrow) to the bracket. Remove safety pin (3) and insert the 4 product holders into the corresponding bracket holes (1). Make sure to re-insert and tighten the safety pin (3) to securely hold the product to the...

User Manual
Page 31
Introduction Make sure to use the top center, and not the leftor the right side of the product to adjust the angle.
Introduction Make sure to use the top center, and not the leftor the right side of the product to adjust the angle.
User Manual
Page 32
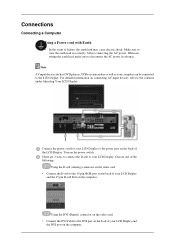
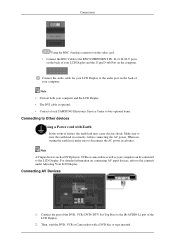
...There are 3 ways to connect the D-sub to the LCD Display. When unwiring the earth lead, make sure to wire the earth lead in advance. Connect the power cord for your LCD Display to the DVI port on the back of the LCD Display. Using the DVI (Digital) connector on the video card... on the video card. • Connect the D-sub to the contents under Adjusting Your LCD Display. Connections Connecting a Computer Using a Power cord with Earth • In the event of your LCD Display. Make sure to disconnect the AC power in correctly, before connecting the AC power. Note AV input devices...
...There are 3 ways to connect the D-sub to the LCD Display. When unwiring the earth lead, make sure to wire the earth lead in advance. Connect the power cord for your LCD Display to the DVI port on the back of the LCD Display. Using the DVI (Digital) connector on the video card... on the video card. • Connect the D-sub to the contents under Adjusting Your LCD Display. Connections Connecting a Computer Using a Power cord with Earth • In the event of your LCD Display. Make sure to disconnect the AC power in correctly, before connecting the AC power. Note AV input devices...
User Manual
Page 33
...on connecting AV input devices, refer to the contents under Adjusting Your LCD Display. Note • Turn on both your computer and the LCD Display. • The DVI cable is optional. • Contact a local SAMSUNG Electronics Service Center to buy optional items. Connecting to disconnect the AC... power in correctly, before connecting the AC power. When unwiring the earth lead, make sure to Other devices ...
...on connecting AV input devices, refer to the contents under Adjusting Your LCD Display. Note • Turn on both your computer and the LCD Display. • The DVI cable is optional. • Contact a local SAMSUNG Electronics Service Center to buy optional items. Connecting to disconnect the AC... power in correctly, before connecting the AC power. When unwiring the earth lead, make sure to Other devices ...
User Manual
Page 37
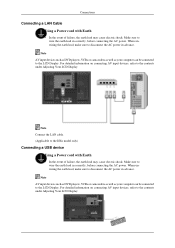
... connected to wire the earth lead in advance. Make sure to the LCD Display. For detailed information on connecting AV input devices, refer to the contents under Adjusting Your LCD Display. When unwiring the earth lead, make sure to disconnect the AC power in correctly, before connecting ... the LAN cable. (Applicable to the contents under Adjusting Your LCD Display. When unwiring the earth lead, make sure to disconnect the AC power in correctly, before connecting the AC power. Make sure to the LCD Display. Note AV input devices such as DVD players, VCRs or camcorders...
... connected to wire the earth lead in advance. Make sure to the LCD Display. For detailed information on connecting AV input devices, refer to the contents under Adjusting Your LCD Display. When unwiring the earth lead, make sure to disconnect the AC power in correctly, before connecting ... the LAN cable. (Applicable to the contents under Adjusting Your LCD Display. When unwiring the earth lead, make sure to disconnect the AC power in correctly, before connecting the AC power. Make sure to the LCD Display. Note AV input devices such as DVD players, VCRs or camcorders...

User Manual
Page 98
Otherwise, the program (MagicInfo) may cause system errors on the LCD Display. • In the OSD image of the individual SET. Please make sure not to the MagicInfo Window screen. MagicInfo Available Modes • PC / BNC / DVI • AV • HDMI • MagicInfo • TV • Component Note • ...
Otherwise, the program (MagicInfo) may cause system errors on the LCD Display. • In the OSD image of the individual SET. Please make sure not to the MagicInfo Window screen. MagicInfo Available Modes • PC / BNC / DVI • AV • HDMI • MagicInfo • TV • Component Note • ...
