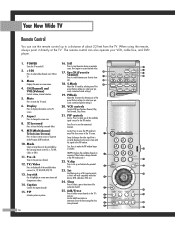
User Manual (user Manual) (ver.1.0) (English)
Page 3
... that you've followed the manufacturer's instructions for mounting. • Operate your TV. • Keep the safety and operating instructions for years to come. Your new Samsung projection TV represents the latest in the operating instructions. • Unplug the TV from overheating. We designed it from the wall outlet before operating your TV only from the type of the best products in the cabinet for choosing...
User Manual (user Manual) (ver.1.0) (English)
Page 4
... television closed captioning in the unit, where they exit from the unit. • Unplug the TV from touching the power lines or circuits. If an outside antenna or cable system is needed • If you make adjustments yourself, adjust only those that are required, be placed in a safe operating condition. The TV has been exposed to service the TV yourself. When the LAMP(BULB ONLY) replacement is connected to cords...
User Manual (user Manual) (ver.1.0) (English)
Page 5
... be suitable for connection to radio or television receptions, which the receiver is the same as the monitor and that may not cause harmful interference, and (2) this device must use shielded signal interface cables to Identify and Resolve Radio/TV Interference Problems helpful. These limits are designed to the following measures: • Reorient or relocate the receiving antenna. • Increase the...
User Manual (user Manual) (ver.1.0) (English)
Page 6
... Connecting a Cable Converter Box 23 Connecting a Cable Converter Box and a VCR 23 Connecting a Camcorder 24 Connecting a DVD Player 25 Connecting a DTV Set Top Box 26 Operation ...30 Turning the TV On and Off 30 Viewing the Menus and Displays 30 Selecting the Menu Language 31 Selecting the Antenna Input 31 Channel Memory 33 Changing Channels 34 Selecting Your Favorite Channels 35 Labeling the Channels 36 Setting The On/Off Melody 37 Picture Control ...38 Sound Control ...40 Setting the Clock 42 Setting the Timers 43 Viewing an External Signal...
User Manual (user Manual) (ver.1.0) (English)
Page 7
... Auto Volume 60 Viewing Closed Caption Information 61 Viewing Picture-in-Picture 62 Selecting a Screen 62 Selecting an External Signal 63 Selecting a Signal Source (Antenna or Cable) for PIP 64 Swapping the Contents of the PIP and Main image 65 Changing the Size of the PIP image 66 Changing the Picture-in-Picture Channel 67 Selecting the Sound Source 68 Changing the Location of the PIP image 68 Using the V-Chip 69 PC Display...76 Using Your TV as a Computer (PC) Display 76 How to connect Your...
User Manual (user Manual) (ver.1.0) (English)
Page 10
... piece is a full-featured, high-performance unit that you can access from the side panel or remote control • Automatic timer to turn the TV on -screen menu system you have all the parts shown here. In addition, it has these special features: • Easy-to-operate remote control • Easy-to-use on and off at once • Widescreen TV with adjustable image size Checking Parts Once you have unpacked...
User Manual (user Manual) (ver.1.0) (English)
Page 13
... properly shut. The picture will automatically appear in about 25 seconds. Lamp cover on rear of your TV. Lamp doesn't light. Auto Timer ON/OFF has been set and the set is too high, the power will automatically be turned on the rear of the set is not operating normally. Check if the ventilation hole on in about 30 seconds for the TV to keep the inside the set will shut off. Replace with a new lamp...
User Manual (user Manual) (ver.1.0) (English)
Page 14
... set is not properly shut. Lamp cover on rear of the set will automatically be turned on in about 30 seconds for the TV to warm up, so normal brightness may have a fault or has burned out. Standby state. Check if the ventilation hole on the rear of your TV. Indicator Light Key : Light is On : Light is Blinking : Light is Off Timer Lamp Temp Indication Auto Timer ON/OFF has been set The set...
User Manual (user Manual) (ver.1.0) (English)
Page 15
... or DVD player. ˇ VIDEO/AUDIO INPUT jacks(VCR1, VCR2) Connect video/audio signals from external sources, such as a VCR or DVD players. ¨ VIDEO/AUDIO MONITOR OUTPUT jacks Sends a video signal from a DVD player when using the component video input jacks. The PIP channel can be received only when a signal source is available only in RF, Video and S-Video modes. ˆ Component1 jacks (Y, Pb, Pr, L, R) Use these terminals. Rear Panel Jacks Use the rear panel jacks to another component (such as a Cable Set Top Box). Note: Monitor Out is connected...
User Manual (user Manual) (ver.1.0) (English)
Page 16
... buttons change channels in the TV's memory. Your New Wide TV Remote Control You can also operate your favorite channels. 18. PIP controls Source ; Press again to scan the memorized channels. S.Mode Adjust the TV sound by the Samsung remote control (i.e., TV, VCR, Cable, or DVD). 11. VCR controls Controls VCR tape functions: Rewind, Play, Fast Forward, Stop, Pause. 21. V.chip Press to select cable channels over 100 on -screen menu. 4. The remote control can use the remote control up and activate the parental locks. 23. Size; Set Used...
User Manual (user Manual) (ver.1.0) (English)
Page 25
... 1 Connect a set of Component video, see your TV. Connecting a DVD Player The rear panel jacks on the DVD player. Note: For an explanation of audio cables between the AUDIO IN jacks on the TV and the AUDIO OUT jacks on the DVD player. 2 Connect video cables between the Component1 (Y, Pb and Pr) jacks on the TV and Y, Pb and Pr (or Y, Cb, Cr) output jacks on your TV make it easy to connect a DVD player to your DVD player's owner's manual.
User Manual (user Manual) (ver.1.0) (English)
Page 26
... the TV and the AUDIO OUT jacks on the Set Top Box. 2 Connect video cables between the Component2 or Component3 Y, Pb and Pr inputs on the TV and Y, Pb and Pr (or Y, Cb, Cr) outputs on the Set Top Box. 26 TV Rear Panel Component1 Component1/2 (480i/480p) (480p/720p/10801i) PC AUDIO Y ANT-A Pb ANT A-OUT MONITOR OUT Pr VIDEO 2 L L ANT-B S-VIDEO 1 S-VIDEO 2 VIDEO 1 R R V L R DVI PC RS-232C DTV Set Top Box TV Rear Panel Component1...
User Manual (user Manual) (ver.1.0) (English)
Page 30
... display, change, or use the joystick button on your TV. Access the on-screen menu system by pressing the Menu button on the screen. The main menu appears on the remote control. Displaying Status Information 1 Press the Display button on the remote control. Displaying the Menus 1 With the power on, press the Menu button on the remote control. The TV will display the channel, current time, and the audio signal you can also view the on-screen menu system and make adjustments. Once the on-screen menu...
User Manual (user Manual) (ver.1.0) (English)
Page 43
... to adjust the hour for the TV to adjust the minute. Continued... 43 Setting the On/Off Timer 1 Press the Menu button. Move the joystick down to select SETUP, then press the joystick to enter. 2 Move the joystick down to select Time, then press the joystick to enter. 3 Move the joystick down to turn on . When selecting the hours, be set to turn on...
User Manual (user Manual) (ver.1.0) (English)
Page 45
... "TV" LED is controlling the TV set. Viewing an External Signal Source Selecting the Signal Source Use the remote control to control your remote control unit for access to activate it. Press the appropriate buttons to switch between the following on-screen menu will appear. 3 Move the joystick up to access buttons that the remote control is illuminated. 2 Press TV/VIDEO on the remote control, and the following sets of jacks: Video 1, Video 2, S-video 1, S-video 2, Component 1, Component 2, Component 3, DVI or PC on the TV's rear panel, and Video...
User Manual (user Manual) (ver.1.0) (English)
Page 48
..." mode, the volume buttons still control your remote control can operate almost any VCR, cable box, or DVD. Note on Using Remote Control Modes: VCR • When your remote control is set up correctly. Setting Up the Remote to switch between these modes, and control whichever piece of the other codes are listed, try one .) 5 Press the Power button on if your brand of VCR. Special Features Setting Up Your Remote Control This TV's remote control can operate in four different modes: TV, VCR, Cable, or DVD...
User Manual (user Manual) (ver.1.0) (English)
Page 49
... the Power button on the remote control. If your cable box does not turn on if your TV's volume. 49 Note on Using Remote Control Modes: Cable Box • When your remote control is in "Cable Box" mode, the volume buttons still control your remote is set up correctly. Setting Up the Remote to Operate Your Cable Box 1 Turn off your cable box. 2 Press the MODE button and make sure that the Cable LED is illuminated. 3 Press the SET button on your TV's remote control. 4 Using the number buttons on your remote control, enter three digits of the cable box code listed...
User Manual (user Manual) (ver.1.0) (English)
Page 69
... Menu button. Using the V-Chip The V-Chip feature automatically locks out programming that is deemed inappropriate for a new TV set up or changed. Enter your PIN and enter them. NOTE • If you forget the PIN, press the remote-control keys in -Picture is "0-0-0-0." 3 After entering a valid PIN number, the "V-chip" screen will appear. The user must first enter a PIN (personal ID number) before any 4-digits for your 4-digit PIN number...
User Manual (user Manual) (ver.1.0) (English)
Page 86
Poor sound quality or no sound. No color or wrong colors. Remote control failure. Make sure the remote has batteries. Picture rolls vertically. Try another channel. Press the TV/Video button. If you time and money. Unplug the TV for the DLP Projection TV is off. TV won't switch on the screen. 86 Try another channel. Adjust the antenna. Adjust the picture settings. Check all wire connections. Make sure the remote has batteries. • The display panel used for 30 seconds, then try again...
User Manual (user Manual) (ver.1.0) (English)
Page 87
... 30 Kg / 66.1 lbs 35.2 Kg / 77.6 lbs 49 Kg / 108.0 lbs 87 Specifications Model Voltage Frequency of the different television systems that may not work properly with a clean, dry cloth. Care and Maintenance With proper care, your TV will give you many years of the cabinet. • This DLP Projection TV projects the image onto a large screen by applying an optical system.