User Manual
Page 43
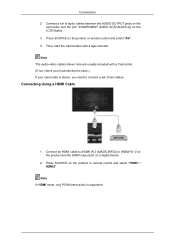
... [AV /COMPONENT AUDIO IN [R-AUDIO-L]] on the LCD Display . 3. Note The audio-video cables shown here are usually included with a tape inserted. Connecting Using a HDMI Cable 1. Connect an HDMI cable to connect a set of two cables. Press SOURCE on a digital device. 2. Then, start the Camcorders with a Camcorder. (If not, check your local electronics store.) If your camcorder is supported. Press SOURCE on the product or remote control and select "HDMI1 / HDMI2" Note In HDMI mode, only PCM...
... [AV /COMPONENT AUDIO IN [R-AUDIO-L]] on the LCD Display . 3. Note The audio-video cables shown here are usually included with a tape inserted. Connecting Using a HDMI Cable 1. Connect an HDMI cable to connect a set of two cables. Press SOURCE on a digital device. 2. Then, start the Camcorders with a Camcorder. (If not, check your local electronics store.) If your camcorder is supported. Press SOURCE on the product or remote control and select "HDMI1 / HDMI2" Note In HDMI mode, only PCM...
User Manual
Page 45
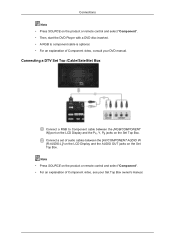
... your Set Top Box owner's manual. Connect a set of Component video, see your DVD manual. Note • Press SOURCE on the product or remote control and select "Component". • For an explanation of audio cables between the [RGB/COMPONENT IN] port on the LCD Display and the PR, Y, PB jacks on the Set Top Box. Connections Note • Press SOURCE on the product or remote control and select "Component". • Then, start...
... your Set Top Box owner's manual. Connect a set of Component video, see your DVD manual. Note • Press SOURCE on the product or remote control and select "Component". • For an explanation of audio cables between the [RGB/COMPONENT IN] port on the LCD Display and the PR, Y, PB jacks on the Set Top Box. Connections Note • Press SOURCE on the product or remote control and select "Component". • Then, start...

User Manual
Page 49
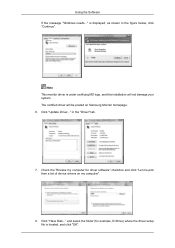
... site : http://www.samsung.com/ Installing the Monitor Driver (Automatic) 1. Choose your monitor model in the model list, then click the "OK" button. 4. Click "Windows". 3. Then click "OK" button (Microsoft® Windows® XP/2000 Operating System). Insert CD into the CD-ROM drive. 2. Follow the directions appropriate for the monitor driver, insert the CDROM included with this monitor. Using the Software Monitor Driver Note When prompted by...
... site : http://www.samsung.com/ Installing the Monitor Driver (Automatic) 1. Choose your monitor model in the model list, then click the "OK" button. 4. Click "Windows". 3. Then click "OK" button (Microsoft® Windows® XP/2000 Operating System). Insert CD into the CD-ROM drive. 2. Follow the directions appropriate for the monitor driver, insert the CDROM included with this monitor. Using the Software Monitor Driver Note When prompted by...
User Manual
Page 50
ization". 3. Click (Start) and "Control Panel". Then, double-click on Samsung Monitor homepage. http://www.samsung.com/ Installing the Monitor Driver (Manual) Microsoft® Windows Vista™, Operating System 1. If the "Properties" button is deactivated, it will be used as is completed. Click "Advanced Settings...". 5. Insert your Manual CD into your CD-ROM drive. 2. Click "Properties" in the "Monitor" tab. The certified driver will not damage your system...
ization". 3. Click (Start) and "Control Panel". Then, double-click on Samsung Monitor homepage. http://www.samsung.com/ Installing the Monitor Driver (Manual) Microsoft® Windows Vista™, Operating System 1. If the "Properties" button is deactivated, it will be used as is completed. Click "Advanced Settings...". 5. Insert your Manual CD into your CD-ROM drive. 2. Click "Properties" in the "Monitor" tab. The certified driver will not damage your system...
User Manual
Page 51
...". Click "Have Disk..." The certified driver will not damage your system. Click "Update Driver..." is displayed, as shown in the "Driver" tab. 7. Note This monitor driver is located, and click "OK". Using the Software If the message "Windows needs..." Check the "Browse my computer for example, D:\Drive) where the driver setup file is under certifying MS logo, and this installation will be posted on my...
...". Click "Have Disk..." The certified driver will not damage your system. Click "Update Driver..." is displayed, as shown in the "Driver" tab. 7. Note This monitor driver is located, and click "OK". Using the Software If the message "Windows needs..." Check the "Browse my computer for example, D:\Drive) where the driver setup file is under certifying MS logo, and this installation will be posted on my...
User Manual
Page 53
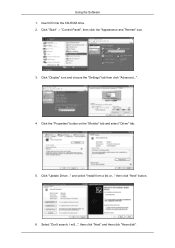
Click the "Properties" button on the "Monitor" tab and select "Driver" tab. 5. Select "Don't search, I will...", then click "Next" and then click "Have disk". and select "Install from a list or..." Click "Display" icon and choose the "Settings" tab then click "Advanced...". 4. then click "Next" button. 6. Click "Start" → "Control Panel", then click the "Appearance and Themes" icon. 3. Using the Software 1. Insert CD into the CD-ROM drive. 2. Click "Update Driver..."
Click the "Properties" button on the "Monitor" tab and select "Driver" tab. 5. Select "Don't search, I will...", then click "Next" and then click "Have disk". and select "Install from a list or..." Click "Display" icon and choose the "Settings" tab then click "Advanced...". 4. then click "Next" button. 6. Click "Start" → "Control Panel", then click the "Appearance and Themes" icon. 3. Using the Software 1. Insert CD into the CD-ROM drive. 2. Click "Update Driver..."
User Manual
Page 55
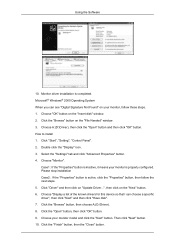
... "Open" button, then click "OK" button. 9. Microsoft® Windows® 2000 Operating System When you can choose a specific driver", then click "Next" and then click "Have disk". 7. Choose "Display a list of the known drivers for this device so that I can see "Digital Signature Not Found" on the "Next" button. 6. Click the "Finish" button, then the "Close" button. Monitor driver installation is properly configured. Using the Software 10...
... "Open" button, then click "OK" button. 9. Microsoft® Windows® 2000 Operating System When you can choose a specific driver", then click "Next" and then click "Have disk". 7. Choose "Display a list of the known drivers for this device so that I can see "Digital Signature Not Found" on the "Next" button. 6. Click the "Finish" button, then the "Close" button. Monitor driver installation is properly configured. Using the Software 10...

User Manual
Page 56
... "Monitor Type" area. 6. Click "Start", "Settings", "Control Panel", and then double-click "Display" icon. 2. If the screen is not normal, change to your computer and click "OK". 11. Set a mouse for your mouse. 3. The next screen is a type of resolution, Colors or frequency). Double click the "Display" icon. 3. Click the "Have Disk" button. 9. Linux Operating System To execute X-Window, you connected to a different mode (lower mode of system setting file...
... "Monitor Type" area. 6. Click "Start", "Settings", "Control Panel", and then double-click "Display" icon. 2. If the screen is not normal, change to your computer and click "OK". 11. Set a mouse for your mouse. 3. The next screen is a type of resolution, Colors or frequency). Double click the "Display" icon. 3. Click the "Have Disk" button. 9. Linux Operating System To execute X-Window, you connected to a different mode (lower mode of system setting file...

User Manual
Page 69
.... Brightness Adjust the brightness for the selected display device. Color Tone Adjust the background color tone for the selected display device. Color Temp Adjust the color temperature for the selected display device. Screen Adjustment The screen settings (contrast, brightness, etc.) can be adjusted. Custom Select an item and change the corresponding screen setting. Color and Tint are not available if the input source is PC. Red, Green, Blue and PC Screen Adjustment are selected. Contrast Adjust...
.... Brightness Adjust the brightness for the selected display device. Color Tone Adjust the background color tone for the selected display device. Color Temp Adjust the color temperature for the selected display device. Screen Adjustment The screen settings (contrast, brightness, etc.) can be adjusted. Custom Select an item and change the corresponding screen setting. Color and Tint are not available if the input source is PC. Red, Green, Blue and PC Screen Adjustment are selected. Contrast Adjust...

User Manual
Page 88
... nearby electronic devices. Troubleshooting Guide Issue The display you want to synchronize the time between the connected displays. The following message appears repeatedly. Check that supports the ID in the system information chart.) Ensure you select the input source the display is not connected. Displays power on the system information chart. Check that the display ID is Disable. The display you want to control is set Remote Control to 99, the...
... nearby electronic devices. Troubleshooting Guide Issue The display you want to synchronize the time between the connected displays. The following message appears repeatedly. Check that supports the ID in the system information chart.) Ensure you select the input source the display is not connected. Displays power on the system information chart. Check that the display ID is Disable. The display you want to control is set Remote Control to 99, the...
User Manual
Page 90
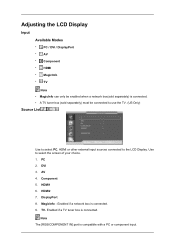
... if a TV tuner box is connected. 9. Note The [RGB/COMPONENT IN] port is connected. • A TV tuner box (sold separately) must be connected to use the TV. (US Only) Source List Use to select PC, HDMI or other external input sources connected to select the screen of your choice. 1. HDMI2 7. MagicInfo - Use to the LCD Display. AV 4. PC 2. Adjusting the LCD Display Input Available Modes • PC / DVI / DisplayPort • AV •...
... if a TV tuner box is connected. 9. Note The [RGB/COMPONENT IN] port is connected. • A TV tuner box (sold separately) must be connected to use the TV. (US Only) Source List Use to select PC, HDMI or other external input sources connected to select the screen of your choice. 1. HDMI2 7. MagicInfo - Use to the LCD Display. AV 4. PC 2. Adjusting the LCD Display Input Available Modes • PC / DVI / DisplayPort • AV •...

User Manual
Page 93
.... Source AutoSwitch Settings Turning on the external input mode. • When connecting a PC to the HDMI terminal, set Edit Name to AV. Refer to PIP > Source for compatible signals for the PIP feature to work , the Source AutoSwitch selection must be set Edit Name to DVI Device to enjoy the video and audio from the connected PC. • When an AV device is connected, set to Off, for each primary input source...
.... Source AutoSwitch Settings Turning on the external input mode. • When connecting a PC to the HDMI terminal, set Edit Name to AV. Refer to PIP > Source for compatible signals for the PIP feature to work , the Source AutoSwitch selection must be set Edit Name to DVI Device to enjoy the video and audio from the connected PC. • When an AV device is connected, set to Off, for each primary input source...
User Manual
Page 110
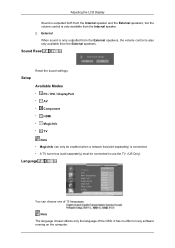
... separately) must be connected to use the TV. (US Only) Language You can choose one of the OSD. Sound Reset Reset the sound settings. Adjusting the LCD Display Sound is outputted both from the Internal speaker and the External speakers, but the volume control is only available from the External speakers. Note The language chosen affects only the language of 13 languages. It has no effect on any software running on the...
... separately) must be connected to use the TV. (US Only) Language You can choose one of the OSD. Sound Reset Reset the sound settings. Adjusting the LCD Display Sound is outputted both from the Internal speaker and the External speakers, but the volume control is only available from the External speakers. Note The language chosen affects only the language of 13 languages. It has no effect on any software running on the...
User Manual
Page 128
... directly connected to LCD Display : execute Device mode. • Press ESC to directly go to the MagicInfo Window screen. • To setup MagicInfo on a Windows screen, a keyboard and mouse are required. • To setup MagicInfo on . • Do not unplug the LAN cable used to the MagicInfo Server Help. Adjusting the LCD Display • A TV tuner box (sold separately) must Commit them. • By selecting Disable, Enable...
... directly connected to LCD Display : execute Device mode. • Press ESC to directly go to the MagicInfo Window screen. • To setup MagicInfo on a Windows screen, a keyboard and mouse are required. • To setup MagicInfo on . • Do not unplug the LAN cable used to the MagicInfo Server Help. Adjusting the LCD Display • A TV tuner box (sold separately) must Commit them. • By selecting Disable, Enable...
User Manual
Page 132
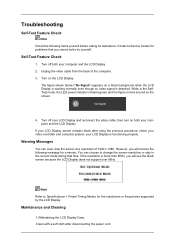
... current mode during that you will see the black screen because the LCD Display does not support over 85Hz. Turn on the screen. 4. Self-Test Feature Check 1. Maintenance and Cleaning 1) Maintaining the LCD Display Case. Turn off both your computer and the LCD Display If your LCD Display screen remains blank after disconnecting the power cord. Troubleshooting Self-Test Feature Check Note Check the following message for the resolutions or frequencies supported by yourself. Contact a Service Center...
... current mode during that you will see the black screen because the LCD Display does not support over 85Hz. Turn on the screen. 4. Self-Test Feature Check 1. Maintenance and Cleaning 1) Maintaining the LCD Display Case. Turn off both your computer and the LCD Display If your LCD Display screen remains blank after disconnecting the power cord. Troubleshooting Self-Test Feature Check Note Check the following message for the resolutions or frequencies supported by yourself. Contact a Service Center...
User Manual
Page 133
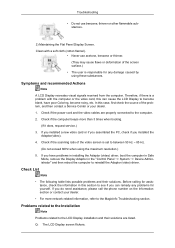
... service.) 3. If you installed a new video card or if you assembled the PC, check if you have poor Coloring, become noisy, etc. If you installed the Adaptor(video). 4. Clean with the computer or the video card, this section to reinstall the Adaptor (video) driver. Symptoms and recommended Actions Note A LCD Display recreates visual signals received from the computer. Therefore, if there is set to the LCD Display installation and their solutions. Problems...
... service.) 3. If you installed a new video card or if you assembled the PC, check if you have poor Coloring, become noisy, etc. If you installed the Adaptor(video). 4. Clean with the computer or the video card, this section to reinstall the Adaptor (video) driver. Symptoms and recommended Actions Note A LCD Display recreates visual signals received from the computer. Therefore, if there is set to the LCD Display installation and their solutions. Problems...

User Manual
Page 134
... Modes Chart. A: Adjust the Brightness and Contrast. (Refer to the recommended ranges. A: Check if the signal cable is unstable and shakes. If not, reset them referring to Connecting a Computer) Q: The image is off. A: Ensure that the PC or video sources are turned on again after removing all accessories (video extension cable, etc.) A: Set the resolution and frequency to the Brightness, Contrast) A: Check if the resolution and frequency set for the computer video card falls in the range supported by the LCD Display. A: Check...
... Modes Chart. A: Adjust the Brightness and Contrast. (Refer to the recommended ranges. A: Check if the signal cable is unstable and shakes. If not, reset them referring to Connecting a Computer) Q: The image is off. A: Ensure that the PC or video sources are turned on again after removing all accessories (video extension cable, etc.) A: Set the resolution and frequency to the Brightness, Contrast) A: Check if the resolution and frequency set for the computer video card falls in the range supported by the LCD Display. A: Check...

User Manual
Page 135
.... A: Check if the power cord is on. Q: The remote control buttons do not respond. A: Ensure that the audio cable is currently saving the changes made in port on your LCD Display and the audio-out port on your sound card. (Refer to its power management system. Problems related to the Remote Control Note Problems related to the appropriate levels. A: Check if the power is securely connected. Q: The Color image is using its maximum, check the volume control on the key- A: Adjust the Color Control...
.... A: Check if the power cord is on. Q: The remote control buttons do not respond. A: Ensure that the audio cable is currently saving the changes made in port on your LCD Display and the audio-out port on your sound card. (Refer to its power management system. Problems related to the Remote Control Note Problems related to the appropriate levels. A: Check if the power is securely connected. Q: The Color image is using its maximum, check the volume control on the key- A: Adjust the Color Control...
User Manual
Page 136
...; Display → Settings. A: Windows XP: Set the resolution in Screen Saver. Note Before calling for details. Do not leave any water enter the LCD Display. Troubleshooting A: Check if a special fluorescent or neon lamp is on the Information section or contact your dealer. A: The frequency can I clean the outer case/LCD Panel? Q & A Q: How can be changed by reconfiguring the video card. If you can I adjust the resolution? A: Disconnect the power cord and...
...; Display → Settings. A: Windows XP: Set the resolution in Screen Saver. Note Before calling for details. Do not leave any water enter the LCD Display. Troubleshooting A: Check if a special fluorescent or neon lamp is on the Information section or contact your dealer. A: The frequency can I clean the outer case/LCD Panel? Q & A Q: How can be changed by reconfiguring the video card. If you can I adjust the resolution? A: Disconnect the power cord and...

User Manual
Page 142
... when the pattern is changed. When the LCD panel is operated for a long time with a fixed pattern (over 12 hours), there may appear. Information For a Better Display Adjust the computer resolution and screen injection rate (refresh rate) on screen if the best picture quality is not provided for TFTLCD. • Resolution: 1920 x 1080 • Vertical frequency (refresh rate): 60 Hz TFT-LCD panels manufactured by performing the "Auto Adjustment" function in a pixel. If you are...
... when the pattern is changed. When the LCD panel is operated for a long time with a fixed pattern (over 12 hours), there may appear. Information For a Better Display Adjust the computer resolution and screen injection rate (refresh rate) on screen if the best picture quality is not provided for TFTLCD. • Resolution: 1920 x 1080 • Vertical frequency (refresh rate): 60 Hz TFT-LCD panels manufactured by performing the "Auto Adjustment" function in a pixel. If you are...


