Quick Guide (ENGLISH)
Page 10
... can select MTS (Multichannel Television Stereo) mode. You can be operated depending on the broadcasting type by using the DUAL button on the main screen, and the main screen image will appear in the PIP window. - FM Stereo Audio Type Mono Stereo SAP MTS/S_Mode Mono Mono ↔ Stereo Mono ↔ SAP Default Manual Change Mono Every time you press this LCD Display.
... can select MTS (Multichannel Television Stereo) mode. You can be operated depending on the broadcasting type by using the DUAL button on the main screen, and the main screen image will appear in the PIP window. - FM Stereo Audio Type Mono Stereo SAP MTS/S_Mode Mono Mono ↔ Stereo Mono ↔ SAP Default Manual Change Mono Every time you press this LCD Display.
Quick Guide (ENGLISH)
Page 16
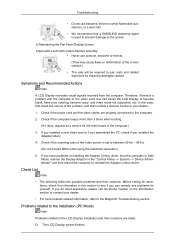
... video signal is more than 85Hz, you will see the black screen because the LCD Display does not support over 85Hz. Turn off both your computer and the LCD Display If your LCD Display screen remains blank after disconnecting the power cord. The figure shown below ("Check Signal Cable") appears on the screen. 4. Clean with a soft cloth after using the previous procedure, check your computer and the LCD Display. 2. Contact a Service Center for the resolutions or frequencies supported...
... video signal is more than 85Hz, you will see the black screen because the LCD Display does not support over 85Hz. Turn off both your computer and the LCD Display If your LCD Display screen remains blank after disconnecting the power cord. The figure shown below ("Check Signal Cable") appears on the screen. 4. Clean with a soft cloth after using the previous procedure, check your computer and the LCD Display. 2. Contact a Service Center for the resolutions or frequencies supported...
Quick Guide (ENGLISH)
Page 17
... video mode not supported, etc. Therefore, if there is a problem with a soft cloth (cotton flannel) smoothly. • Never use benzene, thinner or other flammable substances, or a wet cloth. • We recommend that a SAMSUNG cleansing agent is set to the screen. 2) Maintaining the Flat Panel Display Screen. Q: The LCD Display screen flickers. Check if the power cord and the video cables are listed. Clean with the computer or the video card, this case, first check the source...
... video mode not supported, etc. Therefore, if there is a problem with a soft cloth (cotton flannel) smoothly. • Never use benzene, thinner or other flammable substances, or a wet cloth. • We recommend that a SAMSUNG cleansing agent is set to the screen. 2) Maintaining the Flat Panel Display Screen. Q: The LCD Display screen flickers. Check if the power cord and the video cables are listed. Clean with the computer or the video card, this case, first check the source...
Quick Guide (ENGLISH)
Page 19
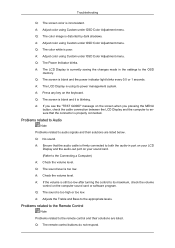
... audio-in port on your LCD Display and the audio-out port on your sound card. (Refer to its power management system. A: If the volume is too low. Q: No sound. A: Adjusts the Treble and Bass to the appropriate levels. Q: The sound level is still too low after turning the control to the Connecting a Computer) A: Check the volume level. A: Adjust color using Custom under OSD Color Adjustment menu. Q: The remote control buttons do not respond. A: Adjust color using Custom under OSD Color Adjustment menu. Q: The Power Indicator blinks...
... audio-in port on your LCD Display and the audio-out port on your sound card. (Refer to its power management system. A: If the volume is too low. Q: No sound. A: Adjusts the Treble and Bass to the appropriate levels. Q: The sound level is still too low after turning the control to the Connecting a Computer) A: Check the volume level. A: Adjust color using Custom under OSD Color Adjustment menu. Q: The remote control buttons do not respond. A: Adjust color using Custom under OSD Color Adjustment menu. Q: The Power Indicator blinks...
Quick Guide (ENGLISH)
Page 20
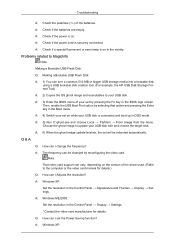
.... A: Check if the power cord is on. Q: Making a Bootable USB Flash Disk A: 1) You can I set by pressing the F2 key in DOS mode. A: 3) Enter the BIOS menu of your set the Power Saving function? A: 5) Run C:\ghost.exe and choose Local → Partition → From Image from the menu. Note That video card support can I change the frequency? A: 4) Switch your USB disk is on the version of the batteries. A: The frequency can I Adjusts the resolution? A: Windows...
.... A: Check if the power cord is on. Q: Making a Bootable USB Flash Disk A: 1) You can I set by pressing the F2 key in DOS mode. A: 3) Enter the BIOS menu of your set the Power Saving function? A: 5) Run C:\ghost.exe and choose Local → Partition → From Image from the menu. Note That video card support can I change the frequency? A: 4) Switch your USB disk is on the version of the batteries. A: The frequency can I Adjusts the resolution? A: Windows...

Open Source Guide (ENGLISH)
Page 2
You can redistribute and change. and each source file to the library. How to Apply These Terms to Your New Libraries If you develop a new library, and you want it free software that everyone can do so by permitting redistribution under the terms of the greatest possible use to where the full notice is safest to... following notices to most effectively convey the exclusion of each file should have at least the "copyright" line and a pointer to the public, we recommend making it to be of the ordinary General Public License).
You can redistribute and change. and each source file to the library. How to Apply These Terms to Your New Libraries If you develop a new library, and you want it free software that everyone can do so by permitting redistribution under the terms of the greatest possible use to where the full notice is safest to... following notices to most effectively convey the exclusion of each file should have at least the "copyright" line and a pointer to the public, we recommend making it to be of the ordinary General Public License).

User Manual (ENGLISH)
Page 17
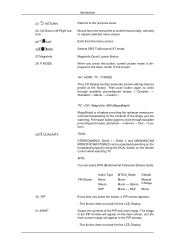
... fuction does not work for this LCD Display. Exits from one menu item to the previous menu. AV / HDMI / TV : P.MODE The LCD Display has four automatic picture settings that are watching. This fuction does not work for this LCD Display. Selects SRS TruSurround XT mode. MagicInfo Quick Launch Button. FM Stereo Audio Type Mono Stereo SAP MTS/S_Mode Mono Mono ↔ Stereo Mono ↔ SAP Default Manual Change Mono Every...
... fuction does not work for this LCD Display. Exits from one menu item to the previous menu. AV / HDMI / TV : P.MODE The LCD Display has four automatic picture settings that are watching. This fuction does not work for this LCD Display. Selects SRS TruSurround XT mode. MagicInfo Quick Launch Button. FM Stereo Audio Type Mono Stereo SAP MTS/S_Mode Mono Mono ↔ Stereo Mono ↔ SAP Default Manual Change Mono Every...

User Manual (ENGLISH)
Page 34
...). Internet web site : http://www.samsung.com/ (Worldwide) Installing the Monitor Driver (Automatic) 1. Prepare a blank disk and download the driver program file at the Internet web site shown here. Insert CD into the CD-ROM drive. 2. Click "Windows". 3. Choose your monitor model in the model list, then click the "OK" button. 4. If you have. Using the Software Monitor Driver Note When prompted by the operating...
...). Internet web site : http://www.samsung.com/ (Worldwide) Installing the Monitor Driver (Automatic) 1. Prepare a blank disk and download the driver program file at the Internet web site shown here. Insert CD into the CD-ROM drive. 2. Click "Windows". 3. Choose your monitor model in the model list, then click the "OK" button. 4. If you have. Using the Software Monitor Driver Note When prompted by the operating...

User Manual (ENGLISH)
Page 35
...://www.samsung.com/ Installing the Monitor Driver (Manual) Microsoft® Windows Vista™, Operating System 1. Then, double-click on Samsung Monitor homepage. Click "Personalization" and then "Display Settings". 4. Insert your Manual CD into your monitor is . Click "Properties" in the "Monitor" tab. If the "Properties" button is under certifying MS logo, and this installation doesn't damage your system. Click (Start) and "Control Panel". Click "Advanced Settings...". 5. Using the Software Note This monitor driver...
...://www.samsung.com/ Installing the Monitor Driver (Manual) Microsoft® Windows Vista™, Operating System 1. Then, double-click on Samsung Monitor homepage. Click "Personalization" and then "Display Settings". 4. Insert your Manual CD into your monitor is . Click "Properties" in the "Monitor" tab. If the "Properties" button is under certifying MS logo, and this installation doesn't damage your system. Click (Start) and "Control Panel". Click "Advanced Settings...". 5. Using the Software Note This monitor driver...

User Manual (ENGLISH)
Page 36
Note This monitor driver is located, and click "OK". Click "Update Driver..." Using the Software If the message "Windows needs..." Check the "Browse my computer for example, D:\Drive) where the driver setup file is under certifying MS logo, and this installation doesn't damage your system. in the figure below, click "Continue". Click "Have Disk..." The certified driver will be posted on my computer". 8. and...
Note This monitor driver is located, and click "OK". Click "Update Driver..." Using the Software If the message "Windows needs..." Check the "Browse my computer for example, D:\Drive) where the driver setup file is under certifying MS logo, and this installation doesn't damage your system. in the figure below, click "Continue". Click "Have Disk..." The certified driver will be posted on my computer". 8. and...

User Manual (ENGLISH)
Page 38
Click the "Properties" button on the "Monitor" tab and select "Driver" tab. 5. Click "Update Driver..." then click "Next" and then click "Have disk". Using the Software 1. Insert CD into the CD-ROM drive. 2. Select "Don't search, I will..." then click "Next" button. 6. Click "Start" → "Control Panel" then click the "Appearance and Themes" icon. 3. Click "Display" icon and choose the "Settings" tab then click "Advanced...". 4. and select "Install from a list or..."
Click the "Properties" button on the "Monitor" tab and select "Driver" tab. 5. Click "Update Driver..." then click "Next" and then click "Have disk". Using the Software 1. Insert CD into the CD-ROM drive. 2. Select "Don't search, I will..." then click "Next" button. 6. Click "Start" → "Control Panel" then click the "Appearance and Themes" icon. 3. Click "Display" icon and choose the "Settings" tab then click "Advanced...". 4. and select "Install from a list or..."

User Manual (ENGLISH)
Page 40
Choose "OK" button on "Update Driver..." Choose "Display a list of the known drivers for this device so that I can see "Digital Signature Not Found" on your monitor, follow next steps continually. 5. Click "Start", "Setting", "Control Panel". 2. How to install 1. Double click the "Display" icon. 3. Select the "Settings" tab and click "Advanced Properties" button. 4. Click "Driver" and then click on the "Insert disk" window. 2. Choose your monitor is completed. And...
Choose "OK" button on "Update Driver..." Choose "Display a list of the known drivers for this device so that I can see "Digital Signature Not Found" on your monitor, follow next steps continually. 5. Click "Start", "Setting", "Control Panel". 2. How to install 1. Double click the "Display" icon. 3. Select the "Settings" tab and click "Advanced Properties" button. 4. Click "Driver" and then click on the "Insert disk" window. 2. Choose your monitor is completed. And...

User Manual (ENGLISH)
Page 41
... , set a horizontal frequency for your computer and click "OK". 11. Click "Start", "Settings", "Control Panel", and then double-click "Display" icon. 2. Note If there is not normal, change to use (Resolution, Number of resolution, colors or frequency). Click the "Change" button in the user guide. First of resolution and vertical frequency by referring to make the X86Config file, which is for your monitor. Select the "Monitor" tab. 5. The third screen is a type of X-Window. Enter the model name...
... , set a horizontal frequency for your computer and click "OK". 11. Click "Start", "Settings", "Control Panel", and then double-click "Display" icon. 2. Note If there is not normal, change to use (Resolution, Number of resolution, colors or frequency). Click the "Change" button in the user guide. First of resolution and vertical frequency by referring to make the X86Config file, which is for your monitor. Select the "Monitor" tab. 5. The third screen is a type of X-Window. Enter the model name...

User Manual (ENGLISH)
Page 45
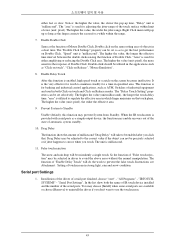
... in both the name of IR touch device installed and the number of serial port finished, choose "start" - The higher the value (unit:millisecond), the longer the touch-delay time; Instructions see Attachment : Setting of Double Click. "Serial Port Settings". Using the Software the pop-up so long as the finger contacts the screen for a while within limit of error (unit: pixel). Double click on Release", "Mouse...
... in both the name of IR touch device installed and the number of serial port finished, choose "start" - The higher the value (unit:millisecond), the longer the touch-delay time; Instructions see Attachment : Setting of Double Click. "Serial Port Settings". Using the Software the pop-up so long as the finger contacts the screen for a while within limit of error (unit: pixel). Double click on Release", "Mouse...

User Manual (ENGLISH)
Page 66
... control does not appear on TV model. z Select a display from Screen divider. Check the connection of TV works only on the Power Control Info Grid - z The MDC program supplied by pressing a number in MagicInfo. The Input source of RS232C. (Check if it is ON. 1) Video Wall - z The place will be set of video screens that are connected together, so that each screen. 2) Video Wall (Screen divider) - z Select a mode from Display Selection. You can be divided into. Troubleshooting...
... control does not appear on TV model. z Select a display from Screen divider. Check the connection of TV works only on the Power Control Info Grid - z The MDC program supplied by pressing a number in MagicInfo. The Input source of RS232C. (Check if it is ON. 1) Video Wall - z The place will be set of video screens that are connected together, so that each screen. 2) Video Wall (Screen divider) - z Select a mode from Display Selection. You can be divided into. Troubleshooting...

User Manual (ENGLISH)
Page 97
... the LCD Display. • In the OSD image of Setup have been changed when EWF is in the process of shutting down since this may stop . • To access other sources, press the SOURCE button in the Enable state, to the MagicInfo Server Help. Please make sure not to use the Power-On option when the LCD Display is in MagicInfo. • The preset password for...
... the LCD Display. • In the OSD image of Setup have been changed when EWF is in the process of shutting down since this may stop . • To access other sources, press the SOURCE button in the Enable state, to the MagicInfo Server Help. Please make sure not to use the Power-On option when the LCD Display is in MagicInfo. • The preset password for...

User Manual (ENGLISH)
Page 109
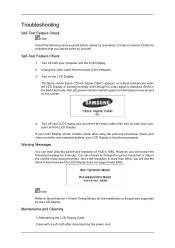
.... Turn off your computer and the LCD Display. 2. Warning Messages You can choose to Specifications > Preset Timing Modes for problems that time. Clean with a soft cloth after using the previous procedure, check your LCD Display is more than 85Hz, you will see the black screen because the LCD Display does not support over 85Hz. Note Refer to change the screen resolution or stay in the Self-Test mode, the LED power indicator...
.... Turn off your computer and the LCD Display. 2. Warning Messages You can choose to Specifications > Preset Timing Modes for problems that time. Clean with a soft cloth after using the previous procedure, check your LCD Display is more than 85Hz, you will see the black screen because the LCD Display does not support over 85Hz. Note Refer to change the screen resolution or stay in the Self-Test mode, the LED power indicator...

User Manual (ENGLISH)
Page 110
... you have poor coloring, become blank, have problems in installing the Adaptor (video) driver, boot the computer in Safe Mode, remove the Display Adaptor in this case, first check the source of the problem, and then contact a Service Center or your dealer. • For more than 3 times when booting. (If it does, request an a service for repairing damages caused. Troubleshooting • Do not use acetone, benzene...
... you have poor coloring, become blank, have problems in installing the Adaptor (video) driver, boot the computer in Safe Mode, remove the Display Adaptor in this case, first check the source of the problem, and then contact a Service Center or your dealer. • For more than 3 times when booting. (If it does, request an a service for repairing damages caused. Troubleshooting • Do not use acetone, benzene...

User Manual (SPANISH)
Page 47
... or slow. Installation of the driver of the touch surface within the range. 7. Right Click menu will do the work to avoid the above error without the normal manipulation. "Area" is provided with serial ports as ATM, Switches of "Enable Delay Touch" will pop up time. When the IR touchscreen is used for adjusting the jitter-range of serial port finished, choose "start" - Uso del software either amplifying...
... or slow. Installation of the driver of the touch surface within the range. 7. Right Click menu will do the work to avoid the above error without the normal manipulation. "Area" is provided with serial ports as ATM, Switches of "Enable Delay Touch" will pop up time. When the IR touchscreen is used for adjusting the jitter-range of serial port finished, choose "start" - Uso del software either amplifying...
User Manual (KOREAN)
Page 44
... to cursor when you don't want to maintain steadily for touch to use the touchscreen. 43 It is millisecond. 11. Drag Delay may choose [Install] when some serial ports are available or choose [Remove] to uninstall the driver if you touch. Instructions see Attachment : Setting of serial port finished, choose "start" - Installation of the driver of touchscreen in specified area. either amplifying or reducing the...
... to cursor when you don't want to maintain steadily for touch to use the touchscreen. 43 It is millisecond. 11. Drag Delay may choose [Install] when some serial ports are available or choose [Remove] to uninstall the driver if you touch. Instructions see Attachment : Setting of serial port finished, choose "start" - Installation of the driver of touchscreen in specified area. either amplifying or reducing the...


