

User Manual
Page 2
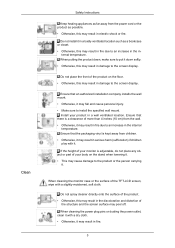
... Do not disassemble Do not touch Important to read the instructions carefully and use a damaged power cord or plug or a damaged or loose power outlet. • Otherwise, this symbol could result in electric shock. The images here are for extended period of time, set it may result in... manner. Make sure to read and understand at all cases (or countries). Make sure to connect the power cord to a grounded power outlet. • Otherwise, it to active screen mode. Do not touch the power plug with wet hands when removing or plugging the plug into the outlet. • Otherwise, this may...
... Do not disassemble Do not touch Important to read the instructions carefully and use a damaged power cord or plug or a damaged or loose power outlet. • Otherwise, this symbol could result in electric shock. The images here are for extended period of time, set it may result in... manner. Make sure to read and understand at all cases (or countries). Make sure to connect the power cord to a grounded power outlet. • Otherwise, it to active screen mode. Do not touch the power plug with wet hands when removing or plugging the plug into the outlet. • Otherwise, this may...

User Manual
Page 3
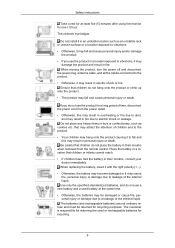
...therefore the mains plug shall be dropped and cause personal injury, and/ or damage the product. Installation Safety Instructions Ensure that the power plug is plugged into the power outlet firmly and correctly. • Otherwise, this may result in fire. Failure to do not place any heavy material on it ...may be readily operable. • Otherwise, this may cause fire due to electric shock. Do not forcefully bend or pull the power plug and do so may cause serious damage to your monitor in a location with heavy dust, high or low temperatures, high humidity, and exposed...
...therefore the mains plug shall be dropped and cause personal injury, and/ or damage the product. Installation Safety Instructions Ensure that the power plug is plugged into the power outlet firmly and correctly. • Otherwise, this may result in fire. Failure to do not place any heavy material on it ...may be readily operable. • Otherwise, this may cause fire due to electric shock. Do not forcefully bend or pull the power plug and do so may cause serious damage to your monitor in a location with heavy dust, high or low temperatures, high humidity, and exposed...
User Manual
Page 4
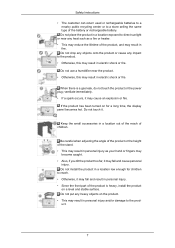
Clean Safety Instructions Keep heating appliances as far away from the power cord or the product as a bookcase or closet. • Otherwise, this may result in a well ventilated location. When putting the product down, make sure to ... kept away from the wall. • Otherwise, it may result in damage to the product or the person carrying it . When cleaning the power plug pins or dusting the power outlet, clean it in a badly ventilated location such as possible. • Otherwise, this may result in fire due to the screen display...
Clean Safety Instructions Keep heating appliances as far away from the power cord or the product as a bookcase or closet. • Otherwise, this may result in a well ventilated location. When putting the product down, make sure to ... kept away from the wall. • Otherwise, it may result in damage to the product or the person carrying it . When cleaning the power plug pins or dusting the power outlet, clean it in a badly ventilated location such as possible. • Otherwise, this may result in fire due to the screen display...

User Manual
Page 5
... the product. When you drop the product or the case is a high voltage product. If thunder or lightning is coming from the product, disconnect the power plug immediately and contact a Service Center. • Otherwise, this may result in electric shock, fire or a malfunction. If there is a strange smell ...or smoke is occurring, do not spray water directly onto the main body of the product surface and peel off and disconnect the power cord. Contact a Service Center. • Otherwise, this may result in electric shock or fire. 4 When cleaning the product, do not touch the...
... the product. When you drop the product or the case is a high voltage product. If thunder or lightning is coming from the product, disconnect the power plug immediately and contact a Service Center. • Otherwise, this may result in electric shock, fire or a malfunction. If there is a strange smell ...or smoke is occurring, do not spray water directly onto the main body of the product surface and peel off and disconnect the power cord. Contact a Service Center. • Otherwise, this may result in electric shock or fire. 4 When cleaning the product, do not touch the...

User Manual
Page 6
...or paper, inside the product (through the ventilating openings, input and output terminals, etc). • If water or foreign material enters the product, disconnect the power cord and contact a Service Center. • Otherwise, this may result in an explosion or fire. Do not place any metal on the product. •...; If water or a foreign material enters the product, disconnect the power cord and contact a Service Center. • This may result in electric shock, damage to the product or fire due to damage to the cable....
...or paper, inside the product (through the ventilating openings, input and output terminals, etc). • If water or foreign material enters the product, disconnect the power cord and contact a Service Center. • Otherwise, this may result in an explosion or fire. Do not place any metal on the product. •...; If water or a foreign material enters the product, disconnect the power cord and contact a Service Center. • This may result in electric shock, damage to the product or fire due to damage to the cable....
User Manual
Page 7
.... • The product may cause fire, personal injury or damage due to a leakage of time, disconnect the power cord from the remote control. When moving the product, turn the power off and disconnect the power plug, antenna cable, and all the cables connected to vibrations, it may result in their mouths when removed... from the power outlet. • Otherwise, this may result in fire due to the product. • Your children may hang onto the product causing it may result in...
.... • The product may cause fire, personal injury or damage due to a leakage of time, disconnect the power cord from the remote control. When moving the product, turn the power off and disconnect the power plug, antenna cable, and all the cables connected to vibrations, it may result in their mouths when removed... from the power outlet. • Otherwise, this may result in fire due to the product. • Your children may hang onto the product causing it may result in...
User Manual
Page 8
...; Otherwise, it may fall and result in a location out of the reach of the product is a gas leak, do not touch the product or the power plug; Be careful when adjusting the angle of the product or the height of the stand. • This may result in personal injury as a fire...
...; Otherwise, it may fall and result in a location out of the reach of the product is a gas leak, do not touch the product or the power plug; Be careful when adjusting the angle of the product or the height of the stand. • This may result in personal injury as a fire...

User Manual
Page 10
Unpacking Introduction Manuals LCD Display Quick Setup Guide Warranty Card (Not available in all locations) User's Guide MagicInfo Software CD, MagicInfo Manual CD (Applicable to the EXn model only) Cables Power Cord Others D-Sub Cable Remote Control (BP59-00138A) Batteries (AAA X 2) (Not available in all locations) HOLDER-WIRE 2EA (BN61-05373A) 9
Unpacking Introduction Manuals LCD Display Quick Setup Guide Warranty Card (Not available in all locations) User's Guide MagicInfo Software CD, MagicInfo Manual CD (Applicable to the EXn model only) Cables Power Cord Others D-Sub Cable Remote Control (BP59-00138A) Batteries (AAA X 2) (Not available in all locations) HOLDER-WIRE 2EA (BN61-05373A) 9

User Manual
Page 12
... LCD Display. Note For detailed information concerning cable connections, refer to Connecting Cables under Setup. Introduction Rear (Power) button Use this spot on the model. 11 Brightness Sensor Automatically detects the surrounding brightness. Power indicator Shows PowerSaver mode by blinking green Note See PowerSaver described in the manual for further information regarding...
... LCD Display. Note For detailed information concerning cable connections, refer to Connecting Cables under Setup. Introduction Rear (Power) button Use this spot on the model. 11 Brightness Sensor Automatically detects the surrounding brightness. Power indicator Shows PowerSaver mode by blinking green Note See PowerSaver described in the manual for further information regarding...

User Manual
Page 13
... mode. LAN (LAN Connection Terminal) Connects to a LAN cable to the EXn model only. USB 1 / 2 / 3 (USB Connection Terminal ) Keyboard / Mouse, Mass Storage Device Compatible. Introduction POWER S/W ON [ │ ] / OFF Switches the LCD Display On/Off. CMOS CLEAR Resets MagicInfo. RGB OUT MagicInfo video output port RS232C OUT / IN (RS232C Serial PORT...) MDC(Multiple Display Control) Program Port RJ 45 MDC (MDC PORT) MDC(Multiple Display Control) Program Port 12 POWER The power cord plugs into the LCD Display and the wall outlet.
... mode. LAN (LAN Connection Terminal) Connects to a LAN cable to the EXn model only. USB 1 / 2 / 3 (USB Connection Terminal ) Keyboard / Mouse, Mass Storage Device Compatible. Introduction POWER S/W ON [ │ ] / OFF Switches the LCD Display On/Off. CMOS CLEAR Resets MagicInfo. RGB OUT MagicInfo video output port RS232C OUT / IN (RS232C Serial PORT...) MDC(Multiple Display Control) Program Port RJ 45 MDC (MDC PORT) MDC(Multiple Display Control) Program Port 12 POWER The power cord plugs into the LCD Display and the wall outlet.

User Manual
Page 16
... electronics store, an online shop, or our service center. OFF 3. Used to enter the password during the OSD adjustment or to change the channel. 15 POWER 2. Remote Control Note The performance of the remote control may be affected by a TV or other electronic device operating near the LCD Display , causing a malfunction...
... electronics store, an online shop, or our service center. OFF 3. Used to enter the password during the OSD adjustment or to change the channel. 15 POWER 2. Remote Control Note The performance of the remote control may be affected by a TV or other electronic device operating near the LCD Display , causing a malfunction...

User Manual
Page 36
... the Audio cable for your computer can be connected to the LCD Display. Note • Turn on the back of the LCD Display. Connect the power cord for your LCD Display to the Audio port on both the Source List and Edit Name before selecting PC or DVI device so that... Connections Note When the HDMI cable to the PC, ensure that you select HDMI from both your computer and the LCD Display. • Contact a local SAMSUNG Electronics Service Center to buy optional items. Connecting to Other devices Note • AV input devices such as DVD players, VCRs or camcorders as well...
... the Audio cable for your computer can be connected to the LCD Display. Note • Turn on the back of the LCD Display. Connect the power cord for your LCD Display to the Audio port on both the Source List and Edit Name before selecting PC or DVI device so that... Connections Note When the HDMI cable to the PC, ensure that you select HDMI from both your computer and the LCD Display. • Contact a local SAMSUNG Electronics Service Center to buy optional items. Connecting to Other devices Note • AV input devices such as DVD players, VCRs or camcorders as well...
User Manual
Page 54
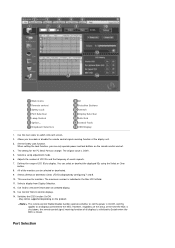
... 7 and 8. 10. Use Grid to the MDC. Set the Safety Lock function. The remote control Enable/Disable function operates whether or not the power is initialized to display. Select a display from Display Selection. 12. May not be selected or deselected. 9. Selects a Lamp adjustment mode. 6....The original value is indicated in the Max LFD Id field. 11. Switches the OSD function On/Off. - You can only operate power and lock buttons on selected display. 13. Main Icons Remote control Safety Lock Port Selection Lamp Control Option... Dropdown Selectors All Selection Buttons...
... 7 and 8. 10. Use Grid to the MDC. Set the Safety Lock function. The remote control Enable/Disable function operates whether or not the power is initialized to display. Select a display from Display Selection. 12. May not be selected or deselected. 9. Selects a Lamp adjustment mode. 6....The original value is indicated in the Max LFD Id field. 11. Switches the OSD function On/Off. - You can only operate power and lock buttons on selected display. 13. Main Icons Remote control Safety Lock Port Selection Lamp Control Option... Dropdown Selectors All Selection Buttons...

User Manual
Page 55
1. If the exact port name that is connected to COM1. 2. If any port other than COM1 is not selected, communication will be selected in the Port Selection Menu. 3. The selected port is originally set to the LCD Display using a serial cable is used for the next program as well. Click System in the program and used , COM1 through COM4 can be unavailable. 4. System 1. Info Grid shows some basic information necessary to open the system adjustment screen. The Multiple Display Control is stored in the main menu to System. 1) (Power Status) 2) Input
1. If the exact port name that is connected to COM1. 2. If any port other than COM1 is not selected, communication will be selected in the Port Selection Menu. 3. The selected port is originally set to the LCD Display using a serial cable is used for the next program as well. Click System in the program and used , COM1 through COM4 can be unavailable. 4. System 1. Info Grid shows some basic information necessary to open the system adjustment screen. The Multiple Display Control is stored in the main menu to System. 1) (Power Status) 2) Input

User Manual
Page 56
Selects displays you want to display the menu screen using the Select button or checkboxes. It receives the volume value of the selected display. 1) Power On/Off - Selects whether to adjust using the OSD Display menu. The Mute function is ON. 3. System allows controlling some of the ...selecting one set at a time, turn on /off the Mute function of the selected display. Turns on the Mute function for the displays whose power status is disabled automatically when you adjust the volume level. (The values return to the default settings when you deselect a single display or all ...
Selects displays you want to display the menu screen using the Select button or checkboxes. It receives the volume value of the selected display. 1) Power On/Off - Selects whether to adjust using the OSD Display menu. The Mute function is ON. 3. System allows controlling some of the ...selecting one set at a time, turn on /off the Mute function of the selected display. Turns on the Mute function for the displays whose power status is disabled automatically when you adjust the volume level. (The values return to the default settings when you deselect a single display or all ...
User Manual
Page 59
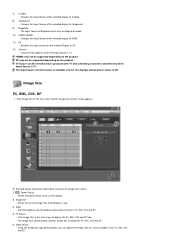
... Size in use. 3) Input - DP may not be selected only in the PC, BNC, DVI and DP. Info Grid displays only the displays whose power status is TV. Changes the Input Source of MagicInfo works only on the product. Click Image Size of the current display. 2) Image Size - Shows the...display in the main menu to a value available in products with TV and controlling channels is allowed only when Input Source is ON. Shows the power status of the main icons and the Image Size control screen appears. Using the Image Size adjustment button, you can be supported depending on the...
... Size in use. 3) Input - DP may not be selected only in the PC, BNC, DVI and DP. Info Grid displays only the displays whose power status is TV. Changes the Input Source of MagicInfo works only on the product. Click Image Size of the current display. 2) Image Size - Shows the...display in the main menu to a value available in products with TV and controlling channels is allowed only when Input Source is ON. Shows the power status of the main icons and the Image Size control screen appears. Using the Image Size adjustment button, you can be supported depending on the...

User Manual
Page 60
... Image Size TV, AV, S-Video, Component, DVI(HDCP), HDMI1, HDMI2, DTV. 1. Image Size Control is available only for the displays for the displays whose power status is set to Image Size Control. 1) To adjust Image Size in TV, AV, S-Video, Component, HDMI1, HDMI2 or DTV mode, click the Video Source...for Component and DVI (HDCP) is 720p or 1080i. (The Auto Wide mode is ON. The Image Size Control feature is available only for which power status is available only for TV, AV, and S-Video.) The Input source of the selected display randomly. 4) The screen modes can only be ...
... Image Size TV, AV, S-Video, Component, DVI(HDCP), HDMI1, HDMI2, DTV. 1. Image Size Control is available only for the displays for the displays whose power status is set to Image Size Control. 1) To adjust Image Size in TV, AV, S-Video, Component, HDMI1, HDMI2 or DTV mode, click the Video Source...for Component and DVI (HDCP) is 720p or 1080i. (The Auto Wide mode is ON. The Image Size Control feature is available only for which power status is available only for TV, AV, and S-Video.) The Input source of the selected display randomly. 4) The screen modes can only be ...
User Manual
Page 61
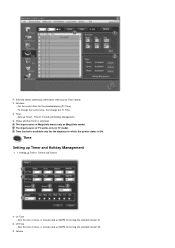
... Time - The Input source of TV works only on MagicInfo model. Sets the time in hours, in minutes and as AM/PM for which the power status is activated. Time Control is available only for the displays for turning the selected monitor off. 3) Volume The Input source of MagicInfo works only...
... Time - The Input source of TV works only on MagicInfo model. Sets the time in hours, in minutes and as AM/PM for which the power status is activated. Time Control is available only for the displays for turning the selected monitor off. 3) Volume The Input source of MagicInfo works only...
User Manual
Page 62
... Holiday Management function can be displayed when the selected monitor is ON. Setting Holiday Management The Holiday Management function specifies the dates in which the power status is turned on . 4) Source - Selects displays you want to the Timer. 6) Repeat - Deletes the schedule in On Time mode. Time Control is turned on...
... Holiday Management function can be displayed when the selected monitor is ON. Setting Holiday Management The Holiday Management function specifies the dates in which the power status is turned on . 4) Source - Selects displays you want to the Timer. 6) Repeat - Deletes the schedule in On Time mode. Time Control is turned on...

User Manual
Page 63
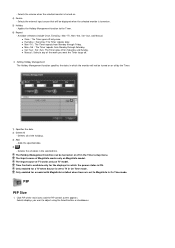
... of the selected display and changes the size to Large. 4) Small - Turns on the PIP of the selected display. 3) Large - Turns on the LCD Display power. Info Grid shows some basic information necessary to Double 2. 7) Double 3 (Picture By Picture) -
... of the selected display and changes the size to Large. 4) Small - Turns on the PIP of the selected display. 3) Large - Turns on the LCD Display power. Info Grid shows some basic information necessary to Double 2. 7) Double 3 (Picture By Picture) -


